

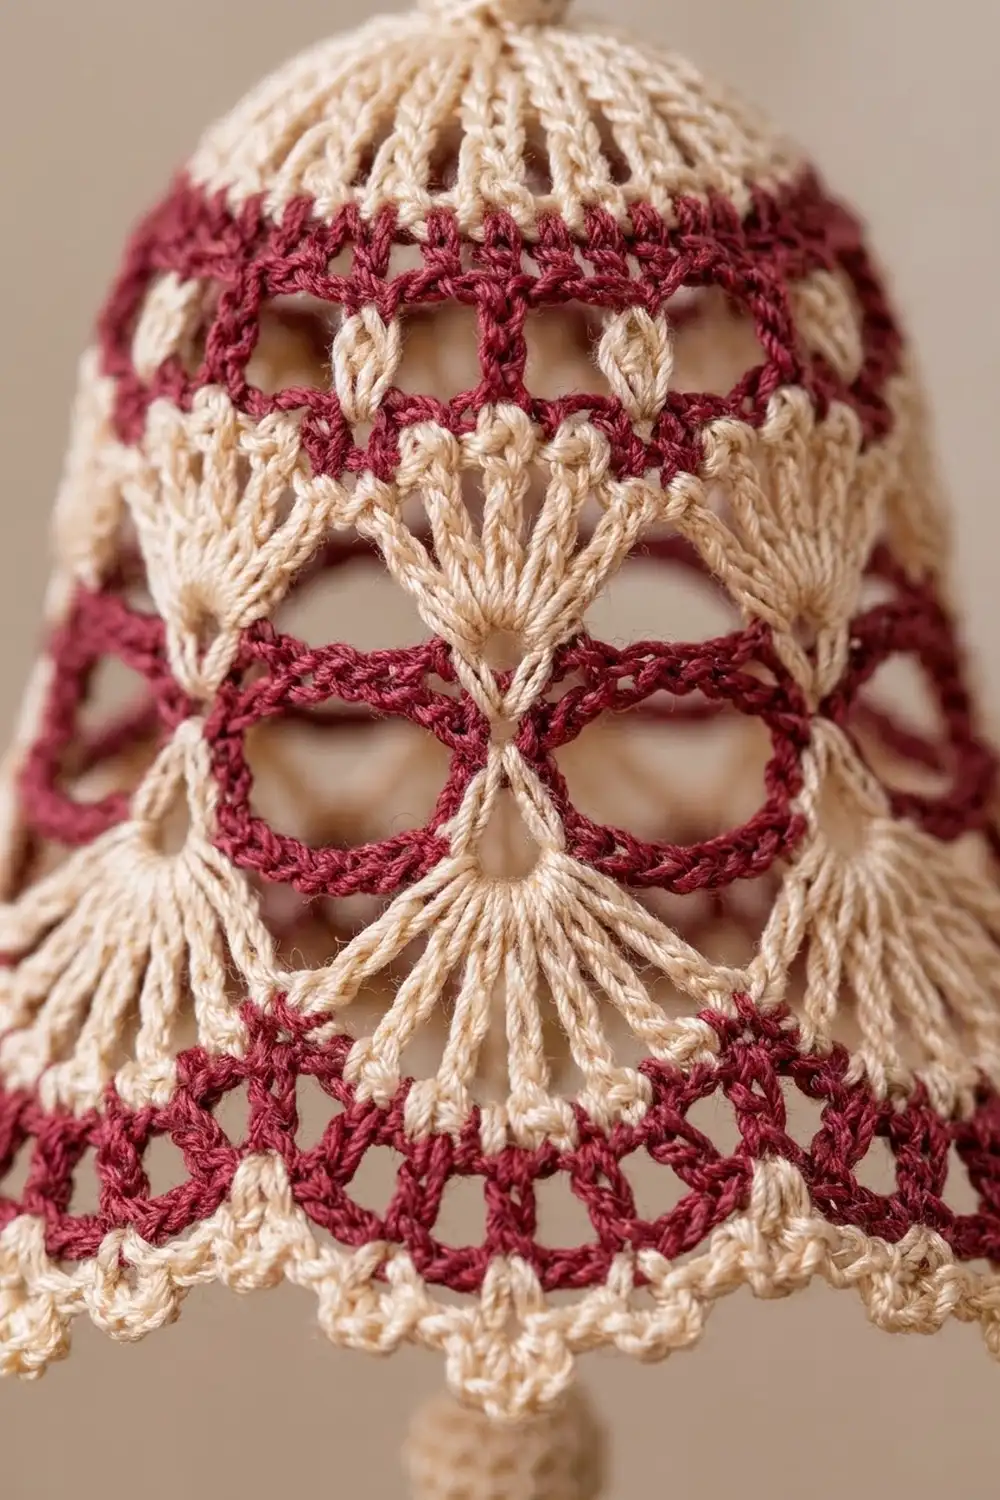
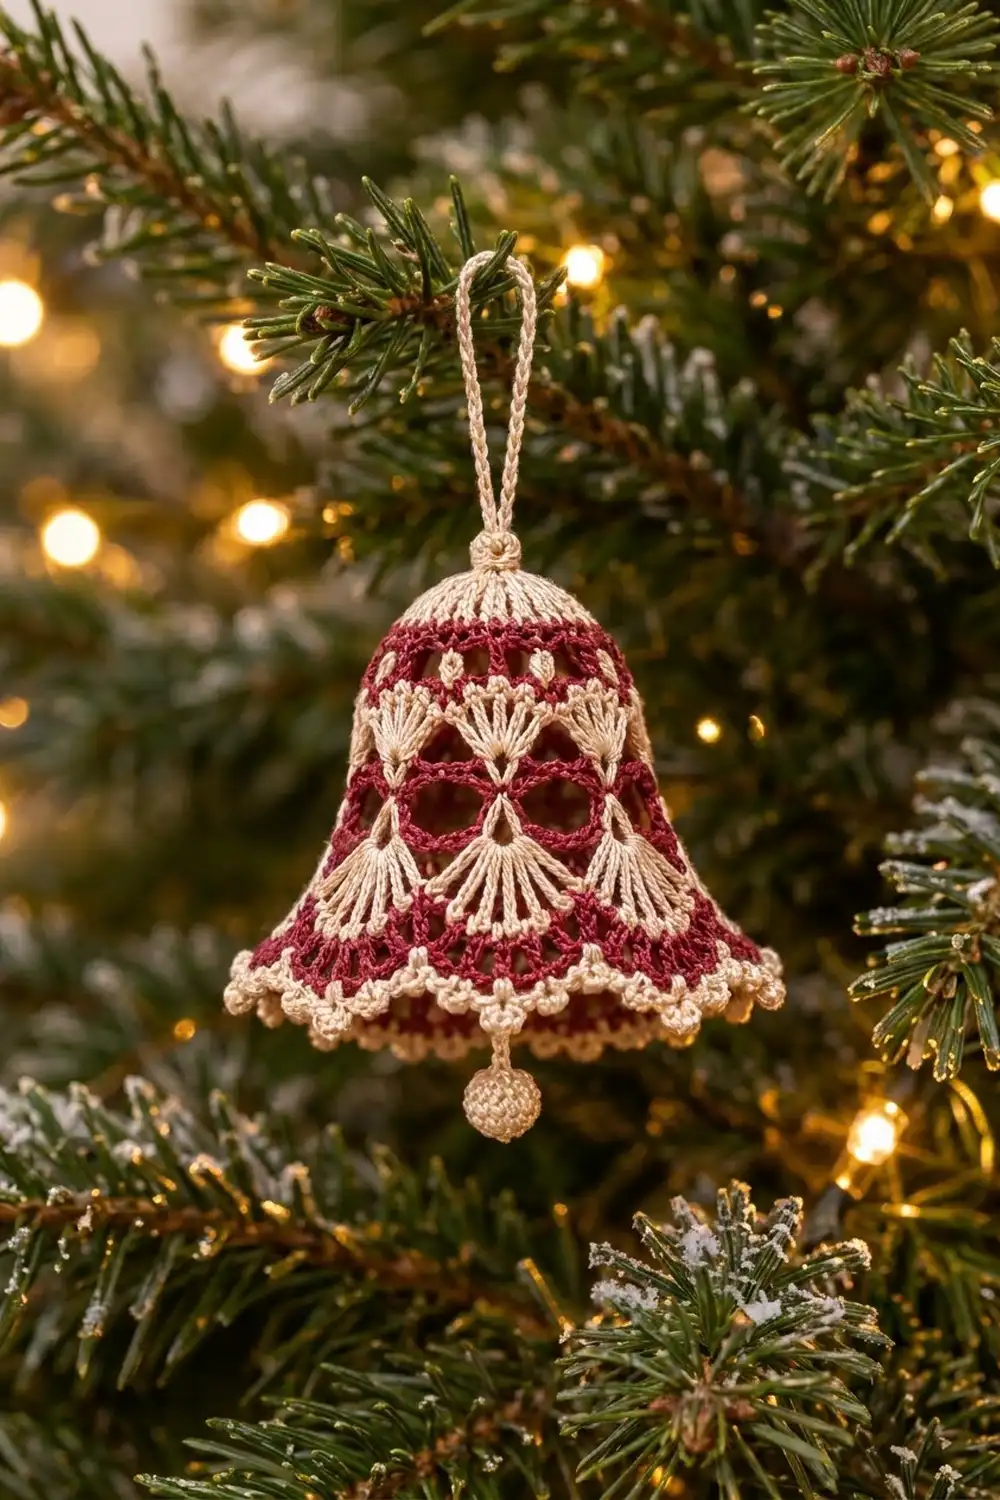
This little bell ornament is worked in fine cotton thread. It pairs deep cranberry with soft cream for a classic heirloom look. A solid cream crown sits at the top under a twisted hanging loop. Below it, open cranberry mesh frames two tiers of cream fans. The hem flares out into a cranberry band finished with cream picot scallops, and a small crocheted ball hangs from the center as a clapper.
The style is traditional thread lace: airy, symmetrical, and stiff enough to hold its shape on a branch. The two fan tiers are offset, so the lower fans sit between the upper ones and the bell gets its diamond-like openwork.
This pattern uses US crochet terms. After blocking, the bell is about 2.75 in (7.0 cm) tall from crown to scalloped hem, not counting the loop or clapper. The hem is about 3.25 in (8.3 cm) across.
The bell is one seamless piece worked top-down in joined rounds. You start with a dense dome, move into chain mesh and fan rounds, add a widening band, and finish with a scalloped edge. The clapper ball and hanging loop are small extras added at the end.
Finished Size and Construction
- Finished size: 2.75 in (7.0 cm) tall; 3.25 in (8.3 cm) hem diameter
- Skill level: Intermediate (thread crochet, joined rounds, chain mesh)
- Terminology: US crochet terms
- Yarn weight: Size 10 cotton crochet thread (Lace, weight 0)
- Hook: 1.5 mm steel hook
- Number of pieces: 1 bell, plus 1 clapper ball and 1 hanging loop
- Layout: Single bell worked in the round, top-down
- Piece size: 2.75 in (7.0 cm) tall
- Size before border: 2.5 in (6.4 cm) tall after Round 13
- Border depth: 0.25 in (0.6 cm)
Materials
Use a mercerized size 10 cotton thread. It has a crisp twist, clean stitch definition and a slight sheen, and it takes starch well. Steer clear of soft or fuzzy threads, because the fans won’t hold their shape.
- Cream: 6 g, about 30 m. Used for the crown, both fan tiers, the scallop edge, the clapper and the loop.
- Cranberry: 5 g, about 25 m. Used for the mesh rounds and the hem band.
Both amounts include a margin for swatching and weaving in ends. One bell uses roughly two-thirds of each amount.
Tools:
- 1.5 mm steel crochet hook
- Fine tapestry needle or steel darning needle
- Small scissors
- Stitch marker
- A bell-shaped blocking form, such as a small plastic cup, a shot glass or a foil cone
- Plastic wrap
- Fabric stiffener or heavy spray starch
- Rustproof pins
- A small pinch of thread scraps or fiberfill for the clapper
Abbreviations (US Terms)
- ch: chain
- sl st: slip stitch
- sc: single crochet
- dc: double crochet
- sc2tog: single crochet 2 together
- sp: space
- st(s): stitch(es)
- MR: magic ring
- rep: repeat
Special stitches:
- Upper fan: 7 dc in the same ch-5 loop. The 4th dc is the center.
- Lower fan: 9 dc in the same ch-6 loop. The 5th dc is the center.
- Picot: ch 3, sl st in the 3rd ch from the hook.
- Scallop: (2 dc, picot, 2 dc) in the same ch-1 sp.
Gauge and Checkpoints
Gauge: 20 dc and 8 dc rounds = 2 in (5.1 cm) in cotton thread, worked flat with a 1.5 mm hook.
Treat the crown as your gauge swatch. Rounds 1 to 5 take only a few minutes and tell you everything you need to know.
Checkpoints:
- After Round 5: the crown is a firm dome with a lower edge about 1.5 in (3.8 cm) across and about 0.75 in (1.9 cm) deep.
- After Round 11: the bell measures about 2 in (5.1 cm) from the top center.
- After Round 13: the bell measures about 2.5 in (6.4 cm) tall, and the hem circumference is about 9.6 in (24.4 cm).
- After the border: the bell measures 2.75 in (7.0 cm) tall, with a 3.25 in (8.3 cm) hem diameter once blocked.
If your crown is too big (wider than 1.75 in / 4.4 cm), go down to a 1.25 mm hook. If it is too small (narrower than 1.25 in / 3.2 cm), go up to a 1.75 mm hook. If the crown lies flat instead of cupping, your stitches are too loose. Tighten your tension or change hook size before you continue.
Pattern: The Bell
Join each round with a sl st to the first stitch unless the pattern says otherwise. A ch 3 at the start of a round counts as 1 dc.
Crown (Cream)
Round 1: Make a MR. Ch 3, then work 11 dc in the ring. Join and pull the ring closed. (12 dc)
Round 2: Ch 3, dc in the same st, then 2 dc in each st around. Join. (24 dc)
Round 3: Ch 3, dc in the same st, dc in the next st, *2 dc in the next st, dc in the next st*. Rep from * around. Join. (36 dc)
Round 4: Ch 3, dc in the same st, dc in the next 2 sts, *2 dc in the next st, dc in the next 2 sts*. Rep from * around. Join. (48 dc)
Round 5: Ch 3, then dc in each st around. Join. (48 dc)
This straight round turns the edge downward and forms the dome. Fasten off the cream.
Upper Mesh (Cranberry)
Round 6: Join the cranberry in any st. Ch 1 and sc in the same st. *Ch 5, skip 2 sts, sc in the next st*. Rep from * 14 more times. To finish, ch 2, skip 2 sts, and dc in the first sc. The ch 2 plus dc counts as the 16th loop and leaves your hook at the center of that loop. (16 loops)
Round 7: Ch 1, then sc in the loop just formed. *Ch 5, sc in the next loop*. Rep from * around. Ch 5 and join to the first sc. (16 ch-5 loops)
Fasten off the cranberry.
Upper Fan Tier (Cream)
Round 8: Join the cream in any ch-5 loop. Ch 1 and sc in the same loop. *Work an upper fan in the next loop, then sc in the following loop*. Rep from * around, ending with an upper fan in the last loop. Join to the first sc. (8 upper fans and 8 sc = 64 sts)
The fans sit in every other loop. Fasten off.
Middle Mesh (Cranberry)
Round 9: Join the cranberry in any sc between fans. Ch 1 and sc in the same st. *Ch 5, sc in the center dc of the next fan, ch 5, sc in the next sc*. Rep from * around, leaving out the last sc. Join to the first sc. (16 ch-5 loops)
Each fan is now framed by two cranberry loops.
Round 10: Sl st into the first 3 ch of the first loop. Ch 1 and sc in the same loop. *Ch 6, sc in the next loop*. Rep from * around. Ch 6 and join to the first sc. (16 ch-6 loops)
Look at where the loops land. The 1st, 3rd, 5th (and so on) loops are centered over the upper fans. The 2nd, 4th, 6th (and so on) loops are centered over the sc points between the fans. Fasten off.
Lower Fan Tier (Cream)
Round 11: Join the cream in the first ch-6 loop, which sits over an upper fan. Ch 1 and sc in the same loop. *Work a lower fan in the next loop, then sc in the following loop*. Rep from * around, ending with a lower fan in the 16th loop. Join. (8 lower fans and 8 sc = 80 sts)
Because the lower fans sit over the gaps, they alternate with the upper fans. Fasten off.
Checkpoint: the bell is about 2 in (5.1 cm) tall.
Hem Band (Cranberry)
Round 12 (conversion round): Join the cranberry in any sc. Ch 3, which counts as a dc in the sc. *2 dc in the 1st dc of the fan, dc in the next 7 dc, 2 dc in the 9th dc, dc in the next sc*. Rep from * around, leaving out the last dc. Join. (80 sts worked 1 per st + 16 increases = 96 dc, 12 per fan repeat)
Round 13: Ch 4, which counts as a dc plus ch 1. Skip the next st. *Dc in the next st, ch 1, skip the next st*. Rep from * around. Join to the 3rd ch of the starting ch 4. (48 dc and 48 ch-1 sps, 6 per repeat)
Fasten off.
Checkpoint: the bell is 2.5 in (6.4 cm) tall, with a hem circumference of about 9.6 in (24.4 cm).
Border: Scalloped Picot Edge
Border gauge: each scallop with its sc takes up 2 ch-1 sps, about 0.4 in (1.0 cm) of the hem. The scallops stand 0.25 in (0.6 cm) tall.
A round bell has no straight sides, so the counts below are given per fan repeat. There are 8 repeats around the bell.
Round 14 (cream): Join the cream in any ch-1 sp. Ch 1 and sc in the same sp. *Work a scallop in the next ch-1 sp, then sc in the next ch-1 sp*. Rep from * around, leaving out the last sc. Join to the first sc. (24 scallops and 24 sc in total; 3 scallops and 3 sc per repeat)
Why the math works: Round 12 builds 12 dc per repeat (8 × 12 = 96). Round 13 turns those into 6 ch-1 sps per repeat (8 × 6 = 48). The border uses 2 sps per scallop unit, which gives exactly 3 scallops per repeat (8 × 3 = 24). Nothing is left over, so the scallops line up evenly under the lower fans. The extra 16 stitches from Round 12 give the hem its flare, so the scallops sit out flat instead of cupping inward.
Fasten off and weave in all ends on the inside, inside dense stitches.
Clapper Ball (Cream)
Round 1: Make a MR and work 6 sc in the ring. (6 sc)
Round 2: 2 sc in each st. (12 sc)
Rounds 3 to 4: Sc in each st. (12 sc)
Stuff the ball firmly with thread scraps.
Round 5: Sc2tog 6 times. (6 sts) Close the opening with the tail.
The ball measures about 0.4 in (1.0 cm) across. Leave a long tail.
Hanging Loop and Clapper Cord
- Thread the clapper tail onto the needle and pass it up through the center of Round 1. A cord of about 3 in (7.6 cm) inside the bell lets the ball hang just below the scallops. Check the drop by eye, then secure the tail at the crown with a few tiny stitches.
- For the loop, join the cream at the top center. Ch 24, about 2 in (5.1 cm), then sl st back into the top center to make a 1 in (2.5 cm) loop.
- Optional: twist the chain before joining for a corded look, then wrap the base with the tail to form a small knot.
Final Blocking
- Wrap a cup, glass or cone about 3 in (7.6 cm) across in plastic wrap.
- Mix fabric stiffener as the label directs, or use it undiluted for a firmer ornament.
- Soak the bell, then press out the excess in a towel. Don’t wring it.
- Slide the bell onto the form with the crown centered on top.
- Ease each fan open with a fingertip so the two tiers alternate evenly.
- Pull the hem down and out to 3.25 in (8.3 cm) across. Pin the scallop tips if your form allows it.
- Open every picot with a pin tip.
- Keep the clapper free of stiffener. Stiffen the loop lightly so it stands upright.
- Let it dry for 12 to 24 hours, then lift it off the form.
Final Quality-Control Checklist
- The crown is a smooth dome with the magic ring pulled tightly closed.
- Rounds 6, 7, 9 and 10 each have 16 cranberry loops.
- There are 8 upper fans of 7 dc and 8 lower fans of 9 dc, and the tiers alternate.
- Round 12 has 96 dc and Round 13 has 48 ch-1 sps.
- There are 24 evenly spaced scallops with open picots.
- The bell is 2.75 in (7.0 cm) tall with a 3.25 in (8.3 cm) hem.
- The clapper hangs centered, just below the hem.
- All ends are woven in and hidden.
Troubleshooting
The crown is flat or rippled. Flat means loose tension. Rippled means the increases weren’t spaced evenly. Rework Rounds 3 and 4.
The fans line up instead of alternating. Round 11 started in the wrong loop. Begin it in a loop that sits over an upper fan.
The mesh loops sag. Keep the chains snug and equal in length. Starch also firms the mesh.
The hem ruffles. Your gauge is loose. Use a smaller hook for Rounds 12 to 14.
The hem pulls inward. Go up 0.25 mm in hook size for Rounds 12 to 14.
The picots close up. Open them with a pin while the stiffener is still wet.
The color changes show. Join new colors at the back and weave ends into stitches of the same color.
Care
Dust gently or use a cool hair dryer. If it gets dirty, hand-wash in cool water, then re-stiffen and re-block it on the form.
Final Notes
Each stage of this bell has a measurement to check. The crown is 1.5 in (3.8 cm) across. The bell is 2 in (5.1 cm) tall after the lower fans, then 2.5 in (6.4 cm) tall with a 9.6 in (24.4 cm) hem after the band. After the border and blocking, it is 2.75 in (7.0 cm) tall with a 3.25 in (8.3 cm) hem. Get the crown right and the rest will follow.
Happy crocheting!