

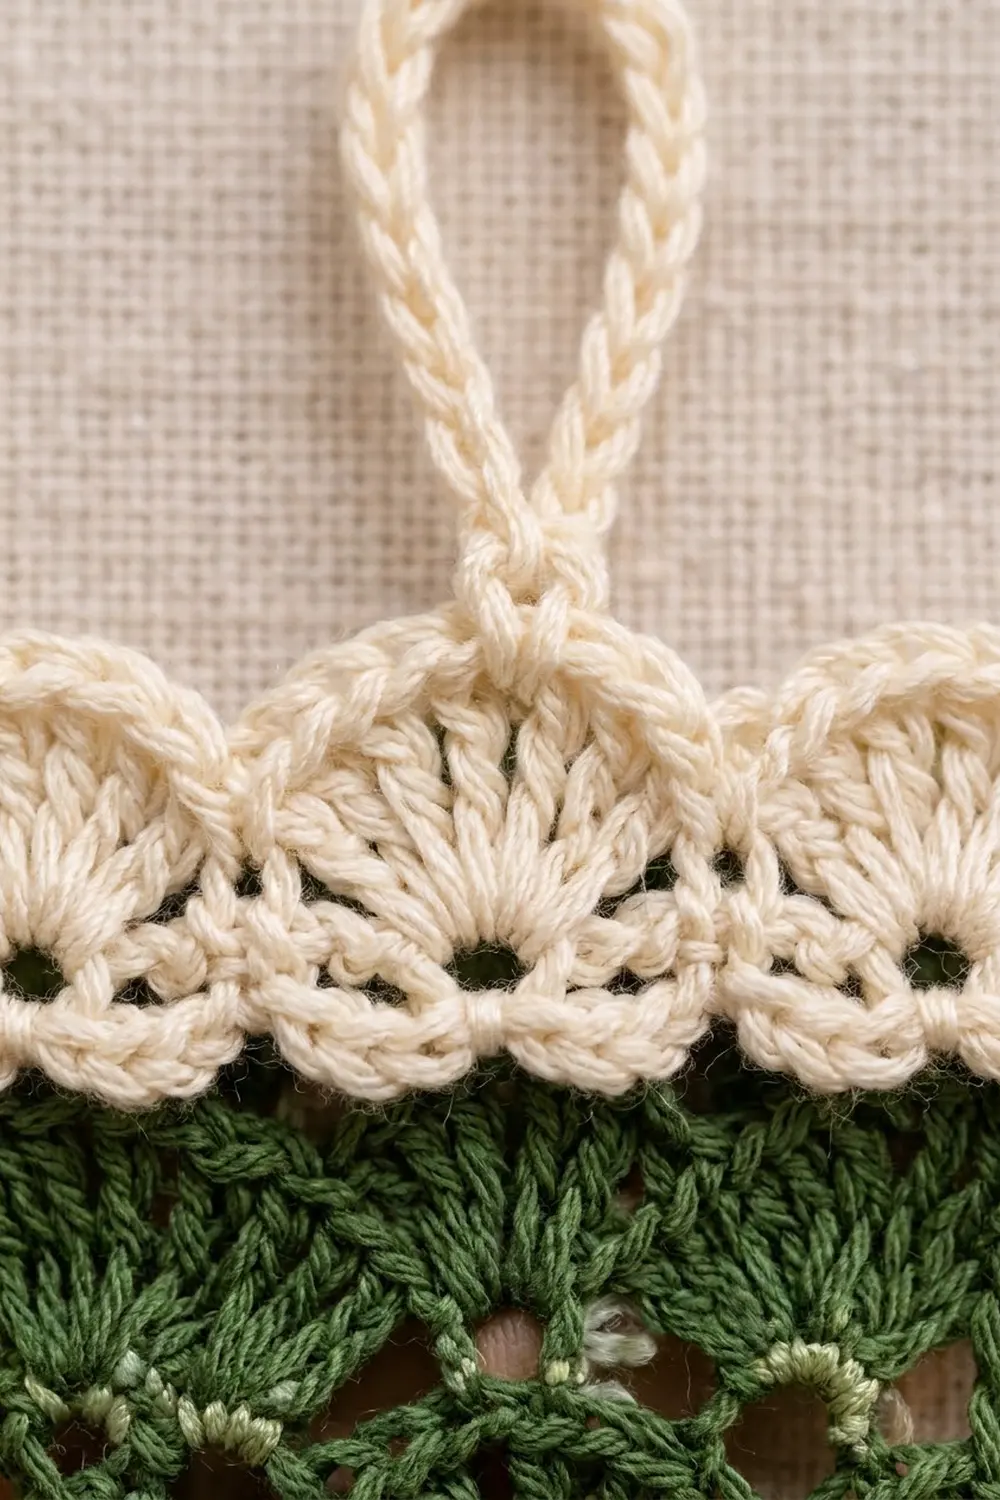
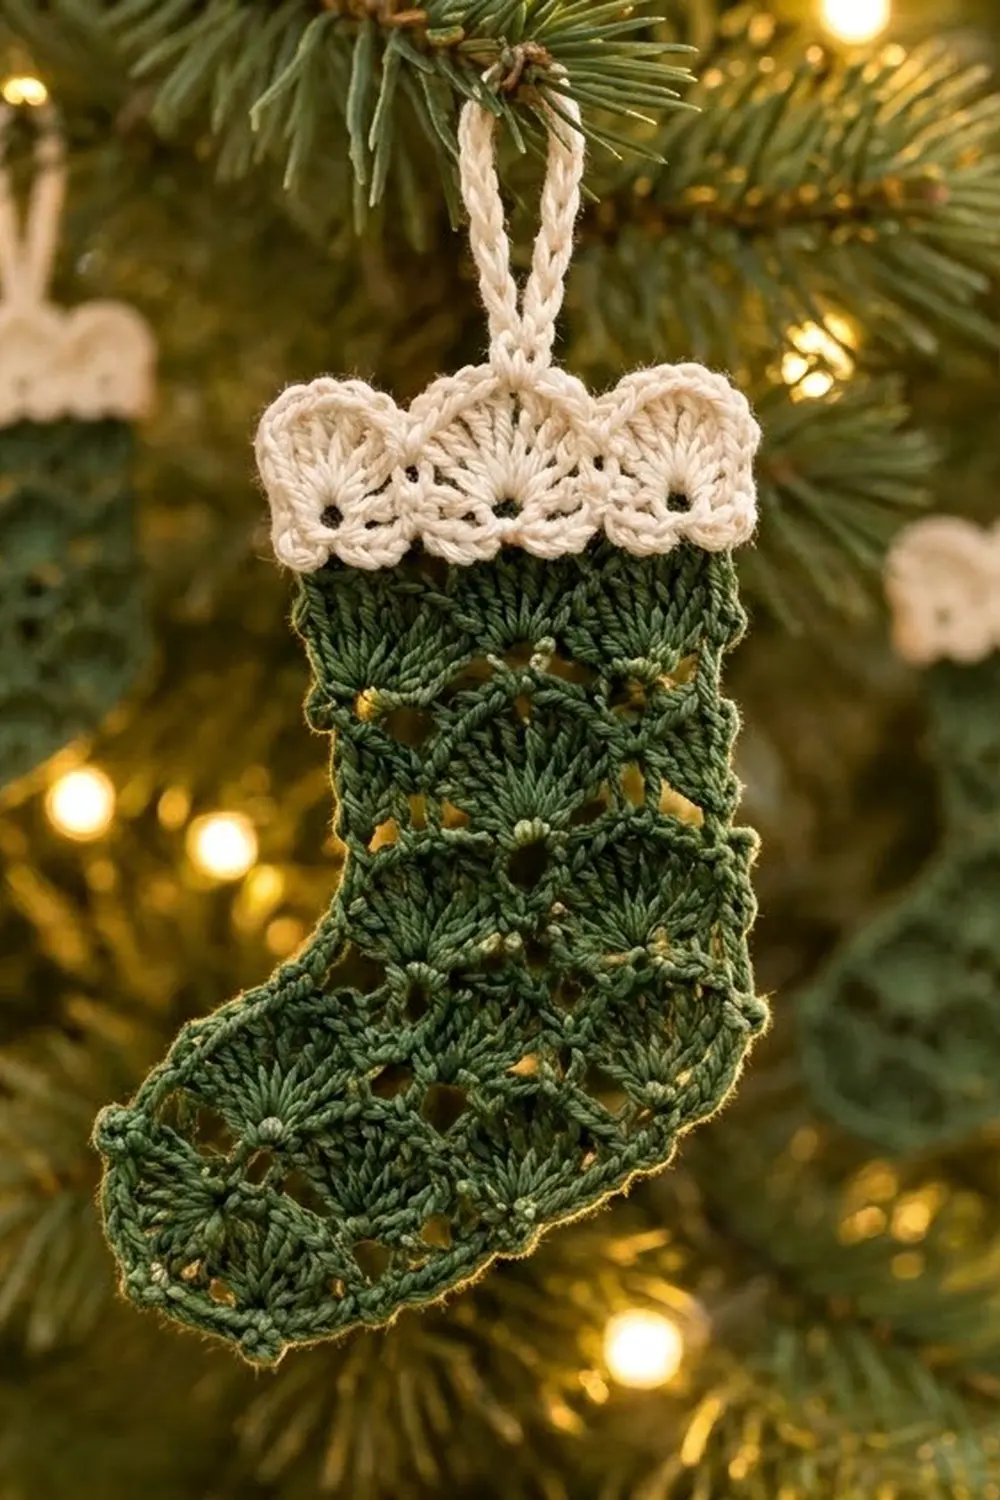
This little stocking ornament is a single flat piece of shell lace. Rows of small green fans stack in an offset pattern, and the open gaps between them let tree lights show through. A cream cuff with three rounded scallops sits on top, with a cream hanging loop above it.
The main color is a deep forest green. The cuff and loop are a soft cream. Optional tiny sage-green French knots sit at the base of the fans and add a little sparkle. The look is classic, quiet, and a bit vintage, so it suits a natural or farmhouse Christmas tree.
The pattern uses US crochet terms. The finished stocking measures 3.75 in (9.5 cm) tall without the loop, 2.75 in (7.0 cm) wide at the leg, and 3.5 in (8.9 cm) from heel to toe. The loop adds 1.25 in (3.2 cm), for a hanging height of 5 in (12.7 cm).
You work the stocking top-down in rows, starting at the cuff line. The leg is a straight panel of shell rows. Next you chain a short extension for the toe, then work the foot rows across the full width. A green picot edging goes around the sides and bottom. Last, you work the cream cuff into the foundation chain, add the loop, and block.
Finished Size and Construction
- Finished size: 3.75 in (9.5 cm) tall x 3.5 in (8.9 cm) heel to toe, without the loop
- Skill level: Intermediate
- Terminology: US
- Yarn weight: Size 3 crochet thread
- Hook: 2.25 mm (US B-1)
- Number of pieces: 1 single flat piece (one layer, not a pocket)
- Layout: Leg and foot in one piece, edging around the sides and bottom, cuff worked onto the top edge
- Piece size before edging and cuff: 2.5 in (6.4 cm) wide at the leg, 3.25 in (8.3 cm) across the foot, 2.75 in (7.0 cm) tall
- Edging depth: about 0.125 in (0.3 cm) at the sides, 0.25 in (0.6 cm) at the bottom with picots
- Cuff depth: 0.75 in (1.9 cm)
Materials
Use a mercerized cotton crochet thread in size 3. Mercerized cotton gives crisp fans, blocks well, and keeps its shape on the tree. The amounts below assume about 125 m per 50 g.
- Forest green (A): 6 g, about 15 m
- Cream (B): 3 g, about 8 m
- Sage green (C, optional knots): 1 g, about 3 m
All quantities include a small margin for your gauge check and for weaving in ends.
Tools:
- 2.25 mm (US B-1) crochet hook
- Tapestry needle with a small eye
- Scissors
- Blocking mat or foam board
- Rust-proof pins
- Spray bottle with water, or light spray starch
- 1 stitch marker (optional)
Abbreviations (US Terms)
- ch – chain
- sl st – slip stitch
- sc – single crochet
- dc – double crochet
- st(s) – stitch(es)
- sp – space
- tch – turning chain
- RS / WS – right side / wrong side
Special stitches:
- Shell: 5 dc in the same st.
- Corner shell: 7 dc in the same st.
- Half shell: At the start of a row, ch 3 (counts as 1 dc), then 2 dc in the same st. At the end of a row, 3 dc in the same st.
- V-st: (dc, ch 2, dc) in the same st.
- Scallop: 9 dc in the same ch-2 sp.
- Picot: Ch 3, sl st in the 3rd ch from the hook.
Gauge and Checkpoints
Gauge: 19 sts = 2.5 in (6.4 cm) across Row 1. 4 pattern rows = 1.5 in (3.8 cm) tall, so each shell row is about 0.375 in (1.0 cm).
This is a single small piece, so the first five rows are your gauge test. Work Rows 1–5, then measure before you add the toe.
Checkpoints:
- After Row 1: 2.5 in (6.4 cm) wide.
- After Row 5: Rows 2–5 measure 1.5 in (3.8 cm) tall.
- After Row 8: Rows 1–8 measure 2.75 in (7.0 cm) tall. The foot measures 3.25 in (8.3 cm) heel to toe.
- After the edging: 3 in (7.6 cm) tall, 2.75 in (7.0 cm) wide at the leg, 3.5 in (8.9 cm) heel to toe.
- After the cuff: 3.75 in (9.5 cm) tall.
If your piece is too big: Go down to a 2.0 mm hook, or pull up the first loop of each dc a little shorter.
If your piece is too small: Go up to a 2.5 mm hook.
Change the hook and start again from the foundation chain. Don’t change the stitch counts, because the shell repeat depends on them.
Leg
With A, ch 20.
Row 1 (RS): Sc in the 2nd ch from the hook and in each ch across, turn. (19 sc)
Row 2 (A-row, WS): Ch 1, sc in the first sc, skip 2 sts, shell in the next st, skip 2 sts, sc in the next st; rep from * 2 more times, turn. (3 shells + 4 sc = 19 sts)*
Row 3 (B-row, RS): Ch 3 (counts as dc), 2 dc in the first sc, sc in the 3rd dc of the next shell, shell in the next sc, sc in the 3rd dc of the next shell; rep from * once more, 3 dc in the last sc, turn. (3 + 1 + 5 + 1 + 5 + 1 + 3 = 19 sts: 2 full shells, 2 half shells, 3 sc)*
Row 4 (A-row, WS): Ch 1, sc in the first dc, shell in the next sc, sc in the 3rd dc of the next shell; rep from * once more, shell in the next sc, sc in the top of the tch, turn. (3 shells + 4 sc = 19 sts)*
Row 5 (B-row, RS): Repeat Row 3. Do not turn. (19 sts)
Check your gauge now. The sc of each B-row should sit at the center of the fan below, and the fans should alternate like scales. Tip: put a marker in the top of each tch so you never miss the last stitch of an A-row.
Toe Extension and Foot
The toe grows off the end of Row 5. With the RS facing you, this end is on the left. The heel side stays straight.
Toe chain: At the end of Row 5, ch 7, turn.
Row 6 (A-row, WS): Sc in the 2nd ch from the hook, skip 2 ch, shell in the next ch, skip the last 2 ch, sc in the last dc of Row 5. Continue across Row 5: shell in the next sc, sc in the 3rd dc of the next shell; rep from * once more, shell in the next sc, sc in the top of the tch, turn. (6 sts over the chain + 19 sts over Row 5 = 25 sts: 4 shells, 5 sc)*
Each of the 6 working chains gets exactly one stitch or one skip, so the toe adds one full 6-stitch repeat.
Row 7 (B-row, RS): Ch 3 (counts as dc), 2 dc in the first sc, sc in the 3rd dc of the next shell, shell in the next sc, sc in the 3rd dc of the next shell; rep from * 2 more times, 3 dc in the last sc, turn. (3 + 1 + [5 + 1] x 3 + 3 = 25 sts: 3 full shells, 2 half shells, 4 sc)*
Row 8 (A-row with corner shells, WS): Ch 1, sc in the first dc, corner shell in the next sc, sc in the 3rd dc of the next shell, shell in the next sc, sc in the 3rd dc of the next shell, shell in the next sc, sc in the 3rd dc of the next shell, corner shell in the next sc, sc in the top of the tch. (7 + 5 + 5 + 7 = 24 dc + 5 sc = 29 sts)
Fasten off. The two 7-dc corner shells wrap around the bottom corners and give the heel and toe their rounded shape.
Edging
The edging runs in one pass from the top of the heel side to the top of the front of the leg. The top edge stays open for the cuff.
Edging gauge: 1 sc per Row 1 end, 2 sc per shell-row end, and 1 sc per stitch or chain along the bottom and instep.
With the RS facing, join A at the top heel corner, at the end of Row 1.
- Heel side: 1 sc in the end of Row 1, then 2 sc in the end of each of Rows 2–8. (1 + 7 x 2 = 15 sc)
- Bottom: 2 sc in the last st of Row 8 (heel corner), sc in each of the next 27 sts, 2 sc in the first st of Row 8 (toe corner). Along this side, work a picot after every 3rd sc. (29 sts worked 1-per-st + 2 extra corner sc = 31 sc, plus 10 picots)
- Toe side: 2 sc in the end of each of Rows 8, 7, and 6. (3 x 2 = 6 sc)
- Instep: 1 sc in the unused loop of each of the 6 working toe chains. (6 sc)
- Front of leg: 2 sc in the end of each of Rows 5, 4, 3, and 2, then 1 sc in the end of Row 1. (4 x 2 + 1 = 9 sc)
Fasten off. Edging total: 15 + 31 + 6 + 6 + 9 = 67 sc, plus 10 picots.
Why the math works: A shell row is about as tall as 2 sc, so 2 sc per row end keeps the sides flat without ruffling. The bottom gets one sc per stitch of Row 8, plus one extra sc at each corner to turn the curve. Picots are made only of chains and a sl st, so they don’t change the sc count.
Cuff
The cuff is worked into the unused loops of the foundation chain. Each scallop sits right over one shell of Row 2.
Turn the stocking upside down so the foundation edge is at the top, with the RS facing.
Row C1 (RS): Join B in the first unused loop at the right corner. Ch 1, sc in the same loop and in each loop across, turn. (19 sc)
Row C2 (WS): Ch 1, sc in the first sc, skip 2 sts, V-st in the next st, skip 2 sts, sc in the next st; rep from * 2 more times, turn. (4 sc + 3 V-sts = 10 sts and 3 ch-2 sps)*
Row C3 (RS): Ch 1, sc in the first sc, scallop in the next ch-2 sp, sc in the next sc; rep from * 2 more times. (3 scallops x 9 dc + 4 sc = 31 sts)*
Fasten off. The ch-2 space under each scallop forms the small eyelet at the base of each cream fan. The cuff measures 0.75 in (1.9 cm) deep and about 2.75 in (7.0 cm) across the scallops.
Hanging Loop
Join B in the 2nd sc of Row C3, between the first and second scallops on the heel side.
- Ch 20, sl st in the same sc to form a ring.
- Ch 1, work 26 sc over the chain ring, sl st in the first sc.
Fasten off. The loop stands 1.25 in (3.2 cm) above the cuff. Weave the tail down into the cuff so it supports the loop.
Optional Sage Knots
With C and a tapestry needle, work one small French knot (2 wraps) at the base of each full shell, on the sc the shell was worked into. Rows 2–8 have 3 + 2 + 3 + 2 + 4 + 3 + 4 = 21 full shells, so make 21 knots. Carry the thread on the WS behind solid stitches, never across the open gaps.
Final Blocking
- Weave in all ends through stitches of the same color, and trim.
- Mist the stocking until it is damp all the way through.
- Lay it RS up on the mat. Pin the top corners of the leg 2.75 in (7.0 cm) apart.
- Pin the heel side straight down, and pin the bottom to 3.5 in (8.9 cm) heel to toe.
- Pin each bottom picot and the tip of each cuff scallop so the edges stay crisp.
- Ease the corner shells into smooth curves at the heel and toe.
- Let it dry fully, for at least 6 hours. For a firmer ornament, mist it with light spray starch before drying.
Final Quality-Control Checklist
- Row 1 has 19 sc, and Rows 2–5 each have 19 sts.
- Rows 6 and 7 each have 25 sts, and Row 8 has 29 sts.
- The edging has 67 sc and 10 picots.
- The cuff has 3 scallops of 9 dc, each with an eyelet at its base.
- The stocking measures 3.75 in (9.5 cm) tall and 3.5 in (8.9 cm) heel to toe.
- The loop is firmly anchored and 1.25 in (3.2 cm) tall.
- No tails or carried threads show through the open gaps on the RS.
Troubleshooting
Fans look lopsided: You missed the center dc of a shell. Count 1–2–3 on every shell before you place the sc.
A B-row is short by 2–3 sts: You probably skipped a half shell. Every B-row starts and ends with one.
The heel or toe looks square: Check that Row 8 uses 7-dc corner shells, then reblock the curve.
The sides ruffle or pull in: Use 2 sc per shell-row end. If one spot still puckers, add or remove a single sc only there.
The cuff flips forward: Pin it flat while it dries and add a light spray of starch.
The loop twists: Work all 26 sc snugly and evenly, then steam it straight.
Care
Hand wash in cool water with mild soap, roll in a towel to remove the water, and reblock flat. Store flat in tissue so the scallops keep their shape.
Final Notes
The measurement chain is short and easy to check. 19 sts make 2.5 in (6.4 cm) of leg width, and 4 shell rows make 1.5 in (3.8 cm) of height. The 6-stitch toe extension brings the foot to 25 sts, and the corner shells take it to 3.25 in (8.3 cm). The edging adds 0.25 in (0.6 cm), for a 3.5 in (8.9 cm) foot and a 3 in (7.6 cm) green body. The 0.75 in (1.9 cm) cuff brings the stocking to 3.75 in (9.5 cm) tall, with a 1.25 in (3.2 cm) loop on top.
Happy crocheting!