

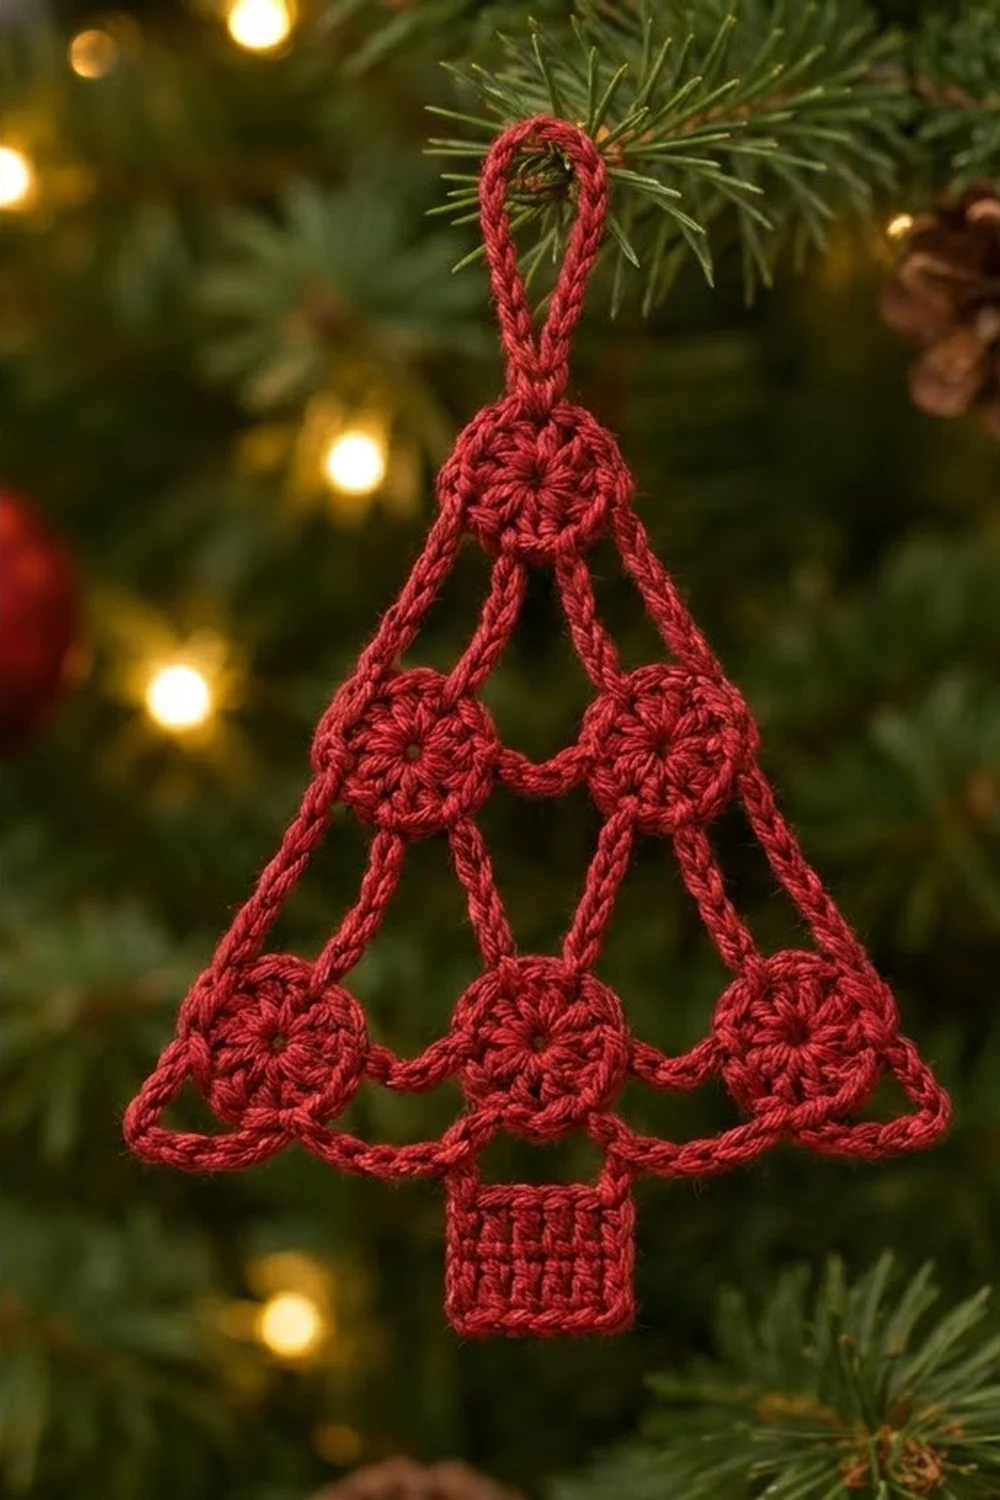
This little tree is a lacy ornament you can see through. Six small round motifs are stacked in a 1-2-3 pyramid. Short corded bridges link them, and a crisp single-crochet frame outlines the shape. A small solid trunk sits under the center of the base, and a chain loop at the top lets it hang.
It is worked in one color, a deep cranberry red, so the texture does the work: the spoked centers of the circles, the ridged outer frame and the vertical ribs of the trunk. It suits a tree, a gift tag or a wreath.
The pattern uses US crochet terms. The finished ornament is 5.75 in (14.6 cm) wide at the base. It is 5.5 in (14.0 cm) tall from the bottom of the trunk to the top of the highest circle, or 6.75 in (17.1 cm) tall with the hanging loop.
Construction is join-as-you-go. You make six circles and join each new one to its neighbors with chain bridges during its last round. Then you work a chain frame around the outside, cover it with single crochet, and add the trunk directly onto the base. No sewing is needed.
Finished Size and Construction
- Finished size: 5.75 in (14.6 cm) wide x 5.5 in (14.0 cm) tall, plus a 1.25 in (3.2 cm) loop
- Skill level: Easy-intermediate (needs careful counting)
- Terminology: US
- Yarn weight: Sport (2), mercerized cotton
- Hook: 3.0 mm
- Number of pieces: 6 circle motifs, joined as you go into one ornament
- Layout: 1 circle on top, 2 in the middle, 3 on the bottom
- Piece size: each circle is 1.25 in (3.2 cm) across
- Size before border: 4.75 in (12.1 cm) wide x 4.25 in (10.8 cm) tall
- Border depth: about 0.2 in (0.5 cm). The frame turns the lattice into a triangle with straight sides.
Materials
Choose a smooth, mercerized cotton in sport weight. Cotton holds its shape on the tree and shows each stitch clearly. Avoid fuzzy or very stretchy yarn, because the frame needs firm chains.
- Cranberry red: 10 g, about 35 m (38 yd)
Tools:
- 3.0 mm crochet hook
- Tapestry needle
- 4 locking stitch markers
- Scissors
- Blocking board or foam, rustproof pins and a spray bottle
- Optional: fabric stiffener or spray starch
The quantities include about 30% extra for a gauge test and for weaving in ends.
Abbreviations (US Terms)
- ch – chain
- sl st – slip stitch
- sc – single crochet
- dc – double crochet
- st(s) – stitch(es)
- MR – magic ring
- Rnd – round
- RS – right side
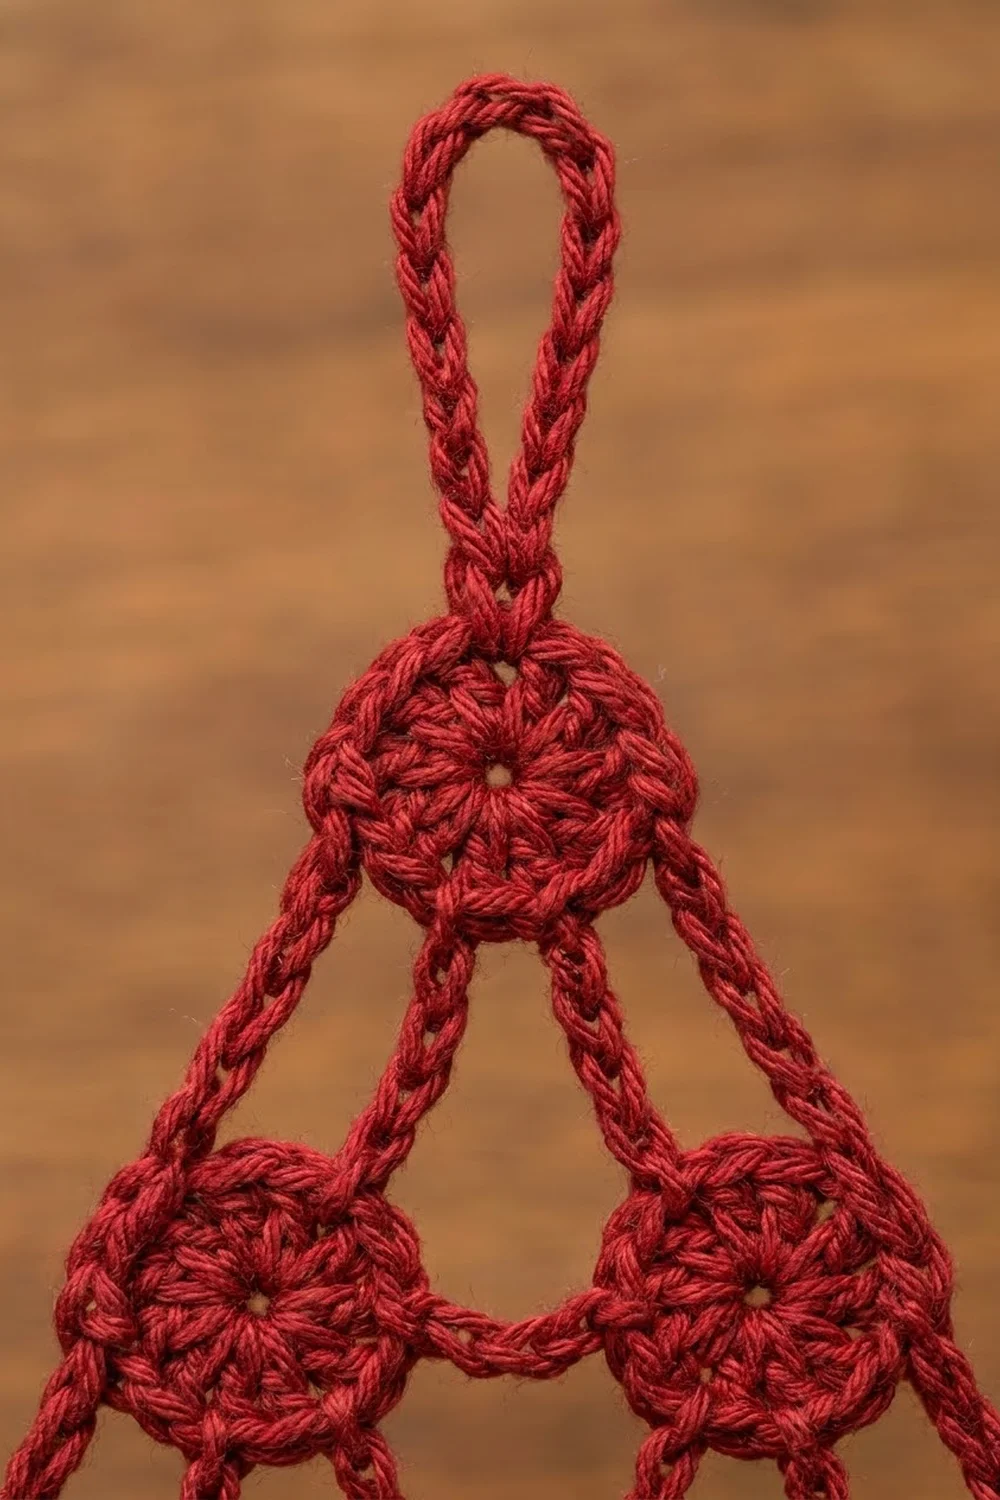
Special stitch – Bridge: Ch 4 and sl st in the stated sc of the neighboring circle. Then sl st in the back bump of each of the 4 ch, working back toward your current circle. The bridge is one firm, corded line about 0.5 in (1.3 cm) long. It does not change the circle’s stitch count.
Stitch numbering: In Rnd 2 of every circle, the first sc is st 1 and sits at 12 o’clock. Right-handed crocheters with the RS facing work counterclockwise. Every 2 sts moves you one hour on the clock: st 7 is at 9 o’clock, st 13 at 6 o’clock and st 19 at 3 o’clock. Left-handed crocheters work clockwise, so follow the clock positions rather than the numbers.
Gauge and Checkpoints
Gauge matters more for the frame than for the circles, because the frame chains must reach from circle to circle in straight lines.
- Chain gauge: 8 ch = 1 in (2.5 cm)
- Circle Rnd 1: 0.75 in (1.9 cm) across
- Circle Rnd 2: 1.25 in (3.2 cm) across
- Trunk: 8 dc = 1.25 in (3.2 cm) wide; 3 rows = 1 in (2.5 cm) tall
Test one piece first. Make one circle, then a chain of 16. Lay both flat without stretching them. The circle should measure 1.25 in (3.2 cm) and the chain 2 in (5.1 cm).
If the circle is too big or the chain too long, change to a 2.75 mm hook. If the circle cups or the chain is too short, change to a 3.25 mm hook. Keep the test circle, because it can become B1.
Circles (Make 6)
All six circles use the same two rounds. Only Rnd 2 changes, to add bridges. Make them in this order: B1, B2, B3, M1, M2, T.
Rnd 1: MR, ch 2 (does not count as a st), 12 dc in ring. Pull the ring closed and sl st in the first dc. (12 dc)
Rnd 2: Ch 1, 2 sc in each dc around, sl st in first sc. (24 sc)
Working 2 sc into each dc keeps the edge flat. The open center and the dc posts give the spoked look.
Before each round with bridges, put locking markers in the target stitches of the circles you have already made. Count from each circle’s joining sl st, which is st 1.
B1 (bottom left)
Work Rnds 1–2 with no bridges. Fasten off, leaving a 4 in (10.2 cm) tail.
B2 (bottom center)
Rnd 1: Work as above.
Rnd 2: Ch 1. Work 2 sc in each dc until you have made st 7, then bridge to B1 st 19. Continue with 2 sc in each dc to the end and sl st in the first sc. (24 sc, 1 bridge) Fasten off.
B3 (bottom right)
Rnds 1–2: Work as for B2, but bridge from st 7 to B2 st 19. (24 sc, 1 bridge) Fasten off.
Checkpoint: The bottom row measures 4.75 in (12.1 cm) from the outer edge of B1 to the outer edge of B3. That is three circles at 1.25 in (3.2 cm) each plus two bridges at 0.5 in (1.3 cm) each.
M1 (middle left)
Rnd 2: Work 2 sc in each dc. Bridge after st 11 to B1 st 23, and after st 15 to B2 st 3. (24 sc, 2 bridges) Fasten off.
M2 (middle right)
Rnd 2: Work 2 sc in each dc. Bridge after st 7 to M1 st 19, after st 11 to B2 st 23, and after st 15 to B3 st 3. (24 sc, 3 bridges) Fasten off.
T (top)
Rnd 2: Work 2 sc in each dc. Bridge after st 11 to M1 st 23, and after st 15 to M2 st 3. Sl st in the first sc to join. (24 sc, 2 bridges)
Hanging loop: Do not fasten off. Ch 20 and sl st in the same st as the join (st 1). Fasten off. Folded, the loop measures 1.25 in (3.2 cm).
Make All Pieces
You need six cranberry red circles, linked by 9 bridges in total:
- Bottom row: 3 circles (B1, B2, B3), 2 bridges
- Middle row: 2 circles (M1, M2), 5 bridges (2 from M1, 3 from M2)
- Top: 1 circle (T), 2 bridges
Layout grid:
        T
      /   \
    M1 --- M2
   /  \   /  \
 B1 --- B2 --- B3
Each line in the grid is one ch-4 bridge. Every gap between neighboring circle edges is 0.5 in (1.3 cm).
Joining
You join with bridges worked inside Rnd 2 of each new circle. A bridge always links two stitches that face each other. For example, M1 st 11 sits at 7 o’clock and points down-left, and B1 st 23 sits at 1 o’clock and points up-right.
The stitch positions follow the geometry. Each diagonal neighbor is 2 clock hours from the next joining point, which is why M1, M2 and T all bridge from sts 11 and 15, exactly 4 sts apart. Horizontal neighbors join at 3 and 9 o’clock (sts 19 and 7).
Keep both circles RS up and flat while you work a bridge. Make the ch 4 as snug as your gauge chain. A loose bridge lets the lattice sag, and a tight one tilts the circles toward each other.
Do not count bridge stitches as part of the round. Each circle still has 24 sc.
Checkpoint: The joined lattice measures 4.75 in (12.1 cm) across the bottom row. It is 4.25 in (10.8 cm) tall from the bottom of B2 to the top of T.
Border
The border has two rounds. Rnd 1 is a chain frame that touches the outermost edge of each outer circle, and Rnd 2 covers those chains with sc. The frame starts and ends on T, so it is an open round that stops at the top circle.
Border gauge: 8 ch = 1 in (2.5 cm), and 8 sc worked into those ch = 1 in (2.5 cm).
Frame tie-in points:
- st 5 (10 o’clock) on T, M1 and B1
- st 13 (6 o’clock) on B1, B2 and B3
- st 21 (2 o’clock) on B3, M2 and T
Border Rnd 1 (chain frame): With the RS facing, join yarn with a sl st in T st 5.
- Left side: ch 14, sl st in M1 st 5; ch 14, sl st in B1 st 5.
- Left corner: ch 19, sl st in B1 st 13. The 10th ch is the corner.
- Base: ch 14, sl st in B2 st 13; ch 14, sl st in B3 st 13.
- Right corner: ch 19, sl st in B3 st 21. The 10th ch is the corner.
- Right side: ch 14, sl st in M2 st 21; ch 14, sl st in T st 21.
Counts per side, not counting the corner ch:
- Left side: 37 ch (14 + 14 + 9)
- Base: 46 ch (9 + 14 + 14 + 9)
- Right side: 37 ch (9 + 14 + 14)
- Corners: 1 ch each
(122 ch total)
Border Rnd 2 (sc cover): Ch 1, turn. Work into the frame chains only and skip the tie-in sl sts.
- Right side: sc in each of the 37 ch.
- Corner: 3 sc in the corner ch.
- Base: sc in each of the 46 ch.
- Corner: 3 sc in the corner ch.
- Left side: sc in each of the 37 ch, then sl st in T st 5.
Count: 122 sc (1 in each ch) + 4 extra corner sc = 126 sc. Fasten off.
Why the math works: The left side runs from T past M1 and B1 to the corner. Because the circle centers sit in a straight line, a straight edge touches all three circles. Along that edge, the distance from one circle to the next equals their center-to-center distance, about 1.75 in (4.4 cm), which is 14 ch. The last stretch to the corner is about 1.125 in (2.9 cm), or 9 ch. That makes 37 ch, which is 4.6 in (11.7 cm) at 8 ch per inch. The base is 9 + 14 + 14 + 9 = 46 ch, or 5.75 in (14.6 cm). The 3 sc in each corner ch turn a sharp point without cupping.
Checkpoint: The tree measures 5.75 in (14.6 cm) across the base and 4.5 in (11.4 cm) tall.
Trunk
The base is symmetric, so you can count its stitches from either corner. Start with the first sc after the 3-sc corner group. The 46 base sc split into 23 on each side of the B2 tie-in, so the center 8 sts are sts 20–27.
Row 1: With the RS facing, join yarn in base sc 20. Ch 2 (does not count as a st), then dc in the same st and in each of the next 7 sts. (8 dc)
Rows 2–3: Ch 2, turn, dc in each st across. (8 dc)
Fasten off. The rows of dc stacked on top of each other form the vertical ribs.
Checkpoint: The trunk is 1.25 in (3.2 cm) wide and 1 in (2.5 cm) tall. The ornament is now 5.5 in (14.0 cm) tall from the bottom of the trunk to the top of T.
Final Blocking
- Weave in all ends along the back of the frame or through Rnd 2 of a circle.
- Draw a triangle 5.75 in (14.6 cm) wide and 4.5 in (11.4 cm) tall on paper. Tape it to your board and cover it with plastic wrap.
- Mist the ornament until it is damp but not soaked.
- Pin the two base corners and the top of T first.
- Pin each side of the frame straight, with one pin at each tie-in point.
- Pin each circle round. Square the trunk to 1.25 in (3.2 cm) x 1 in (2.5 cm).
- For a stiffer ornament, brush on fabric stiffener or spray starch now.
- Let it dry completely, at least 6 hours, then unpin.
Final Quality-Control Checklist
- Six circles, each with 12 dc in Rnd 1 and 24 sc in Rnd 2
- 9 bridges, all flat and all the same length
- All circles with the RS facing the same way
- Frame: 37, 1, 46, 1 and 37 ch, 122 ch total
- Border Rnd 2: 126 sc, with 3 sc in each corner
- Trunk: 3 rows of 8 dc, centered under B2
- Loop: ch 20, secured at T st 1
- Size: 5.75 in (14.6 cm) wide and 5.5 in (14.0 cm) tall without the loop
- No ends showing on the front
Troubleshooting
Circles cup into bowls. Rnd 2 is too tight. Use a 3.25 mm hook for Rnd 2 only.
Circles ruffle. You may have extra sc in Rnd 2. Recount to 24.
Frame sides bow inward. The chains are too tight. Redo Border Rnd 1 more loosely or with a larger hook.
Frame sides wave. The chains are too loose, or Rnd 2 picked up extra sts at the tie-ins. Skip the tie-in sl sts as written.
Lattice twists. A bridge went to the wrong stitch. Check the clock positions, counting from each circle’s joining sl st (st 1).
Trunk is off center. Recount the base from the first sc after the corner group.
Care
Hand wash in cool water with mild soap, press the water out in a towel, and block flat again. Store the ornament flat or hanging, with nothing heavy on top.
Final Notes
Each size builds on the one before:
- Each circle is 1.25 in (3.2 cm), and each bridge is 0.5 in (1.3 cm). Together they make a lattice 4.75 in (12.1 cm) wide and 4.25 in (10.8 cm) tall.
- The chain frame, at 8 ch per inch, turns that into a 5.75 in (14.6 cm) by 4.5 in (11.4 cm) triangle.
- The trunk brings the height to 5.5 in (14.0 cm).
- The loop brings the total height to 6.75 in (17.1 cm).
Check each stage before you move on, and every tree in your set will match.
Happy crocheting!