

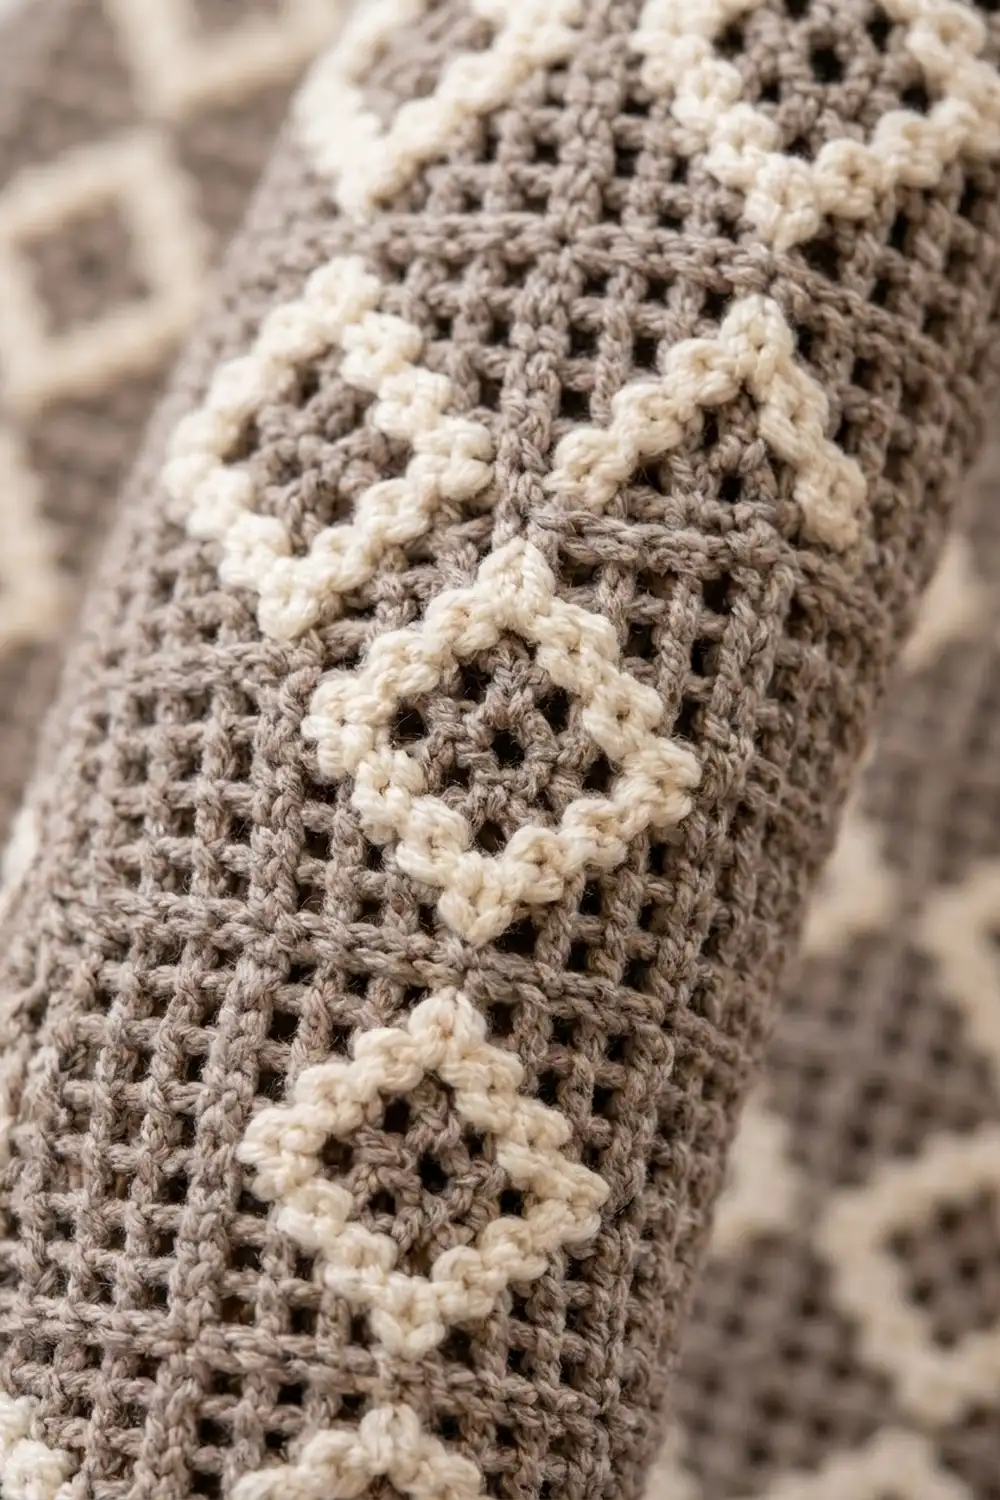
The Cream Lattice Steering Wheel Cover adds a soft, handmade texture to your car. A dense taupe background carries a crisp cream diamond lattice that wraps all the way around the wheel. The fabric is firm enough for a good grip and smooth enough for everyday driving.
The palette is calm and neutral: heathered taupe for the ridged background and creamy ivory for the lattice lines. It suits both warm wood-trim interiors and dark leather dashboards. The style is classic and tailored rather than cute, so it looks good in almost any car.
This pattern uses US crochet terms. The finished cover measures 4.4 in (11.2 cm) wide by 44.4 in (112.8 cm) long when laid flat. That fits a standard wheel with a grip circumference of 4.25–4.75 in (10.8–12.1 cm) and a centerline diameter of about 14 in (35.6 cm).
You crochet one long rectangle flat in tapestry single crochet, working through the back loop to create the ridged grid texture. Next, you add one round of single crochet border, block the strip flat, and lace it around the wheel. Finally, you sew the two short ends together.
Finished Size and Construction
- Finished size (flat, after border): 4.4 in × 44.4 in (11.2 cm × 112.8 cm)
- Skill level: Intermediate (tapestry crochet, carrying yarn)
- Terminology: US crochet terms
- Yarn weight: Sport weight (CYC 2), cotton or cotton blend
- Hook: 3.5 mm (E-4)
- Number of pieces: 1 (single continuous strip)
- Layout: One rectangle, laced into a tube and closed into a ring on the wheel
- Piece size before border: 4.0 in × 44.0 in (10.2 cm × 111.8 cm), 20 sts × 220 rows
- Border depth: 1 round of sc, 0.2 in (0.5 cm) on every edge
Materials
Yarn: Choose a smooth sport-weight cotton or cotton blend. Cotton keeps its shape, resists pilling under your hands, and does not get slippery. Avoid fuzzy or very stretchy acrylics, because the cover would twist on the rim.
- Color T (Taupe/Greige): 100 g, approx. 310 m (339 yd)
- Color C (Cream/Ivory): 50 g, approx. 155 m (170 yd)
These quantities include a margin of about 25%. Both colors are carried through every row, so cream uses more yarn than the small lattice area suggests.
Tools:
- 3.5 mm (E-4) crochet hook
- Tapestry needle
- 4 locking stitch markers
- Flexible measuring tape
- Blocking mat, rust-proof pins and a spray bottle
- Scissors
Abbreviations (US Terms)
- ch – chain
- sc – single crochet
- sl st – slip stitch
- st(s) – stitch(es)
- BLO – back loop only
- rnd – round
- rep – repeat
- T – work in Color T (taupe)
- C – work in Color C (cream)
Special stitch – Tapestry single crochet (tsc): Lay the color you are not using along the tops of the stitches you are working into. Work each sc over that strand so it is enclosed inside the stitch. To change color, work the last sc of the old color until 2 loops remain on the hook. Yarn over with the new color and pull through. The old color now becomes the carried strand.
In this pattern, every tsc after Row 1 is worked in BLO. Because the rows go back and forth, the BLO ridges show on both faces of the strip and form the woven grid texture.
Gauge and Checkpoints
Gauge: 20 tsc and 20 rows = 4 in × 4 in (10.2 cm × 10.2 cm) in BLO tapestry pattern, before blocking.
Test a small section of the strip itself before committing to the full length. Work Rows 1–20 (two full lattice repeats) and measure.
Checkpoints:
- Width at Row 20: 4.0 in (10.2 cm)
- Length after Row 20: 4.0 in (10.2 cm)
- One 10-row repeat: 2.0 in (5.1 cm) long
- After Row 50: 10.0 in (25.4 cm)
- After Row 110 (halfway): 22.0 in (55.9 cm)
- After Row 220: 44.0 in (111.8 cm)
- After border: 4.4 in × 44.4 in (11.2 cm × 112.8 cm)
If your swatch is too wide (more than 4.0 in / 10.2 cm), go down to a 3.25 mm hook. If it is too narrow, go up to a 3.75 mm hook. Width matters most, because it decides whether the long edges meet neatly on the inside of the rim.
If your row gauge is off, keep the hook and adjust the row count instead. Measure your wheel’s centerline circumference (around the middle of the grip). Multiply by 5 and round to the nearest multiple of 10. The answer is your row count. For example, a 45 in (114.3 cm) wheel needs 225, which rounds to 220 or 230 rows.
Lattice Pattern
The lattice repeat is 10 sts wide and 10 rows tall. Each row holds two repeats across its 20 sts. The pattern is symmetrical within each row, so you can read every row from the start of that row whichever direction you are working.
Every row has exactly 16 T sts + 4 C sts = 20 sts.
- Pattern Row 1: 1 C, 8 T, 2 C, 8 T, 1 C. (20)
- Pattern Row 2: 1 T, 1 C, 6 T, 1 C, 2 T, 1 C, 6 T, 1 C, 1 T. (20)
- Pattern Row 3: 2 T, 1 C, 4 T, 1 C, 4 T, 1 C, 4 T, 1 C, 2 T. (20)
- Pattern Row 4: 3 T, 1 C, 2 T, 1 C, 6 T, 1 C, 2 T, 1 C, 3 T. (20)
- Pattern Row 5: 4 T, 2 C, 8 T, 2 C, 4 T. (20)
- Pattern Row 6: Same as Pattern Row 5.
- Pattern Row 7: Same as Pattern Row 4.
- Pattern Row 8: Same as Pattern Row 3.
- Pattern Row 9: Same as Pattern Row 2.
- Pattern Row 10: Same as Pattern Row 1.
Here is how the diamonds form. In Rows 1–5, the cream stitches move one step toward the center of each repeat. In Rows 6–10, they move back out. Where two lines meet (Rows 5–6 in the middle, and Rows 10–1 at the edges and between repeats), you get a 2-stitch × 2-row cream junction. Those junctions are the small cream “knots” of the lattice.
Making the Strip
Foundation: With T, ch 21.
Row 1 (Pattern Row 1): Lay C along the top of the chain. Work tsc in the 2nd ch from hook and in each ch across, following Pattern Row 1: 1 C, 8 T, 2 C, 8 T, 1 C. Turn. (20 sts)
Place a marker in the first st of Row 1 to mark the foundation edge.
Row 2 (Pattern Row 2): Ch 1 (does not count as a st). Working in BLO, tsc across following Pattern Row 2. Turn. (20 sts)
Rows 3–10: Ch 1, tsc in BLO across following Pattern Rows 3–10. Turn at the end of each row. (20 sts each row)
You have now finished one full lattice repeat. The strip should measure 4.0 in × 2.0 in (10.2 cm × 5.1 cm).
Rows 11–220: Rep Rows 1–10 another 21 times. Work Row 1 of each repeat in BLO, like every row after the foundation. (20 sts each row; 22 repeats in total)
Check your length every few repeats against the checkpoints above. At Row 220, the strip measures 4.0 in × 44.0 in (10.2 cm × 111.8 cm). Do not fasten off T. Cut C, leaving a 6 in (15.2 cm) tail to weave in later.
Tension tip: Before each color change, spread the stitches you just worked so the carried strand lies flat. A carried strand that is too tight makes the strip curl lengthwise and shortens your row gauge.
Border
The border is one round of sc in T. It gives the strip clean, firm edges for lacing and seaming.
Border gauge: Same as the main fabric, 5 sc per 1 in (2.5 cm). Because stitch gauge and row gauge are equal (both 20 per 4 in / 10.2 cm), one sc per row-end matches the strip’s length exactly.
Border Rnd 1: With T, ch 1, turn.
- Short edge 1 (top of Row 220): sc in both loops of each of the 20 sts. (20 sc)
- Corner: ch 1.
- Long edge 1: Rotate the work. Sc once in the end of each row down the side. (220 sc)
- Corner: ch 1.
- Short edge 2 (foundation chain): sc once into the free loop of each of the 20 foundation chains. (20 sc)
- Corner: ch 1.
- Long edge 2: sc once in the end of each row up the side. (220 sc)
- Corner: ch 1. Sl st to the first sc to join.
Round total: 20 + 220 + 20 + 220 = 480 sc, plus 4 ch-1 corner spaces.
The corner ch-1 spaces are not counted as stitches, so no stitch is counted twice. Fasten off, leaving a T tail of about 60 in (152.4 cm). You will use it to lace the cover onto the wheel.
Why the math works: Each long edge has 220 row-ends and gets exactly 220 sc, so it neither ruffles nor pulls in. Each short edge has 20 sts and gets exactly 20 sc. Each long edge has the same number of sc, so when you lace them together on the wheel, they match one-to-one along the whole seam. The border adds one sc height (0.2 in / 0.5 cm) to every edge. The width grows from 4.0 in to 4.4 in (10.2 cm to 11.2 cm), and the length grows from 44.0 in to 44.4 in (111.8 cm to 112.8 cm).
Final Blocking
Block the strip flat before you fit it, so the lattice is square and the edges are straight.
- Weave in all short tails except the long T lacing tail. Run each tail through stitches of its own color so no cream shows on the taupe.
- Lay the strip on your blocking mat with the side you like best facing up.
- Pin both long edges straight to a width of 4.4 in (11.2 cm), placing a pin every 2 in (5.1 cm).
- Pin the full length to 44.4 in (112.8 cm). Check that each lattice repeat is close to 2.0 in (5.1 cm).
- Mist the strip evenly until it is damp, not soaked. Pat it gently so the ridges settle.
- Let it dry completely, usually 12–24 hours. Then unpin.
- Fit the cover: Wrap the strip around the rim with the best side facing out, so the long edges meet on the inner side of the grip, toward the driver. Starting next to a spoke, use the T tail to whipstitch the two long edges together. Go through the outer loops of the border sc, matching sc 1 to sc 1 all the way to 220 to 220. At each spoke, carry the yarn behind the spoke and continue on its far side.
- Close the ring: Whipstitch the two short edges together, matching all 20 sc on one end to the 20 sc on the other. Fasten off and bury the tail inside the tube.
Final Quality-Control Checklist
- The strip has 20 sts in every row and 220 rows in total.
- Every row has exactly 4 cream stitches.
- The cream junctions line up in straight lines along the length.
- The border has 20 sc on each short edge and 220 sc on each long edge, with 4 ch-1 corners.
- The blocked size is 4.4 in × 44.4 in (11.2 cm × 112.8 cm).
- No carried strands show through on the outside.
- The lacing seam sits on the inner side of the rim and does not twist.
- The ring seam is flat and firm, and the cover does not slide when you grip and turn the wheel.
Troubleshooting
Cream shows through the taupe: Keep the carried strand at the back of the stitch and pull each loop snug. Switching to a slightly smaller hook also helps.
The strip curls or twists: The carried yarn is too tight. Spread your stitches before each color change. Re-blocking usually fixes mild curling.
The diamonds look lopsided: Check the 2-C junctions in Pattern Rows 1, 5, 6 and 10. Missing one cream stitch shifts the whole line.
The cover is loose on the wheel: Remove 10 rows (one repeat, 2.0 in / 5.1 cm) before the border, or lace the seam a little tighter.
The long edges won’t meet: Your width is too narrow. Remake the strip with a hook 0.25 mm larger.
The border waves: You worked more than 1 sc per row-end. Recount to 220 per long edge.
Care
Hand wash the cover off the wheel in cool water with mild soap. Roll it in a towel and dry it flat to the blocked measurements.

Final Notes
Every measurement follows from one simple chain. A gauge of 20 sts and 20 rows to 4 in (10.2 cm) gives a strip 20 sts wide, which is 4.0 in (10.2 cm). Twenty-two 10-row lattice repeats make 220 rows, or 44.0 in (111.8 cm). One border round of 480 sc, worked one per stitch and one per row-end, brings the cover to 4.4 in × 44.4 in (11.2 cm × 112.8 cm). That fits snugly around a 14 in (35.6 cm) wheel. Check your gauge early, count your cream stitches, and the lattice will line up neatly all the way around.
Happy crocheting!