

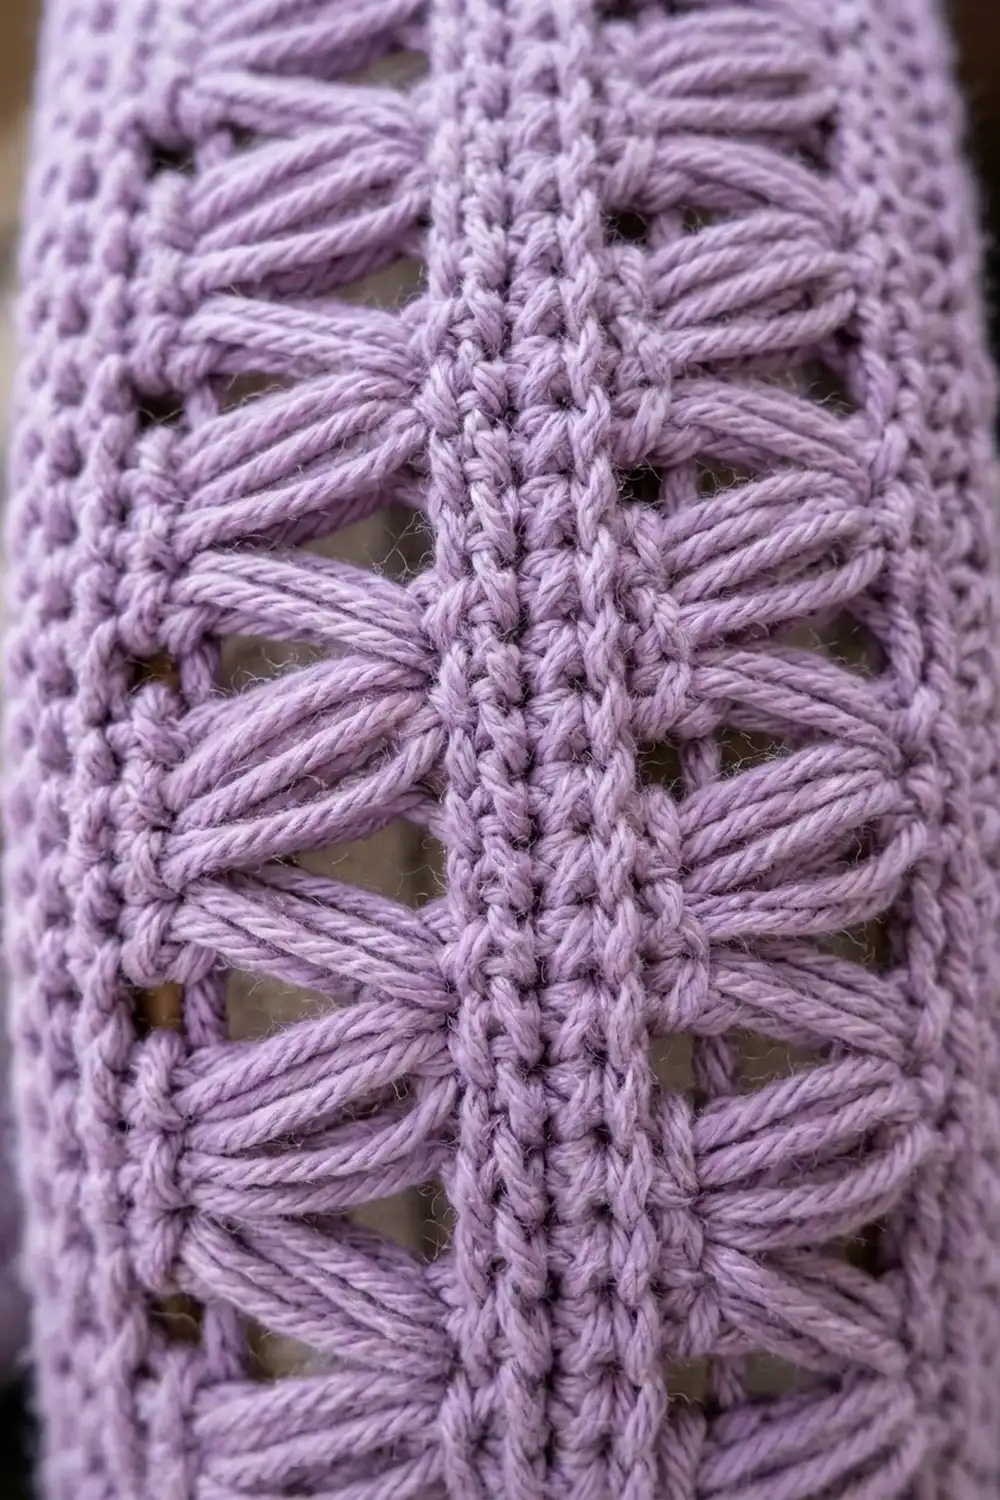
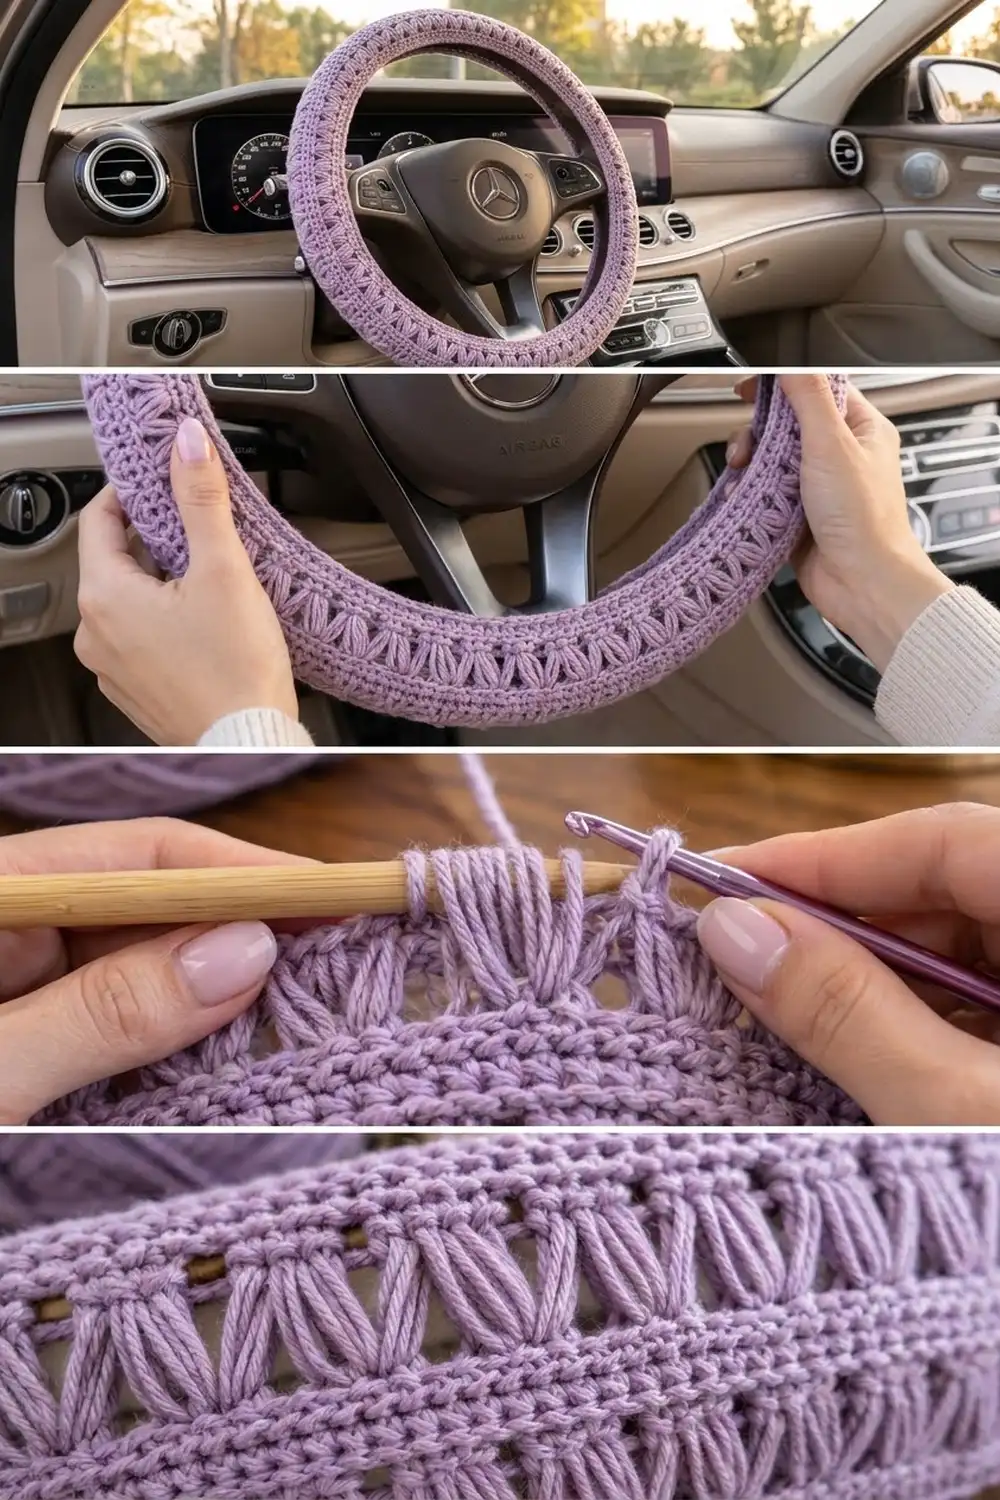
This steering wheel cover pairs two bands of classic broomstick lace with firm single crochet stripes. On the wheel, the bands run in rings all the way around, so the long lace loops make a soft, scalloped texture while the solid stripes give you a good grip.
The sample is worked in one color, a gentle lavender, in worsted weight yarn. The style is part vintage lace and part practical car accessory, and the dense single crochet bands keep it from feeling loose or slippery.
This pattern uses US crochet terms. The flat strip measures 40.5 in x 4.5 in (102.9 cm x 11.4 cm) after its border. Once it is stretched on, it fits wheels about 14.5 to 15.5 in (36.8 to 39.4 cm) in diameter with a grip about 4.75 in (12.1 cm) around.
Construction is simple. You make one long strip in rows: three single crochet bands with two broomstick lace sections between them. A single crochet border goes all the way around. Then you sew the short ends into a ring, wrap the strip around the rim, and lace the long edges together on the back of the wheel.
Finished Size and Construction
- Finished size (flat, after border): 40.5 in x 4.5 in (102.9 cm x 11.4 cm)
- Fits: wheels 14.5 to 15.5 in (36.8 to 39.4 cm) in diameter, about 42 in (106.7 cm) around the centerline of the rim
- Skill level: Intermediate (broomstick lace plus basic stitches)
- Terminology: US
- Yarn weight: Worsted (#4)
- Hook: 5.0 mm (H-8)
- Number of pieces: 1
- Layout: one long strip, seamed into a ring and laced around the rim
- Piece size before border: 40 in x 4 in (101.6 cm x 10.2 cm)
- Border depth: 0.25 in (0.6 cm) on every edge
Materials
Yarn: Use a smooth worsted weight yarn. Acrylic or an acrylic-cotton blend works best because it holds the broomstick loops well, wears well under your hands, and survives washing. Avoid fuzzy yarns, which hide the lace and pill quickly with handling.
- Lavender: 100 g, approx. 180 m (197 yd)
This amount includes about a 25% margin. The sample used about 78 g, and that includes the yarn for seaming and lacing.
Tools:
– 5.0 mm (H-8) crochet hook
– Smooth wooden dowel or jumbo knitting needle, 0.75 in (1.9 cm) diameter, at least 24 in (61.0 cm) long
– Tapestry needle
– 4 locking stitch markers
– Flexible tape measure
– Scissors
– Spray bottle or steam iron (for blocking)
Abbreviations (US Terms)
- ch – chain
- sc – single crochet
- st(s) – stitch(es)
- RS – right side
- rep – repeat
Special stitch: Broomstick lace (BL)
A broomstick section takes two rows:
– Loop row: Do not turn. Pull up the loop on your hook and slip it onto the dowel. Insert your hook in the next st, yo, pull up a loop, and slip it onto the dowel. Rep from * across. You will have 1 loop on the dowel for each stitch.
– Return row: Start at the end where your yarn is. Insert your hook through the first 4 loops together and slide them off the dowel. Yo, pull through all 4 loops, ch 1, then work 4 sc into the center of that group. Insert your hook through the next 4 loops, slide them off, and work 4 sc into the center of the group. Rep from * across.
Each 4-loop group becomes 4 sc, so your stitch count stays the same.
Gauge and Checkpoints
Gauge: 16 sc and 18 rows = 4 in (10.2 cm). One broomstick section (loop row plus return row) on a 0.75 in (1.9 cm) dowel = 1 in (2.5 cm) tall.
Test piece first. Ch 21. Work 3 rows of sc on 20 sts, then 1 broomstick section (5 groups of 4), then 3 more sc rows. The swatch should measure 5 in (12.7 cm) wide and about 2.33 in (5.9 cm) tall. Make sure the groups are an even 1 in (2.5 cm) wide and do not ruffle or pull in.
Checkpoints on the main strip:
– After Row 1: 160 sc, 40 in (101.6 cm) long
– After Row 3: width 0.67 in (1.7 cm)
– After Row 5: width 1.67 in (4.2 cm)
– After Row 8: width 2.33 in (5.9 cm)
– After Row 10: width 3.33 in (8.5 cm)
– After Row 13: width 4 in (10.2 cm)
– After border: 40.5 in x 4.5 in (102.9 cm x 11.4 cm)
If your piece is too big: go down one hook size (4.5 mm). If only the lace bands are too tall, use a thinner dowel, 0.6 in (1.5 cm).
If your piece is too small: go up one hook size (5.5 mm). If only the lace bands are too short, use a thicker dowel.
Custom fit: Measure around the centerline of your rim. Subtract 2 in (5.1 cm) for snug ease. Multiply by 4, then round to the nearest multiple of 4 to get your stitch count. For the sample, 42 in − 2 in = 40 in, and 40 x 4 = 160 sts. Every 4 sts you add or remove changes the length by 1 in (2.5 cm).
Main Strip
The whole strip is worked flat in long rows. You will turn after each sc row, but not before a loop row.
Foundation: Ch 161.
Row 1 (RS): Sc in the 2nd ch from hook and in each ch across. Turn. (160 sc)
Check the length now: it should be 40 in (101.6 cm). Lay it flat without stretching it.
Rows 2–3: Ch 1, sc in each st across. Turn at the end of Row 2 only. At the end of Row 3, do not turn. (160 sc per row)
This is the first solid band, about 0.67 in (1.7 cm) wide.
Row 4 (loop row): Work a BL loop row across: 1 loop from the hook plus 1 loop in each of the remaining 159 sts. (160 loops on dowel)
Push the loops close together so they all fit on the dowel. They should be the same height and should not twist.
Row 5 (return row): Work a BL return row across. (40 groups x 4 sc = 160 sc)
Mark the first and last sc. The groups should form even, upright clusters, like in the photos.
Rows 6–8: Turn, ch 1, sc in each st across. Turn at the end of Rows 6 and 7. At the end of Row 8, do not turn. (160 sc per row)
This is the center solid band. It sits on the front face of the rim once the cover is on.
Row 9 (loop row): Work a BL loop row across. (160 loops on dowel)
Row 10 (return row): Work a BL return row across. (40 groups x 4 sc = 160 sc)
Rows 11–13: Turn, ch 1, sc in each st across, turning after each row. (160 sc per row)
Do not fasten off. Go straight on to the border.
The finished rows read as: 3 sc rows, lace, 3 sc rows, lace, 3 sc rows. That is 9 sc rows at 0.67 in (1.7 cm) per band plus 2 lace sections at 1 in (2.5 cm) each, for a total of 4 in (10.2 cm).
Border
Border gauge: 1 round of sc adds 0.25 in (0.6 cm) to each edge. Along the short ends, work 1 sc in the end of each sc row and 4 sc across each broomstick section. That spacing matches 16 sts per 4 in (10.2 cm).
Border round: Ch 1. Do not turn.
- Long side 1 (top of Row 13): 3 sc in the first st (corner), sc in each of the next 158 sts, 3 sc in the last st (corner).
- Short end 1: Working along the row ends: 3 sc over Rows 13–11, 4 sc over the Row 10–9 lace section, 3 sc over Rows 8–6, 4 sc over the Row 5–4 lace section, and 3 sc over Rows 3–1. (17 sc)
- Long side 2 (foundation chain): 3 sc in the first ch (corner), sc in each of the next 158 ch, 3 sc in the last ch (corner).
- Short end 2: Work as for Short end 1, in reverse order. (17 sc)
Sl st to the first sc. Leave a 30 in (76.2 cm) tail and fasten off. You will use this tail for the end seam.
Counts per side, including both corner center sts:
– Each long side: 1 + 1 + 158 + 1 + 1 = 162 sts
– Each short end: 1 + 1 + 17 + 1 + 1 = 21 sts
Round total: (160 x 2 sts worked 1 per existing st) + (4 corners x 2 extra sts) + (17 x 2 row-end sts) = 320 + 8 + 34 = 362 sts.
Check it against the per-side counts: (162 x 2) + (21 x 2) − 4 shared corner centers = 362.
Why the math works: Each long side starts with the strip’s 160 sts and adds 2 sts at the corners, for 162. Those extra 2 sts cover the 0.25 in (0.6 cm) of border depth at each end, so the strip grows to 40.5 in (102.9 cm). Each short end has 17 row-end sts across 4 in (10.2 cm) plus 2 corner sts on each side, for 21. That lines up with the new 4.5 in (11.4 cm) width.
Final Blocking
- Lay the strip RS up on a towel or blocking mat. Pin it to 40.5 in x 4.5 in (102.9 cm x 11.4 cm).
- Straighten each broomstick group so the loops stand upright and the clusters line up in a neat row.
- Mist the strip lightly, or hover steam over it without touching the yarn. Let it dry completely.
- Fold the strip RS together so the two short ends line up. Whipstitch them through the 21 border sts on each end, matching st to st. Turn the ring RS out.
- Lay the ring over the front of the wheel with the RS facing you. Ease it evenly around the rim and pull the long edges toward the back of the wheel.
- Cut 2.5 m (2.7 yd) of yarn and thread your tapestry needle. Lace the two long edges together on the back of the rim. Go through one border st on one side, then the matching st on the other side, so the 162 sts on one side pair with the 162 sts on the other. Line up the seam you made in Step 4 with the bottom spoke.
- When you reach a spoke, take a few stitches in each edge close to the spoke and pull them firmly. Then skip across and continue lacing on the other side of the spoke.
- Mist the cover once more while it is on the wheel and let it dry. This sets the shape.
Final Quality-Control Checklist
- Every sc row has 160 sts. Each return row has 40 groups.
- All lace loops are the same height, with no twisted or skipped loops.
- The flat strip measured 40.5 in x 4.5 in (102.9 cm x 11.4 cm) after blocking.
- Each long side has 162 border sts, each short end has 21, and the border total is 362.
- The end seam lies flat and sits at the bottom spoke.
- The lacing on the back is snug, and the cover does not rotate when you grip and twist it.
- All yarn ends are woven in on the back of the rim, away from where your hands rest.
Troubleshooting
Loops fall off the dowel: Hold the dowel firmly between your knees or under your arm. Pack the loops close together. You can also put a rubber band on the far end as a stopper.
Lace groups lean or twist: Keep the dowel parallel to the work. Pull each loop straight up without spinning the hook.
Strip edges ruffle at the lace bands: You may have worked 5 sc in a group. Each group must have exactly 4 sc.
Cover is too loose and spins on the wheel: Remove 4 to 8 sts from the foundation, or lace the back more tightly.
Cover will not stretch on: Add 4 sts (1 in / 2.5 cm), or use a hook one size larger.
Border corners curl: Make sure you have exactly 3 sc in each corner and 17 sc along each short end.
Care
Remove the cover and hand wash it in cool water with mild soap. Press out the water in a towel, lay it flat to dry, and do not wring it, because that can stretch the lace loops.
Final Notes
Your measurements build on each other in a simple chain. Gauge of 16 sc = 4 in (10.2 cm) gives 160 sts = 40 in (101.6 cm). Thirteen rows bring the strip to 4 in (10.2 cm) wide. The border brings it to 40.5 in x 4.5 in (102.9 cm x 11.4 cm), with 162 sts on each long side to lace together. Check each link in that chain, and your cover will fit snugly and look tidy on the wheel.
Happy crocheting!