

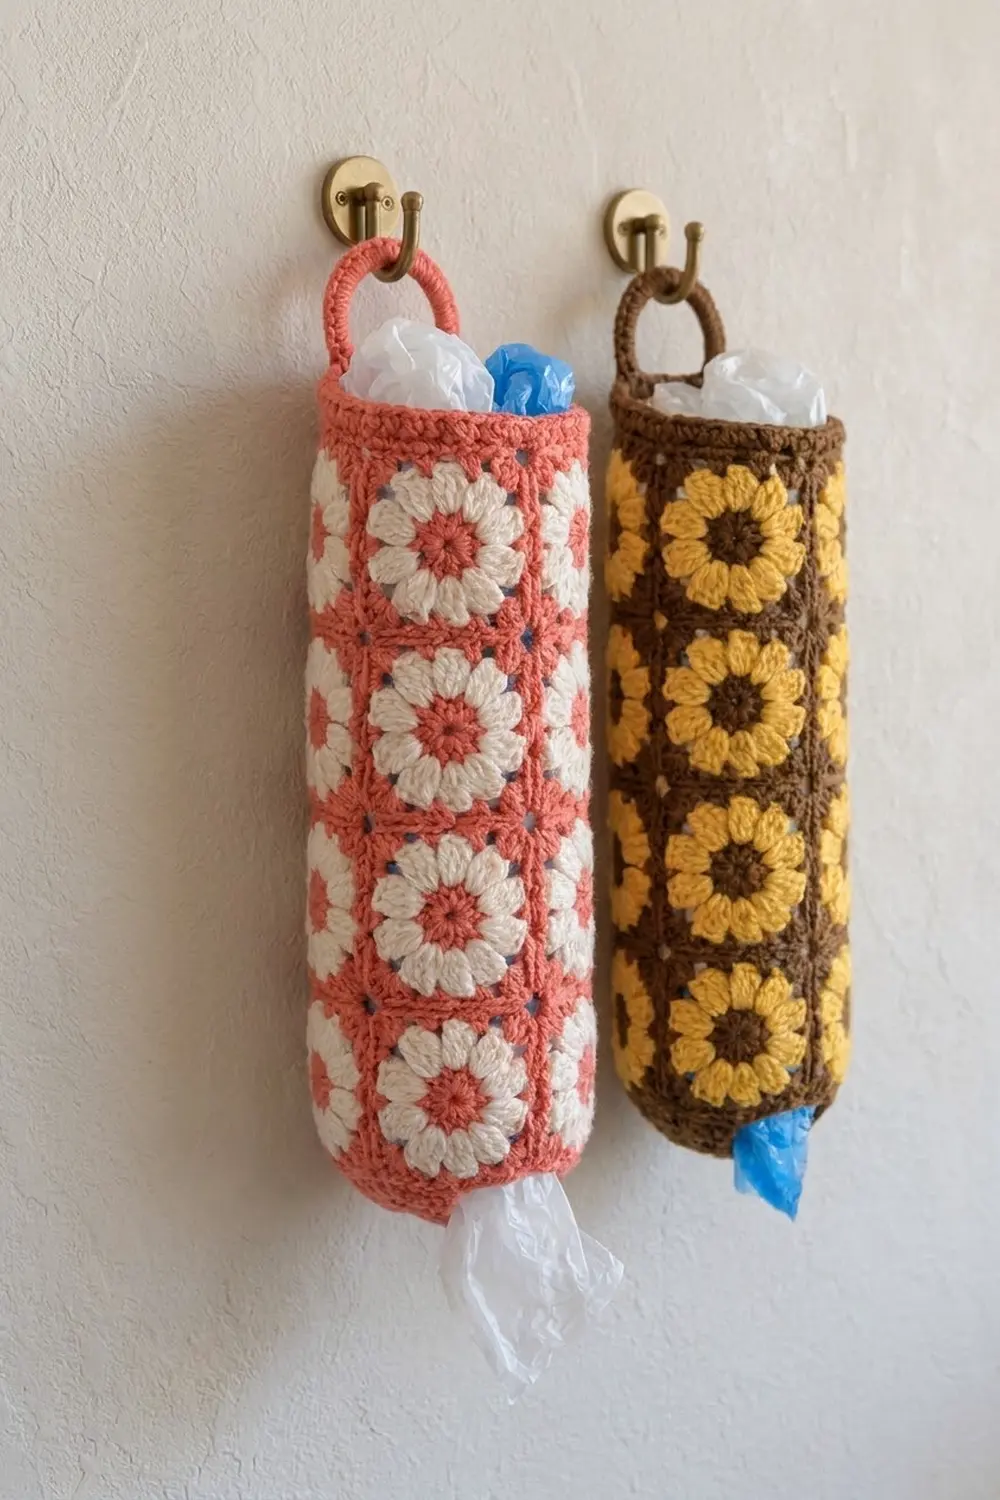
Plastic bags tend to pile up in a drawer. This hanging holder keeps them in one tidy tube: you push bags in at the top and pull them out one at a time from the narrower bottom opening. It’s made from sixteen small daisy granny squares, so it’s cheerful, practical and a good use of a few balls of cotton.
The sample uses coral for the flower centers and backgrounds and cream for the chunky cluster petals. It also looks great in brown with golden-yellow petals for a sunflower look. Each square has a small solid center, twelve rounded petals, and a flat background that squares the flower off with sharp corners.
This pattern uses US crochet terms. The finished holder is 8 in (20.3 cm) wide when laid flat, 16 in (40.6 cm) around, and 18 in (45.7 cm) tall from rim to rim. With the hanging ring, it’s about 21 in (53.3 cm) long.
Construction is simple. You make 16 squares, join them with slip stitches into 4 vertical strips, and join the strips into a tube. Then you add a straight top rim, a decreased bottom rim, and a crocheted ring on a short tab.
Finished Size and Construction
- Finished size: 8 in (20.3 cm) flat width × 18 in (45.7 cm) tall, ring not included
- Circumference: 16 in (40.6 cm)
- Skill level: Easy / advanced beginner
- Terminology: US crochet terms
- Yarn weight: Worsted (#4), cotton or cotton blend
- Hook: 5.0 mm (H-8)
- Number of pieces: 16 squares, plus 1 ring
- Layout: 4 squares around × 4 squares tall
- Square size: 4 in × 4 in (10.2 cm × 10.2 cm)
- Size before rims: 16 in (40.6 cm) circumference × 16 in (40.6 cm) tall
- Rim depth: 1 in (2.5 cm) at the top and 1 in (2.5 cm) at the bottom
Materials
Choose a smooth worsted-weight cotton or cotton blend, at about 200 m per 100 g. Cotton holds its shape well, doesn’t stretch out under the weight of the bags, and makes the petals stand out clearly. Avoid fuzzy yarn, because it blurs the cluster petals.
Yarn:
– Color A, coral (centers, backgrounds, rims, ring): 150 g / about 300 m
– Color B, cream (petals): 60 g / about 120 m
For the brown-and-yellow version, use brown as Color A and yellow as Color B in the same amounts.
Tools:
– 5.0 mm (H-8) crochet hook
– Tapestry needle
– Scissors
– 6–8 locking stitch markers
– Tape measure
– Blocking mat and rust-proof pins
– Spray bottle
These quantities include a margin of about 15–20% for gauge differences and a test square.
Abbreviations (US Terms)
- ch – chain
- sl st – slip stitch
- sc – single crochet
- hdc – half double crochet
- dc – double crochet
- tr – treble crochet
- sc2tog – single crochet 2 together
- sp – space
- st(s) – stitch(es)
- RS / WS – right side / wrong side
- BLO – back loop only
Special stitches
- Beginning cluster (beg-cl): Ch 2, then [yarn over, insert hook in the stitch, pull up a loop, yarn over, pull through 2 loops] twice in the same stitch. Yarn over and pull through all 3 loops on the hook.
- Cluster (cl): [Yarn over, insert hook in the stitch, pull up a loop, yarn over, pull through 2 loops] 3 times in the same stitch. Yarn over and pull through all 4 loops on the hook.
Gauge and Checkpoints
Make one test square before starting the full set. Square gauge sets the size of everything else.
- Rim gauge: 12 sc = 4 in (10.2 cm), and 4 rounds of sc = 1 in (2.5 cm)
- After Round 2: the flower measures about 2.5 in (6.4 cm) across
- After Round 3: the square measures about 3.5 in (8.9 cm) from side to side
- After Round 4: the square measures 4 in × 4 in (10.2 cm × 10.2 cm)
If your square is bigger than 4 in (10.2 cm), go down to a 4.5 mm hook. If it’s smaller than 3.75 in (9.5 cm), go up to a 5.5 mm hook. A difference of 0.25 in (0.6 cm) per square adds up to 1 in (2.5 cm) around the tube and 1 in (2.5 cm) in height, so check this before making all 16.
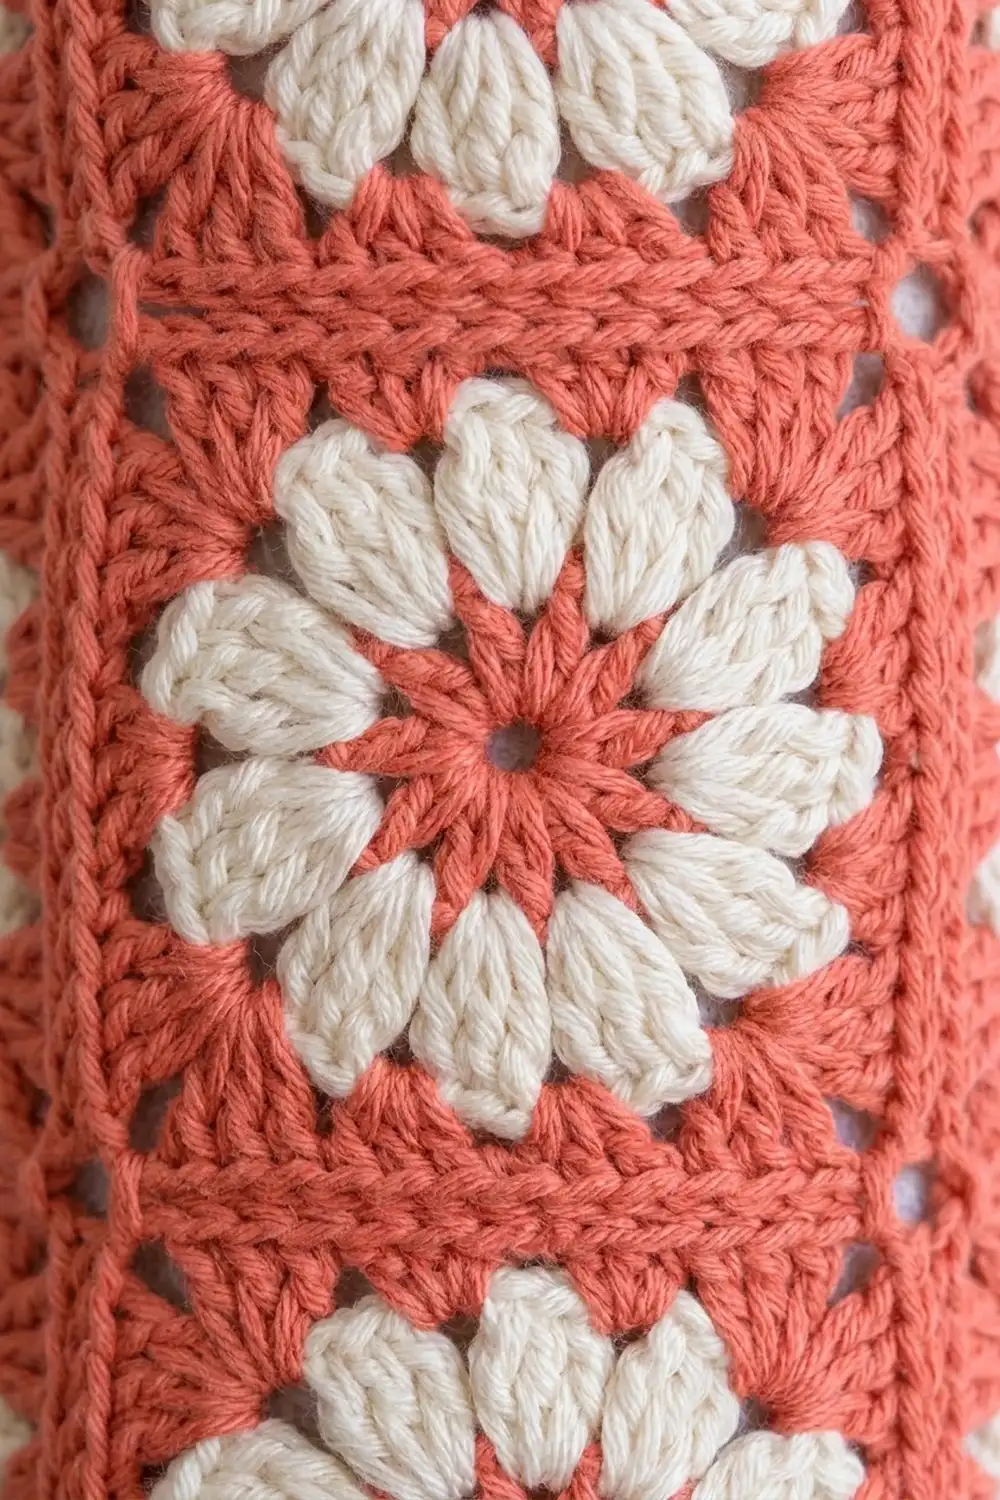
Daisy Square (Make 16)
Round 1 (Color A): Make a magic ring. Ch 2 (does not count as a stitch), then work 12 dc into the ring. Pull the ring closed and sl st to the first dc. Fasten off. (12 dc)
Round 2 (Color B): Join Color B in any dc. Work beg-cl in the same st, then ch 2. Cl in the next dc, ch 2; repeat from * to * 10 more times. Sl st to the top of beg-cl and fasten off. (12 clusters, 12 ch-2 sps)
These 12 clusters are the rounded cream petals. Each ch-2 space sits between two petals.
Round 3 (Color A): Join Color A in any ch-2 sp. Ch 3 (counts as dc), then work (tr, ch 2, tr, dc) in the same sp. This is the first corner. Work 3 hdc in each of the next 2 ch-2 sps. In the next ch-2 sp, work (dc, tr, ch 2, tr, dc) for the next corner. Repeat from * to * 2 more times. Then work 3 hdc in each of the last 2 ch-2 sps and sl st to the top of the beg ch-3.
(40 sts + 4 corner ch-2 sps)
Each side has 10 sts: tr and dc from one corner, 6 hdc, then dc and tr from the next corner. Since 4 sides × 10 = 40, the count checks out. The tall tr stitches pull the corners out and make the circle square.
Round 4 (Color A, conversion round): Ch 1. Sc in the same st and in each st to the first corner. In each corner ch-2 sp, work (sc, ch 2, sc). Continue with 1 sc in each st around and sl st to the first sc. Fasten off and leave a 6 in (15.2 cm) tail.
(40 sc worked 1 per existing st + 8 sc added at corners = 48 sc, plus 4 corner ch-2 sps)
Each side now has 12 sc. That count already includes the 2 corner sc on that side, one at each end. Each square should measure 4 in (10.2 cm).
Weave in the Color B tails. Leave the Color A tails for now, because you can use them to close the corner gaps after joining.
Make All Pieces
Make 16 squares in total. Each square uses:
- Color A: Rounds 1, 3 and 4, about 6 g per square, or 96 g total
- Color B: Round 2, about 3 g per square, or 48 g total
Lightly steam-block the squares to 4 in (10.2 cm) before joining. It’s much easier to match the stitches when all the squares are the same size.
Layout grid (A and B are the front columns, C and D are the back columns. Column D joins back to Column A to close the tube.)
Top rim
| A1 | B1 | C1 | D1 |
| A2 | B2 | C2 | D2 |
| A3 | B3 | C3 | D3 |
| A4 | B4 | C4 | D4 |
Bottom rim
Every square faces RS out and points the same way.
Joining
Method: Slip stitch join through the back loops, using Color A.
Step 1 – Strips. Place two squares with their RS together and line up the edges. Join Color A in the corner ch-2 sps of both squares and work 1 sl st through the pair of corner sps. Then work 1 sl st through the back loops of each matching pair of stitches. That’s 12 sl sts, one for each of the 12 sc on a side. Finish with 1 sl st through the next pair of corner sps.
Join 4 squares into a strip this way, using 3 seams. Make 4 strips.
Step 2 – Strips into a tube. Place Strip A and Strip B with their RS together. Work 1 sl st through each pair of matched corner sps and 12 sl sts along each square’s side. The long seam has 4 × 12 = 48 stitch joins, plus the corner joins at each end and wherever two squares meet.
Join B to C and C to D. Then bring D around to meet A and join it to close the tube. Turn the tube RS out.
Stitch-to-stitch logic: Every side has exactly 12 sc, so each stitch lines up with its partner. Don’t skip any stitches or add extra ones. If the counts don’t match, the seam will twist.
Tension: Keep your slip stitches as loose as the sc in the squares. If they’re too tight, the seams pucker and the tube becomes shorter than 16 in (40.6 cm). If needed, go up half a hook size just for the joining.
Size checkpoint: Lay the tube flat. It should be 8 in (20.3 cm) wide and 16 in (40.6 cm) tall. The small openings where four corners meet are normal and part of the look.
Border: Top and Bottom Rims
Border gauge: 12 sc = 4 in (10.2 cm), and 4 rounds = 1 in (2.5 cm).
Top Rim
Round 1: With the RS facing, join Color A in the first sc of any square’s top edge. Ch 1, then sc in BLO in each of the 12 sts along the top of that square. Skip the joined corner sps at the seam and continue across the next square. Work all 4 squares and sl st to the first sc.
(4 squares × 12 sts = 48 sc)
Working in the back loops creates a neat ridge between the squares and the rim.
Rounds 2–4: Ch 1, then sc in each st around and sl st to the first sc. (48 sc each round)
Fasten off. The rim is 1 in (2.5 cm) deep.
Why the math works: Each square’s top edge has 12 sts, so 4 squares give 48. At 12 sc = 4 in (10.2 cm), 48 sc measure exactly 16 in (40.6 cm), which is the circumference of the tube. You don’t need to add stitches at the seams because the corner sps are already closed by the join.
Bottom Rim
Round 1: Turn the tube upside down. Work the bottom edge the same way as the top rim’s Round 1, with 12 sc in BLO across each square. (48 sc)
Round 2 (decrease): Ch 1. Sc in the next 4 sts, sc2tog. Repeat from * to * 7 more times and sl st to the first sc. (8 repeats × 5 = 40 sc)
Round 3 (decrease): Ch 1. Sc in the next 3 sts, sc2tog. Repeat from * to * 7 more times and sl st to the first sc. (8 repeats × 4 = 32 sc)
Round 4: Ch 1, then sc in each st around and sl st to the first sc. (32 sc)
Fasten off. The opening is about 10.7 in (27.2 cm) around. That’s narrow enough to hold the bags in but wide enough to pull one bag out at a time.
Why the math works: Round 2 uses 8 repeats of 6 sts, which is 48, and produces 40. Round 3 uses 8 repeats of 5 sts, which is 40, and produces 32. The decreases are spread evenly, so the bottom pulls in smoothly without points.
Hanging Ring and Tab
Ring: With Color A, ch 20 and sl st to the first ch to make a ring, making sure it isn’t twisted.
Round 1: Ch 1, then work 30 sc into the center of the ring, working over the chain. Sl st to the first sc and fasten off.
The finished ring is about 2.75 in (7.0 cm) across on the outside, with a 1.75 in (4.4 cm) opening.
Tab: Find the back seam between Columns C and D, which is opposite the front seam between A and B. Join Color A in the top rim, 2 sts to the right of that seam.
- Row 1: Ch 1, then sc in the next 4 sts. (4 sc)
- Rows 2–6: Ch 1, turn, and sc in each st across. (4 sc)
The tab is now about 1.5 in (3.8 cm) long. Pass it through the ring and fold it to the inside of the rim. Whipstitch the last row to the WS of Round 3 of the rim, then weave in the ends.
Final Blocking
- Weave in all remaining tails. Use the Color A tails to close any corner gap that looks larger than the others.
- Roll a towel tightly and slide it into the tube so the tube is firmly filled.
- Lay the tube flat and pin it to 8 in (20.3 cm) wide and 16 in (40.6 cm) tall, measured between the rims.
- Line up the front seam so it runs straight down the center.
- Mist the tube until it’s damp but not soaked. Pinch each cream petal into a round shape.
- Pin the ring flat so it dries round.
- Let it dry completely, which takes 12–24 hours. Then check the total height of 18 in (45.7 cm).
Final Quality-Control Checklist
- All 16 squares measure 4 in (10.2 cm), within 0.25 in (0.6 cm).
- Every square has 12 petals and 12 sc on each side.
- All the squares face the same way, with RS out.
- The seams run straight from top to bottom and nothing spirals.
- The top rim has 48 sc in every round.
- The bottom rim has 48, 40, 32 and 32 sc.
- The ring sits centered above the back seam, and the tab is securely sewn.
- All the ends are woven in and none show on the RS.
Troubleshooting
- The squares cup or ruffle: Round 3 is too tight or too loose. Recheck the 3 hdc per space and the tr corners, then change your hook size.
- The petals look flat: Make sure each cluster has the full number of yarn-over passes, 2 for beg-cl and 3 for cl. Pull the cream yarn up to an even height.
- The tube twists: One seam has a skipped or extra stitch. Count 12 sl sts per square side and redo that seam.
- The seams pucker: Your slip stitches are too tight. Redo them more loosely or with a larger hook.
- Bags fall out of the bottom: Add a 5th round with sc 2, sc2tog repeated 8 times. (24 sc)
- Bags are hard to pull out: Skip Round 3 of the bottom rim and work Round 4 over 40 sts.
- The ring stretches: Work Round 1 of the ring over a 2 in (5.1 cm) plastic ring for extra strength.
Care
Hand wash in cool water with mild soap, gently squeeze out the water, and dry flat over a rolled towel to keep the round shape. Don’t tumble dry, because cotton can shrink and pull the squares out of shape.
Final Notes
Your sizes all build on each other. 12 sc per side gives a 4 in (10.2 cm) square. Four squares around give 48 sts, which is 16 in (40.6 cm) of circumference and an 8 in (20.3 cm) flat width. Four squares tall give a 16 in (40.6 cm) body. Two 1 in (2.5 cm) rims bring the holder to 18 in (45.7 cm), and the tab and ring bring it to about 21 in (53.3 cm) when hung. If your test square is right, everything else will match.
Happy crocheting!