

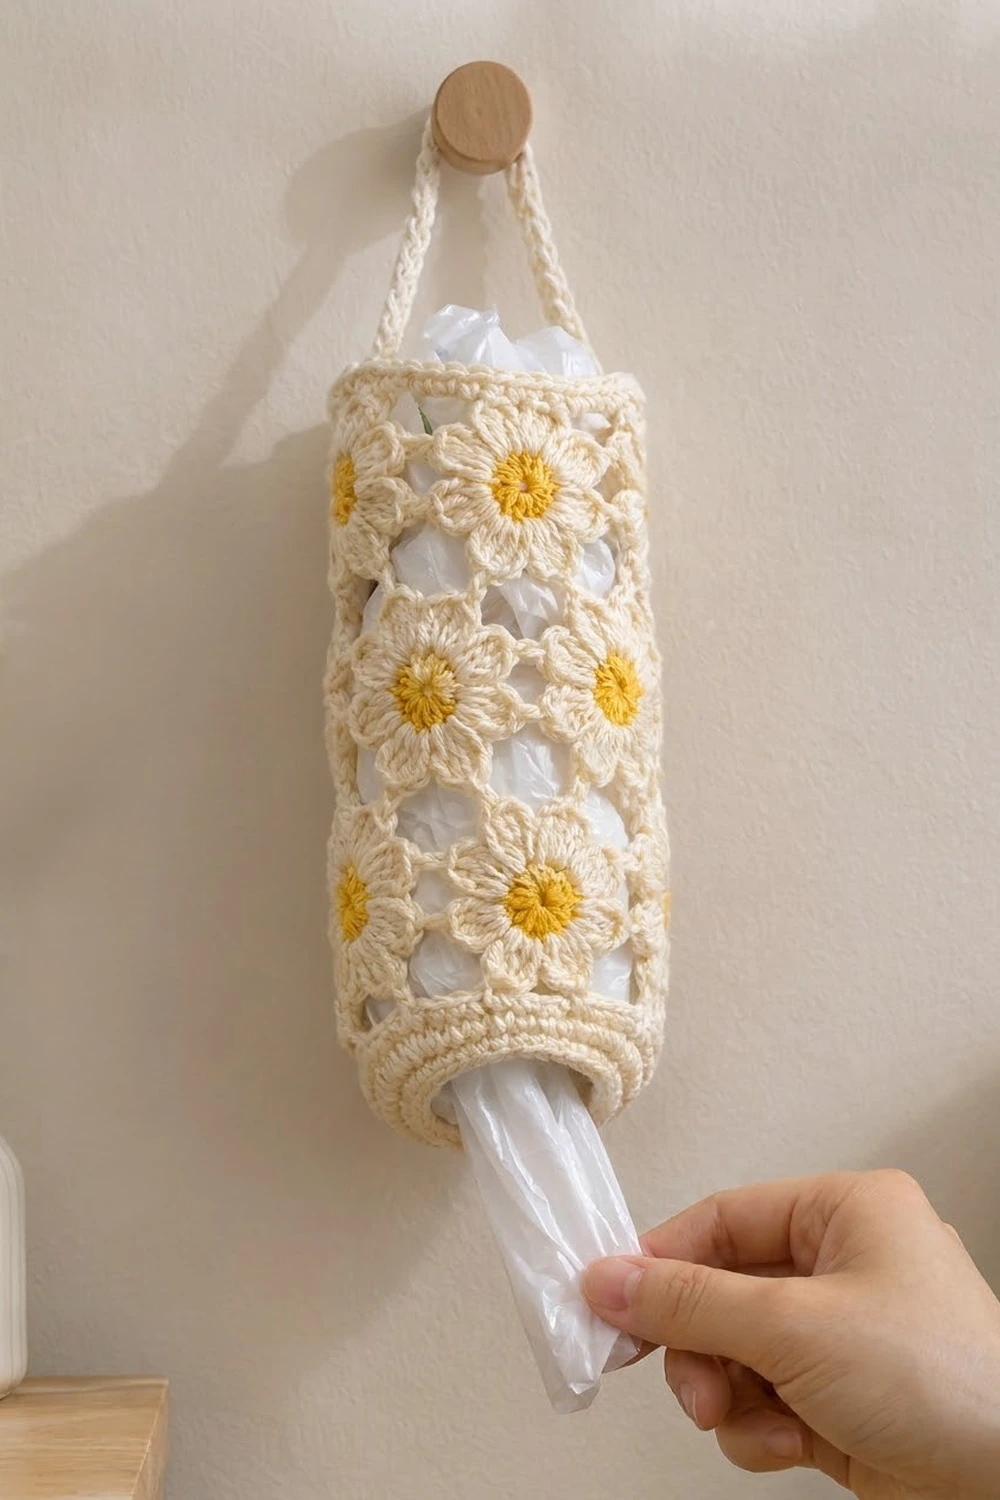
This bag holder is a soft, airy tube of cream daisies with sunny yellow centers. It hangs on a hook or peg by a slim strap. You stuff plastic bags in through the top and pull them out one at a time through the snug ring at the bottom.
The design uses only two colors: cream for the petals, joins, bands and strap, and golden yellow for the daisy centers. The open spaces between the flowers keep the tube light and let you see when it’s time to restock. The look is cottage-style and fresh enough to leave out on display.
The pattern uses US crochet terms. The finished holder is 14½ in (36.8 cm) tall and 6 in (15.2 cm) wide when flat, with a circumference of 12 in (30.5 cm). The strap adds a hanging loop about 9¼ in (23.5 cm) long.
Here’s how it comes together. You make 16 daisy motifs and join them as you go into a tube that is 4 motifs around and 4 motifs tall. Then you add a solid top band, a slightly narrower bottom cuff and a two-row strap.
Finished Size and Construction
- Finished size: 14½ in (36.8 cm) tall × 6 in (15.2 cm) wide when flat
- Skill level: Easy-intermediate
- Terminology: US
- Yarn weight: Worsted (#4) cotton
- Hook: 4.0 mm (G-6)
- Number of pieces: 16 daisy motifs + 1 strap
- Layout: 4 motifs around × 4 motifs tall, joined into a tube
- Motif size: 3 in (7.6 cm) side to side, measured from loop edge to loop edge
- Tube size before the bands: 12 in (30.5 cm) circumference × 12 in (30.5 cm) tall
- Band depth: top band 1 in (2.5 cm); bottom cuff 1½ in (3.8 cm)
Materials
Use a smooth worsted-weight 100% cotton or cotton blend. Cotton holds its shape and the stitches stay crisp. Acrylic also works, but it stretches more once the holder is full of bags.
- Cream: 150 g / approx. 255 m
- Golden yellow: 30 g / approx. 51 m
These quantities include a margin of about 20% for gauge differences and swatching.
Tools:
– 4.0 mm (G-6) crochet hook
– Tapestry needle
– Scissors
– Stitch marker
– Rust-proof pins and a blocking mat
– Measuring tape
Abbreviations (US Terms)
- ch – chain
- sl st – slip stitch
- sc – single crochet
- hdc – half double crochet
- dc – double crochet
- sc2tog – single crochet 2 together
- st(s) – stitch(es)
- sp – space
- rnd – round
Special stitch: Petal. Work (hdc, 3 dc, hdc) all in the same stitch. The middle dc of the three is the petal tip.
Joining loop. Ch 2, sl st into the matching ch-5 loop of the neighboring motif, ch 2. This takes the place of one ch-5 loop.
Gauge and Checkpoints
Sc gauge: 16 sc × 16 rnds = 4 in × 4 in (10.2 cm × 10.2 cm). This controls the bands.
Motif gauge: One finished motif measures 3 in (7.6 cm) side to side, measured across the outer chain loops.
Make one complete motif before anything else, then check it at each stage:
- After Rnd 2: the yellow center is about 1¼ in (3.2 cm) across.
- After Rnd 3: the daisy is about 2½ in (6.4 cm) across from petal tip to petal tip.
- After Rnd 4: the motif is 3 in (7.6 cm) across when pinned out gently.
If your motif is too big: go down to a 3.75 mm hook, or pull the ch-5 loops a little tighter.
If your motif is too small: go up to a 4.5 mm hook.
Your motif can be up to 0.1 in (0.3 cm) off without causing trouble. Bigger differences add up over 4 motifs and change the circumference.
Daisy Motif (Make 16)
The motif has 4 rounds. Don’t turn at any point; work every round with the right side facing you.
Rnd 1 (yellow): Make a magic ring. Ch 1, then work 8 sc into the ring. Pull the ring closed and sl st to the first sc to join. (8 sc)
Rnd 2 (yellow): Ch 1, then 2 sc in each st around. Join with a sl st to the first sc. (16 sc) Fasten off and weave in the yellow tail on the wrong side.
Rnd 3 (cream): Join cream with a sl st in any sc. Work 1 Petal in the next st, then sl st in the next st. Repeat from * to * around. The last sl st lands in the same st as the joining sl st. (8 petals)
Each petal sits over 2 stitches of Rnd 2: the petal itself takes one stitch and the sl st anchors it in the next. So 16 stitches give exactly 8 petals.
Rnd 4 (cream, loop round): Sl st into the hdc and the first 2 dc of the next petal, so you’re at a petal tip. Ch 1 and sc in the same petal tip. Ch 5, then sc in the tip of the next petal. Repeat from * to * 6 more times. Finish with ch 5 and a sl st to the first sc. (8 sc + 8 ch-5 loops)
How the motif is oriented: Treat the 8 loops as 4 sides with 2 loops each. The sc between the 2 loops of a side is the side-middle, and the sc between 2 sides is a corner. Every side has exactly 2 loops, and you join motifs only through these loops.
For the first motif, fasten off at the end of Rnd 4. For every other motif, work Rnd 4 with joins as described in the next section.
Make All Pieces
- Daisy motifs: 16. Every one has a yellow center (Rnds 1–2) and cream petals and loops (Rnds 3–4).
- Strap: 1, in cream (see the Border section).
Layout grid (the tube opened out flat; column D wraps around and joins to column A):
        A    B    C    D
Row 1   [1]  [2]  [3]  [4]   ← top
Row 2   [5]  [6]  [7]  [8]
Row 3   [9]  [10] [11] [12]
Row 4   [13] [14] [15] [16]  ← bottom
Joining
Join the motifs as you go during Rnd 4. The rule is simple: one ch-5 loop on your working motif matches exactly one ch-5 loop on its neighbor. You never add extra chains or stitches at a seam.
- Motif 1: Complete it and fasten off.
- Motif 2: Work Rnd 4 until you reach the first side that will be shared. Replace each of that side’s 2 loops with a Joining Loop into the matching loops of Motif 1: the upper loop joins the upper loop, and the lower loop joins the lower loop. Finish the rest of the round normally.
- Motifs 3–4: Join each one to the motif on its left in the same way. Motif 4 also joins along its right side to the left side of Motif 1, which closes Row 1 into a ring. Before you join, check that the ring isn’t twisted.
- Rows 2–4: Join each motif to the one above it with 2 Joining Loops. Join it to the one on its left with 2 more. The last motif in each row also joins to the first motif of that row with 2 more.
Corners: Never join corner sc stitches. When four motifs meet, their four corners frame a small open diamond, which is the lacy gap you see between the flowers.
Tension: Keep the ch 2 on each side of the joining sl st the same size as your normal chains. If they’re tight, the seams pucker. If they’re loose, the tube sags.
Size checkpoint: The finished tube should be 12 in (30.5 cm) around (6 in / 15.2 cm flat) and 12 in (30.5 cm) tall. Check this before you start the bands.
Border: Top Band, Bottom Cuff and Strap
Border gauge: 16 sc = 4 in (10.2 cm), so 4 sc per inch, with 4 rnds per inch.
Why the math works: Each motif’s top side has 2 ch-5 loops. Work 6 sc into each loop, which gives 12 sc per motif. With 4 motifs around, that’s 4 × 12 = 48 sc. At 4 sc per inch, 48 sc is 12 in (30.5 cm), which matches the tube exactly. You skip the side-middle and corner sc stitches; they’re covered by the sc worked in the loops on either side. No stitches are added at the seams. The joined loop counts once, for the motif it belongs to on that edge.
Top Band (cream)
Rnd 1: Join cream in the first top loop of Motif 1. Ch 1. Work 6 sc in that loop, then 6 sc in the next top loop. Move to the next motif and repeat from * to * around all 4 motifs. Join with a sl st. (48 sc: 12 per motif × 4)
Rnds 2–4: Ch 1, sc in each st around, join. (48 sc)
Fasten off. The band is 1 in (2.5 cm) deep.
Bottom Cuff (cream)
Turn the tube upside down and work into the bottom loops of Motifs 13–16.
Rnd 1: Work exactly like Rnd 1 of the top band. (48 sc: 12 per motif × 4)
Rnd 2 (decrease round): Ch 1. Sc in each of the next 2 sts, then sc2tog over the next 2 sts. Repeat from * to * 12 times around, then join. (36 sts: 24 sc + 12 sc2tog)
This round turns 48 stitches into 36 by working them as 12 repeats of 4. Each repeat uses 4 stitches and makes 3.
Rnds 3–6: Ch 1, sc in each st around, join. (36 sc)
Fasten off. The cuff is 1½ in (3.8 cm) deep. The opening measures 9 in (22.9 cm) around, or 4½ in (11.4 cm) when flat. That’s snug enough to hold the bags in while letting you pull one out at a time.
Strap (cream)
Row 1: Ch 46. Sc in the 2nd ch from the hook and in each ch across. (45 sc)
Row 2: Ch 1, turn, and sc in each st across. (45 sc)
Fasten off and leave a 12 in (30.5 cm) tail. The strap is 11¼ in (28.6 cm) long and ½ in (1.3 cm) wide.
Attaching the strap: Place markers in stitch 1 and stitch 25 of the top band. These are exactly opposite each other, since 48 ÷ 2 = 24 stitches apart. Overlap each end of the strap 1 in (2.5 cm) onto the inside of the band at a marker and whipstitch it down firmly. That leaves a free loop of 9¼ in (23.5 cm).
Final Blocking
- Weave in all the ends along the wrong side of the stitches, following the yarn path.
- Wet the holder in cool water and gently squeeze out the extra water. Don’t wring it.
- Roll it in a towel and press to remove more water.
- Slide in a rolled towel or a cardboard tube 4 in (10.2 cm) across to fill out the shape.
- Pat each daisy round and open up the petals with your fingers.
- Check the measurements: 12 in (30.5 cm) around at the motif rows and 14½ in (36.8 cm) tall.
- Let it dry completely, standing upright.
Final Quality-Control Checklist
- [ ] There are 16 motifs, each with 8 petals and 8 ch-5 loops.
- [ ] Each shared side is joined with exactly 2 Joining Loops.
- [ ] The corners are unjoined and form open diamonds.
- [ ] The tube is not twisted.
- [ ] The top band has 48 sc in every round.
- [ ] Bottom cuff Rnd 1 has 48 sc, and Rnds 2–6 have 36 sts each.
- [ ] Each strap row has 45 sc, and the ends are sewn at stitches 1 and 25.
- [ ] Measurements: 14½ in (36.8 cm) tall and 6 in (15.2 cm) wide flat.
- [ ] All ends are woven in securely.
Troubleshooting
The petals cup or ruffle. Your Rnd 2 is probably short of 16 sc. Count it again, or use a hook half a size smaller for Rnd 3.
The motifs are lopsided. You may have joined a corner sc by mistake, or put the side’s 2 loops in the wrong order. Undo the join and line up the loops pair to pair.
The tube spirals. One row was joined one motif off. Compare it with the layout grid.
The top band ruffles. You worked more than 6 sc in a loop, or added stitches into the corners. Rnd 1 must be 48 sc.
The top band pulls in. Your sc gauge is too tight. Go up half a hook size for the band only.
Bags fall out of the bottom. Add a seventh round of 36 sc, or crochet the cuff more firmly.
Bags won’t come out. Leave out Rnd 2 of the cuff and work Rnds 3–6 with 48 sc each.
Care
Hand wash in cool water with mild soap, then reshape it and dry it flat or upright. Avoid the dryer, which can shrink cotton and shorten the strap.

Final Notes
Everything in this holder comes back to one measurement: a 3 in (7.6 cm) motif. Four of them around give a 12 in (30.5 cm) circumference. That matches 48 sc at 4 sc per inch, which is exactly 12 sc per motif edge. Four motifs tall give 12 in (30.5 cm). The 1 in (2.5 cm) top band and the 1½ in (3.8 cm) bottom cuff bring the total height to 14½ in (36.8 cm). Check your motif first and the rest of the numbers will line up.
Happy crocheting!