

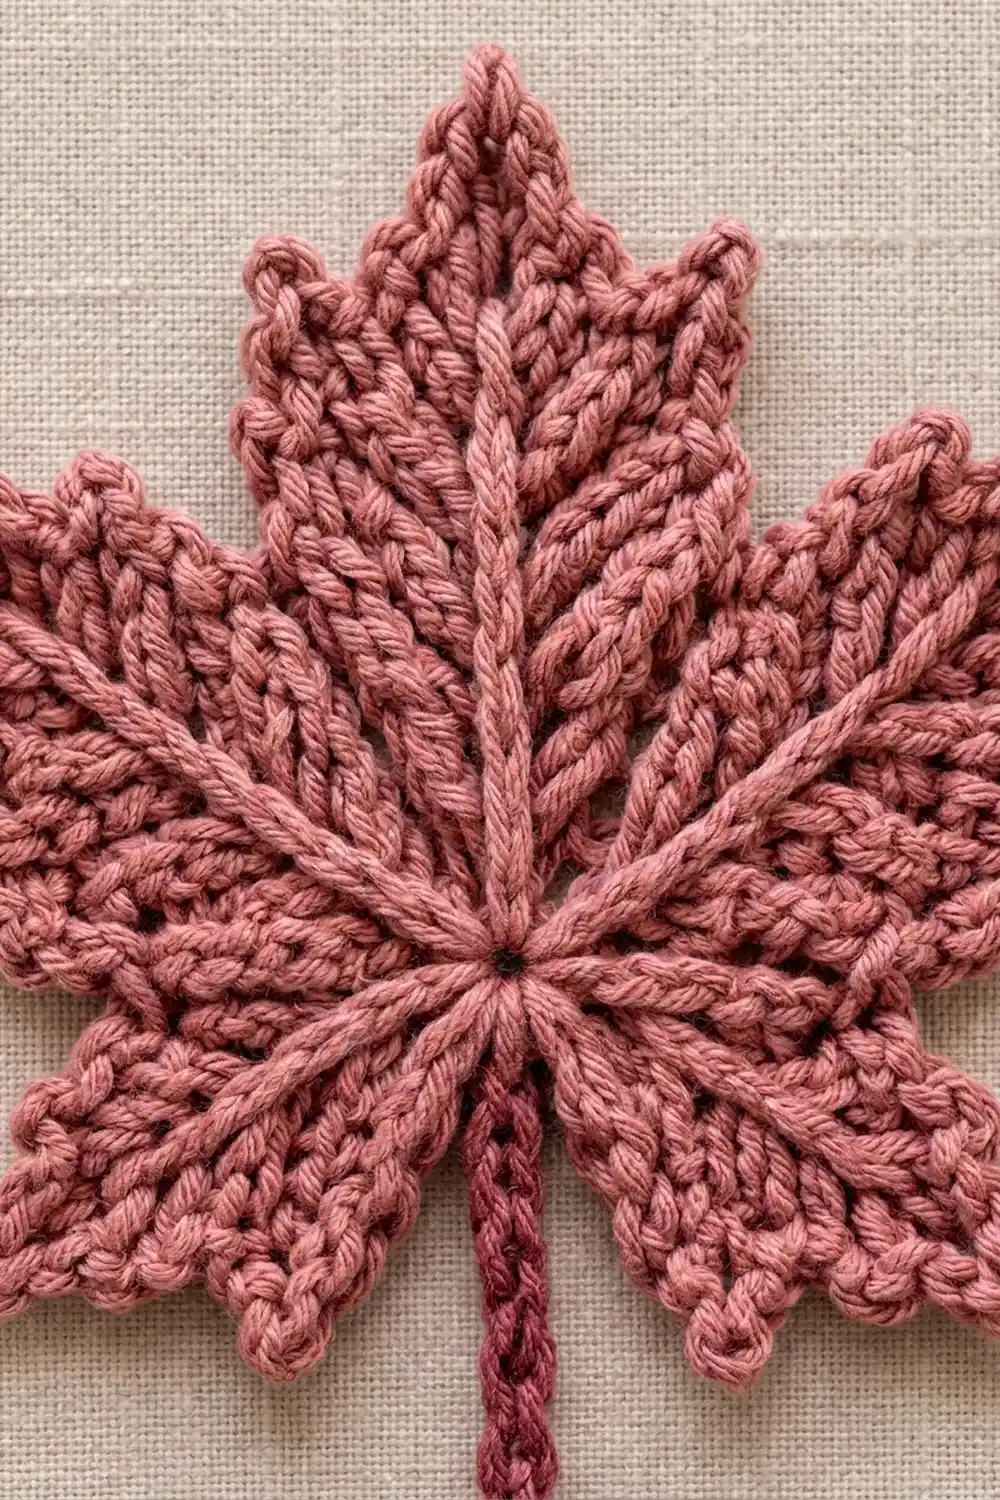
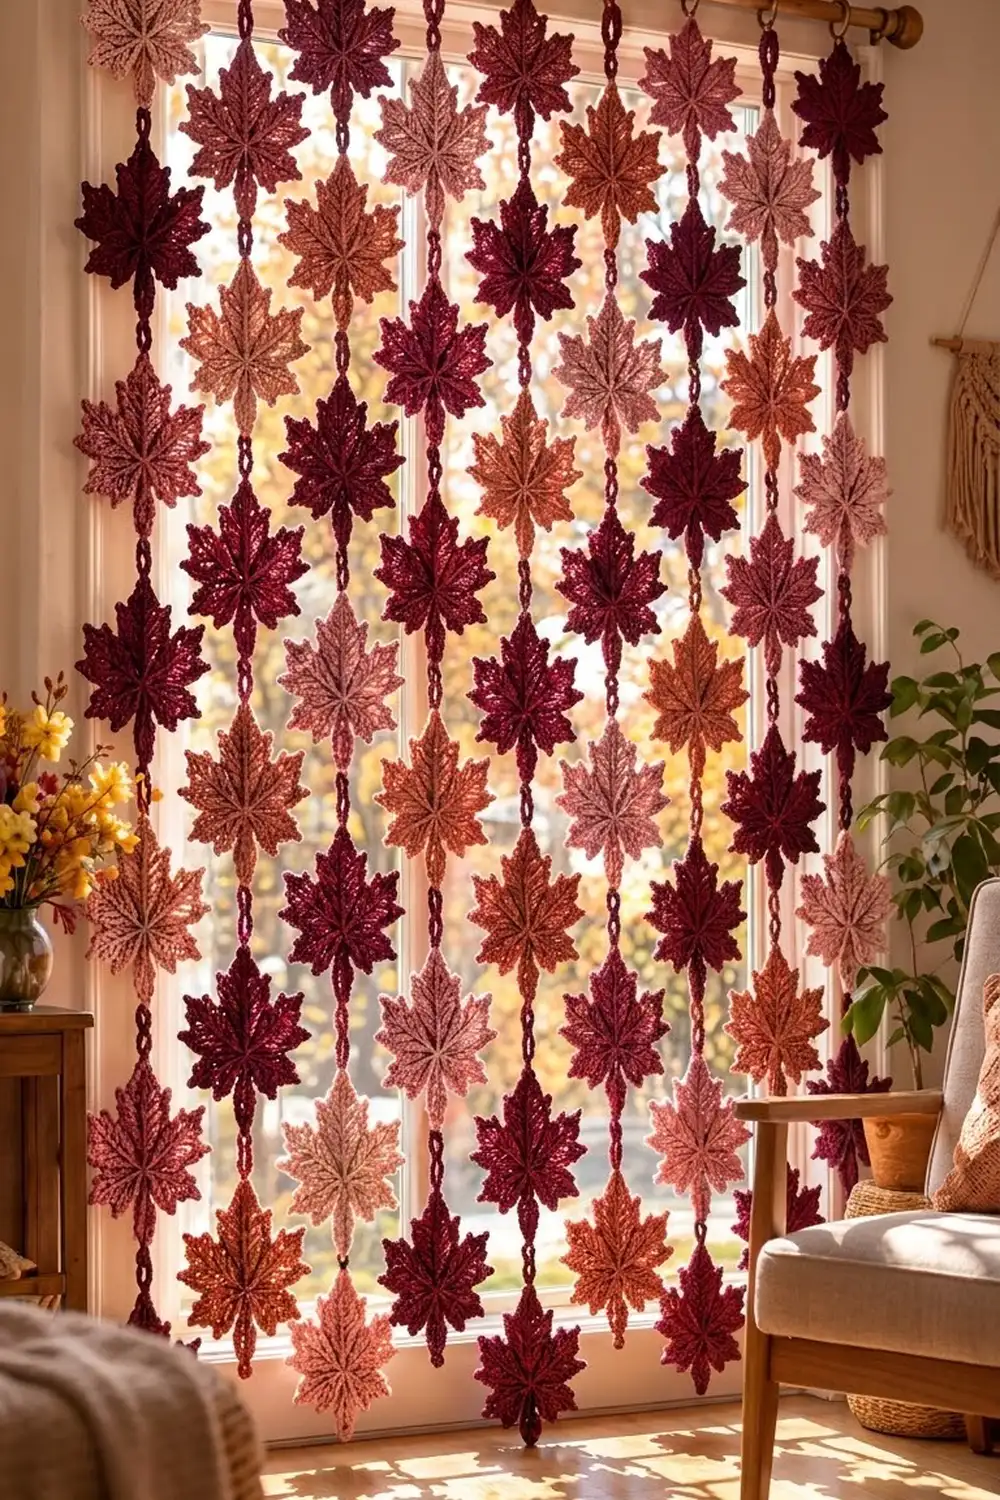
The Ember Maple Leaf Curtain is a hanging curtain made of many textured maple leaves. Each leaf has five pointed lobes, a small ring at the center, raised veins running out to each tip, and a tight serrated edge. Short corded stems connect the leaves into vertical strands, and each strand hangs from the rod on its own loop.
The palette uses four autumn colors: deep burgundy, dusty rose, pale blush pink, and warm terracotta. Hung in front of a sunny window, the solid leaves block the light and the gaps between them let it through, so you get leaf-shaped shadows on the floor.
This pattern uses US crochet terms. The finished curtain is 53.5 in (135.9 cm) wide and 64 in (162.6 cm) long, made of 9 strands with 10 leaves each, for 90 leaves in total. Each finished leaf is 5.5 in (14.0 cm) wide and 5 in (12.7 cm) tall.
Construction is simple. Each leaf is worked in the round from a magic ring. Rounds 1–3 make a flat circle, Round 4 shapes the five lobes, and a serrated border round finishes the edge. You then add the veins with surface slip stitch, join the leaves top to bottom with slip-stitched chain stems, and add a hanging loop to the top of each strand.
Finished Size and Construction
- Finished size: 53.5 in (135.9 cm) wide × 64 in (162.6 cm) long
- Skill level: Intermediate
- Terminology: US crochet terms
- Yarn weight: Worsted (#4), cotton or cotton blend
- Hook: 5.0 mm (H-8)
- Number of pieces: 90 leaves
- Layout: 9 vertical strands × 10 leaves, spaced 6 in (15.2 cm) apart, center to center
- Piece size (one leaf): 5.5 in (14.0 cm) wide × 5 in (12.7 cm) tall
- Size before border: 5 in (12.7 cm) wide × 4.5 in (11.4 cm) tall
- Border depth: 0.25 in (0.6 cm) on every edge
Materials
Use a smooth, plied worsted cotton or cotton blend with about 200 m per 100 g. Cotton keeps the points crisp and holds blocking well, so the leaves won’t curl as they hang. Acrylic works too, but the tips will be softer.
- Color B – Deep Burgundy: 400 g / 800 m (30 leaves, plus all hanging loops)
- Color R – Dusty Rose: 260 g / 520 m (20 leaves)
- Color P – Blush Pink: 260 g / 520 m (20 leaves)
- Color T – Terracotta: 260 g / 520 m (20 leaves)
One leaf, including its border, veins, and connector stem, uses about 11 g / 22 m. These quantities include a margin of about 15% for gauge swatches and tails.
Tools:
- 5.0 mm (H-8) crochet hook
- Tapestry needle
- Stitch markers (at least 5)
- Rust-proof pins and a blocking mat
- Spray bottle
- Measuring tape
- Curtain rod at least 60 in (152.4 cm) long, up to 1.25 in (3.2 cm) in diameter
Abbreviations (US Terms)
- ch – chain
- sl st – slip stitch
- sc – single crochet
- hdc – half double crochet
- dc – double crochet
- tr – treble crochet
- dtr – double treble crochet (yarn over 3 times, then work off loops in pairs)
- sp – space
- st(s) – stitch(es)
- rnd – round
- RS / WS – right side / wrong side
Special stitches
- Picot: ch 3, sl st in the 3rd ch from hook.
- Surface sl st: hold the working yarn behind the leaf. Insert the hook from front to back between stitches, pull up a loop, and draw it through the loop on your hook.
Gauge and Checkpoints
Make one complete leaf before you start the full set. With the 5.0 mm hook, your leaf should match these checkpoints:
- After Rnd 1: 1.25 in (3.2 cm) diameter
- After Rnd 2: 2.25 in (5.7 cm) diameter
- After Rnd 3: 3 in (7.6 cm) diameter, lying flat
- After Rnd 4: 5 in (12.7 cm) wide × 4.5 in (11.4 cm) tall
- After Rnd 5 (border), blocked: 5.5 in (14.0 cm) wide × 5 in (12.7 cm) tall
- Chain gauge: 12 ch = 2 in (5.1 cm)
If the leaf is more than 0.25 in (0.6 cm) too big, go down a hook size. If it is too small, go up a hook size. If the Rnd 3 circle ruffles or cups, fix your tension rather than the stitch count. Ruffling means your dc are too short, and cupping means your increases are too tight. Check your chain gauge as well, because it sets the spacing between the leaves.
Leaf Pattern
Rounds 1–3: Center Circle
Rnd 1: Make a magic ring. Ch 3 (counts as dc), 14 dc in the ring, sl st to the top of the beginning ch-3. Pull the ring closed. (15 dc)
Rnd 2: Ch 3 (counts as dc), dc in the same st, 2 dc in each st around, sl st to the top of the beginning ch-3. (30 dc)
Rnd 3: Ch 3 (counts as dc), 2 dc in the next st, dc in the next st, 2 dc in the next st; repeat from * around, sl st to the top of the beginning ch-3. (45 dc)*
Divide the round into 5 sections of 9 sts each, with the joining st as st 1 of Section 1. Put a marker in st 1 of each section.
Round 4: Lobes
Round 4 turns the circle into five pointed lobes. The stitches rise from a slip stitch at each valley to a tall point in the middle of each section. The two lower lobes use shorter stitches, which makes them smaller, as on a real maple leaf.
Large lobe (worked over 9 sts): sl st in the 1st st, sc in the next, hdc in the next, dc in the next, (tr, dtr, ch 3, dtr, tr) in the next, dc in the next, hdc in the next, sc in the next, sl st in the next.
Small lobe (worked over 9 sts): sl st in the 1st st, sc in each of the next 2 sts, hdc in the next, (dc, tr, ch 3, tr, dc) in the next, hdc in the next, sc in each of the next 2 sts, sl st in the next.
Rnd 4: Don’t chain. Starting in the same st as the join, work: Small lobe (Section 1), Large lobe (Section 2), Large lobe (Section 3, the top lobe), Large lobe (Section 4), Small lobe (Section 5). Sl st in the first sl st of the round. The joining sl st doesn’t count as a stitch.
Count: 45 sts worked 1 per st + 15 extra sts (3 extra at each of the 5 points) = 60 sts and 5 ch-3 sps. That’s 12 sts and 1 ch-3 sp per lobe.
The two sl sts between neighboring lobes make a deep valley. The valley between Sections 5 and 1 is the stem valley.
Before going on, work the border (Rnd 5, below) on this leaf. Every leaf gets its border before it is joined.
Veins
Use a 20 in (50.8 cm) length of the same color. Starting in the magic ring, work surface sl sts in a straight line toward the ch-3 tip of one lobe: 3 sl sts across each of Rnds 1–3 and 3 sl sts up the center of Rnd 4. That’s 12 sl sts per vein. Fasten off on the WS, then repeat for all 5 lobes. Keep the vein loops the same size as the stitches underneath so the leaf stays flat.
Make All Pieces
Make 90 leaves, each with Rnds 1–5 and 5 veins:
- Color B (Burgundy): 30 leaves
- Color R (Dusty Rose): 20 leaves
- Color P (Blush Pink): 20 leaves
- Color T (Terracotta): 20 leaves
Fasten off each leaf after the border and weave in the ends. You’ll join new yarn for the stems later. Each row is a shifted copy of the same 9-leaf sequence, so no two neighbors in a row share a color.
Layout grid (columns = strands 1–9, rows = leaf position from top):
Row 1:  B R P B T R B P T
Row 2:  P B T R B P T B R
Row 3:  T R B P T B R P B
Row 4:  B P T B R P B T R
Row 5:  T B R P B T R B P
Row 6:  R P B T R B P T B
Row 7:  B T R B P T B R P
Row 8:  R B P T B R P B T
Row 9:  P T B R P B T R B
Row 10: B R P B T R B P T
Each row has 3 B, 2 R, 2 P, and 2 T. Over 10 rows, that gives 30 B, 20 R, 20 P, and 20 T.
Joining
The leaves are joined into strands with corded connector stems. Each stem runs from the stem valley of one leaf to the top-lobe tip picot of the leaf below it. Build each strand from the top down, following one column of the grid.
Connector stem (on every leaf in Rows 1–9): Join the upper leaf’s color with a sl st in its stem valley, then ch 12. With the RS of the next leaf facing, sl st into its top-lobe tip picot. Then sl st into the back bump of each of the 12 ch, working back up to the upper leaf, and sl st in the stem valley. Fasten off and weave in the end. (12 ch + 12 sl sts)
That’s exactly one stitch back for every chain, so the cord stays the same length as the chain: 2 in (5.1 cm). Don’t twist the chain. Both leaves should face RS forward.
Bottom stem (Row 10 leaves only): Join the leaf’s color in the stem valley, ch 13, sl st in the 2nd ch from the hook and in each ch back to the leaf, then sl st in the stem valley. (12 sl sts) This makes a free 2 in (5.1 cm) stem.
Hanging loop (top of each strand, Color B): Join B in the top-lobe tip picot of the Row 1 leaf. Ch 48, then sl st in the same tip picot to form a ring. Sl st in the back bump of each of the 48 ch, then sl st in the tip picot. Fasten off. (48 ch + 48 sl sts) The loop measures 8 in (20.3 cm) around and hangs 4 in (10.2 cm) deep over the rod.
Tension: Keep the slip stitches on the cord as loose as the chains. Tight slip stitches will shorten the stems and pucker the tips. Lay each connector flat next to a ruler as you go.
Size checkpoint: Each repeat, from one top tip to the next, is the leaf’s tip-to-valley height of 4 in (10.2 cm) plus the 2 in (5.1 cm) stem, for a total of 6 in (15.2 cm). One strand measures 4 in (10.2 cm) of loop + 9 repeats × 6 in (15.2 cm) + the last leaf’s 4 in (10.2 cm) to the stem valley + 2 in (5.1 cm) of bottom stem. That’s 64 in (162.6 cm) in all. The lobes of the bottom leaf end 1 in (2.5 cm) above the end of the stem.
Hanging: Slide the 9 loops onto the rod in grid order. Space them 6 in (15.2 cm) apart, center to center: 8 gaps × 6 in (15.2 cm) + one 5.5 in (14.0 cm) leaf width = 53.5 in (135.9 cm).
Border: Serrated Leaf Edge (Rnd 5)
Each leaf gets the border right after Rnd 4. The curtain doesn’t get an outer border, because the strands hang freely. This round is the finishing edge on all 90 leaves.
Border gauge: 7 sc + 2 picots along one lobe side = 1.75 in (4.4 cm). The border adds 0.25 in (0.6 cm) all around.
Per lobe (worked into the 12 sts and ch-3 sp of Rnd 4):
sl st in the sl st; sc in the next st; (sc, picot) in the next st; sc in the next st; (sc, picot) in the next st; 2 sc in the next st (the dtr, or the tr on a small lobe); (sc, picot, sc) in the ch-3 sp; 2 sc in the next st; (sc, picot) in the next st; sc in the next st; (sc, picot) in the next st; sc in the next st; sl st in the sl st.
Rnd 5: Starting in the first sl st of Rnd 4, work the per-lobe sequence 5 times. Sl st in the first sl st to join. You’ll end at the stem valley.
Counts per lobe: 14 sc + 2 sl sts + 5 picots.
- Each lobe side: 1 sl st + 7 sc + 2 picots, plus the shared tip picot.
- Round total: 60 sts worked 1 per st + 20 extra sc (1 extra in each of the 2 tallest sts, plus 2 in the tip sp, on each of the 5 lobes) = 80 sts (70 sc + 10 sl sts) and 25 picots.
Why the math works: On each side, the tall stitches beside the tip make the longest stretch of edge, so each gets 2 sc to cover it without cupping. Every shorter stitch gets 1 sc. The tip sp gets a sc on each side of the picot, which gives a sharp point, and the sl sts at the valleys keep the notches deep. Picots on every other stitch make the toothed maple edge without adding width.
Final Blocking
- Weave in all ends before blocking. Work each end through 1–2 in (2.5–5.1 cm) of matching stitches.
- Spray each leaf until it is evenly damp. Don’t soak it.
- Pin the leaf RS up to 5.5 in (14.0 cm) wide × 5 in (12.7 cm) tall. Put one pin in the center ring and one pin in every tip picot.
- Pin each valley in toward the center so the notches look sharp.
- Pin the two picots on each lobe side out slightly to bring out the teeth.
- Lay each connector stem straight and pin it at 2 in (5.1 cm).
- Let everything dry completely. Block one strand at a time, laid flat on a large surface or on the floor over towels.
Final Quality-Control Checklist
- Every leaf has 5 lobes: 3 large and 2 small, with the small lobes on either side of the stem.
- Rnd 4 has 60 sts and 5 ch-3 sps. Rnd 5 has 80 sts and 25 picots.
- All 5 veins run straight from the center ring to each tip.
- Each leaf measures 5.5 in (14.0 cm) × 5 in (12.7 cm).
- Every connector is 2 in (5.1 cm), with no twists.
- Colors match the layout grid.
- Each strand measures 64 in (162.6 cm).
- All 9 hanging loops are the same size and slide easily onto the rod.
Troubleshooting
The circle ruffles after Rnd 3: You may have extra stitches, so recount to 45. If the count is right, your dc are too short; pull up a slightly taller loop.
The center cups: Work the increases a little looser, or go up a hook size for Rnds 1–3 only.
The lobes are uneven: Check that each section has exactly 9 sts before you start Rnd 4. Use markers.
The tips are rounded, not sharp: Pin the tip picot firmly while blocking, and make sure the ch-3 sp got (sc, picot, sc).
The edge waves: Your border is too loose. Go down half a hook size for Rnd 5 only.
The strands are different lengths: Measure every connector. A stem with tight slip stitches can come up 0.5 in (1.3 cm) short. Redo it at the correct tension.
The leaves twist as they hang: Re-block them and check that every connector was joined with both leaves facing RS forward.
Care
Hand wash in cool water with mild soap, press out the water in a towel, and dry flat with the leaves pinned to shape. Between washes, shake the strands gently or dust them with a soft brush.
Final Notes
Everything in this pattern follows one chain of measurements. Rnds 1–3 make a 3 in (7.6 cm) circle, and Rnd 4 builds it into a 5 in (12.7 cm) × 4.5 in (11.4 cm) leaf. The border brings it to 5.5 in (14.0 cm) × 5 in (12.7 cm). Each 2 in (5.1 cm) stem sets a 6 in (15.2 cm) repeat. Ten leaves plus the hanging loop and bottom stem make a 64 in (162.6 cm) strand, and 9 strands spaced 6 in (15.2 cm) apart make a curtain 53.5 in (135.9 cm) wide. Check each link in that chain as you go, and the finished curtain will hang evenly.
Happy crocheting!