

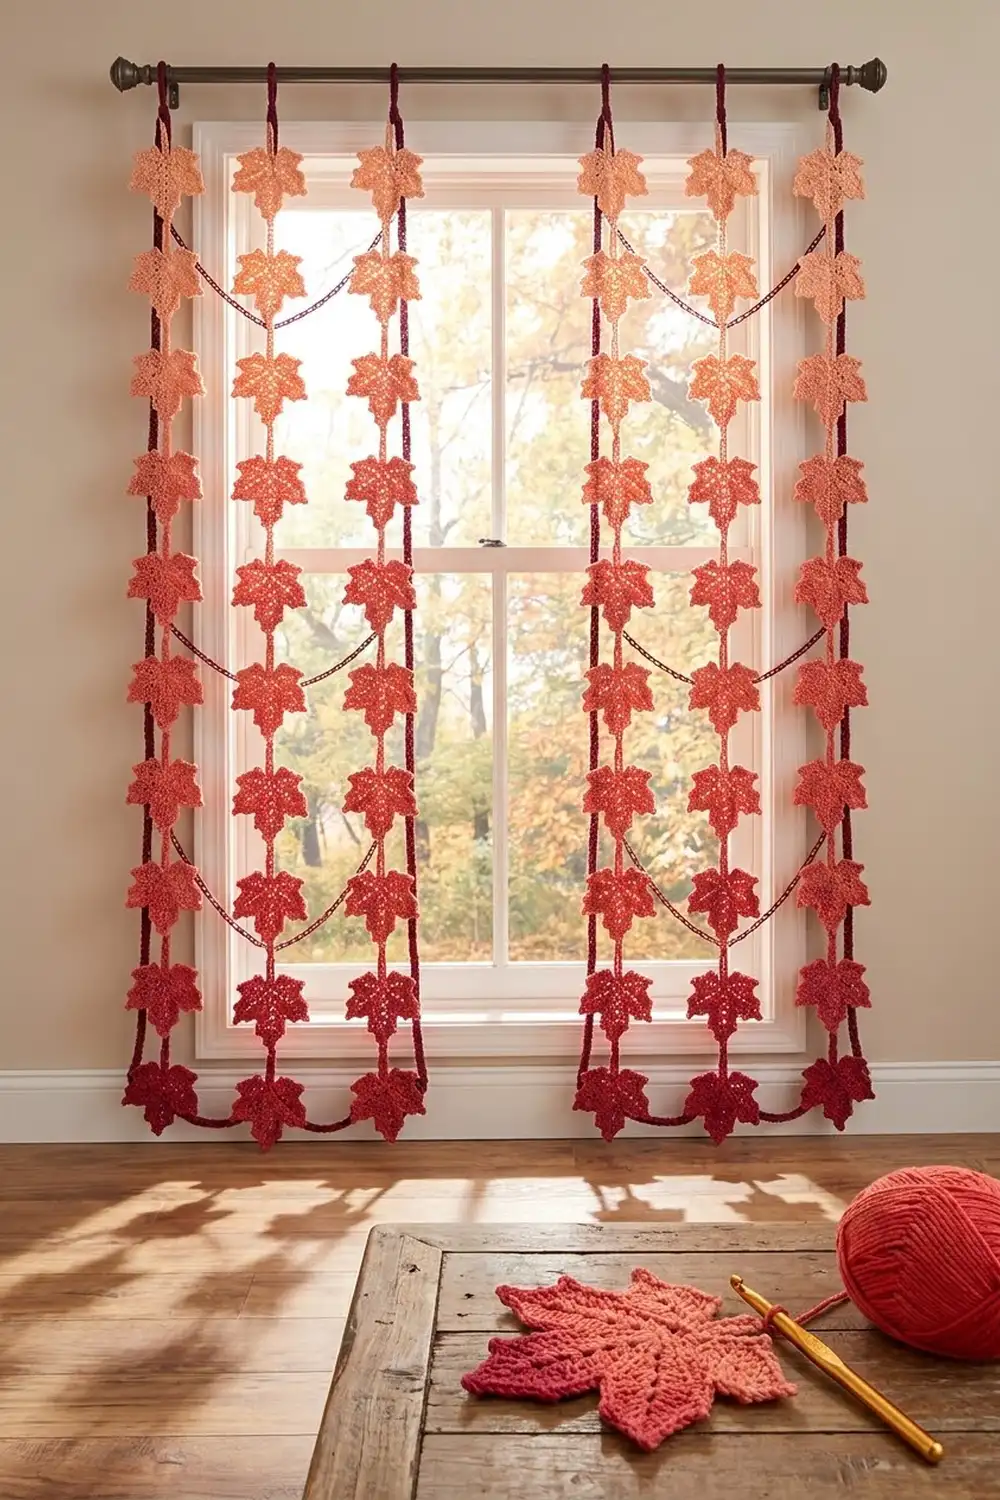
Autumn Ember is a pair of lacy curtain panels made from dozens of five-pointed maple leaves. Each leaf fades from soft peach at the center through coral and red to a deep crimson picot edge, so the curtain glows like late-October foliage when light comes through the window.
The leaves hang from dark burgundy slip-stitch cords that run from a solid header to the floor. Short burgundy chain ties angle from the leaf tips to the neighboring cord. They hold every leaf in place and form a light diagonal lattice.
This pattern uses US crochet terms. Each panel measures 22.25 in (56.5 cm) wide and 88.5 in (224.8 cm) long, from the top of the header to the end of the cords, plus the hanging tabs. Each leaf is 5 in (12.7 cm) from tip to tip.
Construction is modular. You crochet 84 identical leaves in the round, changing color every round. Then you make two headers with tabs, chain the cords down from each header while joining the leaves as you go, and finish with the lattice ties.
Finished Size and Construction
- Finished panel size: 22.25 in (56.5 cm) wide x 88.5 in (224.8 cm) long, plus 3 in (7.6 cm) tab loops
- Skill level: Intermediate
- Terminology: US
- Yarn weight: DK (weight 3) cotton or cotton blend
- Hook: 4.0 mm (G-6)
- Number of pieces: 84 leaves and 2 headers; the 6 cords are crocheted in place
- Layout: each panel has 3 cords, 6 in (15.2 cm) apart, with 14 leaves per cord (42 leaves per panel)
- Leaf size: 5 in (12.7 cm) tip to tip, plus a 1 in (2.5 cm) stem
- Header size before edging: 21.75 in x 2 in (55.2 cm x 5.1 cm)
- Edging depth: 0.25 in (0.6 cm) per edge, for a header of 22.25 in x 2.5 in (56.5 cm x 6.4 cm)
Materials
Use a smooth, mercerized DK cotton. It shows the picots and lace clearly, holds its shape when hung, and doesn’t stretch much under the weight of the leaves. Amounts assume about 224 m per 100 g.
- Color A, light peach: 100 g (224 m)
- Color B, coral: 150 g (336 m)
- Color C, red: 200 g (448 m)
- Color D, deep crimson: 200 g (448 m)
- Color E, dark burgundy: 200 g (448 m)
Tools: 4.0 mm (G-6) hook, tapestry needle, scissors, stitch markers, blocking mats, rust-proof pins, spray bottle, measuring tape.
These quantities include a margin of about 15–25% for swatches, tails, and differences in tension.
Abbreviations (US Terms)
- ch – chain
- sl st – slip stitch
- sc – single crochet
- hdc – half double crochet
- dc – double crochet
- tr – treble crochet
- sc2tog – single crochet 2 together
- sk – skip
- sp – space
- st(s) – stitch(es)
- RS – right side
Picot: ch 3, sl st in the 3rd ch from the hook. Picots don’t count as stitches.
V-st: (dc, ch 1, dc) in the same space.
Drop-loop join: take the hook out of the working loop, insert it from front to back through the target stitch, pick up the dropped loop, and pull it through. This adds no stitch.
Gauge and Checkpoints
- Single crochet: 16 sc and 18 rows = 4 in (10.2 cm)
- Cord: 20 ch, slip-stitched back = 4 in (10.2 cm), which is 5 sts per inch
Make one complete leaf first, and measure it after each of these rounds:
- After Rnd 2: 2 in (5.1 cm) tip to tip
- After Rnd 3: 3.25 in (8.3 cm)
- After Rnd 4: 4.5 in (11.4 cm)
- After Rnd 5, lightly blocked: 5 in (12.7 cm)
If the leaf comes out larger than 5.25 in (13.3 cm), go down to a 3.75 mm hook. If it’s smaller than 4.75 in (12.1 cm), go up to a 4.5 mm hook. The lattice ties are sized for 5 in leaves on cords 6 in (15.2 cm) apart, so match this gauge closely.
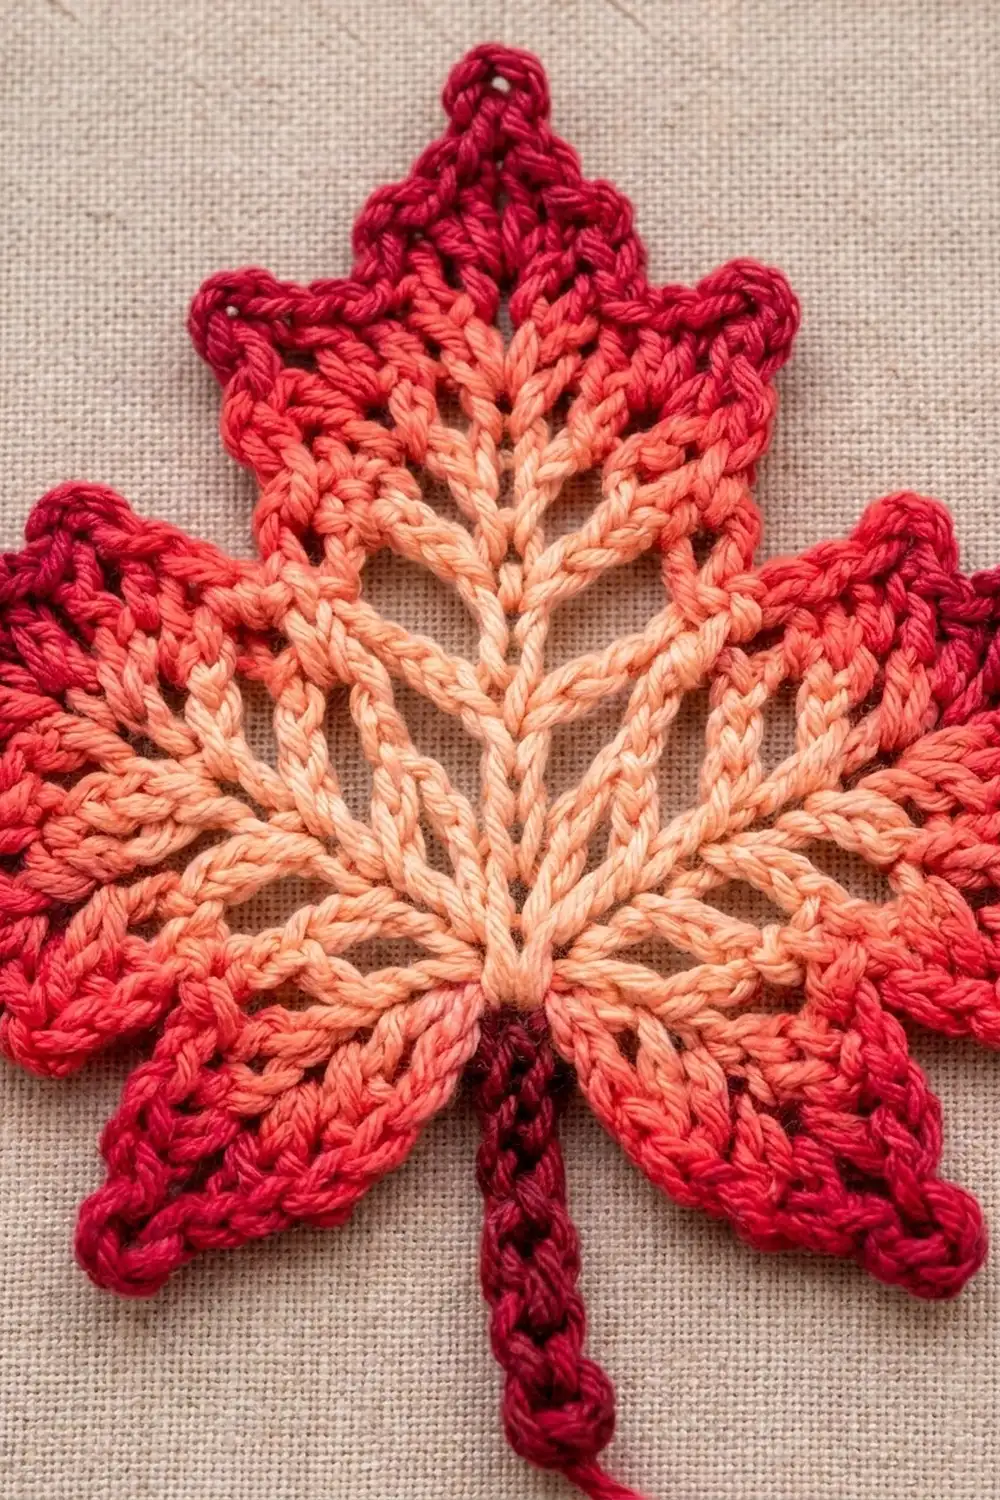
Maple Leaf (make 84)
The leaf has five lobes. Lobes 1 and 5 are the short lower lobes, Lobe 3 is the tall top lobe, and the stem grows from the notch between Lobes 5 and 1. Every round starts at that notch.
Rnd 1 (A): Magic ring, ch 3 (counts as dc), 14 dc in ring, sl st to top of ch-3. (15 dc)
Each lobe is built on a group of 3 dc. Mark the top of the ch-3 as the stem notch.
Rnd 2 (A): Ch 1, sc in same st as join, (dc, ch 1, dc, ch 3, dc, ch 1, dc) in next dc, sc in next dc; sc in next dc, (dc, ch 1, dc, ch 3, dc, ch 1, dc) in next dc, sc in next dc; rep from * 3 more times, sl st to first sc. Fasten off.
(30 sts: 10 sc, 20 dc; 10 ch-1 sps, 5 ch-3 tip sps)*
Rnd 3 (B): Pull up a loop of B in the last sc of Lobe 5, ch 1, then sc2tog over that sc and the first sc of Lobe 1. Ch 1, sk dc, V-st in ch-1 sp, ch 1, sk dc, (2 dc, ch 3, 2 dc) in ch-3 sp, ch 1, sk dc, V-st in ch-1 sp, ch 1, sk dc, sc2tog over next 2 sc; rep from * 4 more times, but on the last repeat skip the final sc2tog and sl st to the first sc2tog instead. Fasten off.
(45 sts: 5 sc2tog, 40 dc; 30 ch-1 sps, 5 ch-3 sps; 9 sts per lobe)*
The ch-1 spaces create the open, lacy center. The stacked tip spaces and V-sts line up to form the radiating veins.
Rnd 4 (C): Join C with a standing sc in the sc2tog at the stem notch. Hdc in ch-1 sp, dc in dc, dc in ch-1 sp, dc in dc, dc in ch-1 sp, dc in next 2 dc, (2 dc, ch 3, 2 dc) in ch-3 sp, dc in next 2 dc, dc in ch-1 sp, dc in dc, dc in ch-1 sp, dc in dc, hdc in ch-1 sp, sc in next sc2tog; rep from * 4 more times, ending the last repeat at , sl st to first sc. Fasten off.
(95 sts: 19 per lobe = 1 sc + 2 hdc + 12 side dc + 4 tip dc; 5 ch-3 sps)*
Maple shaping: On Lobes 1 and 5, work the 12 side dc as hdc instead, and keep the tip as (2 dc, ch 3, 2 dc). On Lobe 3, work the tip as (2 tr, ch 3, 2 tr). The stitch counts don’t change, but the lower lobes come out shorter and the top lobe taller.
Rnd 5 (D): Join D with a sl st in the sc at the stem notch. Sc in hdc, [sc in next 2 sts, picot] 3 times, sc in next 2 sts, (hdc, dc, picot, dc, hdc) in ch-3 sp, sc in next 2 sts, [picot, sc in next 2 sts] 3 times, sc in hdc, sl st in next sc (notch); rep from * 4 more times, working the final sl st into the first sl st.
(115 sts and 35 picots: 23 sts and 7 picots per lobe, counting each notch sl st with the lobe before it)*
The sl st notches make deep, sharp valleys between the lobes, and the picots give the crimson edge its beaded texture.
Stem (D): Don’t fasten off. Ch 7, sl st in 2nd ch from hook and in next 5 ch, then sl st in the notch. (6 sl sts, about 1 in / 2.5 cm long) Fasten off and weave in all ends.
Spray-block each leaf to 5 in (12.7 cm), pinning out every lobe tip.
Make All Pieces
Each leaf uses A for Rnds 1–2, B for Rnd 3, C for Rnd 4, and D for Rnd 5 and the stem.
- Leaves: 42 per panel, 84 total
- Headers (E): 1 per panel, 2 total
- Cords and lattice ties (E): made during joining
Each cord has 14 join points, 6 in (15.2 cm) apart. At the odd-numbered joins the leaf hangs on the left of the cord, and at the even-numbered joins it hangs on the right. All three cords follow the same sequence, so in every gap between cords the leaves alternate from one cord to the other. Here is the layout per panel, measured down from the header:
Depth    Out-L | C1 | Gap 1-2 | C2 | Gap 2-3 | C3 | Out-R
 6 in     C1-L |    |  C2-L   |    |  C3-L   |    |   .
12 in       .  |    |  C1-R   |    |  C2-R   |    |  C3-R
18 in     C1-L |    |  C2-L   |    |  C3-L   |    |   .
24 in       .  |    |  C1-R   |    |  C2-R   |    |  C3-R
...  repeat to the 14th join at 84 in
Joining: Cords and Lattice
The header has to be made first, because the cords hang from it. Work the next section, then come back here.
Cords (3 per panel): Join E with a sl st in bottom-edge st 20 of the header. Ch 30, then drop-loop join the stem tip of Leaf 1, placed on the left of the cord with RS facing. Ch 30, drop-loop join the next leaf on the opposite side; rep from * until all 14 leaves are joined. Ch 10.
(430 ch: 30 + 13 x 30 + 10)*
Turn. Sl st in the back bump of the 2nd ch from hook and in each ch back up (429 sl sts), then sl st into the header stitch. The cord is 86 in (218.4 cm) long, with joins at 6 in, 12 in, and every 6 in after that, the last one at 84 in (213.4 cm). Repeat for the other two cords at sts 44 and 68.
Keep the chains relaxed and even. As you go, check that each 30-chain section measures 6 in (15.2 cm).
Lattice ties (28 per panel): Only the leaves in the inner gaps get ties: C1-R, C2-L, C2-R, and C3-L. For each one, join E with a sl st in the Lobe 3 tip picot, ch 18 (3.6 in / 9.1 cm), and sl st into the neighboring cord at the join point 6 in (15.2 cm) above this leaf’s own join. For leaves at the 6 in depth, there’s no join point above, so sl st into the neighboring cord’s header stitch instead. Fasten off.
Size checkpoint: Lay the panel flat. The outer cords should be 12 in (30.5 cm) apart, no leaves should overlap, and every tie should lie straight without pulling a lobe out of shape.
Border: Header and Hanging Tabs
Header gauge: 4 sc and 4.5 rows per inch.
Row 1 (E): Ch 88, sc in 2nd ch from hook and in each ch across, turn. (87 sc)
Rows 2–9: Ch 1, sc in each st across, turn. (87 sc) The header now measures 21.75 in x 2 in (55.2 cm x 5.1 cm).
Edging Rnd: Ch 1. Work 87 sc across the top (1 per st), ch 1 at the corner, 9 sc down the side (1 per row-end), ch 1, 87 sc along the bottom (1 per foundation ch), ch 1, 9 sc up the other side, ch 1, sl st to first sc.
(192 sc = 87 + 9 + 87 + 9; the 4 corner ch-1 sps are not counted as stitches)
The header now measures 22.25 in x 2.5 in (56.5 cm x 6.4 cm).
Tabs (make 6): Working in rows of sc on the top edge, make a tab over each of these 7-st groups: sts 1–7, 17–23, 33–39, 49–55, 65–71, and 81–87. Work each tab for 27 rows, or 6 in (15.2 cm). Fold each tab to the back and whipstitch it down. This makes a 3 in (7.6 cm) loop that fits a rod up to 1.5 in (3.8 cm) in diameter.
Why the math works:
- Tab spacing: 6 tabs x 7 sts = 42 sts, and 5 gaps x 9 sts = 45 sts. Together that’s exactly 87.
- Cord spacing: The cords hang from bottom sts 20, 44, and 68, which puts them 24 sts apart. At 4 sts per inch, that’s exactly 6 in (15.2 cm).
- Outer margins: That leaves 19 sts (4.75 in / 12.1 cm) beyond each outer cord, which is about how far a 5 in leaf reaches out from its cord.
Final Blocking
- Weave in any remaining tails along the cords or under the picots.
- Lay the panel face up on mats or on a clean sheet.
- Mist it evenly until damp.
- Pin the header square at 22.25 in (56.5 cm) wide.
- Straighten the cords so they are 6 in (15.2 cm) apart.
- Pin the leaf tips open and the ties straight.
- Let it dry completely, then hang it for a day so the cords settle.
Final Quality-Control Checklist
- Every leaf measures 5 in (12.7 cm) and has 35 picots.
- The lower lobes are short and the top lobe is tall on every leaf.
- Each cord has 430 chains and 14 leaves alternating left and right.
- Each header has 87 sts across and 6 tabs in the correct positions.
- Each panel has all 28 ties, attached at the correct heights.
- The two panels match in length within 0.5 in (1.3 cm).
Troubleshooting
- Leaf cups: Rnd 4 is too tight. Work that round with a hook 0.25 mm larger.
- Leaf ruffles: The picots are too loose. Chain them more snugly.
- Lobes look rounded: Make sure each tip is worked into the ch-3 space, not into the stitches next to it.
- Cords are uneven: Recount the 30-chain sections, and re-block the cords while they hang.
- Leaves twist: Rejoin any leaf that was attached with the wrong side facing.
- Header ripples: Keep the same hook and an even tension for the edging.
Care
Hand wash in cool water with mild soap, roll in a towel to press out the water, and dry flat. Don’t hang the panels while they’re wet, because the weight will stretch the cords.
Final Notes
Every measurement builds on the one before it. Each 5 in (12.7 cm) leaf rides on a cord with joins every 6 in (15.2 cm). The cords hang 6 in (15.2 cm) apart from a header that is 87 sts wide and edged out to 22.25 in (56.5 cm). Get the first leaf to gauge and check every 30-chain section, and the panel will fall into place.
Happy crocheting!