

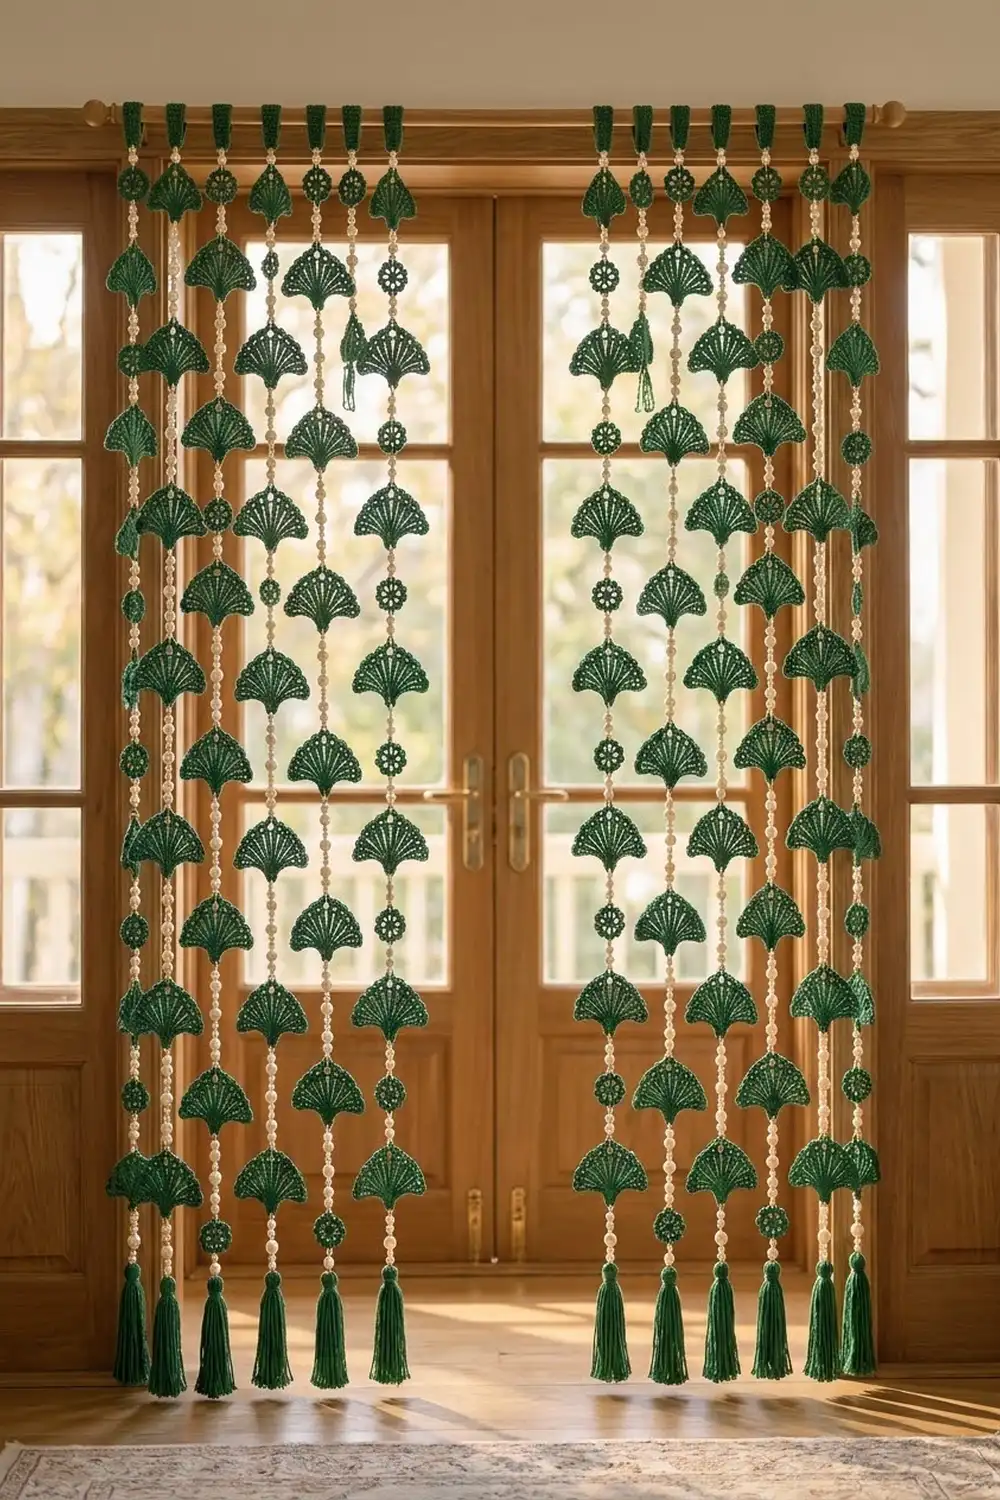
This beaded door curtain hangs in soft, staggered columns of emerald-green ginkgo fans and small round flowers, with pairs of ivory pearls between them. Each strand ends in a full green tassel at the bottom and hangs from a folded tab at the top.
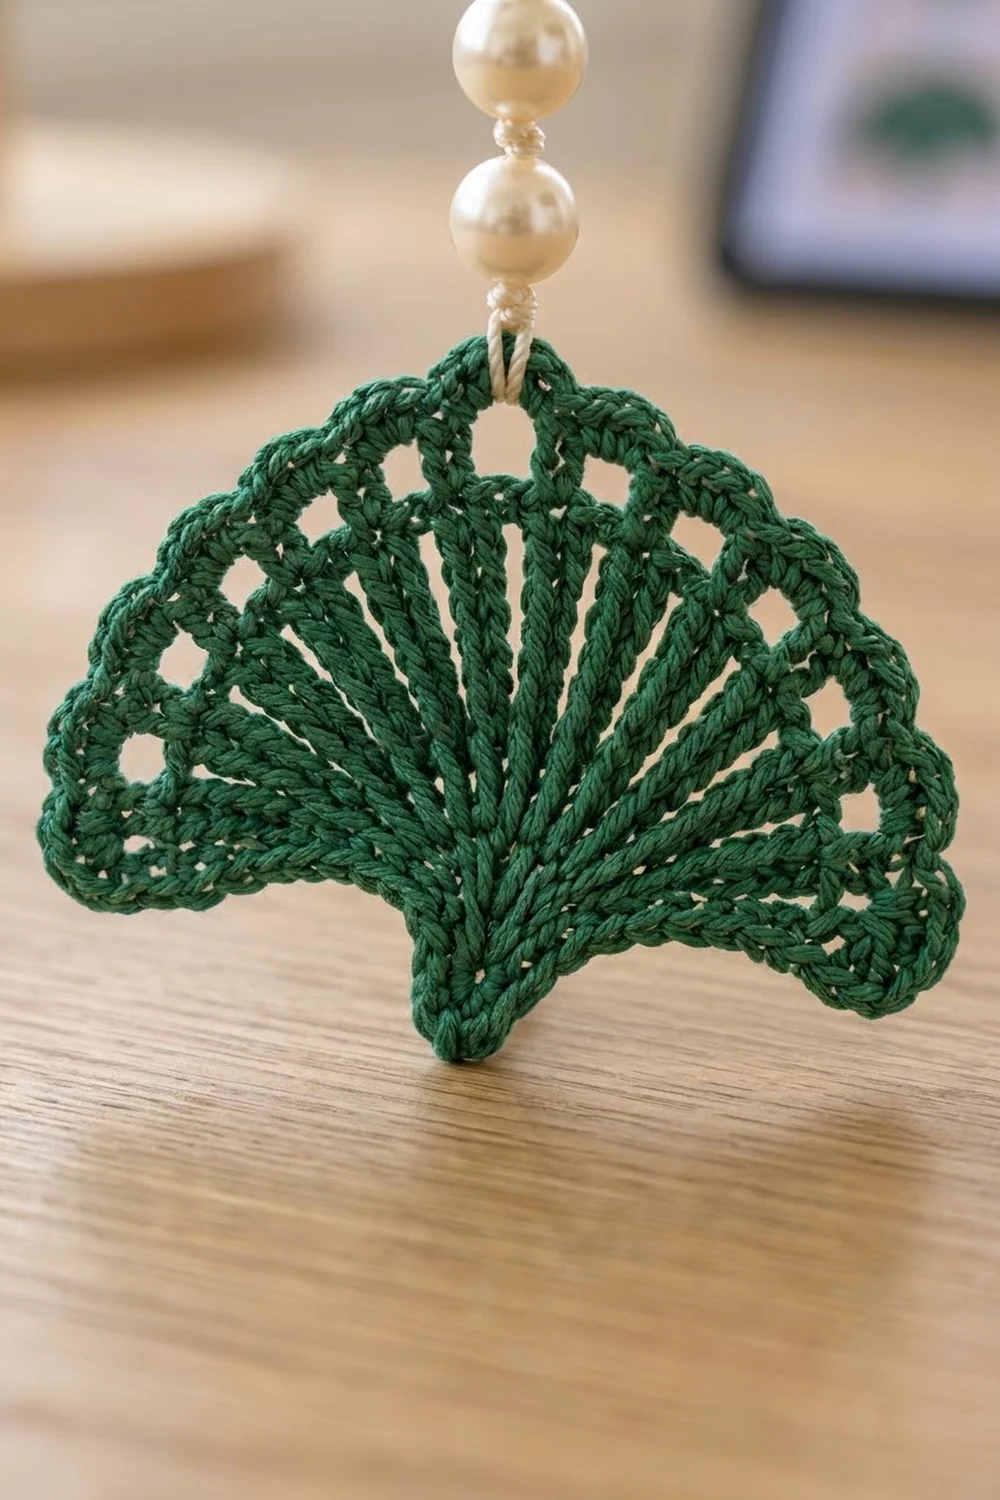
The style is botanical and a little vintage. The fans have open ribs and a scalloped top edge, and the flowers add a lighter, lacy accent. In front of a bright window, the open stitches let light through while the curtain still reads as one rich color.
The pattern uses US crochet terms. The finished curtain has 12 strands and measures about 38 in (96.5 cm) wide by 72 in (182.9 cm) long, measured from the top of the rod to the tips of the tassels.
To make it, you crochet the fans, flowers, tabs, and tassels separately. Then you string each strand on ivory beading cord, threading the cord through the center back of every motif and adding two pearls between motifs.
Finished Size and Construction
- Finished size: about 38 in (96.5 cm) wide x 72 in (182.9 cm) long
- Skill level: Intermediate
- Terminology: US
- Yarn weight: Super Fine (#1) fingering-weight mercerized cotton
- Hook: 2.5 mm
- Number of pieces: 96 fans, 96 flowers, 12 tabs, 12 tassels, plus 408 pearls
- Layout: 12 strands spaced 3 in (7.6 cm) apart, center to center; each strand has 8 repeats
- Piece size: fan 4.5 in (11.4 cm) wide x 3.25 in (8.3 cm) tall; flower 1.75 in (4.4 cm) across
- Fan size before border: 4 in (10.2 cm) wide x 2.75 in (7.0 cm) tall
- Border depth: 0.25 in (0.6 cm) on the fan edges
Materials
Choose a smooth, tightly plied mercerized cotton. It gives crisp ribs, holds its shape when blocked, and won’t stretch much under the weight of the pearls. Avoid fuzzy or very soft yarns, because the eyelets and scallops will blur.
- Emerald green: about 340 g / 1,150 m. That is 7 balls of 50 g / 170 m.
- Ivory glass pearl beads: 10 mm, with holes at least 1.5 mm wide. You need 430 beads (408 needed plus spares).
- Ivory nylon beading cord: about 1 mm thick, 40 m total. Cut it into 12 lengths of 120 in (304.8 cm).
Quantities include a margin of about 10% for swatching and tails.
Tools:
– 2.5 mm crochet hook
– Yarn needle
– Big-eye beading needle that fits the cord
– Sharp scissors
– A 5 in (12.7 cm) piece of cardboard for winding tassels
– Blocking mat, rustproof pins, and a spray bottle
– Tape measure
– Curtain rod up to 1 in (2.5 cm) in diameter
Abbreviations (US Terms)
- ch – chain
- sl st – slip stitch
- sc – single crochet
- dc – double crochet
- tr – treble crochet
- sp – space
- st(s) – stitch(es)
- tch – turning chain
- RS / WS – right side / wrong side
Magic ring: Wrap the yarn into a loop, work the first round into the loop, then pull the tail to close the center.
Stem loop: At the base of the fan, ch 4, then sl st into the magic ring. This makes a small loop at the point of the fan that the cord passes through.
Gauge and Checkpoints
Make one flower and one fan, and block them before you start production. Over 216 pieces, small differences add up quickly.
- Single crochet gauge (tab): 26 sc x 28 rows = 4 in (10.2 cm)
- Flower: Rnd 1 measures 0.75 in (1.9 cm) across, Rnd 2 measures 1.25 in (3.2 cm), and Rnd 3 measures 1.75 in (4.4 cm).
- Fan width:
- Row 1: 1 in (2.5 cm)
- Row 3: 2.25 in (5.7 cm)
- Row 4: 3.5 in (8.9 cm)
- Row 5: 4 in (10.2 cm) wide x 2.75 in (7.0 cm) tall
- Fan after border: 4.5 in (11.4 cm) wide x 3.25 in (8.3 cm) tall, including the stem loop
If your pieces are too big, go down to a 2.25 mm hook. If they’re too small, go up to a 2.75 mm hook. If only the fan is off, check the height of your tr. Tall, loose tr make the fan grow taller faster than it grows wider.
Hanging Tab (make 12)
Ch 6.
Row 1: Sc in 2nd ch from hook and in each remaining ch. (5 sc)
Rows 2–28: Ch 1, turn, sc in each st across. (5 sc)
The tab measures 0.75 in (1.9 cm) wide x 4 in (10.2 cm) long.
Fold the tab in half. Sl st through both layers of Row 28 and the foundation chain to make a closed loop (5 sl st). Fasten off, leaving a 6 in (15.2 cm) tail. The loop fits a rod up to 1 in (2.5 cm) thick. For a thicker rod, add 4 rows for each extra 0.5 in (1.3 cm) of rod diameter.
Flower Motif (make 96)
Make a magic ring.
Rnd 1: Ch 3 (counts as dc), 11 dc in the ring. Pull the ring closed and sl st in the top of the ch-3. (12 dc)
Rnd 2: Ch 1, sc in the same st, ch 4, skip next dc. Sc in next dc, ch 4, skip next dc. Repeat from * 4 more times, then sl st in the first sc. (6 sc, 6 ch-4 sps)
Rnd 3: Ch 1, sc in the same st, 5 sc in the next ch-4 sp. Sc in next sc, 5 sc in next ch-4 sp. Repeat from * 4 more times, then sl st in the first sc. (36 sc) That is 6 sc worked one in each existing sc, plus 30 sc worked into the spaces.
The ch-4 spaces become the six open windows between the solid center and the solid rim. Fasten off and weave in the ends.
Joining points: The top point of the flower is the 3rd sc of any 5-sc group. The bottom point is the 3rd sc of the opposite group, 18 sts away.
Fan Motif (make 96)
Make a magic ring.
Row 1 (WS): Ch 3 (counts as dc), 12 dc in the ring. Pull the ring closed until the stitches form a tight half circle. Turn. (13 dc)
Row 2 (RS): Ch 4 (counts as dc + ch 1), skip first st. Dc in next dc, ch 1. Repeat from * 10 more times, then dc in the top of the tch. Turn. (13 dc, 12 ch-1 sps)
Row 3: Ch 5 (counts as dc + ch 2), skip first st. Dc in next dc, ch 2. Repeat from * 10 more times, then dc in the 3rd ch of the tch. Turn. (13 dc, 12 ch-2 sps)
Row 4: Ch 7 (counts as tr + ch 3), skip first st. Tr in next dc, ch 3. Repeat from * 10 more times, then tr in the 3rd ch of the tch. Turn. (13 tr, 12 ch-3 sps)
These are the 13 ribs. Each one is a column of stitches stacked directly on top of each other, and the chain spaces between them get wider every row, so the ribs fan out.
Row 5 (eyelet row, WS): Ch 4 (counts as dc + ch 1), dc in the next ch-3 sp, ch 1. Dc in next tr, ch 1, dc in next ch-3 sp, ch 1. Repeat from * 10 more times, then dc in the 4th ch of the tch. Turn. (25 dc, 24 ch-1 sps) That is 13 dc worked one in each existing tr, plus 12 dc added in the spaces.
The ch-1 spaces form the row of eyelets near the top of the fan. Don’t fasten off. Continue straight into the Border (Rows 6–7) below. Work the border on every fan before you start stringing.
Joining points: The top point of the fan is the 13th sc of Row 6. The bottom point is the stem loop.
Tassel (make 12)
- Wind the yarn 40 times around the 5 in (12.7 cm) card.
- Thread a 10 in (25.4 cm) strand of yarn under the wraps at the top and tie it tightly. This is the hanging tie.
- Cut the wraps at the bottom and remove the card.
- Wrap a separate strand of yarn 6 times around the bundle, 0.5 in (1.3 cm) below the top, to form the neck. Knot it, then bury the ends inside the tassel.
- Trim the tassel to 4.5 in (11.4 cm) long.
Make All Pieces
All pieces are emerald green.
- Fans: 96 (8 per strand)
- Flowers: 96 (8 per strand)
- Tabs: 12
- Tassels: 12
There are two strand types. They are arranged on the rod as follows, where A and B are the strand types:
Rod:   A  B  A  B  A  B  A  B  A  B  A  B
       1  2  3  4  5  6  7  8  9  10 11 12

Strand A (top to bottom): Tab – 8 x [Link – Fan – Link – Flower] – Link – Tassel
Strand B (top to bottom): Tab – 8 x [Link – Flower – Link – Fan] – Link – Tassel
Because A and B start with different motifs, the fans on neighboring strands are offset and sit beside flowers instead of other fans.
Joining (Stringing the Strands)
Method. Thread one 120 in (304.8 cm) length of cord onto the beading needle. Tie it to the folded end of a tab with a double knot, leaving a 4 in (10.2 cm) tail.
Link. Each link has an overhand knot, then 2 pearls, then another overhand knot. Space the knots so the link measures 1.5 in (3.8 cm) from the motif above to the motif below. Each strand has 17 links (2 per repeat x 8 repeats, plus 1 above the tassel), so it uses 34 pearls.
Stitch-to-stitch logic for a fan. Enter the fan through its top point, the 13th sc of Row 6. Run the cord down the WS, behind the center rib:
- the 13th dc of Row 5, which was worked into the 7th tr
- the 7th tr of Row 4
- the 7th dc of Rows 3, 2, and 1
- out through the stem loop
The cord stays hidden behind the rib.
Stitch-to-stitch logic for a flower. Enter the flower through its top point. Run the cord behind Rnd 2 and across the back of the center ring, then exit through the bottom point.
Locking the motifs. At each exit point, make one half-hitch around the stitch so the motif can’t slide along the cord.
Tension. Pull the cord just snug. If a motif cups or its center rib puckers, the cord is too tight. Loosen it before tying the next knot.
Finishing the strand. After the last link, pass the cord through the tassel’s hanging tie and knot it 3 times. Add a drop of clear glue, let it dry, and trim the cord.
Size checkpoint. Each repeat adds 8 in (20.3 cm): 1.5 + 3.25 + 1.5 + 1.75 in. Measure from the top of the rod. After 4 repeats, the strand should measure 34 in (86.4 cm). After all 8 repeats, it should measure 66 in (167.6 cm) at the bottom of the last motif. The final link and tassel bring it to 72 in (182.9 cm).
Border (Fan Edging)
Border gauge: about 4 scallops per 1 in (2.5 cm) along the top curve, and 11 sc per 2.75 in (7.0 cm) side edge.
Row 6 (scallop row, RS): Ch 1, sc in the first dc. Ch 2, sc in next dc. Repeat from * 23 more times; the last sc goes into the 3rd ch of the tch. (25 sc, 24 ch-2 scallops) That is 25 sc worked one in each existing dc, plus no extra sc.
Row 7 (side edging and stem, RS): Don’t turn. Ch 1, then rotate the fan to work along the left side.
- Left side: 2 sc around the end of Row 5, 3 sc around the tr post of Row 4, then 2 sc around each of Rows 3, 2, and 1. (11 sc)
- Base: Ch 4, sl st into the magic ring to make the stem loop.
- Right side: 2 sc around each of Rows 1, 2, and 3, 3 sc around Row 4, and 2 sc around Row 5. (11 sc)
Sl st in the first sc of Row 6 and fasten off.
Border totals:
– Top: 25 sc and 24 scallops
– Each side: 11 sc
– Base: 1 ch-4 stem loop
Why the math works:
– Row 6 has one sc on top of every dc, so the ribs and eyelets stay lined up and exactly one scallop sits above each eyelet.
– With 25 sc, the 13th sc is the exact center: 12 sc on each side of it, sitting over the 7th rib.
– The side edging uses 2 sc per dc row and 3 per tr row: (4 x 2) + 3 = 11. This matches the row heights, so the sides lie flat without flaring.
– The border adds 0.25 in (0.6 cm) to each edge. That takes the fan from 4 in (10.2 cm) x 2.75 in (7.0 cm) to 4.5 in (11.4 cm) x 3.25 in (8.3 cm), including the stem loop.
Final Blocking
Block all the pieces before stringing them.
- Draw a fan template, 4.5 in (11.4 cm) wide x 3.25 in (8.3 cm) tall, and a circle 1.75 in (4.4 cm) across. Put both under clear plastic on the blocking mat.
- Mist each piece until it is damp all the way through.
- Pin the fan’s stem loop at the point of the template. Pin the 13th sc at the top center, then pin the two top corners.
- Pin each scallop so it forms an even arch, and straighten the ribs so they radiate evenly.
- Pin each flower at its 6 sc-in-sc points so it forms a round.
- Let everything dry completely. A light spray of starch helps the fans keep their shape when they hang.
Final Quality-Control Checklist
- [ ] Every fan has 13 ribs, 24 eyelets, 24 scallops, and 11 sc on each side.
- [ ] Every flower has 36 sc and 6 even windows.
- [ ] Fans measure 4.5 x 3.25 in (11.4 x 8.3 cm), and flowers measure 1.75 in (4.4 cm).
- [ ] All links measure 1.5 in (3.8 cm), each with 2 pearls.
- [ ] Every motif is locked with a half-hitch.
- [ ] A and B strands alternate on the rod.
- [ ] All strands are 72 in (182.9 cm) long, within 0.5 in (1.3 cm) of each other.
- [ ] Tassels are trimmed to the same length, and all ends are woven in.
Troubleshooting
- The fan cups: Your chain spaces are too tight. Loosen them, or add 1 ch to each Row 4 space for that fan.
- The fan ruffles: Your chains are loose. Work Row 6 with tighter ch-2 scallops.
- The flower windows are uneven: Check that you skipped exactly 1 dc between the sc in Rnd 2.
- Motifs slide down the cord: Add a second half-hitch at the exit point.
- Strands differ in length: Adjust the knot spacing in the links, not the motifs.
- Pearls won’t pass over the cord: Use a beading needle with a collapsible eye, or switch to pearls with larger holes.
Care
Dust the curtain gently, or shake it out. If it needs washing, remove the strands from the rod, hand-wash them in cool water, then lay them flat and reshape them while damp.
Final Notes
The measurements build on each other:
- Gauge gives 1.75 in (4.4 cm) flowers and 4 in (10.2 cm) fans before the border.
- The border brings each fan to 4.5 x 3.25 in (11.4 x 8.3 cm).
- Each repeat of link, fan, link, and flower adds 8 in (20.3 cm).
- Eight repeats plus the tab, the final link, and the tassel make a 72 in (182.9 cm) strand.
- Twelve strands at 3 in (7.6 cm) spacing fill about 38 in (96.5 cm) of rod.
Check each stage before moving on, and the curtain will hang evenly. Happy crocheting!