

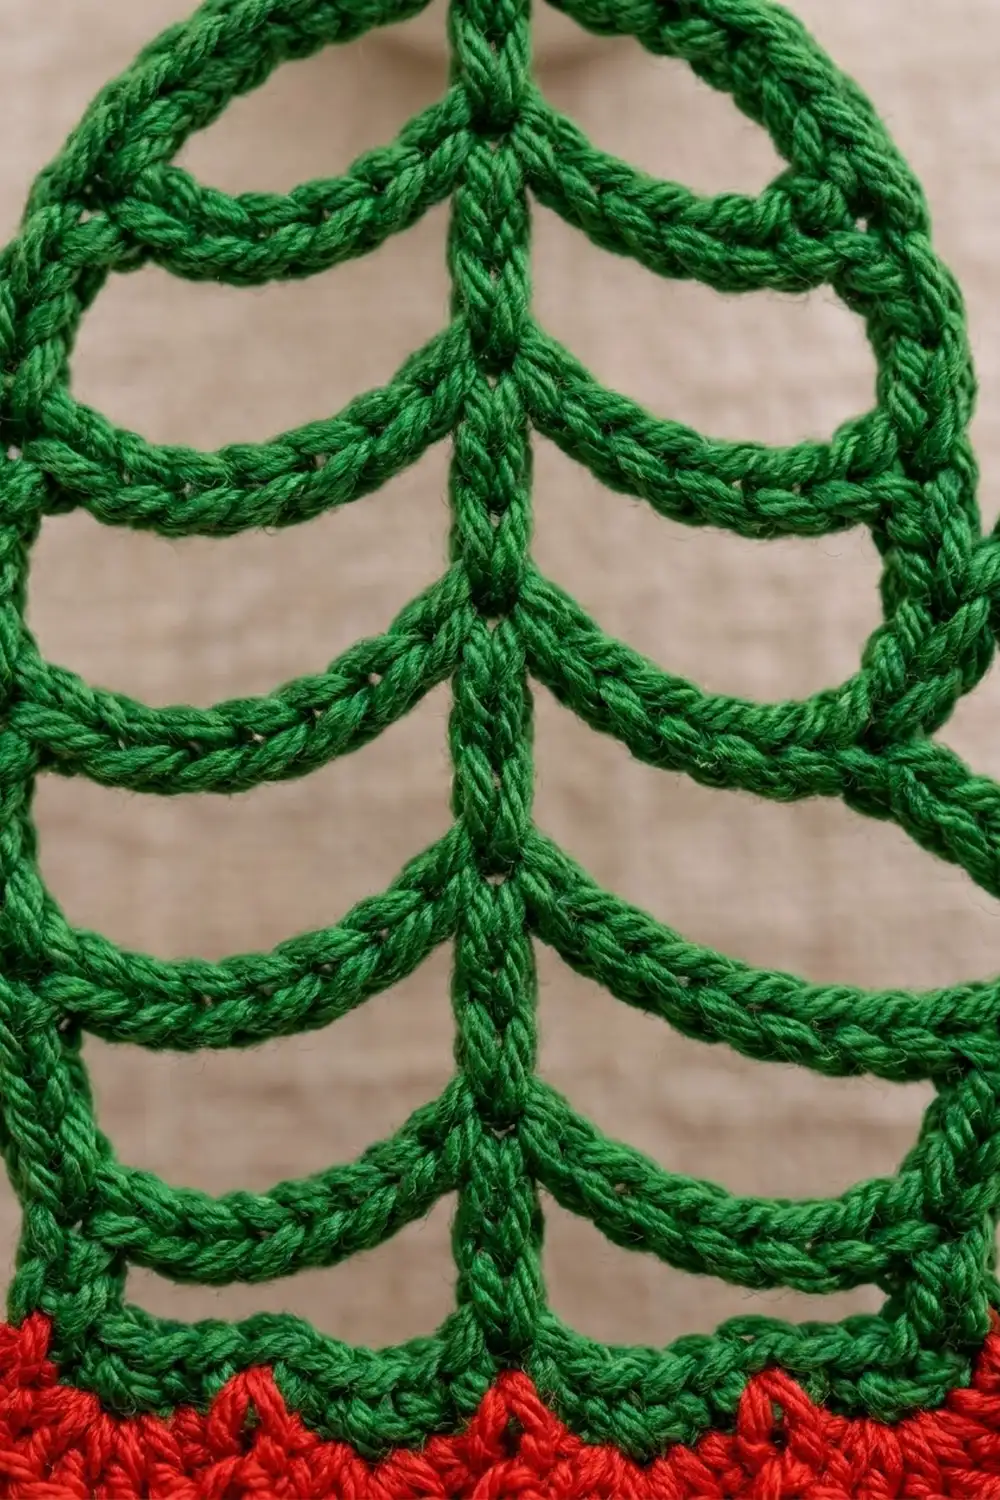
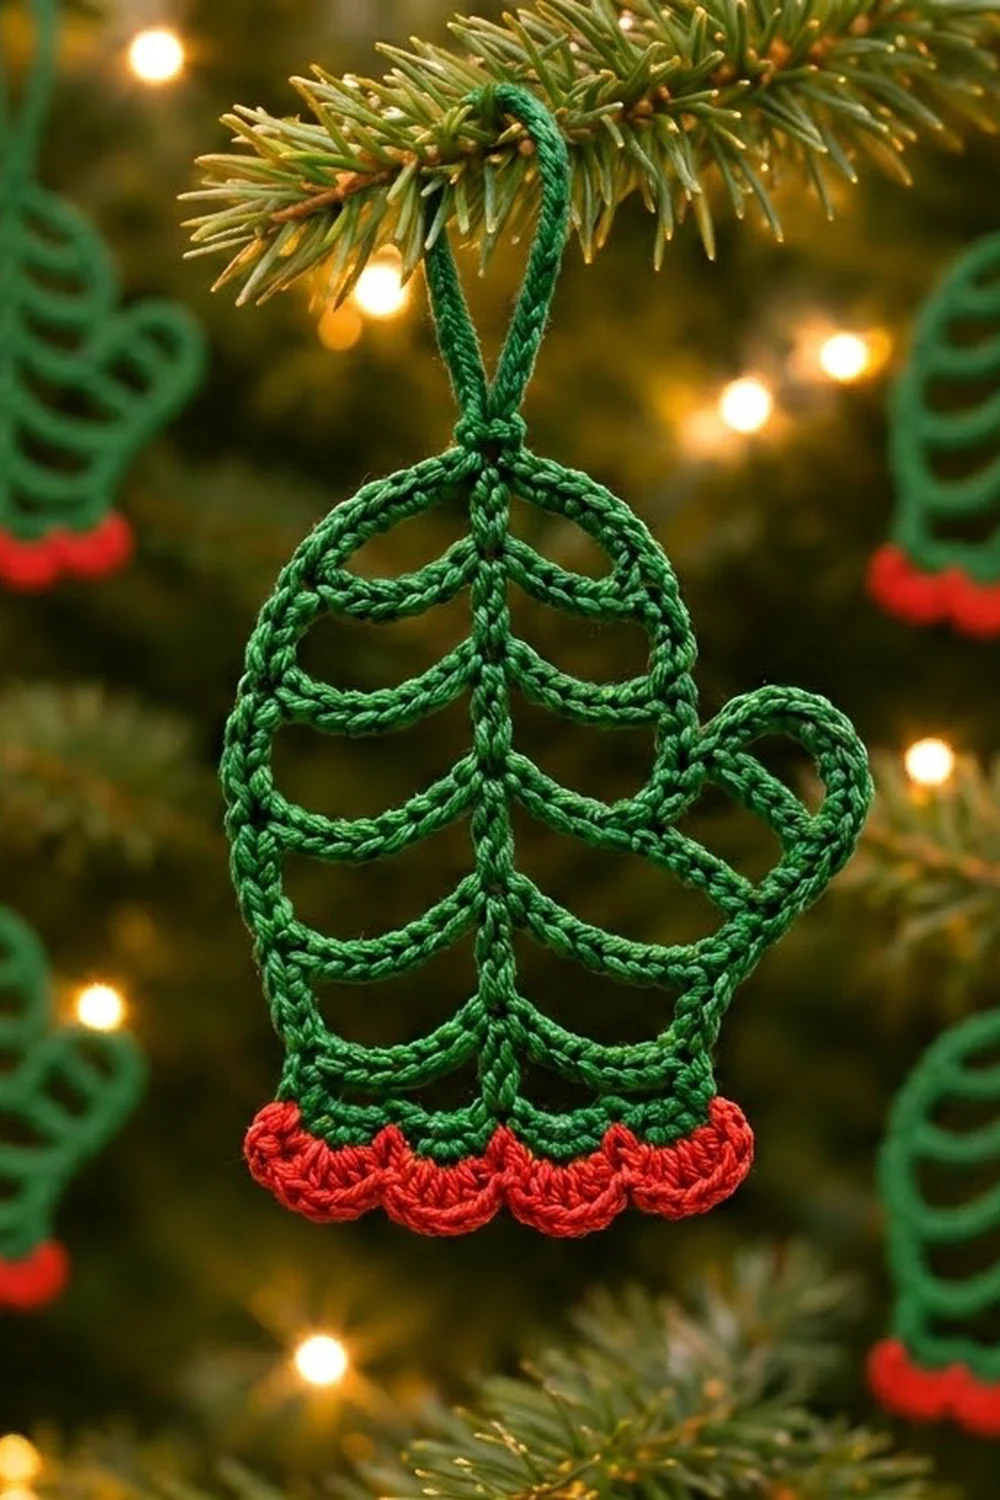
This little mitten looks like a sketch drawn in yarn. A green corded outline gives the mitten shape, a center spine runs up the middle, and ten curved branches fan out from it like the boughs of a fir tree. A red scalloped cuff finishes the bottom edge, and a slim loop at the top lets it hang straight on a branch.
The palette is classic Christmas: deep forest green for the lace frame and bright red for the cuff. Because the ornament is all open space, it lets tree lights glow through, and it weighs almost nothing.
The pattern uses US crochet terms. The finished ornament measures 3.75 in (9.5 cm) wide including the thumb and 4.5 in (11.4 cm) tall including the hanging loop.
It is made as one single piece. You crochet a short base bar, chain the full outline, and then cover it with single crochet so it becomes a firm cord. Next you add the corded spine, the ten branches and the hanging loop. The red cuff is worked last into the underside of the base bar.
Finished Size and Construction
- Finished size: 3.75 in (9.5 cm) wide × 4.5 in (11.4 cm) tall, including the loop
- Mitten body before border: 3.0 in (7.6 cm) wide at the base × 3.25 in (8.3 cm) tall
- Border (cuff) depth: 0.5 in (1.3 cm)
- Hanging loop: about 0.75 in (1.9 cm) tall
- Skill level: Intermediate (the shaping is simple, but you need careful placement)
- Terminology: US
- Yarn weight: Sport (#2), mercerized cotton
- Hook: 2.75 mm (C-2)
- Number of pieces: 1
- Layout: single freestanding ornament with no assembly
Materials
Use a smooth, tightly plied mercerized cotton. The crisp twist helps every single-crochet cord look round, and cotton holds the blocked curves far better than acrylic does. Avoid fuzzy or splitty yarns, because the lace lines will lose their definition.
- Forest green: 7 g / 20 m (about 22 yd)
- Bright red: 2 g / 6 m (about 6.5 yd)
These quantities include a margin for your gauge swatch and weaving in ends.
Tools:
– 2.75 mm (C-2) crochet hook
– Tapestry needle
– 6–10 rustproof pins
– Blocking board or foam mat with a printed grid
– Spray bottle, or fabric stiffener (optional)
– Removable stitch markers (at least 4)
Abbreviations (US Terms)
- ch – chain
- sl st – slip stitch
- sc – single crochet
- dc – double crochet
- sk – skip
- st(s) – stitch(es)
- RS – right side
Special technique: cording a chain. Make a chain of the stated length, then work 1 sc into each chain going back along it. The finished cord has exactly as many sc as it had chains. Every green line in this ornament is a corded chain.
Gauge and Checkpoints
Gauge: 7 sc = 1 in (2.5 cm), and a corded chain of 7 ch with 7 sc = 1 in (2.5 cm).
This ornament is the swatch. Make the base bar first and measure it before you go on.
- Checkpoint 1 (base bar): 21 sc = 3.0 in (7.6 cm).
- Checkpoint 2 (outline): before blocking, the left side cord (14 sc) measures 2.0 in (5.1 cm).
- Checkpoint 3 (spine): 21 sc = 3.0 in (7.6 cm), from the base bar to the top of the dome.
- Checkpoint 4 (finished): 3.75 in × 4.5 in (9.5 cm × 11.4 cm) after blocking.
Too big? Go down to a 2.5 mm hook. Tight chains matter most here, because loose chains make the branches sag.
Too small? Go up to a 3.0 mm hook.
Base Bar
With green, ch 22.
Row 1 (RS): Sc in 2nd ch from hook and in each ch across. (21 sc)
Do not turn and do not fasten off. Your hook is now at the left end of the bar with the RS facing you. Check Checkpoint 1 now.
Mark the center st (st 11) with a stitch marker.
Outline Frame
The outline is one long chain that travels up the left side, over the dome and down the right side, including the thumb lobe. You then cord it back to where it started.
Outline chain: Working from the left end of the bar, make the chain in these sections without stopping:
– ch 14 (left side)
– ch 29 (dome top)
– ch 5 (upper right side)
– ch 13 (thumb lobe)
– ch 7 (lower right side)
(68 ch total) Sl st in the last sc at the right end of the base bar.
Cord the outline: Turn. Work 1 sc in each of the 68 ch, back toward the left end. Sl st in the first sc of the base bar. (68 sc)
Fasten off.
Numbering the outline. For the rest of the pattern, count the outline sc starting at the bottom left and moving up and around:
– sc 1–14: left side
– sc 15–43: dome (sc 29 is the dome center)
– sc 44–48: upper right side
– sc 49–61: thumb lobe
– sc 62–68: lower right side (sc 68 sits at the bottom right corner)
Place markers in outline sc 29, 49 and 61.
Lay the piece flat and shape it with your fingers. The left side goes straight up, the dome is rounded and the thumb bulges out to the right. Checkpoint 2: the left side cord measures 2.0 in (5.1 cm).
Center Spine
Join green with a sl st in the marked base st 11.
Spine chain: Ch 21. Sl st in outline sc 29, the dome center. (21 ch)
Cord the spine: Turn. Work 1 sc in each of the 21 ch going down. Sl st in base st 11. (21 sc)
Number the spine sc from the bottom up: spine sc 1 is next to the base bar, and spine sc 21 is next to the dome. Checkpoint 3: the spine measures 3.0 in (7.6 cm) when gently straightened.
Do not fasten off.
Branches
You work the ten branches in one pass. The left branches go up the spine, and the right branches come back down. The sl sts you make while travelling along the spine add a second layer of yarn, which gives the spine its thicker, braided look.
Each branch is worked the same way:
1. Ch the stated number.
2. Sl st in the stated outline sc.
3. Turn and work 1 sc in each ch back to the spine.
4. Sl st in the same spine sc where the branch started.
Left side (moving up):
Sl st in spine sc 1–4. (4 sl st)
- Branch L1: from spine sc 4, ch 13, sl st in outline sc 2, then work back. (13 sc)
- Sl st in spine sc 5–8.
- Branch L2: from spine sc 8, ch 13, sl st in outline sc 5, then work back. (13 sc)
- Sl st in spine sc 9–12.
- Branch L3: from spine sc 12, ch 13, sl st in outline sc 8, then work back. (13 sc)
- Sl st in spine sc 13–16.
- Branch L4: from spine sc 16, ch 13, sl st in outline sc 11, then work back. (13 sc)
- Sl st in spine sc 17–20.
- Branch L5: from spine sc 20, ch 12, sl st in outline sc 16, then work back. (12 sc)
Right side (moving down): Stay in spine sc 20.
- Branch R5: from spine sc 20, ch 12, sl st in outline sc 42, then work back. (12 sc)
- Sl st in spine sc 19–16.
- Branch R4: from spine sc 16, ch 13, sl st in outline sc 49 (top of the thumb), then work back. (13 sc)
- Sl st in spine sc 15–12.
- Branch R3: from spine sc 12, ch 13, sl st in outline sc 61 (bottom of the thumb), then work back. (13 sc)
- Sl st in spine sc 11–8.
- Branch R2: from spine sc 8, ch 13, sl st in outline sc 64, then work back. (13 sc)
- Sl st in spine sc 7–4.
- Branch R1: from spine sc 4, ch 13, sl st in outline sc 67, then work back. (13 sc)
Sl st in spine sc 3–1, then sl st in base st 11. Fasten off.
Branch totals: 8 branches × 13 sc = 104 sc, plus 2 branches × 12 sc = 24 sc, for 128 sc.
Each branch’s chain is longer than the straight distance between its two ends, so it naturally bows. During blocking you set that bow as an upward curve, like a fir bough.
Hanging Loop
Join green with a sl st in outline sc 29, the dome center where the spine meets it.
Ch 14, then sl st in the same sc to form a ring. Ch 1 and work 20 sc into the ring, around the chain. Sl st in the first sc. (20 sc)
Fasten off. Wrap the tail twice around the base of the loop and pull it snug to form the small knot visible at the top. Weave the tail into the spine.
Border: Scalloped Red Cuff
The cuff is worked into the free loops on the underside of the foundation chain of the base bar. There are 21 free loops, one under each base sc.
Border gauge: the sc row is about 0.125 in (0.3 cm) deep, and each scallop is about 0.4 in (1.0 cm) deep. Together they make a finished cuff depth of 0.5 in (1.3 cm).
Row 1: Turn the piece upside down. Join red with a sl st in the first free loop at the right end. Ch 1, then sc in each free loop across. (21 sc = 21 worked one per free loop + 0 extra)
Row 2: Ch 1 and turn.
1. Sc in the first st.
2. Sk 1 st, 5 dc in the next st, sk 1 st, sc in the next st.
3. Repeat from * to * 4 more times.
(5 scallops: 6 sc + 25 dc = 31 sts)
Fasten off and weave in the ends.
Why the math works: each scallop repeat uses exactly 4 sts (skip, dc group, skip, sc). The first sc uses 1 more st, so 1 + (5 × 4) = 21, which matches Row 1 exactly. The row starts and ends with an sc, so the scallops sit symmetrically under the mitten. Row 1 adds no stitches, so the cuff stays 3.0 in (7.6 cm) wide, the same as the base bar, and the scallops flare out only slightly.
Final Blocking
- Weave in all ends before blocking. Hide the tails inside the cords, never across the open spaces.
- Lightly spray the ornament until it is damp. If you want a stiffer ornament for hanging, brush on a thin coat of diluted fabric stiffener instead.
- Lay it on the grid with the RS up. Pin the base bar straight, 3.0 in (7.6 cm) wide.
- Pin the spine straight up the center so the dome top sits 3.25 in (8.3 cm) above the bottom of the base bar.
- Pin the left side straight and round out the dome evenly.
- Pin the thumb lobe out so the overall width is 3.75 in (9.5 cm).
- Push each branch into a smooth upward curve. The spine end should sit higher than the outline end, and the curves on both sides should mirror each other.
- Pin the scallops into even half circles and lay the loop flat above the dome.
- Let it dry completely, usually 6–12 hours, before unpinning.
Final Quality-Control Checklist
- [ ] Base bar has 21 sc and measures 3.0 in (7.6 cm)
- [ ] Outline cord has 68 sc and no twists
- [ ] Spine has 21 sc and meets the dome at sc 29
- [ ] Ten branches: L1–L4 and R1–R4 have 13 sc each, L5 and R5 have 12 sc each
- [ ] Branches on the left and right mirror each other
- [ ] Cuff has 21 sc in Row 1 and 5 even scallops in Row 2
- [ ] Hanging loop is centered and secure
- [ ] Finished size is 3.75 in × 4.5 in (9.5 cm × 11.4 cm)
- [ ] No tails show across the open spaces
Troubleshooting
The outline twists like a spiral. The chain twisted before you corded it. Lay the chain flat before you turn, and keep the bumps of the chain facing the same way.
The branches sag or droop downward. Your chains are too loose. Go down a hook size for the branch chains only, or curve them more firmly when you pin.
The branches pull the outline inward. Your chains are too tight. Add 1 ch to each branch, and add 1 to that branch’s sc count to match.
The thumb looks flat. Pin the thumb lobe out farther while blocking, and check that R4 and R3 are attached at outline sc 49 and 61.
The scallops are uneven. Count again: each repeat must skip exactly 1 st on each side of the 5-dc group.
The ornament hangs crooked. The loop is off center. Move it to outline sc 29, directly above the spine.
Care
Hand wash in cool water with mild soap, press the water out in a towel and re-block flat. Store the ornament flat between tissue paper so the branches keep their curve.
Final Notes
The size of this mitten comes from a short chain of measurements:
– The 21-sc base bar sets the 3.0 in (7.6 cm) width.
– The 21-sc spine sets the 3.25 in (8.3 cm) body height.
– The 68-sc outline wraps the shape and adds the thumb, for a full width of 3.75 in (9.5 cm).
– The 21-stitch cuff fits exactly 5 scallops and adds 0.5 in (1.3 cm).
– The loop brings the total height to 4.5 in (11.4 cm).
If each checkpoint matches, the finished ornament will too. Make one for every branch of the tree.
Happy crocheting!