

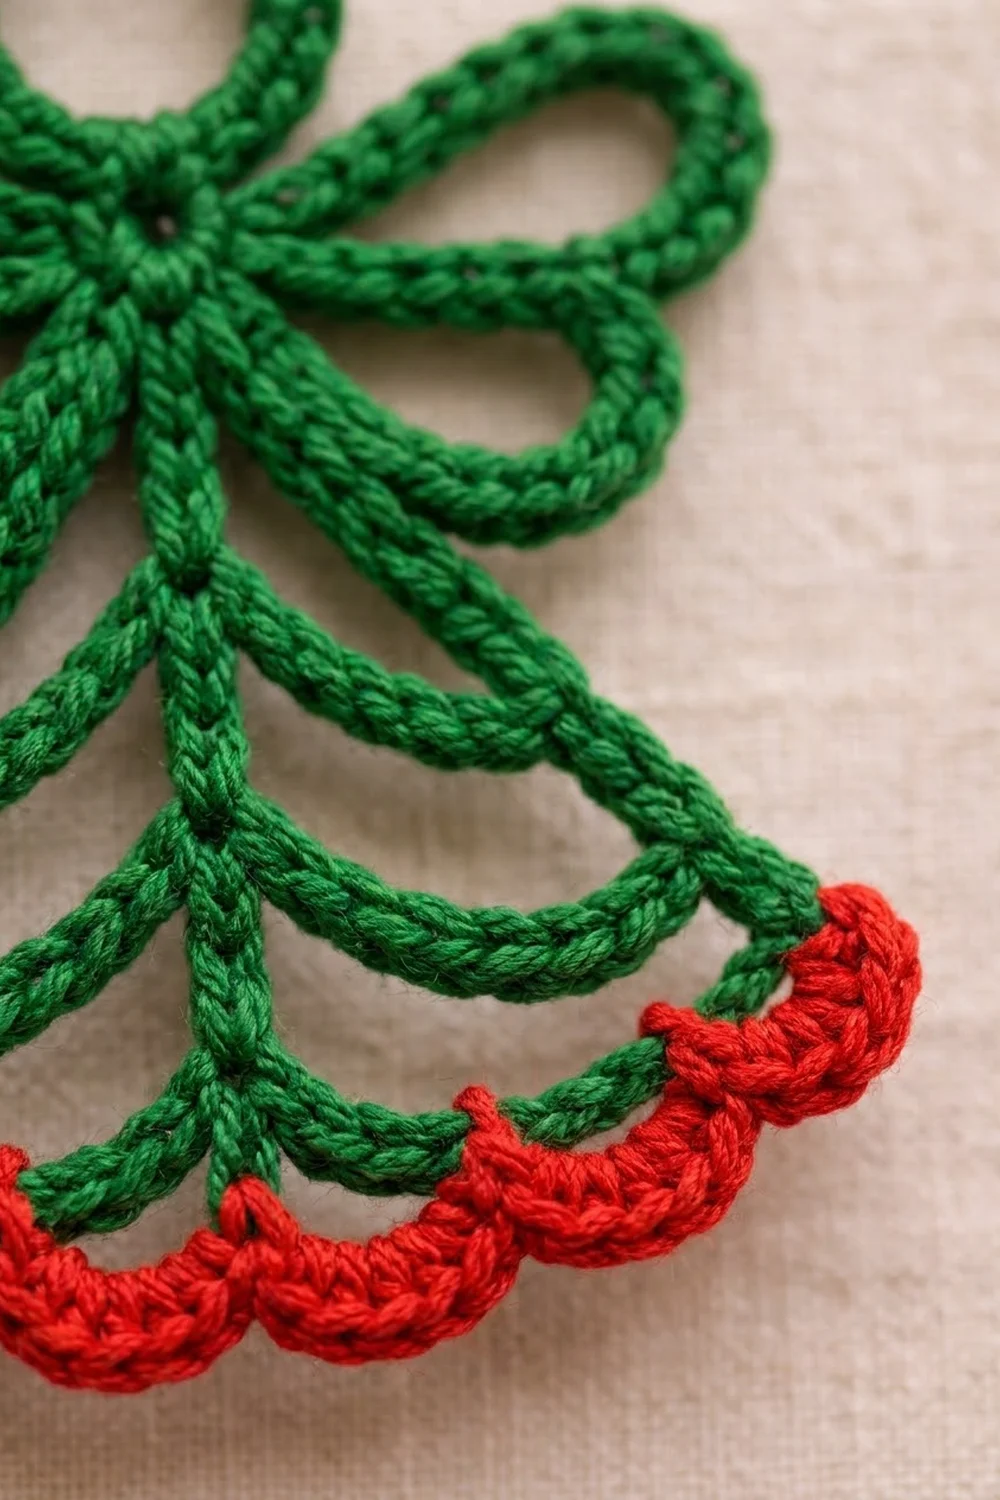
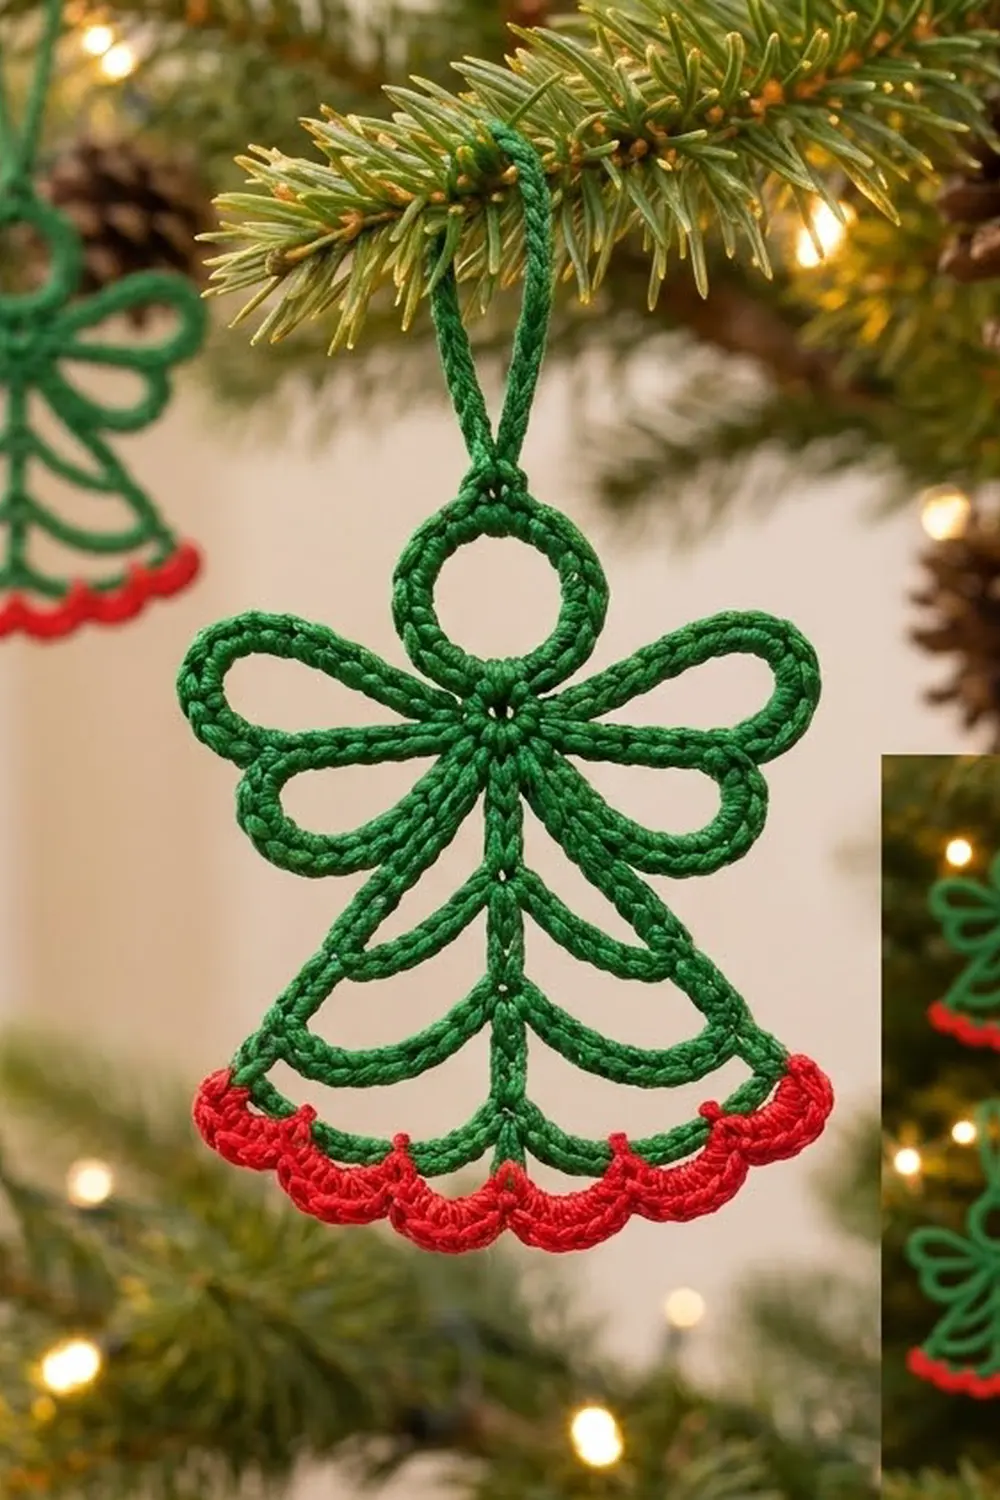
This little angel is made entirely from loops. Each part is a chain loop covered with single crochet, so the outline looks like a smooth, rounded green cord. You get a hanging loop, a ring for the head, four petal wings, and a bell-shaped skirt of three stacked arches. A row of tiny red scallops finishes the hem.
The style is airy and graphic, almost like a cut-paper or tatted ornament. Deep green and a bright Christmas red make it pop on a tree, a gift tag, or a window.
The pattern uses US crochet terms. The finished angel measures 3.5 in (8.9 cm) wide at the hem and 4 in (10.2 cm) tall from the top of the head to the scallops. With the hanging loop it’s 5 in (12.7 cm) tall.
The angel is worked in one continuous piece. You make the head ring, then four wing loops at the neck, then a chain spine down the center with a pair of skirt loops at each of three nodes. Then you work back up the spine. The hanging loop and the red hem trim are added last.
Finished Size and Construction
- Finished size: 3.5 in (8.9 cm) wide × 4 in (10.2 cm) tall, or 5 in (12.7 cm) tall with the hanging loop
- Skill level: Easy+ (simple stitches, careful placement)
- Terminology: US crochet terms
- Yarn weight: Sport-weight (#2) mercerized cotton
- Hook: 2.75 mm (US C-2)
- Number of pieces: 1 single piece
- Layout: Head ring, 4 wing loops, center spine, 3 tiers of skirt loops (2 per tier), hem trim
- Piece size before border: 3.5 in (8.9 cm) wide × 3.75 in (9.5 cm) tall, not counting the hanging loop
- Border depth: 0.25 in (0.6 cm) red scallop trim along the hem only
Materials
Choose a smooth, mercerized cotton. It gives crisp stitch definition and holds its shape after blocking. Fuzzy or very soft acrylic will blur the cord effect.
- Green (main color): 10 g, about 40 m (44 yd)
- Red (trim): 3 g, about 12 m (13 yd)
Both quantities include a margin of about 25% for your gauge swatch and the yarn tails.
Tools:
– 2.75 mm (US C-2) crochet hook
– 2 locking stitch markers
– Tapestry needle
– Scissors
– Blocking mat and rust-proof pins
– Spray bottle, and optional fabric stiffener or starch
Abbreviations (US Terms)
- ch – chain
- sl st – slip stitch
- sc – single crochet
- hdc – half double crochet
- sk – skip
- st(s) – stitch(es)
- RS – right side
Special technique: covered loop. Chain the number given, then sl st into the anchor stitch to close a ring of chains. Next, work the stated number of sc into the ring, around the chains (not into individual chains), packing them tightly so no chain shows. Finish with a sl st into the same anchor. Each covered loop becomes one smooth, rounded cord.
Gauge and Checkpoints
Gauge isn’t critical for an ornament, but it controls the final size. Work the head ring first as your test.
- Chain gauge: 7 ch = 1 in (2.5 cm), gently stretched
- Covered cord: about 7 sc per 1 in (2.5 cm) along the cord, with the cord about 0.25 in (0.6 cm) thick
Checkpoints:
1. Head ring: 1 in (2.5 cm) across the outside edge.
2. Upper wing loop: 1.5 in (3.8 cm) long from neck to tip.
3. Spine: 2.5 in (6.4 cm) from neck to node 3.
4. Tier 3 loop: 1.75 in (4.4 cm) from spine to outer tip.
5. Finished piece: 3.5 in (8.9 cm) × 4 in (10.2 cm).
If your piece is too big: switch to a 2.5 mm hook, or pack your sc more tightly.
If it’s too small or the loops curl: switch to a 3 mm hook. Curling usually means the sc are too crowded, so make sure you’re working around the chain loop and not into each chain.
Pattern
Part 1: Head Ring
With green, ch 16, sl st in first ch to form a ring.
Rnd 1: Ch 1, 24 sc into the ring (worked around the chains), sl st in first sc. (24 sc)
The first sc is the neck stitch. Place a marker in it. Then count around and place a second marker in sc 13. That’s the top of the head, where the hanging loop goes later. Don’t fasten off.
Checkpoint: the ring measures 1 in (2.5 cm) across.
Part 2: Wings
Every wing loop is anchored in the neck stitch (sc 1). Arrange the loops in this order as you work: right upper, right lower, left lower, left upper. You’ll set their final angles during blocking.
Right upper wing: Ch 18, sl st in neck st, 26 sc in loop, sl st in neck st. (26 sc)
Right lower wing: Ch 12, sl st in neck st, 18 sc in loop, sl st in neck st. (18 sc)
Left lower wing: Ch 12, sl st in neck st, 18 sc in loop, sl st in neck st. (18 sc)
Left upper wing: Ch 18, sl st in neck st, 26 sc in loop, sl st in neck st. (26 sc)
Wing total: 26 + 18 + 18 + 26 = 88 sc.
Checkpoint: each upper wing is 1.5 in (3.8 cm) long. Each lower wing is about 1 in (2.5 cm) long. The full wingspan, laid flat, is about 3.25 in (8.3 cm).
Part 3: Spine and Skirt
The spine is a straight chain hanging down from the neck. It has three nodes, and each node is the last chain of a 6-chain segment. Each node anchors one right and one left skirt loop. From tier 2 down, each loop is tied to the outer tip of the loop above it, which creates the straight slanted sides of the skirt.
How the loops are counted: For each covered loop, sc 1 sits next to the node and the sc continue around the loop. The middle sc of the loop is its outer tip.
Spine segment 1: Ch 6. The last ch made is node 1.
Tier 1, right loop: Ch 14, sl st in node 1, 20 sc in loop, sl st in node 1. (20 sc)
Tier 1, left loop: Ch 14, sl st in node 1, 20 sc in loop, sl st in node 1. (20 sc)
The outer tip of each tier 1 loop is sc 10.
Spine segment 2: Ch 6. The last ch made is node 2.
Tier 2, right loop: Ch 10, sl st in sc 10 (outer tip) of the right tier 1 loop, ch 10, sl st in node 2. That’s 20 ch in the loop. Work 28 sc in loop, sl st in node 2. (28 sc)
Tier 2, left loop: Work the same as the right loop, joining to the left tier 1 tip. (28 sc)
The outer tip of each tier 2 loop is sc 14.
Spine segment 3: Ch 6. The last ch made is node 3, the bottom of the spine.
Tier 3, right loop: Ch 13, sl st in sc 14 (outer tip) of the right tier 2 loop, ch 13, sl st in node 3. That’s 26 ch in the loop. Work 36 sc in loop, sl st in node 3. (36 sc)
Tier 3, left loop: Work the same as the right loop, joining to the left tier 2 tip. (36 sc)
The outer tip of each tier 3 loop is sc 18. Each tier 3 loop has 18 sc on its lower (hem) edge, between the tip and node 3.
Skirt loop total: 2 × (20 + 28 + 36) = 168 sc.
Cover the spine: Ch 1. Working back up the spine, sc in each of the 18 spine chains, including the three node chains. Skip the loop joins and only work into the spine chains. Sl st in the neck stitch. (18 sc) Fasten off and weave in the ends.
Checkpoint: the spine is 2.5 in (6.4 cm) long. Each tier 3 loop reaches 1.75 in (4.4 cm) out from the spine, so the hem is 3.5 in (8.9 cm) wide.
Part 4: Hanging Loop
Join green in the marked top stitch (sc 13 of the head ring). Ch 14, sl st in the same st, 20 sc in loop, sl st in the same st. (20 sc) Fasten off and weave in the ends.
Checkpoint: the loop stands 1 in (2.5 cm) above the head.
Green stitch tally: 24 (head) + 88 (wings) + 168 (skirt) + 18 (spine) + 20 (hanging loop) = 318 sc.
Border: Red Scallop Hem
The trim runs along the lower edge of the two tier 3 loops only.
Border gauge: each scallop repeat uses 4 sts and covers about 0.4 in (1 cm). The trim adds 0.25 in (0.6 cm) of depth.
Row 1 (RS, conversion row): Join red in the outer tip (sc 18) of the right tier 3 loop. Ch 1, then sc in the same st and in each of the next 17 sc along the lower edge toward node 3. That’s 18 sc on the right side. Work 1 sc in node 3 at the bottom of the spine (1 added stitch). Then sc in each of the 18 lower-edge sc of the left tier 3 loop, ending at its outer tip. That’s 18 sc on the left side.
Count: 36 sts worked 1-per-existing-stitch + 1 added = 37 sc.
Row 2 (scallops): Ch 1, turn. Sc in first st. Sk 1, 5 hdc in next st, sk 1, sc in next st. Repeat from * 8 more times. (9 scallops: 10 sc + 45 hdc = 55 sts) Fasten off and weave in the ends.
Why the math works: each scallop uses 4 sts, plus 1 sc to begin, so 9 × 4 + 1 = 37. That’s exactly the Row 1 count. The center stitch (st 19) lands on node 3 and becomes the center of scallop 5. You get 4 scallops on each side and 1 centered under the spine, so the hem is symmetrical.
Final Blocking
- Weave in all ends and hide the tails inside the sc cords.
- Dampen the angel evenly with a spray bottle, or soak it briefly and press it in a towel.
- Pin it flat on the mat with the head ring centered at the top.
- Pin the upper wing tips up and out at about 45 degrees, and the lower wing tips out and slightly down.
- Pin the outer tips of all three tiers on each side so they form a straight slanted line. Check that the hem is 3.5 in (8.9 cm) wide.
- Pin the spine straight. Pin the hanging loop upright.
- Shape each scallop with your fingertips.
- For a crisp ornament, brush on diluted fabric stiffener or spray starch.
- Let it dry completely before you unpin it, usually 6 to 8 hours.
Final Quality-Control Checklist
- [ ] Head ring is round, 1 in (2.5 cm) across, with 24 sc.
- [ ] All four wings come from the neck stitch, and both wings in each pair match in size.
- [ ] Spine is straight and 2.5 in (6.4 cm) long.
- [ ] Tier tips line up into straight slanted sides.
- [ ] Hem measures 3.5 in (8.9 cm) across.
- [ ] Red trim has 9 scallops, with the center scallop under the spine.
- [ ] Total height is 4 in (10.2 cm), or 5 in (12.7 cm) with the loop.
- [ ] No chains show through the covered loops.
- [ ] All ends are secure and hidden.
Troubleshooting
Loops twist or curl: the sc are too crowded. Loosen your tension slightly, or check that you’re working around the chain and not into it.
Chains show between the sc: your sc are too loose. Go down a hook size, or push the sc together along the loop as you work.
Sides aren’t straight: you joined to the wrong stitch. Count again and join exactly to sc 10 of tier 1 and sc 14 of tier 2.
Wings are uneven: recount the sc. Upper wings have 26 and lower wings have 18.
Red scallops are off-center: Row 1 must have exactly 37 sc, with one sc placed in node 3.
Ornament won’t hang flat: block it again and use stiffener.
Care
Hand wash in cool water, press out excess water in a towel, and reshape and pin flat to dry. Store it flat or hang it so it doesn’t get crushed.
Final Notes
The measurement chain is simple. The 24-sc head ring is 1 in (2.5 cm) across. The 18-ch spine is 2.5 in (6.4 cm) long. Each 36-sc tier 3 loop reaches 1.75 in (4.4 cm), which makes the hem 3.5 in (8.9 cm) wide. The 37-st red trim adds 0.25 in (0.6 cm), bringing the angel to 3.5 in × 4 in (8.9 cm × 10.2 cm), plus 1 in (2.5 cm) for the hanging loop. If you hit each checkpoint as you go, the finished angel will match. Make a few for the tree or tie one onto a gift.
Happy crocheting!