

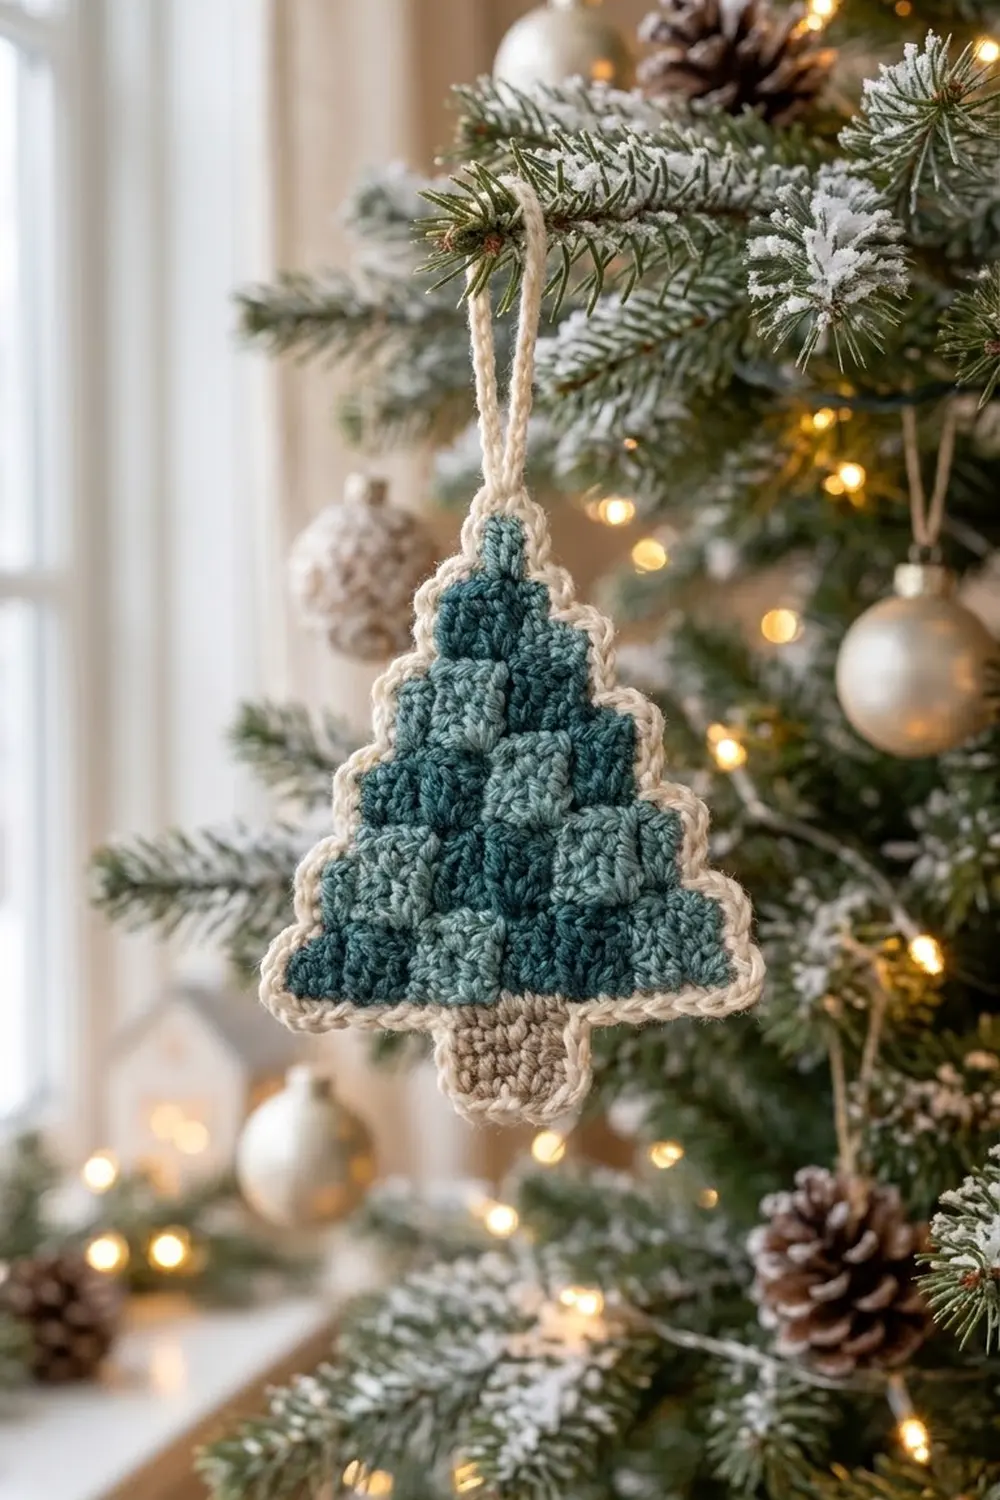
The Evergreen Checkerboard Tree is a flat Christmas tree ornament made of small square tiles. Two shades of teal alternate in offset rows like bricks, so the tree looks quilted. A tan trunk sits below the tree, and a cream crab-stitch border and loop finish the outline.
The palette is calm: deep teal, soft sage-teal, oatmeal tan and warm cream. It suits a minimalist tree, a gift tag, or a row of ornaments hung across a window.
This pattern uses US crochet terms. The finished ornament measures about 5.3″ wide x 6.1″ tall (13.5 cm x 15.5 cm), not counting the hanging loop. The loop adds about 1.5″ (3.8 cm).
The tree is one single piece, worked flat from the bottom up in double crochet rows. Each tile is 4 stitches wide and 2 rows tall, and the colors change inside each row. Each new tile row starts 2 stitches in from both edges, which creates the stepped sides. The trunk is worked down from the foundation chain, and two border rounds and a loop finish the ornament.
Finished Size and Construction
- Finished size: 5.3″ x 6.1″ (13.5 cm x 15.5 cm), plus a 1.5″ (3.8 cm) loop
- Skill level: Intermediate (simple stitches with tapestry-style color changes)
- Terminology: US
- Yarn weight: DK (#3)
- Hook: 4.0 mm (G-6)
- Number of pieces: 1 (no joining)
- Layout: 6 tile rows of 6, 5, 4, 3, 2 and 1 tiles (21 tiles), with a trunk below
- Tile size: 0.8″ x 0.8″ (2.0 cm x 2.0 cm)
- Size before border: 4.8″ wide x 5.6″ tall (12.2 cm x 14.2 cm), including the trunk
- Border depth: about 0.25″ (0.6 cm) per side
Materials
Choose a smooth DK yarn so the stitches show clearly. Cotton or a cotton blend gives crisp tiles. Soft acrylic also works and blocks well with steam. Use the same yarn line for all colors so the tiles stay the same size.
- Color A, dark teal: 8 g / 19 m
- Color B, light sage-teal: 7 g / 17 m
- Color C, tan/oatmeal (trunk): 2 g / 5 m
- Color D, cream (border and loop): 5 g / 12 m
These amounts include a margin. Colors A and B are carried inside the stitches through most rows, which uses more yarn than the tiles alone.
Tools:
– 4.0 mm (G-6) crochet hook
– Tapestry needle
– Scissors
– 2 stitch markers
– Ruler or tape measure
– Blocking mat and rust-proof pins
– Spray bottle or steamer
Abbreviations (US Terms)
- ch – chain
- sl st – slip stitch
- sc – single crochet
- dc – double crochet
- rev sc – reverse single crochet (crab stitch)
- st(s) – stitch(es)
- sp – space
- RS / WS – right side / wrong side
Color change: Work the last dc of a tile until 2 loops remain on the hook. Yarn over with the new color and pull through both loops. Lay the old color along the top of the row and work the next stitches over it, so it stays hidden inside them.
Reverse single crochet (rev sc): Work from left to right. Insert the hook into the next stitch to the right, yarn over, pull up a loop, yarn over and pull through both loops.
Gauge and Checkpoints
Gauge: 20 dc and 10 rows = 4″ (10.2 cm). One tile (4 dc x 2 rows) = 0.8″ x 0.8″ (2.0 cm x 2.0 cm).
Because this is a single piece, the first tile row is your test. Work Rows 1–2, then lay the piece flat and measure before you go on.
Checkpoints:
– After Row 2: 4.8″ wide x 0.8″ tall (12.2 cm x 2.0 cm)
– After Row 6: 2.4″ tall (6.1 cm), with a top row 3.2″ wide (8.1 cm)
– After Row 12: 4.8″ wide x 4.8″ tall (12.2 cm x 12.2 cm)
– After the trunk: 5.6″ tall (14.2 cm) in total
– After the border: 5.3″ x 6.1″ (13.5 cm x 15.5 cm)
A difference of ±0.2″ (0.5 cm) is fine. If Row 2 is wider than 5.0″ (12.7 cm), restart with a 3.75 mm hook. If it is narrower than 4.6″ (11.7 cm), switch to a 4.5 mm hook. If the width is right but the tiles are too tall, pull up shorter loops on each dc.

Tree Body
Work the body in rows, starting at the base. RS rows go right to left and WS rows come back left to right. On WS rows, work each stitch in the same color as the stitch below it. Color sequences are listed in the order you work them.
The ch-3 at the start of each row counts as the first dc. It belongs to the first tile and is made in that tile’s color.
Foundation and Row 1 (RS): With B, ch 26. Dc in 4th ch from hook (the 3 skipped ch count as the first dc). Dc in next 2 ch, changing to A on the last one. Carry B and continue across: 4 A, 4 B, 4 A, 4 B, 4 A. That gives 6 tiles in the order B, A, B, A, B, A. (24 dc)
Row 2 (WS): Ch 3 (counts as dc), turn. Dc in each st across, matching the colors below: A, B, A, B, A, B. (24 dc)
Measure now (see checkpoints).
How each new tile row starts: Turn and sl st in each of the first 3 sts, using the color already on your hook. If the first tile of the new row is a different color, change to it on the 3rd sl st. Ch 3 (counts as the first dc). Work across and leave the last 2 sts unworked. That moves the row in 2 sts on each side and makes one step on each edge.
Row 3 (RS): Turn, sl st in first 3 sts, ch 3, dc in next 19 sts. Leave 2 sts unworked. Colors: A, B, A, B, A. (20 dc, 5 tiles)
Row 4 (WS): Ch 3, turn, dc in next 19 sts. Colors: A, B, A, B, A. (20 dc)
Row 5 (RS): Turn, sl st in first 3 sts, ch 3, dc in next 15 sts, leave 2 sts unworked. Colors: B, A, B, A. (16 dc, 4 tiles)
Row 6 (WS): Ch 3, turn, dc in next 15 sts. Colors: A, B, A, B. (16 dc)
Row 7 (RS): Turn, sl st in first 3 sts, ch 3, dc in next 11 sts, leave 2 sts unworked. Colors: A, B, A. (12 dc, 3 tiles)
Row 8 (WS): Ch 3, turn, dc in next 11 sts. Colors: A, B, A. (12 dc)
Row 9 (RS): Turn, sl st in first 3 sts, ch 3, dc in next 7 sts, leave 2 sts unworked. Colors: B, A. (8 dc, 2 tiles)
Row 10 (WS): Ch 3, turn, dc in next 7 sts. Colors: A, B. Cut B at the end of this row. (8 dc)
Row 11 (RS): With A, turn, sl st in first 3 sts, ch 3, dc in next 3 sts, leave 2 sts unworked. (4 dc, 1 tile)
Row 12 (WS): Ch 3, turn, dc in next 3 sts. (4 dc) Fasten off.
Stitch count summary: Rows 1–2: 24 · Rows 3–4: 20 · Rows 5–6: 16 · Rows 7–8: 12 · Rows 9–10: 8 · Rows 11–12: 4.
Tile count: A = 3 + 3 + 2 + 2 + 1 + 1 = 12 tiles. B = 3 + 2 + 2 + 1 + 1 = 9 tiles. That makes 21 tiles in total.
Each step is 2 sts (0.4″, 1.0 cm) wide and one tile row (0.8″, 2.0 cm) tall. That keeps both sides even and the top tile centered.
Trunk
Turn the tree upside down so the foundation edge is on top, with RS facing. Count 9 sts in from each end and mark the 10th and 15th sts. These are the 6 center sts.
Row 1 (RS): Join C with a standing sc in the free loop at the base of the 10th st. Sc in each of the next 5 free loops. (6 sc)
Rows 2–5: Ch 1, turn, sc in each st across. (6 sc)
Fasten off. The trunk is about 1.1″ wide x 0.8″ tall (2.8 cm x 2.0 cm), with 9 free foundation sts on each side of it.
Weave in all A, B and C ends through stitches of their own color before you start the border.
Border
Border gauge:
– 1 sc in each st along the top and bottom edges
– 2 sc into the end of each dc row
– 1 sc into the end of each sc row
– A ch-1 at every outer corner
– Nothing extra at inner corners, where a step meets the wall above it
Round 1 (RS): With RS facing, join D with a standing sc in the right-hand st of the top edge (last st of Row 12).
- Sc in next 3 sts. (4 sc on the top edge)
- Ch 1 for the top-left corner.
- Down the left side: work 4 sc over the 2 row-ends of tile row 6. Then 2 sc in the 2 ledge sts, ch 1, 4 sc over the next 2 row-ends. Repeat from * 4 more times. (34 sc, 5 ch-1 sps)
- Ch 1 for the bottom-left corner of the tree.
- Along the bottom:
- sc in the 9 free foundation loops
- 5 sc up the side of the trunk
- ch 1
- sc in the 6 trunk sts
- ch 1
- 5 sc along the other trunk side
- sc in the 9 remaining free foundation loops
(34 sc, 2 ch-1 sps)
6. Ch 1 for the bottom-right corner of the tree.
7. Up the right side: 4 sc over 2 row-ends, ch 1, 2 sc in the 2 ledge sts. Repeat from * 4 more times, then work 4 sc over the row-ends of tile row 6. (34 sc, 5 ch-1 sps)
8. Ch 1 for the top-right corner. Sl st to the first sc.
Round 1 total: 4 + 34 + 34 + 34 = 106 sc, plus 16 ch-1 sps.
Round 2: Ch 1, do not turn. Rev sc in each sc and in each ch-1 sp around. (106 + 16 = 122 rev sc) Sl st to the first st and fasten off.
Hanging loop: Join D with a sl st into the 2nd sc of the Round 1 top edge, working behind Round 2. Ch 18, then sl st into the same st. Work 24 sc over the loop, then sl st into the base. Fasten off.
Why the math works:
– Side edges: A DK dc row is about 0.4″ (1.0 cm) tall, and 2 sc cover that height without stretching or ruffling.
– Flat edges: 1 sc per st keeps their width the same.
– Outer corners: each of the 16 gets a ch-1, which gives it room to turn.
– Inner corners: no extra stitches, so the steps stay crisp.
– Round 2: one rev sc in every Round 1 stitch and space makes exactly 122.
– Finished size: each side gains about 0.25″ (0.6 cm). That makes the width 4.8″ + 0.5″ = 5.3″ (13.5 cm) and the height 5.6″ + 0.5″ = 6.1″ (15.5 cm).
Final Blocking
- Lightly mist cotton, or hover a steamer just above acrylic. Don’t press it.
- Lay the ornament RS up on the mat.
- Pin the top point, the two bottom tree corners and the two trunk corners. Make it 5.3″ (13.5 cm) wide and 6.1″ (15.5 cm) tall.
- Pin the outer corner of every step so both sides match.
- Use your fingertips to square up the tiles so the stitches stand straight.
- Pin the loop straight up from the top point.
- Let it dry completely, at least 2 hours, before you unpin.
Final Quality-Control Checklist
- 21 tiles: 12 A and 9 B, with colors alternating in every tile row
- Each tile row is centered, with 2-st steps on both sides
- The top tile is 4 dc wide and centered
- The trunk is 6 sts wide, with 9 free sts on each side
- Round 1 has 106 sc and 16 ch-1 sps. Round 2 has 122 rev sc.
- No carried yarn shows on the RS
- The finished size is 5.3″ x 6.1″ (13.5 cm x 15.5 cm) ±0.2″ (0.5 cm)
- The loop is firm, centered and about 1.5″ (3.8 cm) tall
- All ends are woven in through matching colors
Troubleshooting
Carried yarn peeks through: Keep the carried strand flat along the row top, and snug it gently every few stitches.
Tiles are taller than they are wide: Pull up shorter loops on each dc, or go down 0.25 mm in hook size.
The tree leans to one side: Make sure every RS row starts with exactly 3 sl sts and leaves exactly 2 sts unworked.
Border ripples: Use exactly 2 sc per dc row-end, no more.
Border pulls in at the steps: Check that every outer corner has its ch-1, and work the rev sc loosely.
Blurred color edges: Change color on the final yarn over of the previous stitch.
Care
Hand wash in cool water with mild soap, then roll it in a towel to remove water and dry it flat, reshaping as needed. Store it flat so the loop and points stay crisp.
Final Notes
Everything depends on the first tile row. If Rows 1–2 measure 4.8″ x 0.8″ (12.2 cm x 2.0 cm), each tile is 0.8″ (2.0 cm). Six tile rows then make a stepped triangle 4.8″ (12.2 cm) wide and tall, and the trunk brings the height to 5.6″ (14.2 cm). The border adds 0.25″ (0.6 cm) per side, for a finished ornament of 5.3″ x 6.1″ (13.5 cm x 15.5 cm). Check each measurement as you go, and every tree you make will match.
Happy crocheting!