

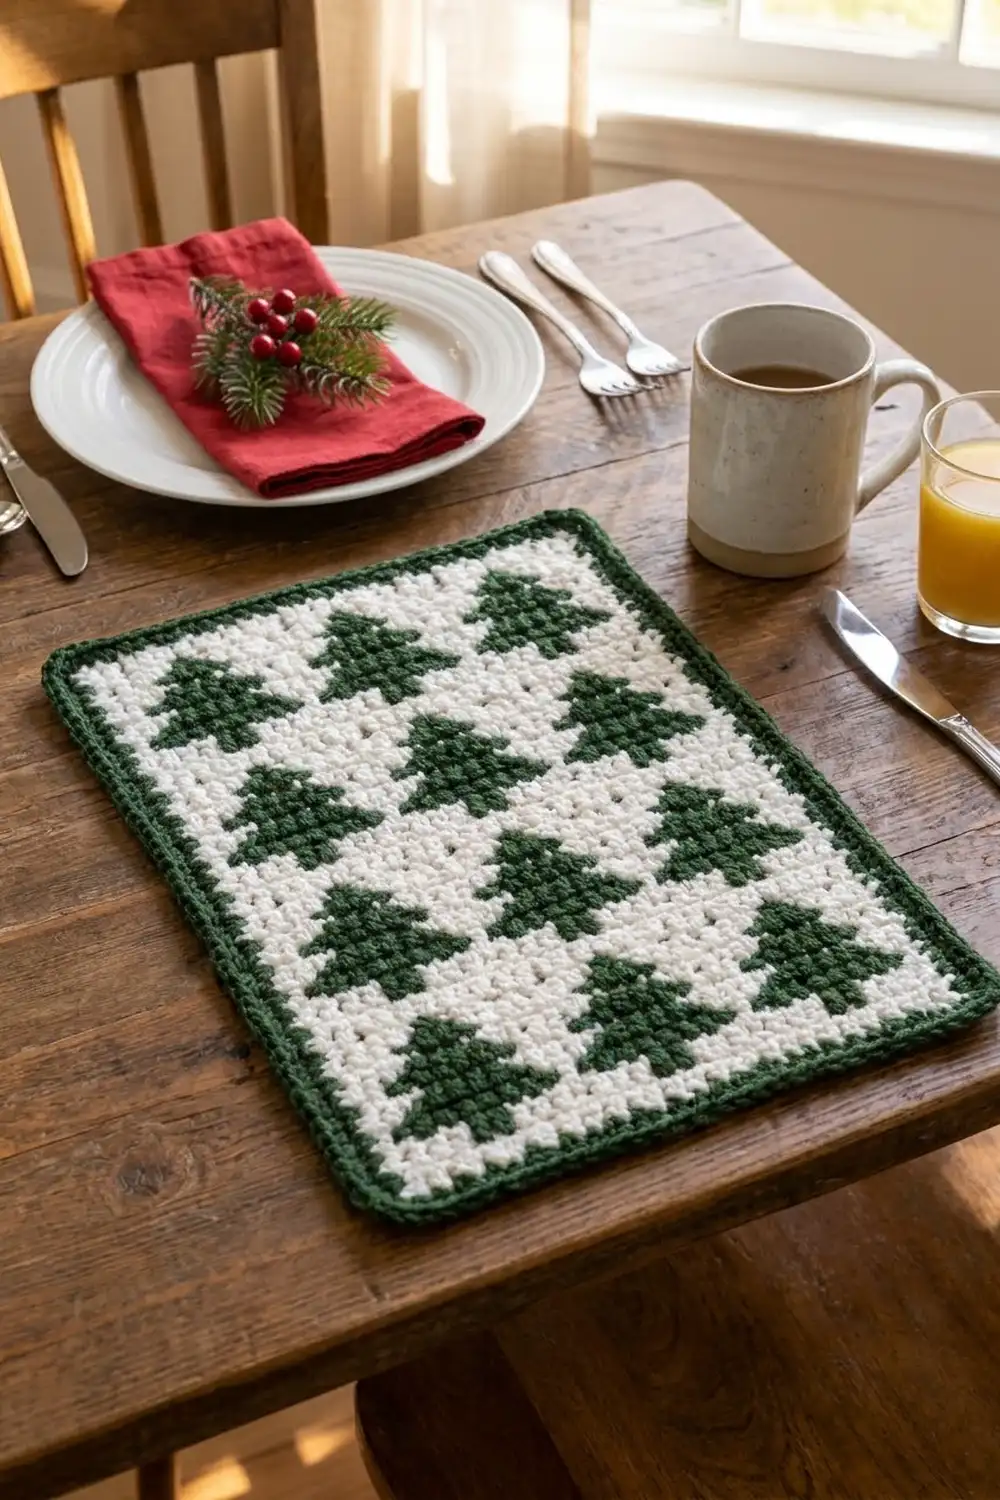
The Evergreen Grove placemat is a crisp, graphic holiday piece. Twelve forest-green trees stand in neat rows on a bright white background, and a deep green corded border frames the whole rectangle. It looks like a little winter woodland on the table.
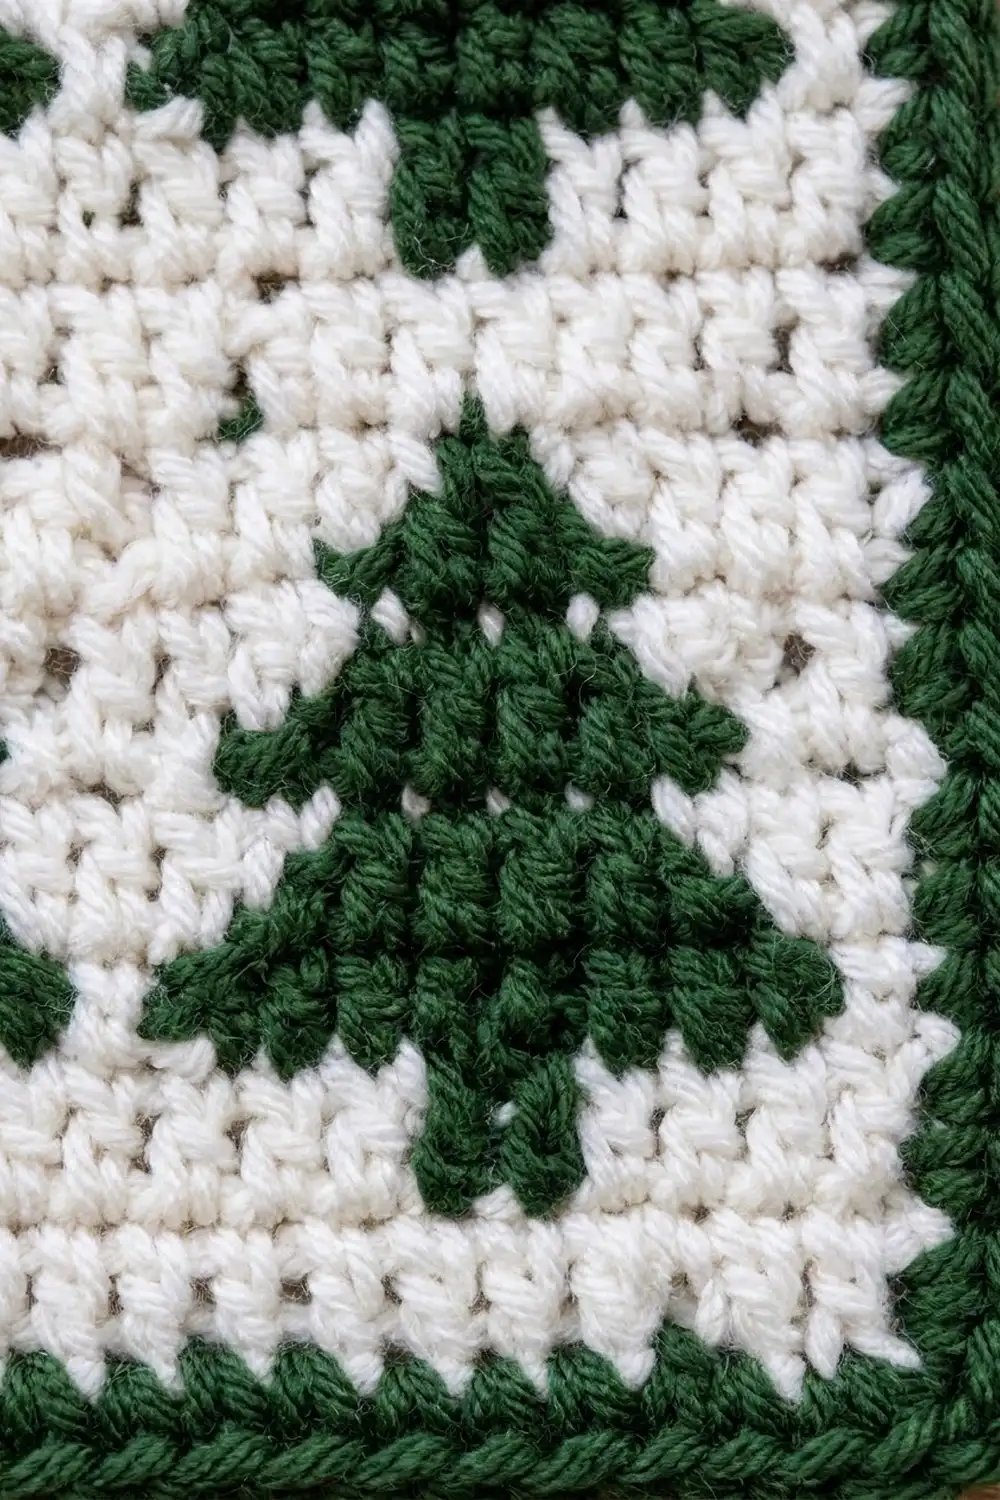
The design uses tapestry crochet in single crochet. Two colors are worked at the same time, and the color you are not using is carried inside the stitches. The result is a thick, firm fabric with sharp edges on every tree, which suits a placemat, a mug-and-plate mat, or a small wall hanging.
This pattern uses US crochet terms. The finished placemat measures 11.25 x 15 in (28.6 x 38.1 cm) after blocking, including the border.
Construction is simple. You make one rectangular panel in rows from the bottom up, following written color counts for each row. Then you add three rounds of border in green, and finish with reverse single crochet for the rope-like edge. There are no separate pieces and nothing to sew together.
Finished Size and Construction
- Finished size: 11.25 x 15 in (28.6 x 38.1 cm)
- Skill level: Intermediate (comfortable with single crochet and color changes)
- Terminology: US crochet terms
- Yarn weight: Worsted (CYC #4, medium)
- Hook: 4.5 mm (US 7)
- Number of pieces: 1
- Layout: 3 trees across x 4 trees up, worked into one panel
- Piece size (body before border): 41 sts x 70 rows = 10.25 x 14 in (26.0 x 35.6 cm)
- Size before border: 10.25 x 14 in (26.0 x 35.6 cm)
- Border depth: 0.5 in (1.3 cm) on each side
- Single tree motif: 9 sts x 11 rows = 2.25 x 2.2 in (5.7 x 5.6 cm)
Materials
Choose a smooth worsted-weight yarn with good stitch definition. Cotton or a cotton blend is ideal for a placemat, because it washes well and holds the tree shapes crisply. Soft acrylic also works well for a wall hanging. Avoid fuzzy or highly textured yarns, since they blur the stepped tree edges.
The amounts below assume about 200 m per 100 g (approximately 219 yd per 100 g).
- White (background): 60 g, approximately 120 m (131 yd)
- Forest green (trees and border): 40 g, approximately 80 m (87 yd)
Quantities include a margin of about 25% for your gauge swatch, carried strands, and tension differences.
Tools:
- 4.5 mm (US 7) crochet hook
- Tapestry needle
- Scissors
- Stitch markers (2 to 4)
- Measuring tape or ruler
- Blocking mat and rust-proof pins
- Spray bottle or steam iron
Abbreviations (US Terms)
- ch – chain
- sc – single crochet
- sl st – slip stitch
- st(s) – stitch(es)
- rev sc – reverse single crochet (crab stitch)
- W – white
- G – forest green
- RS / WS – right side / wrong side
- rep – repeat
Special stitches
Tapestry color change: Work the last sc in the old color until 2 loops remain on the hook. Drop the old color, yarn over with the new color, and pull through both loops. Lay the dropped color along the top of the row and work the next sts over it so it is hidden inside them.
Reverse single crochet (rev sc): Working from left to right (right-handed), insert the hook into the next st to the right, yarn over, pull up a loop, yarn over, and pull through both loops. This creates the twisted, corded edge.
Color counts: In the row instructions, “W6, G3” means 6 sc in white followed by 3 sc in green. Always work the counts in the order written.
Gauge and Checkpoints
Gauge: 16 sc x 20 rows = 4 x 4 in (10.2 x 10.2 cm) in tapestry single crochet, carrying the second color.
Since this is a one-piece design, test your gauge on a small swatch that includes one tree first.
Gauge swatch: Ch 21. Work 20 sc per row for 20 rows, ch 1 and turn at the end of each row. Work Rows 1–4 in W. For Rows 5–15, work W5, the 9-st tree row from the Tree Chart below, then W6. Work Rows 16–20 in W. The swatch should measure 5 x 4 in (12.7 x 10.2 cm), and the tree should measure 2.25 x 2.2 in (5.7 x 5.6 cm).
If your swatch is too big: go down a hook size (4 mm). If your swatch is too small: go up a hook size (5 mm). Carrying yarn tends to tighten rows, so recheck your gauge after changing hooks.
Measurement checkpoints for the body:
- After Row 4: width 10.25 in (26.0 cm)
- After Row 21: height 4.2 in (10.7 cm)
- After Row 38: height 7.6 in (19.3 cm)
- After Row 55: height 11 in (27.9 cm)
- After Row 70: 10.25 x 14 in (26.0 x 35.6 cm)
If the width drifts by more than 0.25 in (0.6 cm), count your stitches first. A missing or extra stitch at the row ends is the usual cause.
Tree Chart (Single Motif)
Each tree is 9 sts wide and 11 rows tall, and is symmetrical. That means it reads the same on RS and WS rows, so you never have to reverse the counts. Tree rows are numbered T1 to T11 from the bottom.
- T1: W3, G3, W3
- T2: W3, G3, W3
- T3: G9
- T4: W1, G7, W1
- T5: W2, G5, W2
- T6: W1, G7, W1
- T7: W2, G5, W2
- T8: W3, G3, W3
- T9: W2, G5, W2
- T10: W3, G3, W3
- T11: W4, G1, W4
T1–T2 form the square trunk, and T3–T11 form three stepped tiers that end in a single-stitch point. Each tree uses 51 green sts.
Placemat Body
The body is worked flat in rows. Ch 1 at the start of each row does not count as a stitch. Every row has 41 sts.
Across the width, the layout is 3 W margin sts + tree (9) + 4 W gap + tree (9) + 4 W gap + tree (9) + 3 W margin sts = 41 sts.
Up the height, the layout is 4 W rows, then four tree bands of 11 rows, separated by three gaps of 6 W rows, then 4 W rows: 4 + 44 + 18 + 4 = 70 rows.
Foundation: With W, ch 42.
Row 1 (RS): Sc in 2nd ch from hook and in each ch across, turn. (41 sts)
Rows 2–4: Ch 1, sc in each st across, turn. (41 sts)
Join G at the start of Row 5 by laying it along the top of Row 4 and working the first sts over it.
Tree Band (work 4 times)
Work these 11 rows, carrying the unused color inside the stitches the whole time. Ch 1 and turn at the end of each row.
- Band Row 1 (T1): W6, G3, W10, G3, W10, G3, W6. (41 sts)
- Band Row 2 (T2): W6, G3, W10, G3, W10, G3, W6. (41 sts)
- Band Row 3 (T3): W3, G9, W4, G9, W4, G9, W3. (41 sts)
- Band Row 4 (T4): W4, G7, W6, G7, W6, G7, W4. (41 sts)
- Band Row 5 (T5): W5, G5, W8, G5, W8, G5, W5. (41 sts)
- Band Row 6 (T6): W4, G7, W6, G7, W6, G7, W4. (41 sts)
- Band Row 7 (T7): W5, G5, W8, G5, W8, G5, W5. (41 sts)
- Band Row 8 (T8): W6, G3, W10, G3, W10, G3, W6. (41 sts)
- Band Row 9 (T9): W5, G5, W8, G5, W8, G5, W5. (41 sts)
- Band Row 10 (T10): W6, G3, W10, G3, W10, G3, W6. (41 sts)
- Band Row 11 (T11): W7, G1, W12, G1, W12, G1, W7. (41 sts)
Every band row adds up to 41: for example, Band Row 3 is 3 + 9 + 4 + 9 + 4 + 9 + 3 = 41.
Full Row Sequence
- Rows 5–15: Tree Band 1
- Rows 16–21: With W, sc in each st across. (41 sts)
- Rows 22–32: Tree Band 2
- Rows 33–38: With W, sc in each st across. (41 sts)
- Rows 39–49: Tree Band 3
- Rows 50–55: With W, sc in each st across. (41 sts)
- Rows 56–66: Tree Band 4
- Rows 67–70: With W, sc in each st across. (41 sts)
Carrying G between bands: Do not cut G at the end of each band. Drop it at the edge and carry it loosely up the side for the 6 W rows. Catch it under the first st of every other row. The border will completely cover this strand. After Row 66, cut G and weave it in.
After Row 70, fasten off W. The body measures 10.25 x 14 in (26.0 x 35.6 cm) and has 12 trees with 612 green sts in all.
Border
Border gauge: The border uses the same 4 sc per in (4 sc per 2.54 cm) as the body. Each sc round adds about 0.25 in (0.6 cm) per side, and the rev sc round adds the corded edge without adding noticeable size.
On the sides, row ends are picked up at 4 sc per 5 rows. This matches 16 sts and 20 rows per 4 in (10.2 cm), so the side stays flat and does not ruffle.
Corners: Each corner is a group of 3 sc worked into one st. The middle sc of each group is the corner center. In the per-side counts below, each side count includes that side’s 2 corner center sts, so corners are shared between neighboring sides.
Round 1: With RS facing, join G with a sl st in the first st of Row 70 (top corner). Ch 1, 3 sc in the same st, sc in each of next 39 sts, 3 sc in the last st. Working down the side row ends, work 56 sc evenly (4 sc over every 5 rows, 14 times). Working along the opposite side of the foundation chain, 3 sc in the first ch, sc in each of next 39 ch, 3 sc in the last ch. Working up the second side, work 56 sc evenly as before. Join with a sl st to the first sc.
Count: 39 + 39 + 56 + 56 sts between corners, + 12 corner sts = 202 sts. Per side, the top and bottom have 43 sts and the sides have 60 sts. Check: (2 x 43) + (2 x 60) − 4 shared corners = 202.
Round 2: Ch 1, sc in the same st as the join, *3 sc in the next st (corner center), sc in each st to the next corner center; rep from * 3 more times, ending with sc in each remaining st. Join with a sl st to the first sc.
Count: 210 sts (8 more than Round 1, 2 per corner). Per side, the top and bottom have 45 sts and the sides have 62 sts. Check: (2 x 45) + (2 x 62) − 4 = 210.
Round 3 (conversion round): Ch 1. Working from left to right, work 1 rev sc in each st around. Join with a sl st to the first rev sc and fasten off.
Count: 210 rev sc worked 1 per existing st + 0 added = 210 sts. Without extra corner sts, the corners round off softly, giving the rounded framed look.
Why the math works: All 41 body sts on the top and bottom edges are used (39 sts + 2 corner centers). The 56 side sts equal 14 in x 4 sts per in, matching the body height exactly. Each corner adds just enough to turn 90 degrees, so the border lies flat. Two sc rounds plus the corded edge give 0.5 in (1.3 cm) per side. That makes the finished size 10.25 + 1 = 11.25 in (28.6 cm) by 14 + 1 = 15 in (38.1 cm).
Final Blocking
- Weave in all ends on the WS, running each end through same-color stitches so it doesn’t show through.
- Lay the placemat RS up on a blocking mat.
- Pin the four corners to 11.25 x 15 in (28.6 x 38.1 cm).
- Add pins along each side about every 2 in (5.1 cm), keeping the edges straight.
- Mist with water until damp, or hover a steam iron about 1 in (2.5 cm) above the fabric. Do not press acrylic.
- Gently nudge any leaning tree columns back into straight lines.
- Leave to dry completely before unpinning.
Final Quality-Control Checklist
- Body has 41 sts per row and 70 rows.
- There are 12 trees in 3 columns and 4 rows, all pointing the same way.
- Each tree has a 3-st trunk, three tiers, and a 1-st point.
- No green shows through the white areas, and no white shows through the trees.
- Border Round 1 has 202 sts, and Rounds 2 and 3 have 210 sts each.
- Corners are smoothly rounded and the edges lie flat.
- Finished size is 11.25 x 15 in (28.6 x 38.1 cm).
- All ends are woven in securely.
Troubleshooting
Trees are leaning or slanting: This is normal for tapestry sc. Blocking reduces it. Working sc through the back loop only on the WS rows can also help.
Carried yarn peeks through: Keep the carried strand flat along the top of the previous row and work snugly over it. A tighter, contrasting color shows through more easily.
Panel is narrowing: You are probably skipping the first or last st. Place markers in both and count to 41 every few rows.
Side border ruffles: You have too many sts. Rework at 4 sc per 5 rows, or drop to 3 sc per 4 rows if your rows are shorter.
Side border pulls in: You have too few sts. Add 1 sc per 10 rows, then recount so both sides match.
Yarns tangle: Turn the work in the same direction every time, then reverse direction on the next turn.
Care
Hand wash or machine wash on gentle in cool water, then reshape and dry flat. Do not tumble dry or iron directly on acrylic yarn.
Final Notes
The measurement chain is short and simple. Your gauge of 16 sc x 20 rows = 4 in (10.2 cm) gives a 9 x 11-st tree of 2.25 x 2.2 in (5.7 x 5.6 cm). Twelve trees on the 41 x 70 grid give a body of 10.25 x 14 in (26.0 x 35.6 cm). The 0.5 in (1.3 cm) green corded border brings the placemat to 11.25 x 15 in (28.6 x 38.1 cm). Check each stage as you go, and your grove will come out straight and even.
Happy crocheting!