

This Ribbon Lattice panel is a lacy rectangle of eight crocheted bows, each held inside a fine gray chain-mesh frame. The bows sit in four horizontal rows, two bows per row. Where the cells meet, the gray spokes cross in small X shapes, so the finished panel looks like a ribbon trellis.
The colors are soft and vintage-inspired. Rows 1 and 3 have dove gray bows, and rows 2 and 4 have pastel pink bows. All frames, seams and the border are worked in gray, which ties the piece together. The panel works well as a dresser scarf, a wall hanging or a lacy accent over a cushion.
The pattern uses US crochet terms. The finished panel measures 12.5 x 20 in (31.8 x 50.8 cm) after blocking.
Construction is simple and repeatable. You crochet each bow in one piece, frame it with three gray rounds to make a rectangular block, join eight blocks in a 2 x 4 layout, and finish with a two-round border.
Finished Size and Construction
- Finished size: 12.5 x 20 in (31.8 x 50.8 cm)
- Skill level: Intermediate
- Terminology: US crochet terms
- Yarn weight: Worsted (#4), cotton or cotton blend
- Hook: 4.5 mm (US 7)
- Number of pieces: 8 bow blocks
- Layout: 2 blocks across x 4 blocks down
- Block size: 5.75 x 4.75 in (14.6 x 12.1 cm)
- Size before border: 11.5 x 19 in (29.2 x 48.3 cm)
- Border depth: 0.5 in (1.3 cm) on each side
Materials
Yarn: Choose a smooth worsted-weight cotton or cotton blend with good stitch definition. Fuzzy yarns blur the open loops and fill in the lattice, so avoid them.
- Gray: 65 g (about 117 m), for 4 bows, all frames, the seams and the border
- Pink: 20 g (about 36 m), for 4 bows
These quantities include a margin of about 25 percent for gauge differences and swatching.
Tools:
– 4.5 mm (US 7) crochet hook
– Tapestry needle
– Scissors
– Stitch markers (at least 6)
– Blocking mat, rustproof pins and a spray bottle
– Measuring tape
Abbreviations (US Terms)
- ch – chain
- sl st – slip stitch
- sc – single crochet
- hdc – half double crochet
- dc – double crochet
- tr – treble crochet
- sp(s) – space(s)
- st(s) – stitch(es)
- RS / WS – right side / wrong side
- rep – repeat
Special technique – anchor: An anchor is the specific stitch on the bow where a frame chain attaches. Mark each anchor with a stitch marker before you start the frame.
Gauge and Checkpoints
Gauge: 16 sc and 16 rows = 4 in (10.2 cm) in rows of sc.
Before committing to all eight blocks, make one complete block first and check it against these measurements:
- Finished bow (unblocked): about 4.25 in (10.8 cm) wide from loop tip to loop tip, and about 3.5 in (8.9 cm) tall from loop top to tail tip.
- After Frame Round 1: the six chain spaces should reach past the bow and lie loosely. Don’t measure yet.
- After Frame Round 3: pin the block flat. It should measure 5.75 x 4.75 in (14.6 x 12.1 cm). That works out to 23 sts across at 4 sts per inch, and 19 sts down.
If the block is too big, go down to a 4 mm hook for the frame rounds only. If it’s too small, go up to a 5 mm hook for the frame rounds. Keep the bow on the 4.5 mm hook so the loops stay crisp. Small differences in the bow itself are fine, because the chain spokes absorb them.
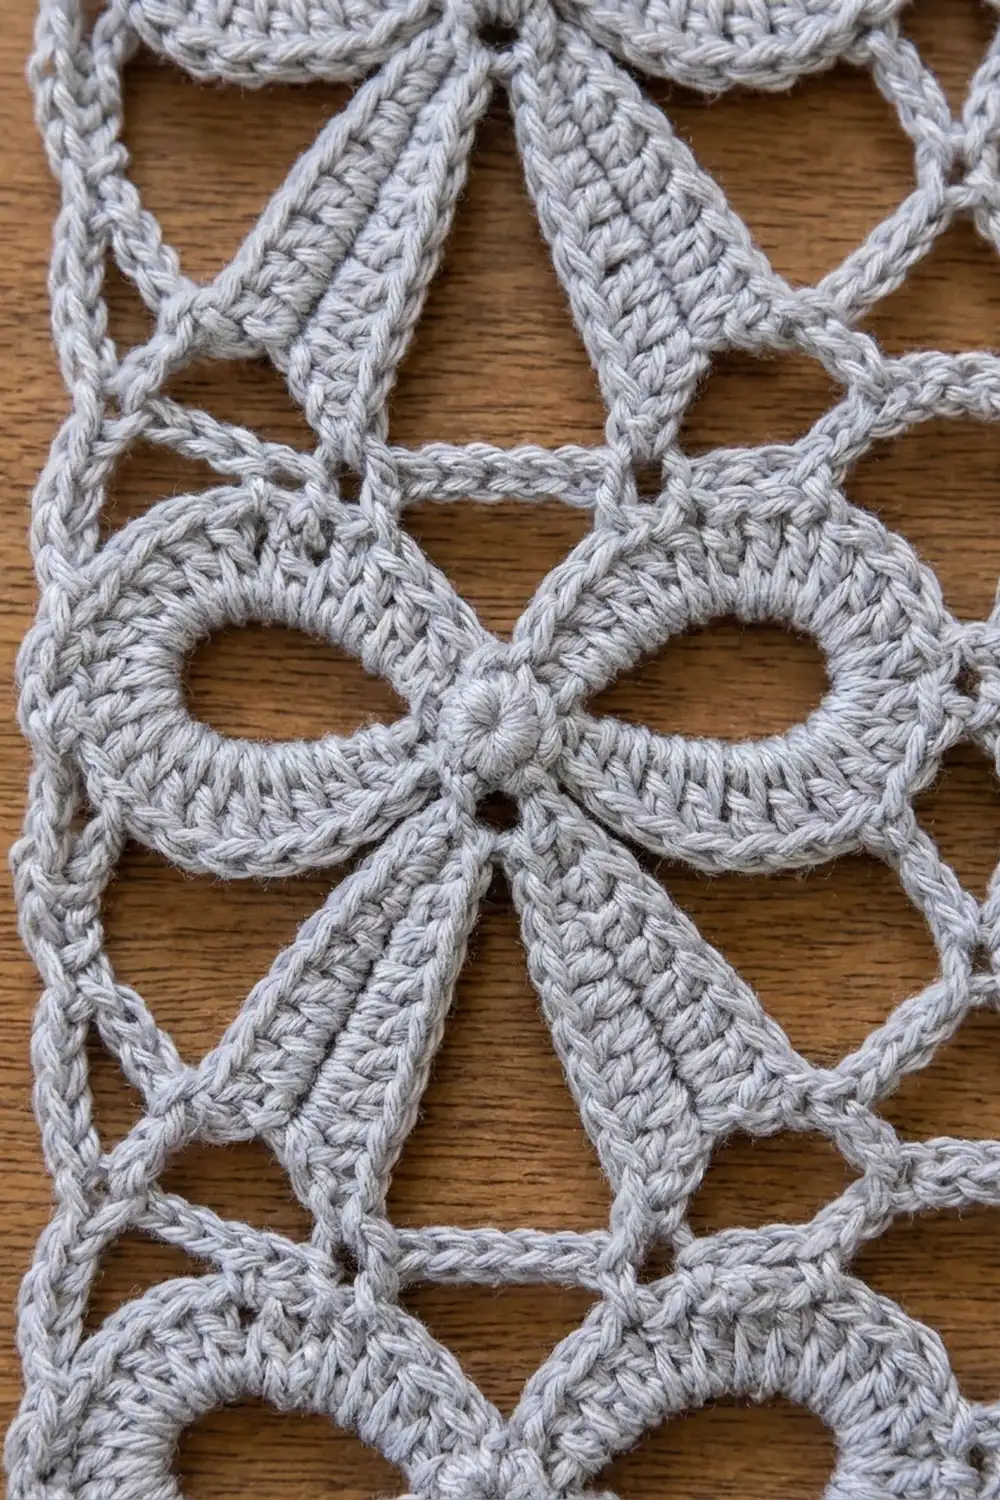
Bow Motif (Make 4 Gray, 4 Pink)
Center Knot
Ch 4, sl st in the first ch to form a ring.
Rnd 1 (RS): Ch 1, 10 sc in the ring, sl st in the first sc. (10 sc)
Number the sc from 1 to 10 in the order you worked them, where sc 1 is the stitch you joined into. Sc 1 sits at the top of the knot. Sc 3 and sc 8 are on opposite sides, and sc 5 and sc 6 are at the bottom.
Loop A
Sl st in sc 2, sl st in sc 3.
Ch 12, sl st in sc 3 again. This makes a ch-12 loop.
Ch 1. Working into the loop, make 2 sc, 16 dc and 2 sc. (20 sts)
Sl st in sc 3 to anchor the loop. The dc stitches bulge outward and form an oval with an open center.
Tail A
Sl st in sc 4, sl st in sc 5.
Ch 10. Tr in the 5th ch from the hook (the skipped 4 ch count as a tr). Then make 1 tr in the next ch, 1 dc in each of the next 2 ch, 1 hdc in the next ch and 1 sc in the last ch. (7 sts, counting the beginning ch)
Sl st in sc 5. The tall stitches sit at the tip and the short stitches sit at the knot, so the tail widens into a flat, angled tip.
Tail B
Sl st in sc 6. Repeat the Tail A instructions, then sl st in sc 6.
The two tails come out of neighboring knot stitches, so they splay naturally into a V.
Loop B
Sl st in sc 7, sl st in sc 8. Repeat the Loop A instructions, then sl st in sc 8.
Sl st in sc 9, sc 10 and sc 1. Fasten off and weave in the ends.
Mark the anchors. Lay the bow RS up with Loop A on your right. Place markers in:
- Loop A top: the 4th dc counted from the knot along the upper edge of the loop
- Loop A tip: the dc at the outermost point (usually the 8th or 9th dc)
- Tail A tip: the top of the beginning ch-4
- Tail B tip: the top of the beginning ch-4
- Loop B tip: mirror of Loop A tip
- Loop B top: mirror of Loop A top
Before framing, check the bow against the measurements in the first checkpoint.
Gray Frame (Every Block)
Work the frame with gray on every bow. Rounds go clockwise around the bow, starting at Loop A top.
Frame Rnd 1 (spokes):
1. Join gray with sc in Loop A top. Ch 15 for the top-right corner sp.
2. Sc in Loop A tip. Ch 19 for the bottom-right corner sp.
3. Sc in Tail A tip. Ch 9 for the bottom sp.
4. Sc in Tail B tip. Ch 19 for the bottom-left corner sp.
5. Sc in Loop B tip. Ch 15 for the top-left corner sp.
6. Sc in Loop B top. Ch 10 for the top sp.
7. Sl st in the first sc.
(6 sc, 6 ch-sps, 87 ch)
Frame Rnd 2 (corners and edges):
1. Sl st in each of the first 8 ch of the top-right ch-15. Ch 1, then (sc, ch 3, sc) in the 8th ch. This is the top-right corner.
2. Ch 15 for the right edge. (Sc, ch 3, sc) in the 13th ch of the bottom-right ch-19. This is the bottom-right corner.
3. Ch 19 for the bottom edge. (Sc, ch 3, sc) in the 7th ch of the bottom-left ch-19. This is the bottom-left corner.
4. Ch 15 for the left edge. (Sc, ch 3, sc) in the 8th ch of the top-left ch-15. This is the top-left corner.
5. Ch 19 for the top edge. Sl st in the first sc.
(8 sc, 4 ch-3 corner sps, 68 edge ch)
Each corner pulls Round 1 into two diagonal spokes. The edge chains run free between the corners, which leaves the open lattice windows.
Frame Rnd 3 (edge):
1. Sl st in the first ch-3 sp. Ch 1, then (sc, ch 2, sc) in the same sp.
2. Right edge: sc in the next sc, sc in each of the 15 ch, sc in the next sc.
3. (Sc, ch 2, sc) in the next ch-3 sp.
4. Bottom edge: sc in the next sc, sc in each of the 19 ch, sc in the next sc.
5. Repeat steps 3 to 4 for the left side (15 ch) and the top (19 ch), then make the last corner.
6. Sl st in the first sc. Fasten off.
Stitch counts per side (each count includes that side’s 2 corner sc):
– Right side: 1 + 1 + 15 + 1 + 1 = 19 sts
– Left side: 1 + 1 + 15 + 1 + 1 = 19 sts
– Top: 1 + 1 + 19 + 1 + 1 = 23 sts
– Bottom: 1 + 1 + 19 + 1 + 1 = 23 sts
– Round total: 84 sc plus 4 ch-2 corner sps
At 4 sts per inch, the block measures 5.75 x 4.75 in (14.6 x 12.1 cm).
Make All Pieces
- Gray-bow blocks: 4 (gray bow, gray frame)
- Pink-bow blocks: 4 (pink bow, gray frame)
Layout (G = gray-bow block, P = pink-bow block):
Row 1:  G  G
Row 2:  P  P
Row 3:  G  G
Row 4:  P  P
Lightly steam or wet-block each block to 5.75 x 4.75 in (14.6 x 12.1 cm) before joining. Joining is much easier when every block has matching edges.
Joining
Method: Use a gray slip-stitch seam. Hold two blocks WS together and work through the inside loops of both blocks.
Step 1 – Join the rows. For each row, hold its two blocks with their 19-st sides together.
1. Sl st through both ch-2 corner sps.
2. Make 19 sl sts, pairing each st with the matching st on the other block.
3. Finish by sl st through the opposite ch-2 corner sps.
This gives you four 2-block strips, each 46 sts across (23 + 23).
Step 2 – Join the strips. Hold Row 1 and Row 2 together along their 46-st edges.
1. Pair the stitches 1 to 1 across the first block (23 sl sts).
2. Sl st through all four corner ch-2 sps at the junction.
3. Continue across the second block (23 sl sts).
4. Repeat to add Row 3, then Row 4.
At every four-block junction, the eight diagonal spokes meet and form the X in the lattice.
Tension: Keep the sl sts as loose as the sc edge. A tight seam will pucker the rows. If yours tightens, go up 0.5 mm for the seams.
Size checkpoint: The joined panel should measure 11.5 x 19 in (29.2 x 48.3 cm). That’s 46 sts across and 76 sts down (4 blocks x 19).
Border
Border gauge: 16 sc and 16 rows = 4 in (10.2 cm). Each border round adds 0.25 in (0.6 cm) on every side.
Starting counts: Top and bottom are 2 blocks x 23 sts = 46 sts. Each long side is 4 blocks x 19 sts = 76 sts. Seams add no stitches. At each seam junction, skip the two ch-2 sps and the seam itself, and work straight from the last sc of one block into the first sc of the next.
Border Rnd 1: Join gray in any panel corner ch-2 sp with (sc, ch 2, sc). Work sc in each st around, skipping seam junctions as described above. At each of the other 3 panel corners, work (sc, ch 2, sc) in the ch-2 sp. Sl st in the first sc.
– Top and bottom: 46 sts worked 1-per-st + 2 corner sc = 48 sts
– Long sides: 76 sts worked 1-per-st + 2 corner sc = 78 sts
– Total: 252 sc plus 4 ch-2 sps
Border Rnd 2: Sl st in the corner ch-2 sp. Ch 1, then (sc, ch 2, sc) in the same sp. Sc in each st around, with (sc, ch 2, sc) in each corner sp. Sl st in the first sc. Fasten off.
– Top and bottom: 48 sts worked 1-per-st + 2 corner sc = 50 sts
– Long sides: 78 sts worked 1-per-st + 2 corner sc = 80 sts
– Total: 260 sc plus 4 ch-2 sps
Why the math works:
– Top and bottom: 50 sts at 4 sts per inch = 12.5 in (31.8 cm).
– Long sides: 80 sts at 4 sts per inch = 20 in (50.8 cm).
– Depth: two rounds at 0.25 in (0.6 cm) each make the 0.5 in (1.3 cm) border.
– Check: 11.5 in + 0.5 in + 0.5 in = 12.5 in, and 19 in + 0.5 in + 0.5 in = 20 in.
Final Blocking
- Weave in all ends along the sc edges, not through the open chains.
- Soak the panel in cool water for 10 minutes, then press out the water in a towel. Don’t wring it.
- Lay it RS up on the blocking mat.
- Pin the four outer corners to 12.5 x 20 in (31.8 x 50.8 cm).
- Pin the middle of each side, then add pins about every 1 in (2.5 cm) along the border.
- Pin each four-block junction so the X spokes run straight.
- Shape each bow: pull the loops into even ovals, open the centers, and pin the tail tips into a clean V.
- Leave it to dry completely, usually 24 hours.
Final Quality-Control Checklist
- [ ] There are 8 blocks: 4 gray-bow, 4 pink-bow, in alternating rows
- [ ] Every block measures 5.75 x 4.75 in (14.6 x 12.1 cm) with 23/19 sts per side
- [ ] Each bow has 2 loops of 20 sts and 2 tails of 7 sts
- [ ] All 6 spokes per block are attached at the correct anchors
- [ ] The seams lie flat, with no puckers or gaps
- [ ] The Border Rnd 2 counts are 50 / 80 / 50 / 80
- [ ] The panel measures 12.5 x 20 in (31.8 x 50.8 cm)
- [ ] All ends are secured and hidden
Troubleshooting
The bow loops cup or ruffle. Your dc are too loose for the ch-12 loop. Try 15 dc instead of 16, or go down a hook size for the bow only.
The spokes sag after joining. Your chains are too loose. Work the frame on a 4 mm hook.
The block won’t reach 5.75 in (14.6 cm). Recount Frame Rnd 3. A missed sc in a 19-ch edge is the most common cause.
The tails point straight down instead of splaying. Make sure Tail A starts in sc 5 and Tail B in sc 6, not both in the same sc.
The border ripples. You have probably added stitches at the seam junctions. Recount against 48/78 for Rnd 1.
The corners curl. Re-block and pin the corner ch-2 sps out firmly.
Care
Hand wash in cool water with mild soap, press out the water in a towel and dry flat, pinning to shape if needed. Don’t tumble dry, because heat can shrink the cotton and distort the lattice.
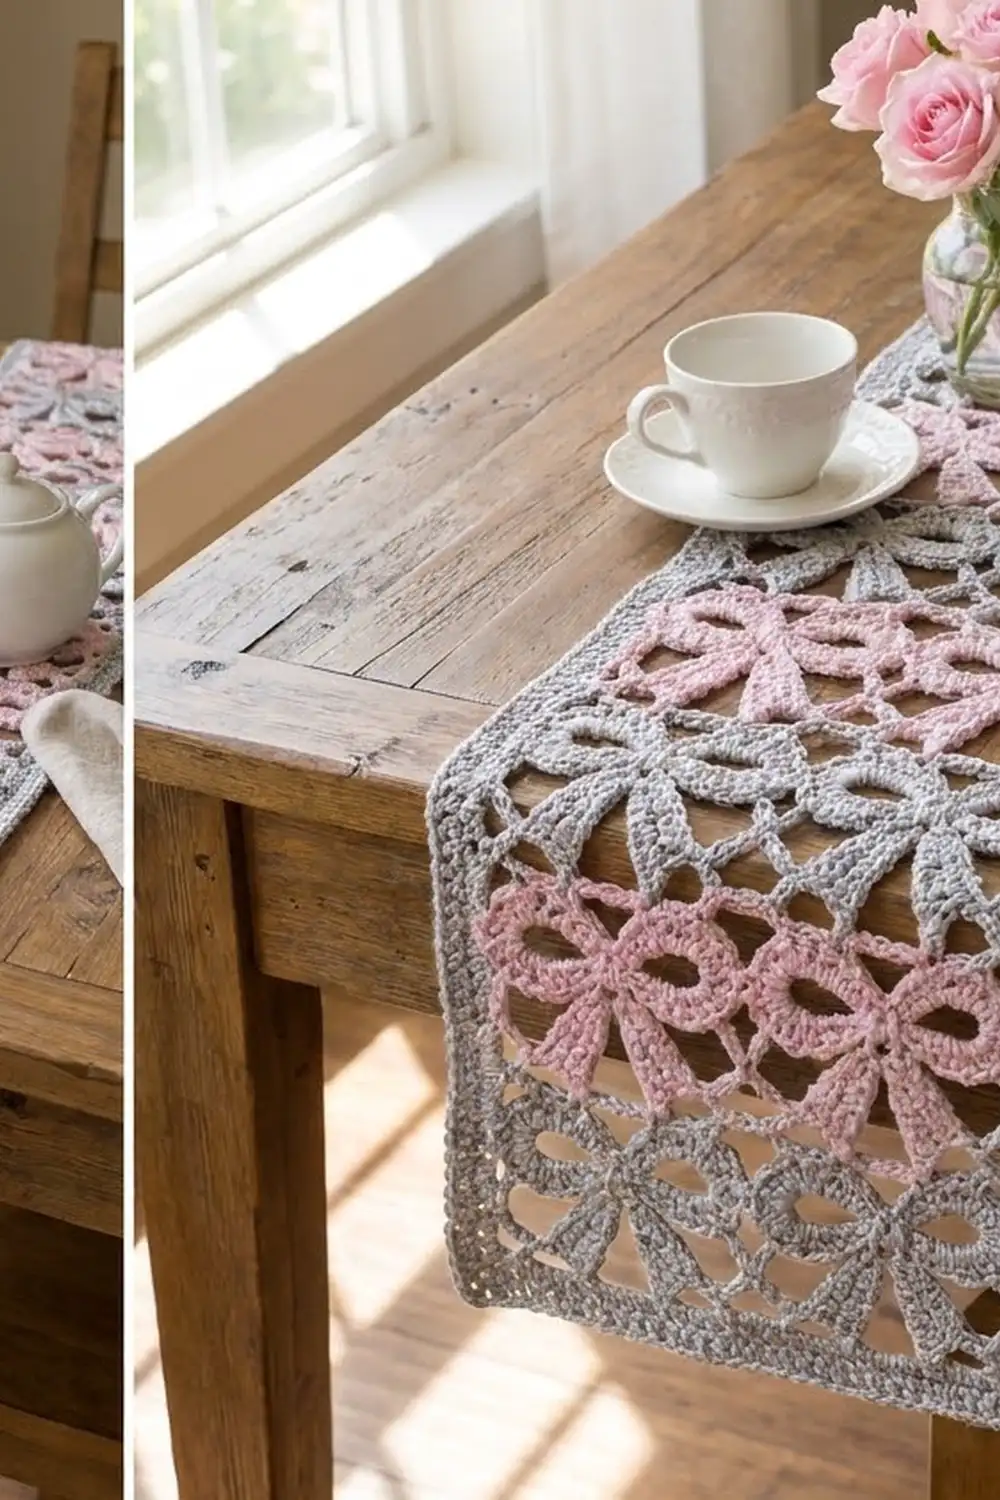
Final Notes
The whole design depends on one measurement chain:
- Each bow anchors a gray frame of exactly 23 x 19 sts, making a 5.75 x 4.75 in (14.6 x 12.1 cm) block.
- Two blocks across and four down give 46 x 76 sts, or 11.5 x 19 in (29.2 x 48.3 cm), with seams that add nothing.
- Two border rounds bring the counts to 50 x 80 sts, for a finished 12.5 x 20 in (31.8 x 50.8 cm).
If you check your first block carefully, every later step will line up.
Happy crocheting!