

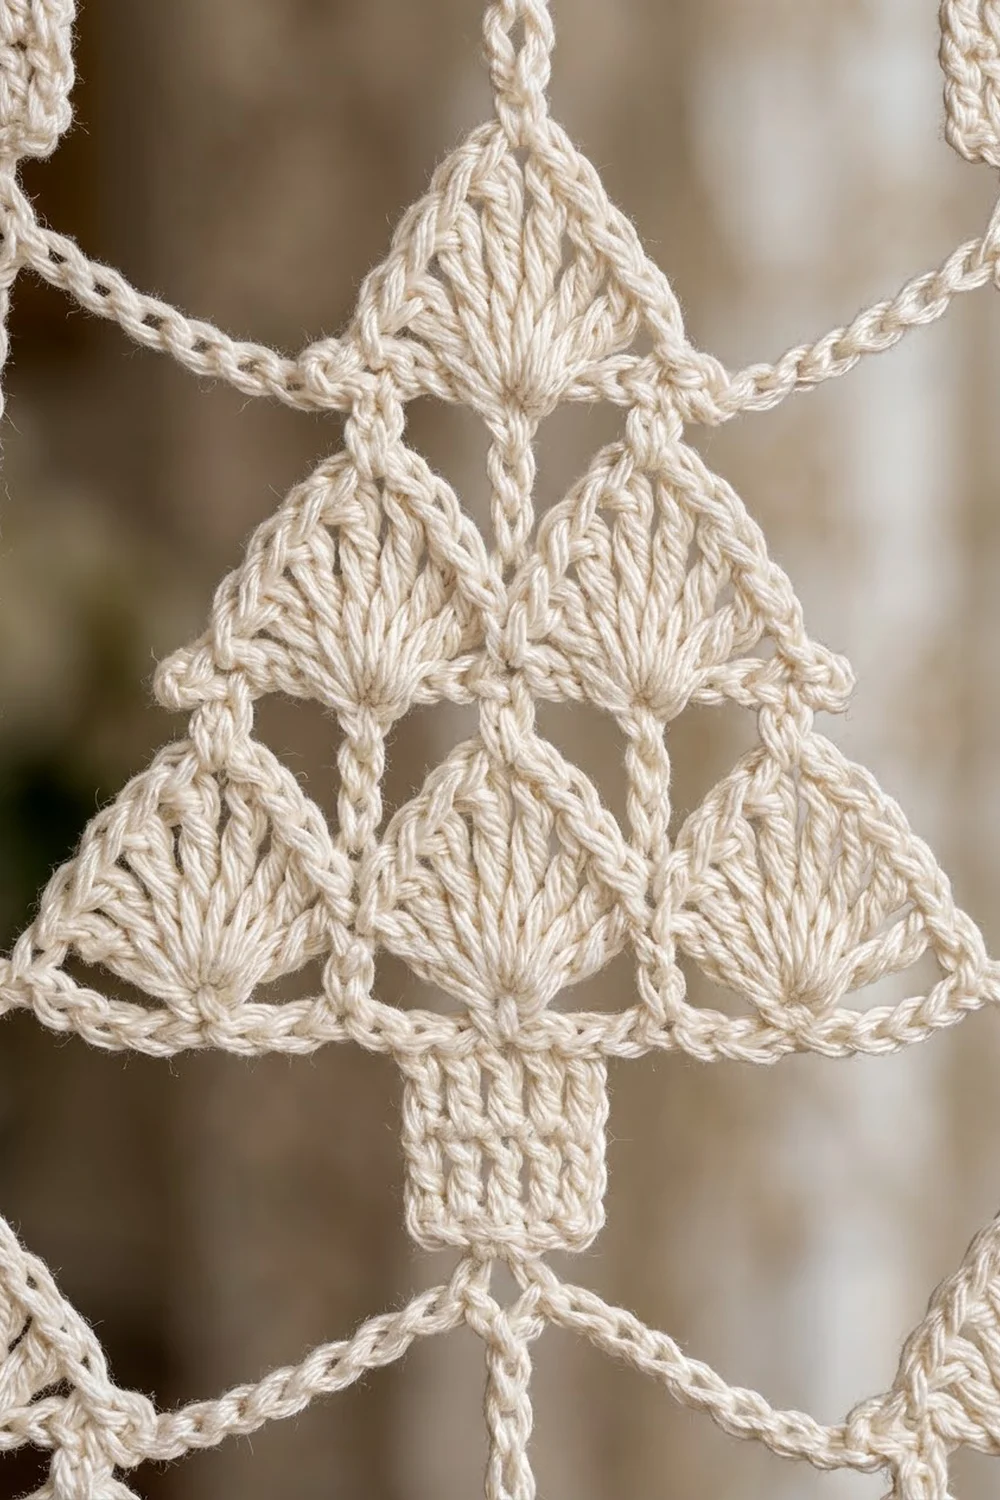
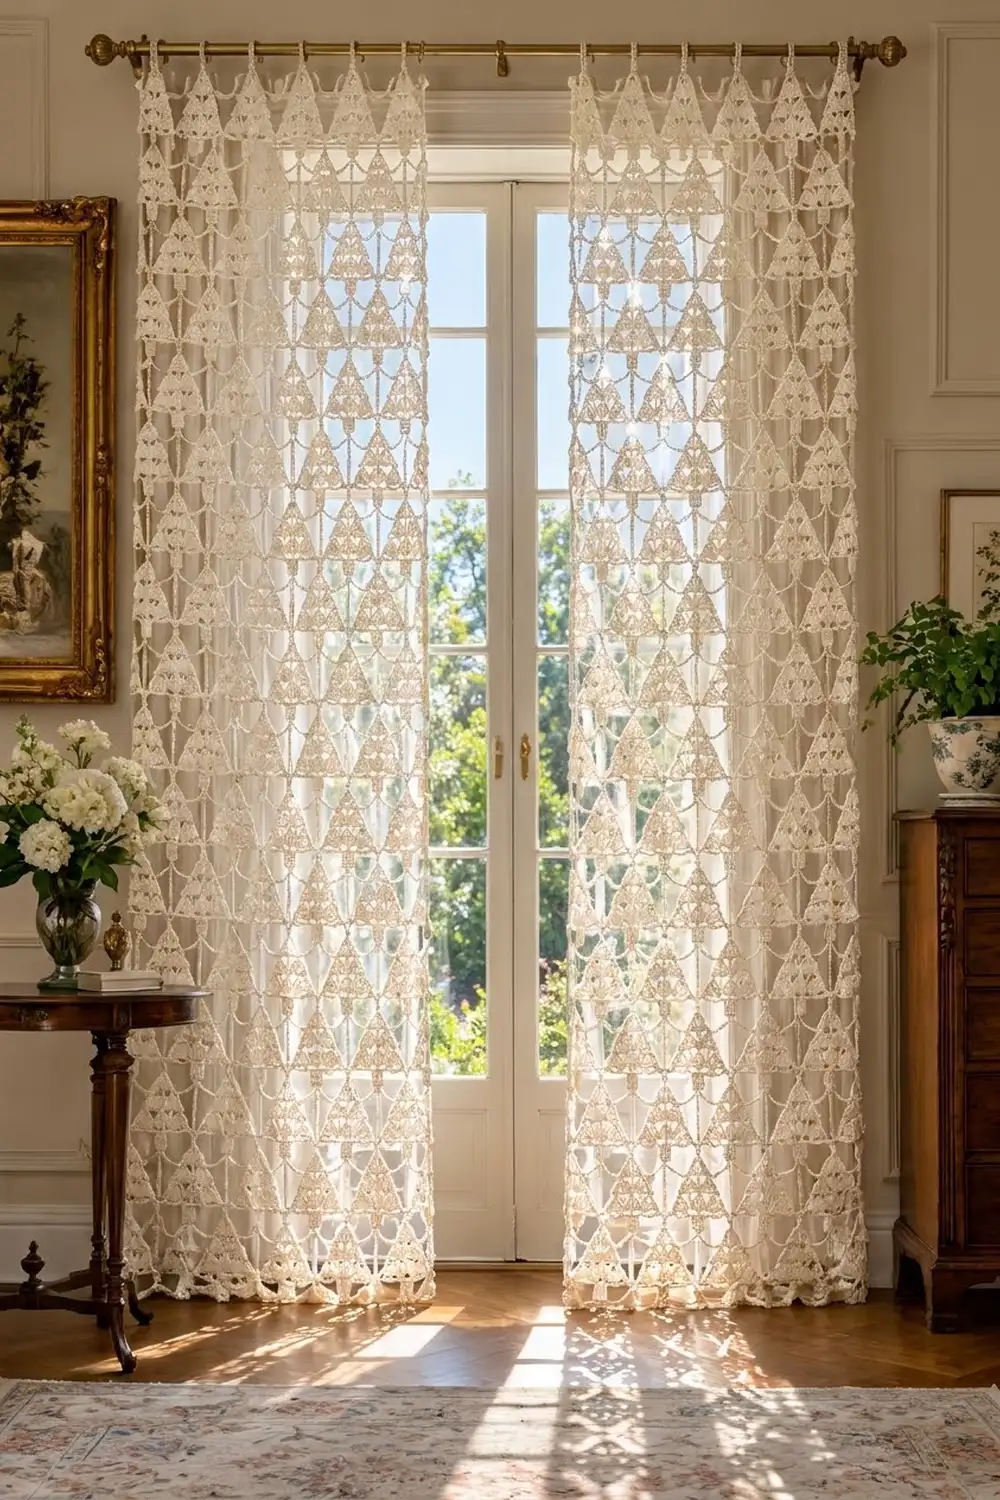
These curtains are made from small, open tree motifs. Each tree is a triangle of six fan shells stacked 1-2-3, with a short trunk below. Once joined, the trees form a lattice of chain lines and open diamonds that lets the light through.
The photographed pair is worked in one color, a soft cream or ivory cotton. That keeps the look calm and classic, so the curtains suit Christmas and also stay up comfortably through winter. All instructions use US crochet terms.
Each finished panel measures 30 in (76.2 cm) wide and 81.25 in (206.4 cm) long from the bottom trunk loops to the top of the heading band. The rod tabs add 1.75 in (4.4 cm) above that. You make two panels.
Construction is simple and repetitive. You crochet one tree in rows from the tip down, add a single edging round, then work the trunk. From the second tree onward, you join each one to its neighbors during the edging round (join-as-you-go). Last, you work a tabbed heading band across the top of each panel.
Finished Size and Construction
- Finished size (each panel): 30 in x 81.25 in (76.2 cm x 206.4 cm), plus 1.75 in (4.4 cm) tabs
- Skill level: Intermediate
- Terminology: US crochet terms
- Yarn weight: DK (light worsted, #3) cotton
- Hook: 4.0 mm (G-6)
- Number of pieces: 192 tree motifs (96 per panel)
- Layout: 6 trees across x 16 trees down per panel, 2 panels
- Piece size: triangle 4.5 in (11.4 cm) wide x 2.75 in (7.0 cm) tall; trunk 1 in (2.5 cm) wide x 1.25 in (3.2 cm) long
- Joined grid spacing: 5 in (12.7 cm) across and 5 in (12.7 cm) down per tree
- Size before border: 30 in x 80 in (76.2 cm x 203.2 cm)
- Border depth: 1.25 in (3.2 cm) heading band at the top edge only, plus tabs
Materials
Choose a smooth, mercerized or combed cotton in DK weight. Cotton shows the fan ribs clearly, keeps the triangles crisp, and holds up to sunlight and washing better than acrylic. Avoid fuzzy or very splitty yarns, which blur the lace.
- Cream / ivory (one color): 450 g, about 945 m (nine 50 g balls of about 105 m each), for both panels
Each tree uses about 4 m of yarn. The heading on each panel uses about 20 m. These quantities include a margin of roughly 15% for gauge swatches, yarn tails and small differences in tension.
Tools
- 4.0 mm (G-6) crochet hook
- Tapestry needle
- Scissors
- Stitch markers
- Measuring tape
- Blocking mats and rustproof pins
- Spray bottle or steam iron
- Curtain rod, up to 1.1 in (2.8 cm) in diameter
Abbreviations (US Terms)
- ch = chain
- sl st = slip stitch
- sc = single crochet
- dc = double crochet
- tr = treble crochet
- sk = skip
- st(s) = stitch(es)
- sp(s) = space(s)
- RS / WS = right side / wrong side
- rep = repeat
Special stitch: Fan. Work 7 tr into the same stitch. On the first fan of a row, the starting ch-4 counts as the first tr, so you work ch 4 and then 6 tr into the same stitch. The center tr of every fan is its 4th tr.
Gauge and Checkpoints
Make one complete tree, with its edging and trunk, before you start anything else. Lace grows in every direction, and a small difference repeated across 16 trees down a panel adds up fast.
- Tree gauge: 1 finished tree triangle = 4.5 in (11.4 cm) wide at the base x 2.75 in (7.0 cm) tall, excluding loops
- Stitch gauge: 1 tr = 0.75 in (1.9 cm) tall; 1 dc = 0.5 in (1.3 cm) tall
- Border gauge: 5 sts = 1 in (2.5 cm) across the heading band
Checkpoints, measured flat:
- After Row 1: 1.5 in (3.8 cm) wide, 0.75 in (1.9 cm) tall
- After Row 2: 2.75 in (7.0 cm) wide, 1.5 in (3.8 cm) tall
- After Row 3: 4.25 in (10.8 cm) wide, 2.25 in (5.7 cm) tall
- After edging: 4.5 in (11.4 cm) wide, 2.75 in (7.0 cm) tall
- After trunk: total 4 in (10.2 cm) from the tip to the trunk’s lower edge
If your tree is too big, go down a hook size (3.5 mm). If it is too small, go up a size (4.5 mm). When only the height is off, check how tall your tr are. Pulling the first loop up a little higher, or keeping it lower, changes the height without affecting the width very much.
Tree Motif
Every tree is made exactly the same way. Rows 1-3 are worked flat from the tip down, turning after each row.
Row 1 (RS): Ch 5, 6 tr in 5th ch from hook. (7 tr: 1 fan. The beginning ch-4 counts as the first tr.) The chain you worked into is the tree’s tip.
Row 2 (WS): Ch 4 (counts as tr), turn. 6 tr in same st as ch-4 (fan A made). Ch 2, sk 2 tr, sc in center (4th) tr, ch 2, sk 2 tr, 7 tr in top of turning ch (fan B made). (14 tr, 1 sc, 2 ch-2 sps.)
Row 3 (RS): Ch 4 (counts as tr), turn. 6 tr in same st (first fan). Ch 2, sc in center tr of next fan, ch 2, 7 tr in next sc (middle fan). Ch 2, sc in center tr of next fan, ch 2, 7 tr in top of turning ch (last fan). (21 tr, 2 sc, 4 ch-2 sps.)
Each fan is worked into a single stitch, so its ribs come together at the top and spread out below. That gives each fan the look of a small ribbed triangle with its point at the top. Because each new row’s end fans are worked into the outer tr of the row above, the outer posts line up in a straight slanted line. That line forms the side of the large triangle.
Do not fasten off. Your hook is now at the outer tr of the last fan, which is a bottom corner.
Edging Round
Work with the RS facing. Each side of the triangle has 3 edge posts (one from each row, either a tr or a ch-4).
Edging: Ch 1. Work (sc, ch 5, sc) in the top of the last tr made for the corner. Work 2 sc around each of the 3 edge posts up the side (6 sc). At the tip, work (sc, ch 7, sc) in the foundation chain. Work 2 sc around each of the 3 edge posts down the other side (6 sc). Work (sc, ch 5, sc) in the top of the first fan’s turning ch-4 for the second corner. Sc in the next 6 tr. Ch 3, skipping the ch-2, sc, ch-2 valley. Sc in each of the 7 tr of the middle fan. Ch 3, skipping the next valley. Sc in the first 6 tr of the last fan. Sl st to the first sc.
Edging count: 2 + 6 + 2 + 6 + 2 + 6 + 7 + 6 = 37 sc, plus 1 ch-7 tip loop, 2 ch-5 corner loops and 2 ch-3 valley bridges.
The ch-3 bridges straighten the bottom edge across the valleys, so the base reads as one clean line.
Fasten off.
Trunk
Turn the tree upside down so the bottom edge is at the top, with RS facing.
Row 1: Join yarn in the 2nd sc of the middle fan’s 7 sc. Ch 3 (counts as dc), dc in next 4 sc. (5 dc)
Row 2: Ch 3 (counts as dc), turn, dc in next 4 sts. (5 dc)
Row 3: Ch 1, turn, sc in first 2 sts, (sc, ch 4, sc) in next st, sc in last 2 sts. (6 sc, 1 ch-4 trunk loop)
Fasten off. The trunk is centered under the middle fan, 1 in (2.5 cm) wide and 1.25 in (3.2 cm) long.
Make All Pieces
Make 192 trees in cream, 96 for each panel. The first tree of each panel is made exactly as written above. Every other tree is joined during its Edging Round, as explained in the next section. Weave in ends on each tree as you go.
Layout per panel (6 across x 16 down = 96 trees):
Row 1:   T1  T2  T3  T4  T5  T6     <- heading attaches here
Row 2:   T1  T2  T3  T4  T5  T6
Row 3:   T1  T2  T3  T4  T5  T6
 ...     (identical rows)
Row 16:  T1  T2  T3  T4  T5  T6     <- trunk loops hang free
All trees point upward. The columns sit straight, so each trunk hangs directly above the tip of the tree below it.
Joining
Use join-as-you-go during the Edging Round. Both joins replace a chain loop with a chain-sl st-chain of the same length, so the stitch counts stay exactly the same.
Corner join (sideways): With the RS facing, one bottom corner lies on the left. For any tree that has a neighbor on its left, work that corner like this: sc, ch 2, sl st into the free ch-5 corner loop at the bottom right of the tree to the left, ch 2, sc. (The 2 ch + sl st + 2 ch take the place of the ch-5.) Leave the right-hand corner loop free for the next tree.
Tip join (downward): For any tree in grid row 2 or below, work the tip like this: sc, ch 3, sl st into the ch-4 trunk loop of the tree directly above, ch 3, sc. (The 3 ch + sl st + 3 ch take the place of the ch-7.)
Order: Work across each grid row from left to right, then start the next row down. Tree 1 in rows 2-16 has only a tip join. Trees 2-6 in grid row 1 have only a corner join. All other trees have both joins.
Tension: Keep the joining sl st snug but not tight. A tight sl st pulls the corners together and makes the triangles cup. A loose one lets the lattice sag. Each joined link should lie flat, about 0.25 in (0.6 cm) long.
Size checkpoint: After the first full grid row, the width from the first tree’s left corner to the last tree’s right corner should be 30 in (76.2 cm): 6 trees x 5 in (12.7 cm). After 4 grid rows, the height should be 20 in (50.8 cm): 4 x 5 in (12.7 cm). The completed grid measures 30 in x 80 in (76.2 cm x 203.2 cm).
Border: Tabbed Heading Band
The border is worked along the top edge only. The sides and bottom keep the natural lace silhouette of the trees, with their corner points and hanging trunks, just as in the photo.
Border gauge: 5 sts = 1 in (2.5 cm). Each tree takes up 25 border sts, which is 5 in (12.7 cm). That exactly matches the 5 in (12.7 cm) grid spacing.
Row 1 (RS): Ch 11, 3 sc in tip loop of first top-row tree, ch 22, 3 sc in tip loop of next tree, rep from * 4 more times, ch 11. Turn.
Count: 11 + (6 x 3) + (5 x 22) + 11 = 150 sts = 6 trees x 25 sts.
Row 2 (WS): Ch 3 (counts as dc), sk first st, dc in each st across. (150 dc)
Row 3 (RS): Ch 1, turn, sc in each st across. (150 sc)
Row 4 (WS, tabs): Ch 1, turn, sc in next 10 sts, ch 20, sk 5 sts, sc in next 10 sts, rep from * 5 more times. (120 sc, 6 ch-20 tab loops; each repeat uses 25 sts)
Row 5 (RS): Ch 1, turn, sc in each sc and 22 sc in each ch-20 loop. (120 + 132 = 252 sc)
Fasten off. Repeat for the second panel.
Why the math works: Each 25-st repeat is laid out as 11 + 3 + 11, so the tip loop sits on sts 12-14 with its center at st 13. In Row 4, the skipped sts 11-15 are centered on st 13 too, which places each tab directly above a tree tip. That makes 150 sts / 5 per inch = 30 in (76.2 cm), the same as the grid width, so the heading neither gathers nor ruffles the lace. Rows 1-4 add 1.25 in (3.2 cm). The tabs stand 1.75 in (4.4 cm) above the band and fit a rod up to 1.1 in (2.8 cm) across.
Final Blocking
- Weave in any remaining ends along the edging sc, not through the open lace.
- Wash each panel in lukewarm water with a gentle soap, then rinse.
- Roll it in a towel and press out the water. Do not wring it.
- Lay the panel flat on blocking mats, working one section at a time if needed.
- Pin the heading band straight to 30 in (76.2 cm).
- Pin every tree as a crisp triangle: tip, both corners, and the trunk loop pulled straight down.
- Check the 5 in (12.7 cm) spacing across and down with a tape measure.
- Let it dry completely. Alternatively, hover steam over the pinned lace without pressing.
- Unpin, then hang the panels on the rod.
Final Quality-Control Checklist
- Every tree has 3 rows of fans: 1, 2 and 3 fans.
- Each edging round has 37 sc and every loop in place.
- Each trunk is 5 dc wide, 2 rows tall, and finished with a ch-4 loop.
- All corner and tip joins are made, with no loops skipped.
- The grid is 6 x 16 trees per panel, with all trees pointing up.
- The heading is 150 sts in Rows 1-3 and has 6 tabs centered above the tree tips.
- Each panel measures 30 in x 81.25 in (76.2 cm x 206.4 cm) without the tabs.
- All ends are woven in securely.
Troubleshooting
- Fans ruffle or curl: your tr are too short for 7 sts in one st. Pull the first loop a little taller, or go up a hook size.
- Triangle sides look stepped: you missed an edge post or worked only 1 sc around it. Work exactly 2 sc per post.
- Bottom edge bows upward: the ch-3 valley bridges are too tight. Chain more loosely.
- Panel narrows toward the bottom: your corner joins are tight. Re-check the 5 in (12.7 cm) spacing every few rows.
- Heading ruffles: you have more than 150 sts in Row 1. Count the ch-22 bridges.
- Trunk off-center: join at the 2nd sc of the middle fan, not the 1st.
Care
Hand wash cold or machine wash on a gentle cycle in a mesh bag, then reshape and dry flat. Turn or swap the panels from time to time so sunlight fades the cotton evenly.
Final Notes
The whole project follows one measurement chain. A tree measures 4.5 in (11.4 cm) wide and 2.75 in (7.0 cm) tall. Once joined, each tree occupies a 5 in (12.7 cm) grid cell. Six cells across give 30 in (76.2 cm), and sixteen down give 80 in (203.2 cm). The 150-st heading matches that width exactly and adds 1.25 in (3.2 cm), for a finished length of 81.25 in (206.4 cm). If your first tree meets gauge, everything after it will fall into place.
Happy crocheting!