
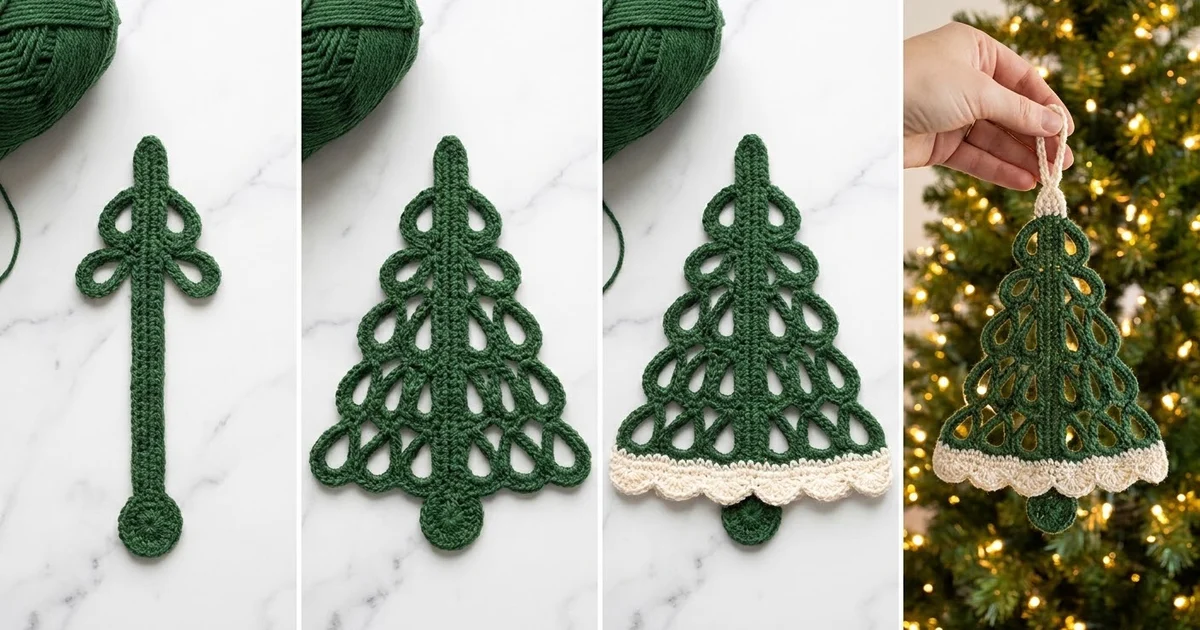
The Evergreen Loop Tree is a light, lacy Christmas ornament. Its branches are open teardrop loops instead of solid fabric. Four tiers of loops sit on each side of a solid center spine, and they get bigger toward the base, which gives the tree a classic triangular shape you can see the tree lights through.
The palette is simple. Deep forest green is used for the spine, branches, trunk, and hanger, and a cream scalloped hem adds a snowy edge along the bottom. Mercerized cotton gives a crisp stitch definition and a soft sheen, so the ornament looks polished on the tree.
This pattern uses US crochet terms. The finished tree measures about 3.5 in (8.9 cm) wide and 5.5 in (14.0 cm) tall from tip to trunk. The hanging loop adds about 1.5 in (3.8 cm).
Construction is quick. First you work a short strip of single crochet for the spine. A skeleton round then adds chain loops down one side and up the other, and a covering round wraps every loop in single crochet. Next you add the cream hem in two short rows across the bottom. Last, you make a tiny trunk disc, sew it on, and add the hanger.
Finished Size and Construction
- Finished size: 3.5 in (8.9 cm) wide x 5.5 in (14.0 cm) tall, plus a 1.5 in (3.8 cm) hanger
- Skill level: Easy-intermediate
- Terminology: US crochet terms
- Yarn weight: Sport weight (#2) mercerized cotton
- Hook: 2.75 mm (C-2)
- Number of pieces: One ornament (main tree body plus a small sewn-on trunk disc)
- Layout: Center spine, 4 loop tiers per side, cream hem, trunk disc below center
- Spine size: 4 in x 0.5 in (10.2 cm x 1.3 cm)
- Size before hem: about 3.5 in (8.9 cm) wide x 4.5 in (11.4 cm) tall
- Hem depth: about 0.5 in (1.3 cm) total, including the scallops
Materials
Choose a smooth, mercerized cotton or cotton blend in sport weight. Cotton holds the open loops firmly and blocks well. Fuzzy or very stretchy yarns blur the loop outlines and let the tiers droop.
- Color A, forest green: 10 g, about 30 m (33 yd)
- Color B, cream: 3 g, about 9 m (10 yd)
These quantities include a margin for your gauge swatch and tails.
Tools:
– 2.75 mm (C-2) crochet hook
– Tapestry needle
– Scissors
– 4 locking stitch markers
– Ruler or tape measure
– Blocking mat and rust-proof pins
– Spray bottle with water
Abbreviations (US Terms)
- ch – chain
- sl st – slip stitch
- sc – single crochet
- hdc – half double crochet
- dc – double crochet
- sk – skip
- st(s) – stitch(es)
- sp – space
- RS – right side
Special stitch – Scallop: Work 5 hdc into the same stitch. Each scallop is a small rounded fan.
Special stitch – Tip: Work (hdc, dc, ch 2, dc, hdc) into the same stitch. This makes the pointed top of the tree.
Gauge and Checkpoints
Gauge: 12 sc x 12 rows = 2 in (5.1 cm), or 6 sc and 6 rows = 1 in (2.5 cm).
Make a 14-st swatch with 14 rows and measure the center 12 x 12. Gauge matters more here than on many ornaments, because the loop lengths are set to fit the spine. With a looser gauge, the loops get floppy and wide.
Checkpoints:
1. Spine after Row 3: 4 in x 0.5 in (10.2 cm x 1.3 cm).
2. After Round 2: about 3.5 in (8.9 cm) across the bottom tier and 4.5 in (11.4 cm) from the tip to the bottom edge.
3. After the hem: about 5 in (12.7 cm) from the tip to the scallop edge.
4. Trunk disc: 0.75 in (1.9 cm) across.
If your piece is too big: Go down to a 2.5 mm hook, or try a slightly thinner cotton.
If your piece is too small: Go up to a 3 mm hook.
Don’t shorten or lengthen the chains to fix your gauge. If you do, the covering counts in Round 2 won’t match.
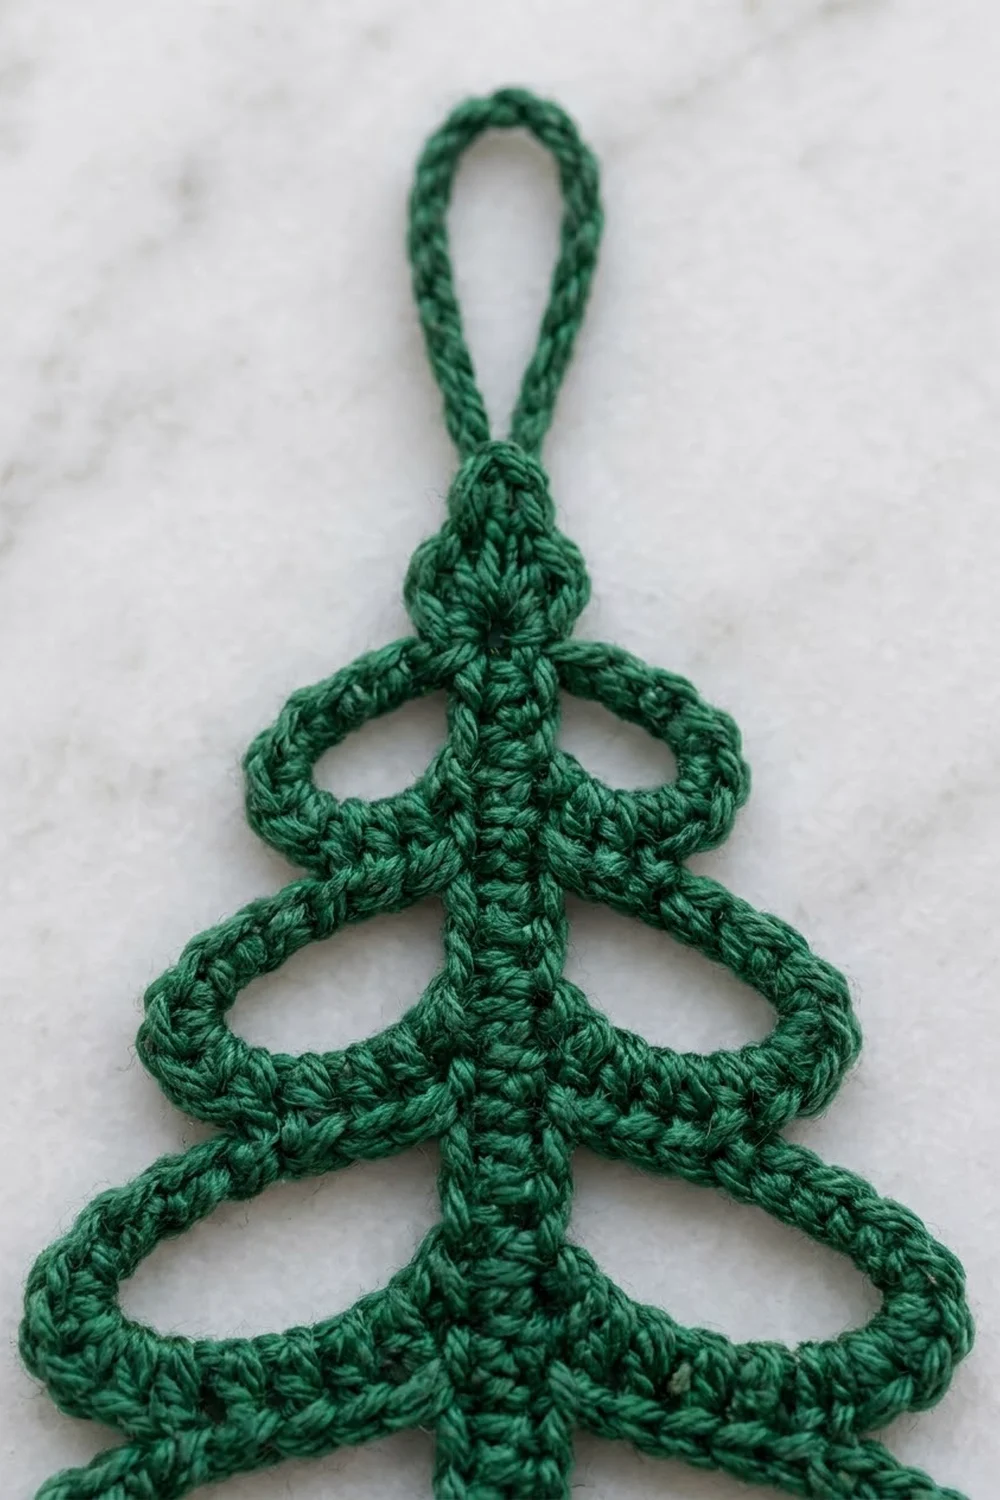
Spine
With Color A, ch 25.
Row 1: Sc in 2nd ch from hook and in each ch across, turn. (24 sc)
Row 2: Ch 1, sc in each st across, turn. (24 sc)
Row 3: Ch 1, sc in each st across. (24 sc) Do not turn and do not fasten off.
Checkpoint: The strip should be 4 in x 0.5 in (10.2 cm x 1.3 cm). Mark the end where your hook is now as the top.
The spine has two long edges with 24 sts each. One is the Row 3 tops and the other is the foundation chain. It also has two short ends, each 3 row-ends wide.
Before you start the skeleton round, place markers on the Row 3 edge. Counting from the top, put them in sts 6, 12, 18, and 24. Each tier uses 6 spine sts, and 4 tiers x 6 sts = 24 sts, so the tiers fill the spine exactly.
Round 1: Branch Skeleton
This round builds every chain loop in one continuous pass. It goes down the right edge, across the bottom, up the left edge, and across the top.
Right side (working down the Row 3 sts): Ch 1, turn so you are working back along Row 3. Sl st in first st (st 1).
– Tier 1: Ch 10, sk next 4 sts, sl st in st 6.
– Tier 2: Sl st in st 7, ch 14, sk next 4 sts, sl st in st 12.
– Tier 3: Sl st in st 13, ch 18, sk next 4 sts, sl st in st 18.
– Tier 4: Sl st in st 19, ch 22, sk next 4 sts, sl st in st 24.
Bottom end: Sc in each of the 3 row-ends. (3 sc)
Left side (working up the foundation chain, counting sts from the bottom): Sl st in st 1.
– Tier 4: Ch 22, sk next 4 sts, sl st in st 6.
– Tier 3: Sl st in st 7, ch 18, sk next 4 sts, sl st in st 12.
– Tier 2: Sl st in st 13, ch 14, sk next 4 sts, sl st in st 18.
– Tier 1: Sl st in st 19, ch 10, sk next 4 sts, sl st in st 24.
Top end: Sc in each of the 3 row-ends. Join with a sl st to the first sl st.
Round 1 count: 8 chain loops (2 each of ch-10, ch-14, ch-18, and ch-22), 16 sl sts, and 6 sc (3 at each end).
Each loop starts and ends on its own 6-st section of the spine, so the tiers sit directly one under another. The chain loops will look loose and floppy at this stage, and that is normal.
Round 2: Covering the Branches
Keep using Color A. This round covers each loop and makes the tree tip.
Right side:
– 14 sc in the tier 1 ch-10 loop. Sl st in each of the next 2 sl sts.
– 18 sc in the tier 2 ch-14 loop. Sl st in each of the next 2 sl sts.
– 22 sc in the tier 3 ch-18 loop. Sl st in each of the next 2 sl sts.
– 26 sc in the tier 4 ch-22 loop. Sl st in the next sl st.
Bottom end: Sc in each of the next 3 sc. (3 sc)
Left side:
– Sl st in the next sl st. 26 sc in the tier 4 ch-22 loop.
– Sl st in each of the next 2 sl sts. 22 sc in the tier 3 ch-18 loop.
– Sl st in each of the next 2 sl sts. 18 sc in the tier 2 ch-14 loop.
– Sl st in each of the next 2 sl sts. 14 sc in the tier 1 ch-10 loop.
– Sl st in the next sl st.
Top: Sc in the next sc. Work the Tip in the next sc: (hdc, dc, ch 2, dc, hdc). Sc in the next sc. Join with a sl st to the first sl st. Fasten off and weave in the ends.
Round 2 count: 160 sc on the loops (14 + 18 + 22 + 26 = 80 per side), 16 sl sts, 3 sc at the bottom, and the top made of 2 sc plus 1 Tip (2 hdc, 2 dc, ch-2 sp).
Each loop gets its chain count plus 4 sc. Those extra 4 sts let the sc ease around the curve at the outer point, so the loop opens into a teardrop instead of puckering.
Checkpoint: The tiers should measure about 1.5 in (3.8 cm), 2.25 in (5.7 cm), 2.75 in (7.0 cm), and 3.5 in (8.9 cm) wide from top to bottom. The body should be 4.5 in (11.4 cm) tall.
Border: Cream Scallop Hem
The hem runs along the lower half of each tier 4 loop and across the bottom of the spine.
Border gauge: Same as the body, 6 sc = 1 in (2.5 cm). Each finished scallop repeat is about 0.67 in (1.7 cm) wide along the curved edge.
Counting the base: On the right tier 4 loop, number the 26 covering sc in the order you worked them. Sc 14 to 26 are the lower half, which is 13 sts. On the left tier 4 loop, sc 1 to 13 are the lower half, also 13 sts.
Row 1 (RS): With the front facing you, join Color B with a sc in sc 14 of the right tier 4 loop.
– Right loop: Sc in each sc through sc 26. (13 sc)
– Center: Sk the sl st, then sc in each of the 3 bottom sc. (3 sc)
– Left loop: Sk the sl st, then sc in sc 1 to 13 of the left tier 4 loop. (13 sc)
– Turn.
Row 1 total: 13 + 3 + 13 = 29 sc.
Row 2: Ch 1. Sc in the first st, sk 1, Scallop in the next st, sk 1, sc in the next st. Repeat from * to * 6 more times. Fasten off.
Row 2 total: 7 Scallops (35 hdc) and 8 sc, for 43 sts.
Why the math works: Each repeat uses 4 base sts (sk 1, Scallop st, sk 1, sc st). The row also needs 1 sc at the start. So 1 + (7 x 4) = 29, which matches Row 1 exactly. The center Scallop falls on st 15, the middle of the 3 spine sts, so the hem is symmetrical.
Skipping the two sl sts in Row 1 keeps the cream band snug in the inner corners where the loops meet the spine. If you work into them, the corners bulge.
Checkpoint: The tree should measure about 5 in (12.7 cm) from the tip to the scallop edge.
Trunk Disc
With Color A, make a magic ring.
Round 1: Ch 2 (does not count as a st), work 12 hdc in the ring, and join with a sl st to the first hdc. Pull the ring partly closed, leaving a small center opening. (12 hdc)
Round 2: Ch 1, sc in next st, 2 sc in next st. Repeat from * to * 5 more times. Join with a sl st. (18 sc)
Fasten off and leave an 8 in (20.3 cm) tail.
Checkpoint: The disc should be 0.75 in (1.9 cm) across.
Attaching: Place the disc behind the center Scallop so that about 0.5 in (1.3 cm) of it shows below the hem. Whipstitch its top edge to the back of the cream Row 1 and the bottom spine sts. Keep the stitches invisible from the front.
Hanging Loop
Join Color A with a sl st in the ch-2 sp of the Tip.
- Ch 20 and sl st in the same ch-2 sp. (1 ch-20 loop)
- Turn, then work 28 sc into the ch-20 loop. Sl st in the ch-2 sp. (28 sc)
Fasten off and weave in the ends. The hanger stands about 1.5 in (3.8 cm) tall.
Final Blocking
- Weave in all remaining tails along the spine or inside the covering sc, so they can’t be seen through the open loops.
- Spray the ornament until it is evenly damp but not dripping.
- Lay it face up on the blocking mat and pin the tip and the base of the spine in a straight line 4.5 in (11.4 cm) apart.
- Open each loop into a teardrop. Put one pin inside each loop at its outer point so the tier widths match the checkpoints: 1.5 in, 2.25 in, 2.75 in, and 3.5 in (3.8, 5.7, 7.0, and 8.9 cm).
- Check that the left and right loops of each tier are mirror images, measuring from the spine.
- Pin each Scallop out so the hem curves smoothly.
- Lay the hanger flat and straight above the tip.
- Let it dry completely. If you want a crisper finish, mist it with fabric stiffener before drying.
Final Quality-Control Checklist
- Spine: 24 sts long, 3 rows wide, perfectly straight
- 8 loops in total, 4 per side, with matching pairs
- Loop sc counts of 14, 18, 22, and 26 on each side
- The Tip is centered on the 3 top sts
- 29 cream sc in Row 1 and 7 Scallops in Row 2
- Trunk disc is 0.75 in (1.9 cm) and centered under the middle Scallop
- Hanger is firmly attached to the ch-2 tip space
- Finished size: 3.5 in x 5.5 in (8.9 cm x 14.0 cm)
- No tails visible through the openings
Troubleshooting
Loops ruffle or twist: You have too many sc in the loop, or your tension is loose. Recount against 14, 18, 22, and 26, or go down a hook size.
Loops pull the spine into a curve: The chains are too tight. Make the chains with a hook one size larger, then switch back for the covering sc.
One side is wider than the other: Count the skipped spine sts. Each tier must skip exactly 4 sts and use 6 in total.
Scallops don’t come out even: Check that Row 1 has exactly 29 sc. Fix the count before working Row 2.
The trunk disc cups: Round 2 is too tight. Rework it with looser stitches, or work Round 2 on a 3 mm hook.
The tip is blunt: Make sure the dc and the ch-2 go into the same middle st, then pin the tip to a point while blocking.
Care
Hand wash in cool water with mild soap, press out the water in a towel, and dry flat, reshaping the loops. If you used stiffener, mist it again and reshape after washing.

Final Notes
Every measurement in this ornament builds on the one before. The gauge of 6 sc per 1 in (2.5 cm) gives a 4 in (10.2 cm) spine. The spine’s 24 sts hold 4 tiers of 6 sts each. The covering counts of chain + 4 open the loops to a full width of 3.5 in (8.9 cm). The 29-st hem base fits 7 Scallops exactly. With the trunk added, the tree finishes at 5.5 in (14.0 cm) tall. If you check each stage as you go, every tree in the set will come out the same size. Make one in green and cream, then try white with silver or red with gold.
Happy crocheting!