

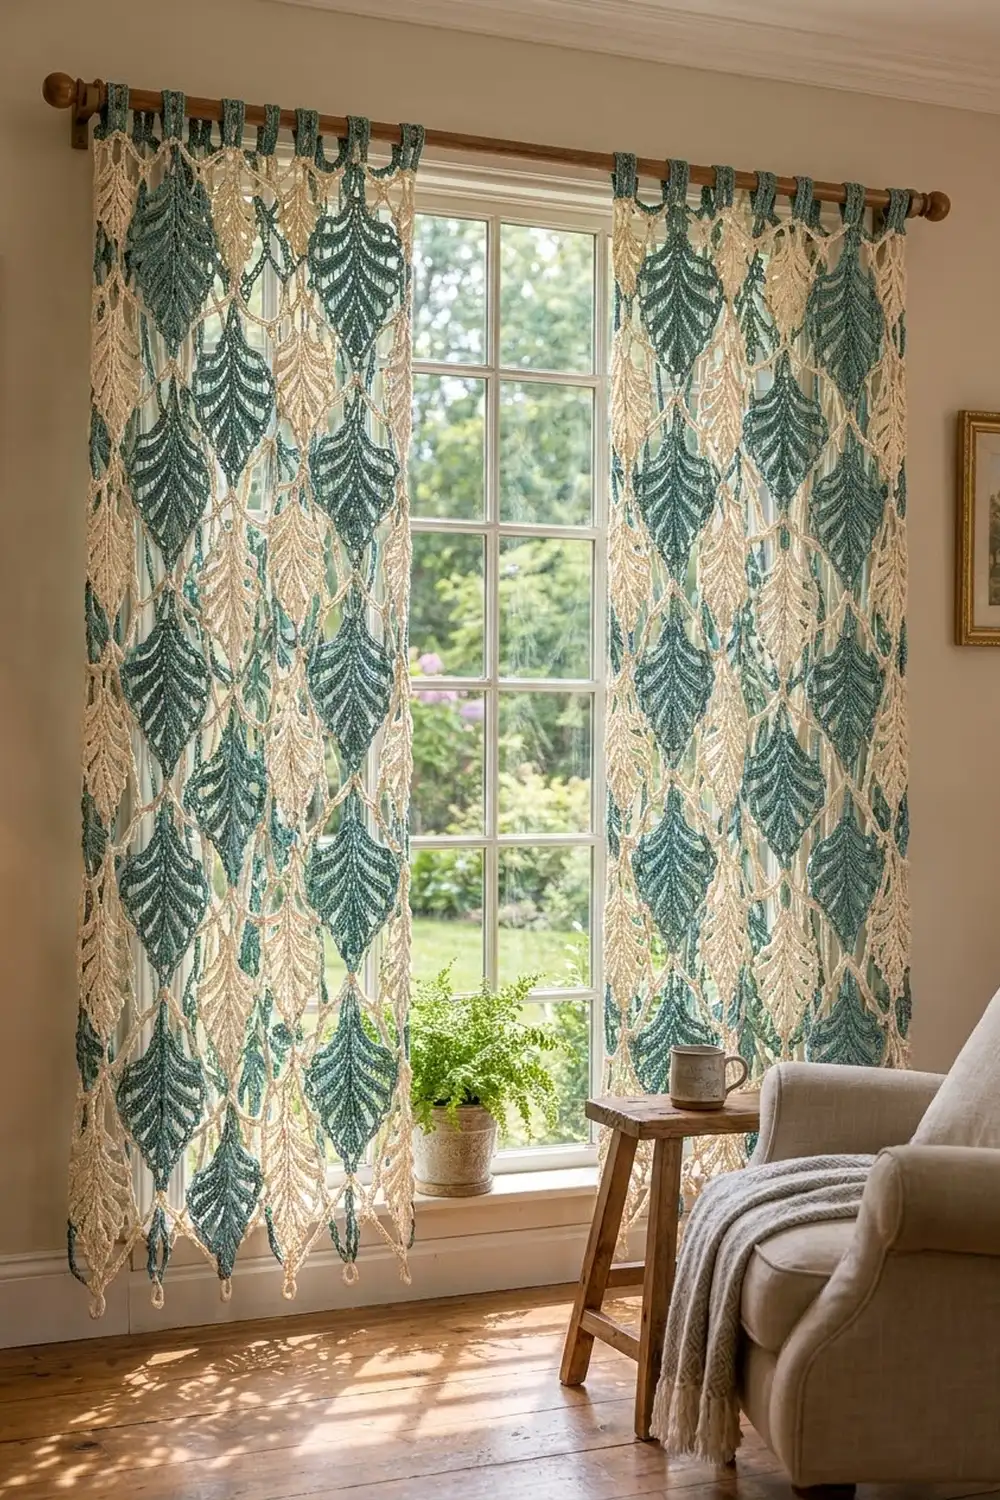
These tab-top curtains are built from ridged, pointed leaf motifs joined into an open lattice. Light comes through the diamond gaps between the leaves, and the raised veins give each motif a sculpted, almost carved look.
The colorway is a calm sea-glass teal with soft cream. The two colors alternate in a checkerboard, so diagonal lines of teal and cream run across each panel. The style is cottage-meets-botanical. It suits a sunny living room, a bedroom window or a garden-facing door.
This pattern uses US crochet terms. One panel measures 31.5 in (80.0 cm) wide by 78 in (198.1 cm) long, from the top of the band to the leaf tips. The tab loops add about 2 in (5.1 cm) above the band. The photo shows a pair, so the materials and counts below cover two panels.
Construction is simple. You make one leaf in turned rows of back-loop single crochet around a chain spine, then add a chain-loop edging round. Every leaf after the first is joined to its neighbors during that edging round. Once all the leaves are joined, you work a solid single crochet band across the top, then the tabs.
Finished Size and Construction
- Finished panel size: 31.5 in (80.0 cm) wide × 78 in (198.1 cm) long, plus tabs
- Skill level: Intermediate
- Terminology: US
- Yarn weight: Worsted (#4) cotton or cotton blend
- Hook: US H-8 (5 mm)
- Number of pieces: 63 leaves per panel, 126 for the pair
- Layout: 7 leaves across × 9 leaves down, alternating colors
- Single leaf size: 4.5 in (11.4 cm) wide × 7.5 in (19.1 cm) long, not counting the loops
- Vertical repeat (joined): 8.5 in (21.6 cm) per leaf row
- Size before border: 31.5 in (80.0 cm) × 76.5 in (194.3 cm)
- Border depth: 1.5 in (3.8 cm) top band; the sides and bottom are left open
Materials
Choose a smooth, mercerized or matte worsted-weight cotton. Cotton keeps the ridges crisp, hangs straight, and handles sun and washing well. Avoid fuzzy or very stretchy yarns. They blur the veins, and a long, heavy panel made with them will grow in length.
- Teal (Color T): about 600 g / 1,000 m (64 leaves)
- Cream (Color C): about 650 g / 1,100 m (62 leaves, 2 top bands, 14 tabs)
Each leaf uses about 13.5 m (roughly 8 g). These quantities include a margin of about 15 percent for swatching, tails and the occasional restart.
Tools:
– US H-8 (5 mm) crochet hook
– Tapestry needle
– Locking stitch markers
– Rust-proof pins and a large blocking surface (foam mats or a bed covered with towels)
– Spray bottle
– Measuring tape
Abbreviations (US Terms)
- ch – chain
- sl st – slip stitch
- sc – single crochet
- BLO – back loop only
- sk – skip
- sp – space
- st(s) – stitch(es)
- RS / WS – right side / wrong side
Special stitch – Join loop: Instead of a ch-3 loop, ch 1, sl st into the matching ch-3 loop of the finished neighbor leaf, ch 1. This still counts as one ch-3 loop.
Gauge and Checkpoints
Gauge: 16 sc and 18 rows = 4 in (10.2 cm) in standard sc worked flat.
Before you commit, make one complete leaf (Rows 1–7 plus Rnd 8) and use it as your gauge piece. Check it at each stage:
- After Row 1: the spine measures about 6.25 in (15.9 cm) from base to tip.
- After Row 7: the leaf is about 7 in (17.8 cm) long and 3.5 in (8.9 cm) wide.
- After Rnd 8: the leaf is 4.5 in (11.4 cm) wide across its widest loops and 7.5 in (19.1 cm) from base to tip.
Too big? Go down half a hook size. Too small? Go up half a size. Width matters most here, because seven leaves have to match the 126-stitch top band. A leaf that is off by 0.25 in (0.6 cm) makes the panel about 1.75 in (4.4 cm) wider or narrower than the band.
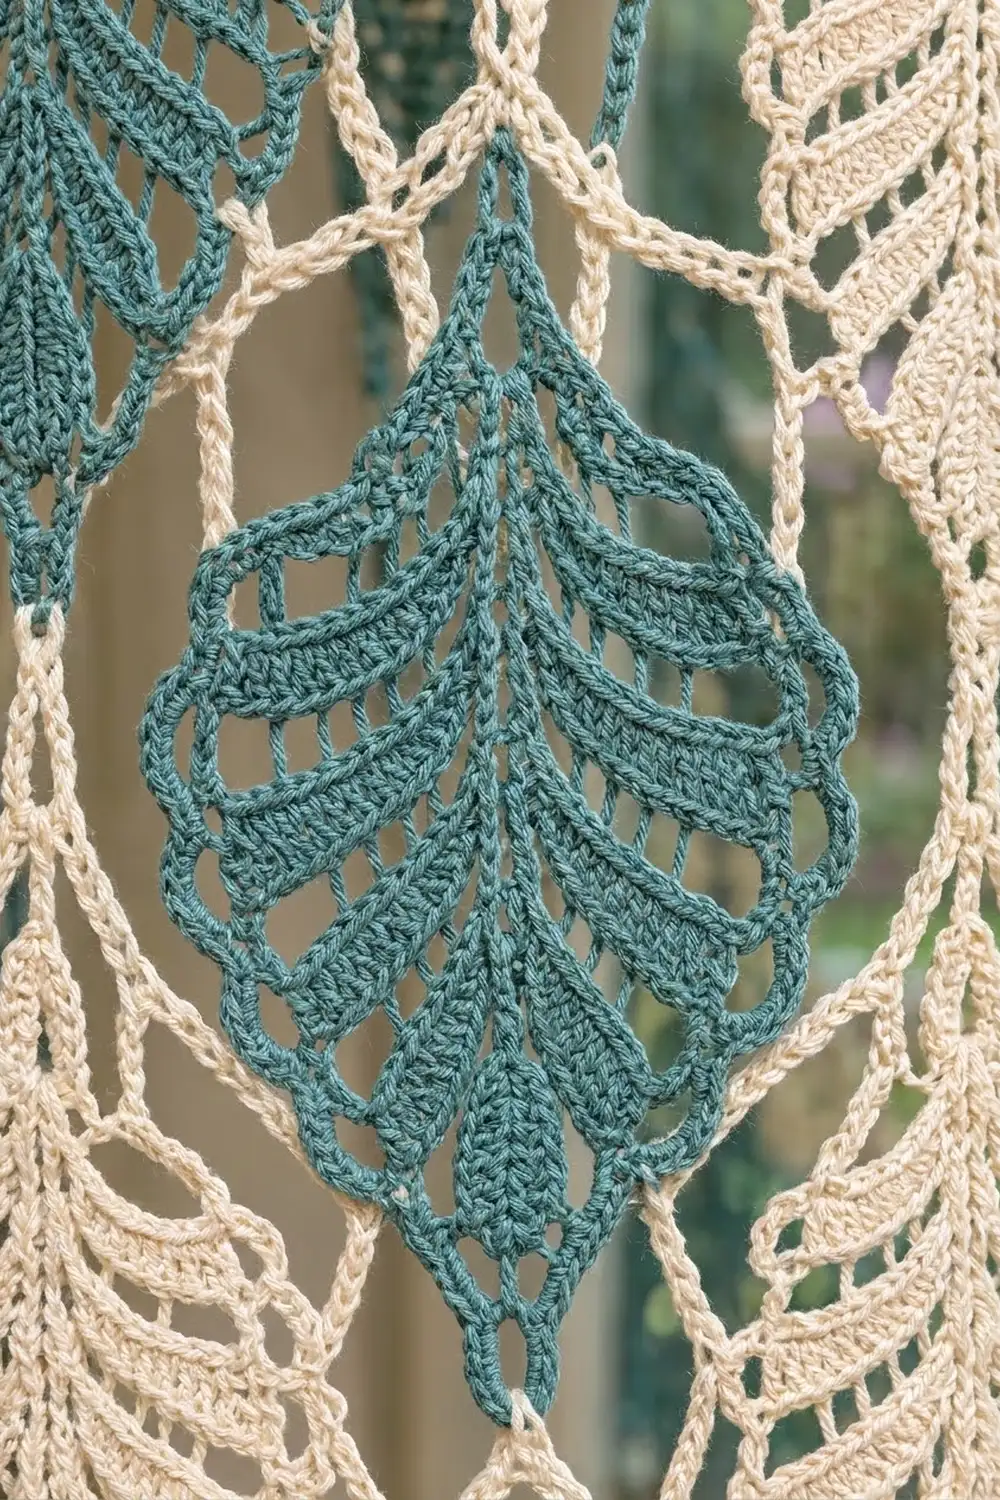
Leaf Motif
Rows are turned. Every sc in Rows 2–7 goes into the BLO, and each row stops 3 sts short at the base. This builds the chevron ridges and a stepped, tapered base. Never work the tip ch-2 through the BLO; always work into the space.
Foundation: Ch 26.
Row 1: Sc in 2nd ch from hook and in each of next 23 ch (24 sc). Work (sc, ch 2, sc) in the last ch for the tip. Rotate and work along the opposite side of the foundation: sc in each of next 24 ch. (50 sc: 25 per side, including each tip sc, plus 1 ch-2 sp.)
Row 2: Ch 1, turn. Working in BLO, sc in each of next 25 sts, (sc, ch 2, sc) in ch-2 sp, sc BLO in each of next 22 sts, leaving 3 sts unworked. (49 sc)
Row 3: Ch 1, turn. Sc BLO in each of next 23 sts, (sc, ch 2, sc) in ch-2 sp, sc BLO in next 23 sts, leaving 3 unworked. (48 sc)
Row 4: Ch 1, turn. Sc BLO in next 24 sts, (sc, ch 2, sc) in ch-2 sp, sc BLO in next 21 sts. (47 sc)
Row 5: Ch 1, turn. Sc BLO in next 22 sts, (sc, ch 2, sc) in ch-2 sp, sc BLO in next 22 sts. (46 sc)
Row 6: Ch 1, turn. Sc BLO in next 23 sts, (sc, ch 2, sc) in ch-2 sp, sc BLO in next 20 sts. (45 sc)
Row 7: Ch 1, turn. Sc BLO in next 21 sts, (sc, ch 2, sc) in ch-2 sp, sc BLO in next 21 sts. (44 sc: 22 per side, including each tip sc)
As a check, each row has one stitch fewer than the row before it (Row n = 51 − n). The leaf is symmetric after every odd row.
Rnd 8 (edging, RS): Ch 1, turn.
– First side: (Sc in next st, ch 3, sk next st) 11 times. This uses 22 sts and makes 11 ch-3 loops.
– Tip: (Sc, ch 5, sc) in ch-2 sp. This is the tip loop.
– Second side: (Ch 3, sk next st, sc in next st) 11 times. This also uses 22 sts and makes 11 loops.
– Base: Work 3 sc evenly down the stepped base to the spine. In the base of the foundation chain, work (sl st, ch 8, sl st) for the stem loop. Work 3 sc evenly up the other stepped edge, then sl st to the first sc. Fasten off.
(Rnd 8 total: 30 sc, 22 ch-3 loops, 1 ch-5 tip loop, 1 ch-8 stem loop.)
Each side has 11 loops, so the middle three (the 5th, 6th and 7th) are the same whether you count from the tip or the base. Those are the side-join loops.
Make All Pieces
For each panel, make 32 teal leaves and 31 cream leaves. For the pair, that is 64 teal and 62 cream. Work Rows 1–7 of every leaf, but leave Rnd 8 until the leaf is being joined (see Joining). The first leaf of each panel (A1) gets a plain Rnd 8.
The layout below is for one panel. The leaves hang tip-down, so the stem loops point up, and Row 1 is the top of the panel.
      Col: 1  2  3  4  5  6  7
Row 1:     T  C  T  C  T  C  T
Row 2:     C  T  C  T  C  T  C
Row 3:     T  C  T  C  T  C  T
Row 4:     C  T  C  T  C  T  C
Row 5:     T  C  T  C  T  C  T
Row 6:     C  T  C  T  C  T  C
Row 7:     T  C  T  C  T  C  T
Row 8:     C  T  C  T  C  T  C
Row 9:     T  C  T  C  T  C  T
To check the counts: the 5 odd rows each have 4 T and 3 C, and the 4 even rows each have 3 T and 4 C. That gives 20 + 12 = 32 T and 15 + 16 = 31 C.
Joining
Join as you go during Rnd 8, filling the grid left to right and top to bottom.
Side joins: When the side you are edging lies next to a finished leaf, work its 5th, 6th and 7th loops as join loops. Hold both leaves RS up and tip-down. Loop 5 joins to the neighbor’s loop 5, loop 6 to loop 6, and loop 7 to loop 7. Each join loop still counts as one ch-3 loop, so the side still has 11 loops.
Vertical joins: For every leaf in Rows 2–9, replace the stem loop with (sl st, ch 4, sl st into the ch-5 tip loop of the leaf directly above, ch 4, sl st). The stem keeps the same length, so the vertical repeat stays at 8.5 in (21.6 cm).
Tension: Work the join sl sts loosely and don’t pull the neighbor’s loop tight. If the leaves pucker toward each other at the joins, the join chains are too tight. Loosen the ch 1 or go up a hook size for the joins.
Size checkpoint: After the first row of leaves, the strip should measure 31.5 in (80.0 cm) across. After three leaf rows, the panel should measure about 25.5 in (64.8 cm) from the stem loops to the tips. With all 9 rows joined, it should be 31.5 in × 76.5 in (80.0 cm × 194.3 cm).
Border: Top Band and Tabs
As in the photo, the sides and bottom stay open, and the tip loops along the bottom act as small drops. The only border is a solid top band with tabs, worked in cream.
Border gauge: standard sc, 4 sts and 4.5 rows per 1 in (2.5 cm).
Row 1 (RS): Make a slip knot, ch 5. Work 8 sc into the stem loop of leaf 1. (Ch 10, 8 sc in stem loop of next leaf) 6 times. Ch 5. (126 sts)
Why the math works: Each top-row leaf owns 18 sts: 5 ch on its left, 8 sc, and 5 ch on its right. Each ch-10 bridge is two 5-ch halves from neighboring leaves meeting. At 4 sts per in, 18 sts = 4.5 in (11.4 cm), which is exactly one leaf width. So 7 × 18 = 126 sts = 31.5 in (80.0 cm), with nothing added at the seams.
Row 2: Ch 1, turn. Sc in each st and ch across. (126 sc)
Rows 3–7: Ch 1, turn, sc in each st across. (126 sc each row) The band now measures about 1.5 in (3.8 cm) deep. Fasten off.
Tabs (make 7): Each 18-st leaf unit across the band is divided into 6 sts, 6 tab sts, 6 sts. With RS facing, sk the first 6 sts of a unit, join cream in the 7th st, and sc in that st and the next 5 sts. (6 sc)
- Tab Rows 2–20: Ch 1, turn, sc in each of 6 sts. The tab is now about 4.5 in (11.4 cm) long. Fasten off, leaving a 12 in (30.5 cm) tail.
- Fold the tab to the WS and whipstitch the last row to the WS of the band just below Row 7.
Repeat over each of the 7 leaf units. The tabs end up centered over the leaves, 4.5 in (11.4 cm) apart, and each loop fits a rod up to 1.25 in (3.2 cm) in diameter.
Final Blocking
- Weave in all ends along the spines or inside the ridges. Never carry an end across an open diamond.
- Soak the panel for 15 minutes in cool water with a little wool wash. Press the water out without wringing.
- Roll the panel in towels to remove more moisture.
- Lay it flat, RS up, on your blocking surface.
- Pin the top band straight at 31.5 in (80.0 cm).
- Pin the side joins so each diamond opens evenly, then pin each leaf tip down. The panel should be 78 in (198.1 cm) from the top of the band to the tip loops.
- Pull each scalloped ch-3 loop into shape, and mist any areas that have dried.
- Let it dry completely before unpinning. Block the second panel to the same measurements as the first.
Final Quality-Control Checklist
- Every leaf has 11 loops per side, a ch-5 tip loop, and a stem loop or stem join.
- The colors follow the checkerboard grid, with no two same-color leaves side by side.
- Every leaf is joined to its side neighbors at loops 5, 6 and 7, and tip-to-stem to the leaves above and below.
- Top band Row 1 has 126 sts, and the band is 31.5 in (80.0 cm) wide.
- There are 7 tabs, all the same length and centered over the leaves.
- Both panels match within 0.5 in (1.3 cm) in width and length.
Troubleshooting
- Leaf curls into a cone: You are working through both loops instead of the BLO, or your sc are too tight. Relax your tension.
- Tip is blunt: Always work (sc, ch 2, sc) into the ch-2 sp, never into a stitch.
- Base isn’t stepped: Leave exactly 3 sts unworked at the end of Rows 2–7.
- Panel is narrower than the band: Your leaves are under 4.5 in (11.4 cm). Loosen Rnd 8, or go up a hook size for the edging.
- Panel sags lengthwise: This is common with heavy cotton. Block and dry flat, never hanging.
Care
Hand wash in cool water, or machine wash on a delicate cycle inside a large mesh bag. Dry flat and reshape the leaves while damp.
Final Notes
The measurement chain is short and reliable. Gauge sets each leaf at 4.5 in × 7.5 in (11.4 cm × 19.1 cm). Seven leaves across give 31.5 in (80.0 cm), and nine joined rows give 76.5 in (194.3 cm). The 126-stitch band matches that width exactly and adds 1.5 in (3.8 cm), for a finished panel of 78 in (198.1 cm). Get one leaf right and the rest of the curtain will follow.
Happy crocheting!