

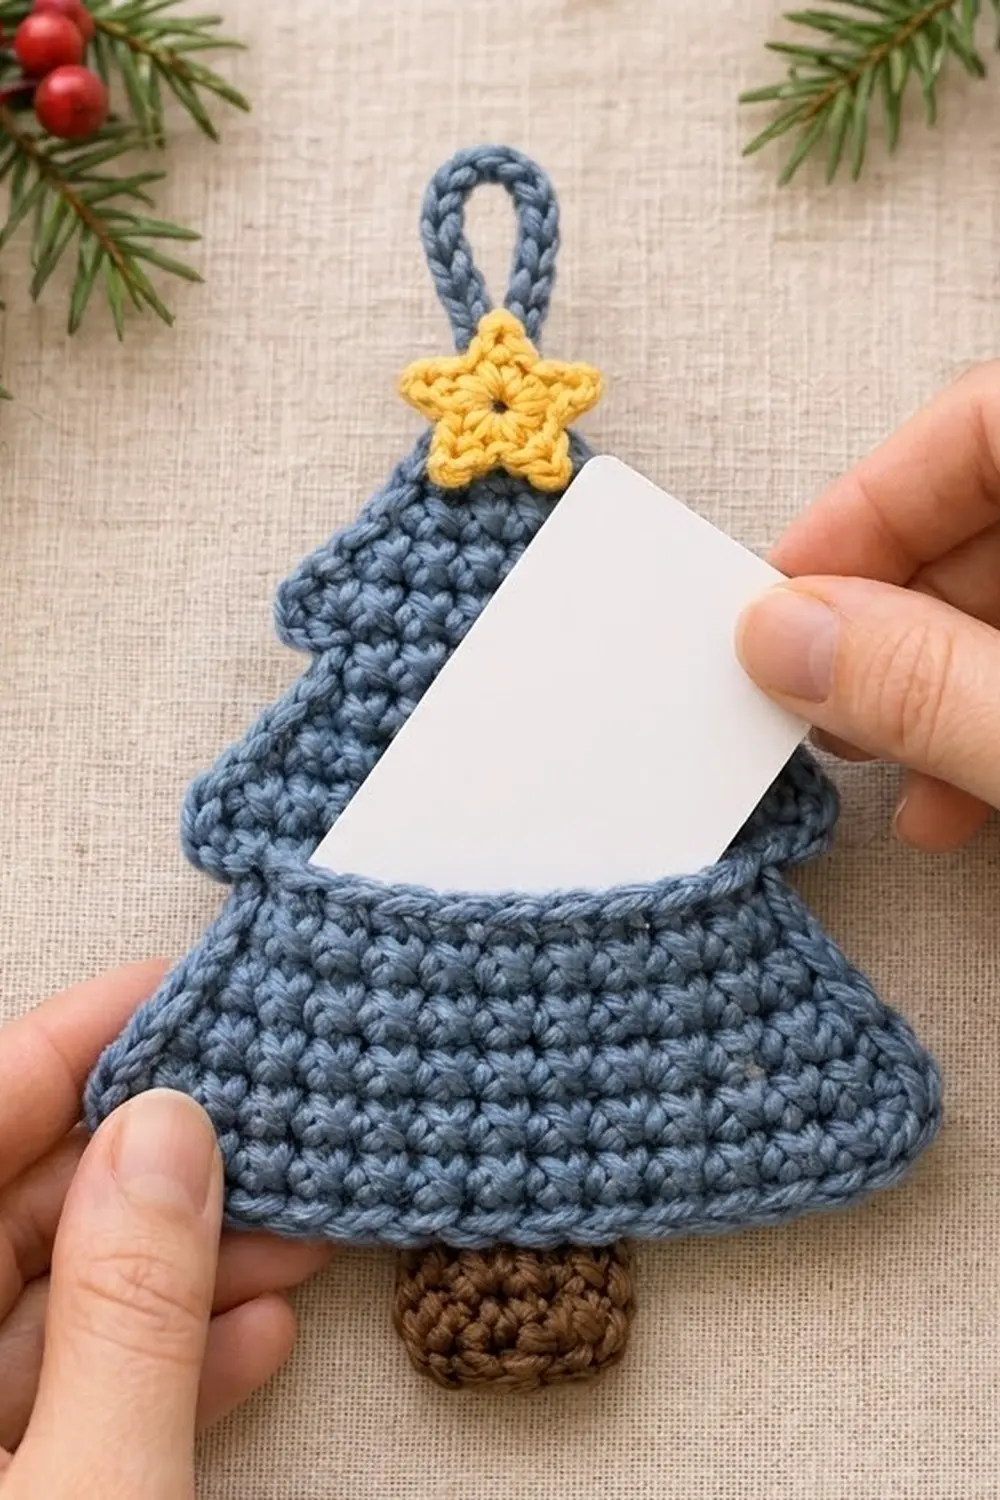
This little tree is a gift and its wrapping in one. It’s a flat, three-tier Christmas tree in dense single crochet. A shaped pocket across the bottom tier holds a standard gift card. A yellow star and a corded hanging loop finish the top, and a brown trunk peeks out below.
The sample is dusty denim blue with a chocolate-brown trunk and a sunny yellow star. The style is soft and cozy, with a clean outline. A slip stitch rim around every edge gives each tier a neat, corded edge. The pocket’s top corners stick out just slightly past the tree outline, like a real branch.
The pattern uses US crochet terms. The finished tree body is 6.25 in wide x 6.5 in tall (15.9 x 16.5 cm). With the trunk and loop it is about 8.25 in (21.0 cm) tall overall.
You work the back panel top-down in rows. Increases widen each tier, and a slip-stitch “step” row starts the next tier. A shorter pocket panel copies the lower part of the bottom tier. Both panels get a two-round edging, and then you sew the pocket on along its sides and bottom. Last, you add the trunk, star and loop.
Finished Size and Construction
- Finished size: 6.25 in wide x 6.5 in tall (15.9 x 16.5 cm) for the tree body; about 8.25 in (21.0 cm) tall with trunk and loop
- Skill level: Easy / advanced beginner
- Terminology: US
- Yarn weight: Worsted (#4), cotton or cotton blend
- Hook: 4.0 mm (G-6)
- Number of pieces: 1 finished ornament made from 5 parts sewn together: back panel, pocket, trunk, star and hanging loop
- Layout: Pocket sewn to the front of the bottom tier, trunk behind the bottom center, star and loop at the tip
- Back panel before border: 5.75 in wide x 6.0 in tall (14.6 x 15.2 cm)
- Border depth: about 0.25 in (0.6 cm) on every edge
- Pocket after its border: 6.25 in wide at the bottom, 5.25 in wide at the top, about 1.8 in tall (15.9 x 13.3 x 4.6 cm)
Materials
Use a smooth worsted cotton or cotton blend. It gives crisp stitches and a firm pocket that won’t stretch out of shape. Fuzzy or very splitty yarn will hide the slip stitch rim.
- Color A, Denim Blue (tree, pocket, loop): 25 g / 50 m (55 yd)
- Color B, Chocolate Brown (trunk): 3 g / 6 m (7 yd)
- Color C, Golden Yellow (star): 2 g / 4 m (5 yd)
These amounts include extra for gauge swatching and sewing tails.
Tools:
– 4.0 mm (G-6) crochet hook
– Tapestry needle
– 4–6 locking stitch markers or sewing clips
– Scissors
– Pins and a blocking mat
– A standard gift card, 3.375 x 2.125 in (8.6 x 5.4 cm), for testing the fit
Abbreviations (US Terms)
- ch – chain
- sc – single crochet
- hdc – half double crochet
- sl st – slip stitch
- st(s) – stitch(es)
- RS – right side
- inc – 2 sc in the same stitch
Special technique – Step row: Don’t chain. Sl st in the first 3 sts, ch 1, then sc in the same st as the last sl st and continue as written. Leave the last 2 sts unworked. This takes 2 sts off each side and makes the ledge between tiers.
Gauge and Checkpoints
Gauge: 16 sc x 18 rows = 4 in (10.2 cm) in sc rows. That works out to 4 sc and 4.5 rows per inch.
Make the back panel first and use it as your gauge test. Measure it flat, without stretching.
- After Row 9 (top tier): 3.75 in (9.5 cm) wide at the base, 2.0 in (5.1 cm) tall
- After Row 18 (middle tier): 4.75 in (12.1 cm) wide at the base, 4.0 in (10.2 cm) tall overall
- After Row 27 (bottom tier): 5.75 in (14.6 cm) wide at the base, 6.0 in (15.2 cm) tall overall
- After the border: 6.25 x 6.5 in (15.9 x 16.5 cm)
If your panel is too big, go down a hook size (3.75 mm / F-5). If it’s too small, go up a hook size (4.5 mm / 7). Check width before height, because width decides whether the card fits. Tight fabric is good here: you shouldn’t be able to see the card through the stitches.

Back Panel
Use Color A. Every row ends with “turn.” The ch 1 at the start of a row does not count as a stitch.
Inc row: Ch 1, 2 sc in first st, sc in each st to the last st, 2 sc in last st, turn (+2 sts).
Plain row: Ch 1, sc in each st across, turn (count stays the same).
Top Tier
Row 1: Ch 4, sc in 2nd ch from hook and in next 2 ch, turn. (3 sc)
Row 2: Inc row. (5 sc)
Row 3: Inc row. (7 sc)
Row 4: Plain row. (7 sc)
Row 5: Inc row. (9 sc)
Row 6: Inc row. (11 sc)
Row 7: Plain row. (11 sc)
Row 8: Inc row. (13 sc)
Row 9: Inc row. (15 sc)
Checkpoint: 3.75 in (9.5 cm) wide, 2.0 in (5.1 cm) tall.
Middle Tier
Row 10 (step row): Sl st in first 3 sts, ch 1, sc in same st as last sl st and in next 10 sts. Leave the last 2 sts unworked, turn. (11 sc)
Row 11: Inc row. (13 sc)
Row 12: Plain row. (13 sc)
Row 13: Inc row. (15 sc)
Row 14: Plain row. (15 sc)
Row 15: Inc row. (17 sc)
Row 16: Plain row. (17 sc)
Row 17: Inc row. (19 sc)
Row 18: Plain row. (19 sc)
Checkpoint: 4.75 in (12.1 cm) wide at the base. You should see a 2-stitch ledge on each side where the top tier overhangs.
Bottom Tier
Row 19 (step row): Sl st in first 3 sts, ch 1, sc in same st as last sl st and in next 14 sts. Leave the last 2 sts unworked, turn. (15 sc)
Row 20: Inc row. (17 sc)
Row 21: Plain row. (17 sc)
Row 22: Inc row. (19 sc)
Row 23: Plain row. (19 sc)
Row 24: Inc row. (21 sc)
Row 25: Plain row. (21 sc)
Row 26: Inc row. (23 sc)
Row 27: Plain row. (23 sc)
Checkpoint: 5.75 x 6.0 in (14.6 x 15.2 cm). Don’t fasten off. Go straight on to the back panel border (see Border).
Use Color A. The pocket rows match Rows 22–27 of the back panel stitch for stitch, so its sides line up exactly with the bottom tier.
Row 1: Ch 20, sc in 2nd ch from hook and in each ch across, turn. (19 sc)
Row 2: Plain row. (19 sc)
Row 3: Inc row. (21 sc)
Row 4: Plain row. (21 sc)
Row 5: Inc row. (23 sc)
Row 6: Plain row. (23 sc)
Checkpoint: 4.75 in (12.1 cm) wide along the foundation chain, 5.75 in (14.6 cm) wide at Row 6, about 1.3 in (3.3 cm) tall. Don’t fasten off.
Trunk
Use Color B.
Row 1: Ch 6, sc in 2nd ch from hook and in each ch across, turn. (5 sc)
Rows 2–4: Plain row. (5 sc)
Fasten off and leave a 10 in (25.4 cm) tail. The trunk measures 1.25 in wide x 0.9 in tall (3.2 x 2.3 cm).
Star
Use Color C.
Rnd 1: Magic ring, 5 sc in ring. Pull the ring closed and sl st to the first sc. (5 sc)
Rnd 2: Ch 3, sl st in 2nd ch from hook, hdc in next ch, sl st in next sc of Rnd 1. Repeat from * to * 4 more times. (5 points)
Fasten off and leave an 8 in (20.3 cm) tail. The star measures about 1.25 in (3.2 cm) from point to point.
Hanging Loop
Use Color A.
Ch 13, sc in 2nd ch from hook and in each ch across. (12 sc)
Fasten off and leave an 8 in (20.3 cm) tail. The cord is about 3 in (7.6 cm) long.
Border
The border is 1 round of sc followed by 1 round of sl st. The sc round adds about 0.25 in (0.6 cm) on every edge. The sl st round adds almost no width but gives the corded rim. Work 1 sc in each row end, 1 sc in each stitch, and 3 sc in each sharp corner.
Back Panel Border
Rnd 1 (RS): Ch 1 and turn so you’re working across the top of Row 27.
- Bottom edge: 3 sc in first st, sc in next 21 sts, 3 sc in last st. (27 sc)
- First side, going up:
- 1 sc in each of the 9 row ends of the bottom tier. (9 sc)
- 1 sc in each of the 2 exposed ledge sts of Row 18. (2 sc)
- 1 sc in each of the 9 row ends of the middle tier, with 2 sc in the Row 18 row end at the tier point. (10 sc)
- 1 sc in each of the 2 ledge sts of Row 9. (2 sc)
- 1 sc in each of the 9 row ends of the top tier, with 2 sc in the Row 9 row end. (10 sc)
- Side total: 33 sc.
- Tip: Working into the foundation ch of Row 1: 2 sc in first ch, sc in next ch, 2 sc in last ch. (5 sc)
- Second side, going down: Mirror the first side: 10, 2, 10, 2, 9. (33 sc)
Sl st to the first sc. (98 sc)
On the side where the step rows began with sl sts, those sl sts are the ledge sts. Work into them as normal.
Rnd 2: Ch 1, sl st loosely in each sc around. Join. (98 sl st)
Fasten off and weave in the ends. Checkpoint: 6.25 x 6.5 in (15.9 x 16.5 cm).
Why the math works: Each side is 9 + 2 + 10 + 2 + 10 = 33 sc. The full round is 27 + 33 + 5 + 33 = 98 sc. Each row end gets exactly 1 sc. The only extras are 1 sc at each tier point and the 3-sc bottom corners, which round the points without ruffling.
Pocket Border
Rnd 1 (RS): Ch 1, turn.
- Bottom edge: 3 sc in first st, sc in next 21 sts, 3 sc in last st. (27 sc)
- First side: 1 sc in each of the 6 row ends. (6 sc)
- Top edge: Working into the foundation ch: 3 sc in first ch, sc in next 17 ch, 3 sc in last ch. (23 sc)
- Second side: 1 sc in each of the 6 row ends. (6 sc)
Sl st to the first sc. (62 sc: 27 + 6 + 23 + 6)
Rnd 2: Ch 1, sl st loosely in each sc around. Join. (62 sl st)
Fasten off and leave a 24 in (61.0 cm) tail for sewing. Checkpoint: 6.25 in (15.9 cm) wide at the bottom, 5.25 in (13.3 cm) wide at the top, about 1.8 in (4.6 cm) tall.
Assembly
Pocket: Lay the back panel RS up. Place the pocket on top, also RS up, with the bottom edges together. Each panel has 27 bottom-edge border sts. Match them 1 to 1 and clip at both corners and at the center (st 14). On each side, match the pocket’s 6 side sc to the lowest 6 of the back’s 9 bottom-tier side sc.
Whipstitch through both layers, 1 stitch to 1 stitch: 6 up one side, 27 across the bottom and 6 up the other side, for 39 joins in total. Leave the 23-st top edge open.
Pull each stitch just snug, so the seam lies flat without puckering. The pocket opening should measure 4.75 in (12.1 cm) inside the seams, and the card should slide in easily. The top of the card stands about 0.5 in (1.3 cm) above the rim.
Trunk: Center the trunk behind the bottom edge so its 5 sts sit behind back border sts 12–16. Overlap the top row (about 0.25 in / 0.6 cm) and sew it to the back panel only. About 0.75 in (1.9 cm) shows below the tree.
Loop: Fold the cord in half. Sew both ends behind the tip, overlapping by 0.5 in (1.3 cm). This leaves a loop about 1 in (2.5 cm) tall.
Star: Center the star over the tip on the front so it covers the base of the loop. Sew around its center ring and tack down each point.
Final Blocking
- Take out the card.
- Spritz the ornament with water until it’s damp but not wet.
- Lay it face up on the blocking mat.
- Pin the bottom corners 6.25 in (15.9 cm) apart and the tip 6.5 in (16.5 cm) above the bottom edge.
- Pin out each tier point so the ledges sit crisp and level.
- Slip a card-sized piece of cardboard into the pocket so the opening keeps its shape.
- Let it dry completely, then unpin.
Final Quality-Control Checklist
- The tree body measures 6.25 x 6.5 in (15.9 x 16.5 cm)
- Both sides are mirror images, with 2-st ledges at both tier steps
- The back border has 98 sts and the pocket border has 62 sts
- The pocket seam has 39 joins and the top edge is fully open
- The card slides in without forcing and doesn’t show through the fabric
- The trunk is centered and the star is level
- The loop is secure, and all ends are woven in and hidden from the front
Troubleshooting
The tree leans to one side: You probably missed an increase. Check each row’s count against the pattern.
The ledges look uneven: Make sure each step row leaves exactly 2 sts unworked at the end, and work the sl sts loosely.
The border ruffles: Your border sts are too loose. Use a hook one size smaller for Rnd 1.
The border cups or pulls in: Check that you added the extra sc at each tier point, then work Rnd 2 more loosely.
The card won’t fit: Your gauge is tight. Remake the pocket with the next larger hook, or block the pocket a little wider.
The pocket gapes: Pull the whipstitches a little firmer and check that you didn’t skip any side stitch.
Care
Take the gift card out first, then hand wash in cool water and lay flat to dry. Reshape the tiers while the ornament is damp.
Final Notes
The measurement chain is short. A gauge of 16 sc x 18 rows = 4 in (10.2 cm) gives a back panel of 5.75 x 6.0 in (14.6 x 15.2 cm). The 98-stitch border brings it to 6.25 x 6.5 in (15.9 x 16.5 cm). The pocket copies back Rows 22–27, and its 62-stitch border makes its sides and bottom match the bottom tier stitch for stitch. A standard gift card fits with room to spare. Try sage, cranberry or cream for a whole set of gift trees.
Happy crocheting!