

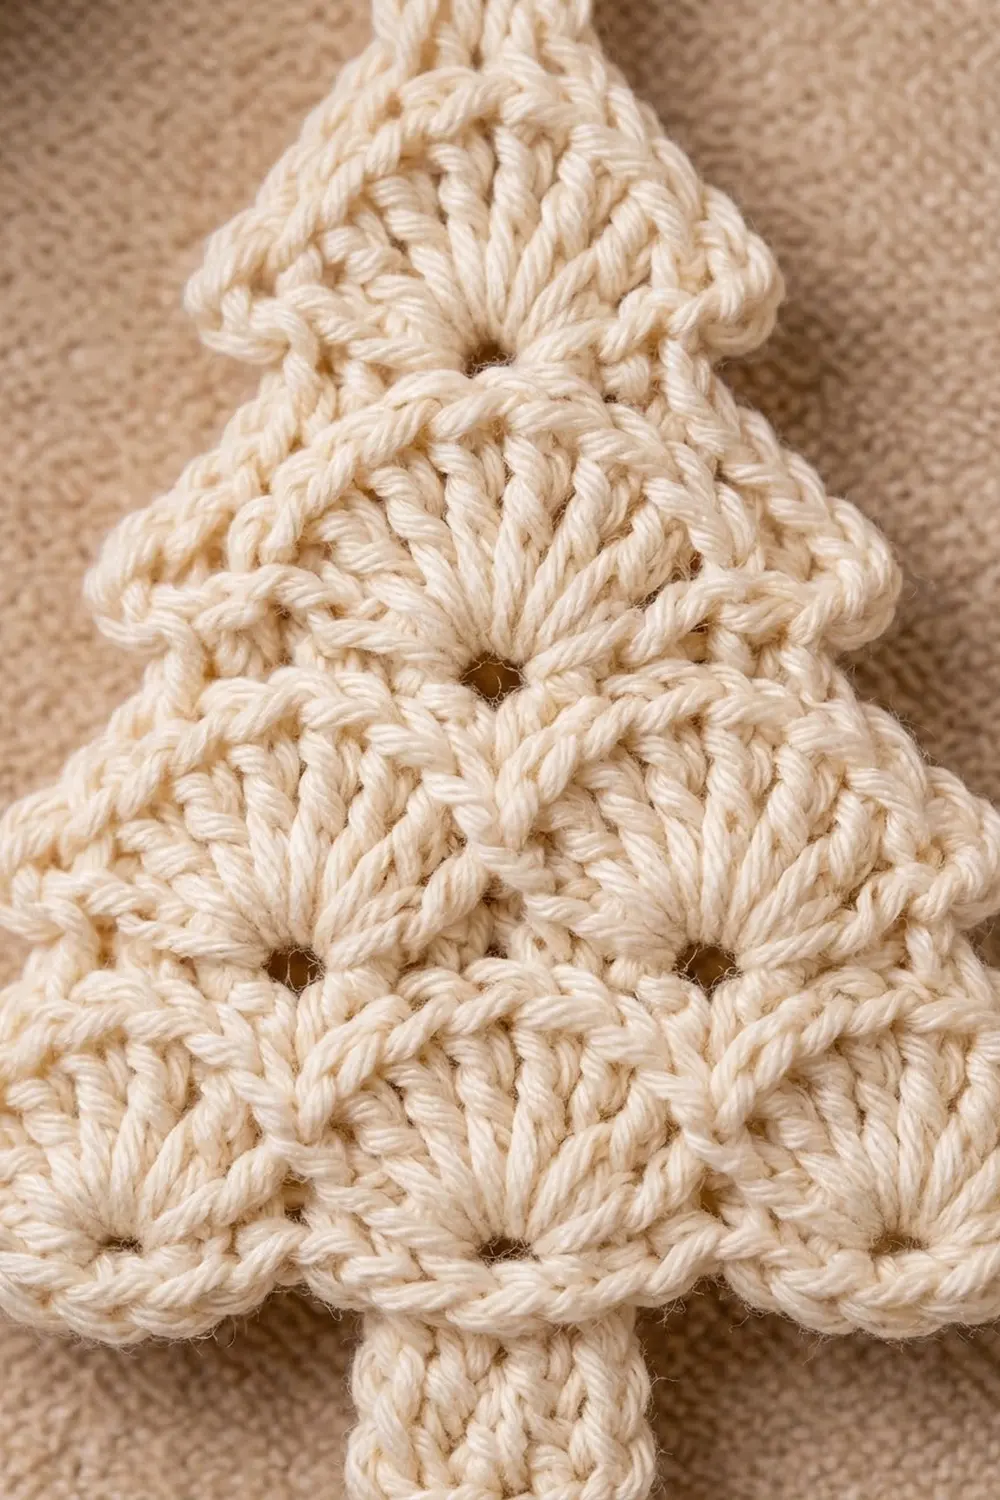
The Ivory Fan Pine is a small, flat Christmas tree ornament built from stacked shell fans. Each fan opens downward from a tiny eyelet, so the tiers look like layered branches with a soft scalloped hem. A short solid trunk and a slim covered loop finish the shape.
It is worked in one color, cream or ivory, which gives it a calm, Scandinavian look against gold baubles and warm lights. The stitch texture does all the work, so no color changes are needed.
This pattern uses US crochet terms. The finished ornament measures about 4.65 in (11.8 cm) wide and 4 in (10.2 cm) tall. The hanging loop adds 1.5 in (3.8 cm), for a hanging height of 5.5 in (14.0 cm).
You work the tree top down in turning rows, starting with a single fan. A “link row” after each fan row sets the anchor points for the next, wider tier. After four tiers, you add the trunk to the center of the bottom edge. One round of single crochet, with the loop worked into it, finishes the piece.
Finished Size and Construction
- Finished size: 4.65 in (11.8 cm) wide × 4 in (10.2 cm) tall, plus a 1.5 in (3.8 cm) loop
- Skill level: Easy / advanced beginner
- Terminology: US
- Yarn weight: Worsted (#4), cotton or cotton blend
- Hook: 4.0 mm (G-6)
- Number of pieces: 1
- Layout: Stepped triangle of 1, 2, 3 and 4 fans, with a centered trunk
- Piece size before border: 4.4 in (11.2 cm) wide × 3.75 in (9.5 cm) tall
- Border depth: 0.125 in (0.3 cm) on every edge
Materials
Yarn: Use a smooth worsted-weight cotton or cotton blend. Cotton shows the fan texture clearly and blocks crisp and flat. Avoid fuzzy yarns, because they blur the eyelets.
- Cream / ivory: 10 g (about 17 m)
That amount makes one ornament and includes a margin for your gauge swatch and weaving in ends. One 50 g ball makes about five ornaments.
Tools:
- 4.0 mm (G-6) crochet hook
- Tapestry needle
- Scissors
- 2 stitch markers
- Rust-proof pins and a blocking mat or foam board
- Spray bottle with clean water
Abbreviations (US Terms)
- ch – chain
- sl st – slip stitch
- sc – single crochet
- dc – double crochet
- sp(s) – space(s)
- sk – skip
- st(s) – stitch(es)
- tch – turning chain
- RS / WS – right side / wrong side
Special stitches:
- Fan: 7 dc worked into the same ch-2 sp, or into the ring for Row 1. When a fan starts a row, ch 3 counts as the first dc, and you work 6 dc more.
- V: (sc, ch 2, sc) in the same stitch. The ch-2 sp of a V is the anchor for the next fan, and it becomes that fan’s eyelet.
Gauge and Checkpoints
Gauge matters here because every tier is exactly one fan wider than the tier above it. Work Rows 1–3 as a test, measure, then continue or start again with a different hook.
- Fan gauge: One fan (Row 1) measures 1.1 in (2.8 cm) wide × 0.6 in (1.5 cm) tall.
- Border gauge: 5 sc = 1 in (2.5 cm).
Checkpoints (unblocked, measured flat):
- After Row 1: 1.1 in (2.8 cm) wide, 0.6 in (1.5 cm) tall
- After Row 3: 2.2 in (5.6 cm) wide, 1.4 in (3.6 cm) tall
- After Row 5: 3.3 in (8.4 cm) wide, 2.2 in (5.6 cm) tall
- After Row 7: 4.4 in (11.2 cm) wide, 3.0 in (7.6 cm) tall
- With trunk: 3.75 in (9.5 cm) tall
- With border: 4.65 in (11.8 cm) × 4 in (10.2 cm)
If your fan is too big (over 1.2 in / 3.0 cm), change to a 3.5 mm hook. If it is too small (under 1.0 in / 2.5 cm), change to a 4.5 mm hook. If the fans cup instead of lying flat, loosen your ch-3 links before you change the hook.
Tree Body
Row 1 is the RS. Odd rows are fan rows, and even rows are link rows. Do not turn the work until the end of each row.
Row 1 (RS, 1 fan): Ch 4, sl st in first ch to form a ring. Ch 3 (counts as dc), 6 dc in ring. Turn.
(7 dc: 1 fan)
Leave a 6 in (15.2 cm) starting tail and keep it free. The ring is the top eyelet of the tree.
Row 2 (link): Ch 1, V in first dc, ch 3, sk 2 dc, sc in next dc (center of fan), ch 3, sk 2 dc, V in top of tch. Turn.
(5 sc, 2 ch-2 sps, 2 ch-3 sps)
Row 3 (2 fans): Sl st in first sc and into ch-2 sp, ch 3 (counts as dc), 6 dc in same ch-2 sp. Sk next sc and ch-3 sp, sc in center sc, sk next ch-3 sp and sc, 7 dc in next ch-2 sp. Leave the last sc unworked. Turn.
(15 sts: 14 dc + 1 sc)
The two new fans hang from the tips of the first fan. That is what makes the tier step outward.
Row 4 (link): Ch 1, V in first dc, ch 3, sk 2 dc, sc in next dc, ch 3, sk 3 dc, V in next sc (between fans), ch 3, sk 3 dc, sc in next dc, ch 3, sk 2 dc, V in top of tch. Turn.
(8 sc, 3 ch-2 sps, 4 ch-3 sps)
Link-row rule: Put a V in each outer dc and in each sc between fans. Put a single sc in the 4th (center) dc of each fan. Each ch-3 skips 2 dc next to an outer V, or 3 dc next to an inner V.
Row 5 (3 fans): Sl st in first sc and into ch-2 sp, ch 3, 6 dc in same sp. Sk next sc and ch-3 sp, sc in center sc, sk next ch-3 sp and sc, 7 dc in next ch-2 sp; rep from * once more. Leave the last sc unworked. Turn.
(23 sts: 21 dc + 2 sc)*
Row 6 (link): Ch 1, V in first dc, ch 3, sk 2 dc, sc in next dc, ch 3, sk 3 dc, V in next sc, ch 3, sk 3 dc, sc in next dc; rep from * once more, ch 3, sk 2 dc, V in top of tch. Turn.
(11 sc, 4 ch-2 sps, 6 ch-3 sps)*
Row 7 (RS, 4 fans): Sl st in first sc and into ch-2 sp, ch 3, 6 dc in same sp. Sk next sc and ch-3 sp, sc in center sc, sk next ch-3 sp and sc, 7 dc in next ch-2 sp; rep from * twice more. Leave the last sc unworked. Fasten off.
(31 sts: 28 dc + 3 sc)*
Count check: A fan row with M fans has 7M dc + (M − 1) sc, so 7, 15, 23 and 31 stitches. A link row after N fans has 3N + 2 sc and N + 1 V’s, so 5, 8 and 11 sc.
Trunk
On Row 7, number the stitches 1 to 31 from either end. Stitch 16 is the center sc, between the second and third fans. Place markers in sts 14 and 18.
Trunk Row 1 (RS): Join yarn with sc in st 14, then sc in sts 15, 16, 17 and 18. Turn.
(5 sc)
This row sits in the dip between the two middle fans and will look slightly curved.
Trunk Rows 2–6: Ch 1, sc in each sc across. Turn.
(5 sc each row)
Row 2 straightens the curve. Fasten off after Row 6.
Checkpoint: The trunk is 1 in (2.5 cm) wide and 1.2 in (3.0 cm) long in total. About 0.75 in (1.9 cm) of it hangs below the scallops. The piece now measures 4.4 in (11.2 cm) × 3.75 in (9.5 cm).
Border
Work one round of sc with the RS facing. Use 5 sc per inch (2.5 cm) as your guide. The counts below are fixed, so don’t add extra stitches.
Top: Join yarn with sc in the free top edge of the ring, between the beginning ch-3 and the last dc of Row 1. Ch 16 for the loop, then sc in the same place.
(2 sc + ch-16 loop)
First side (top to bottom):
- 3 sc evenly along the side of the Row 1 outer dc
- 2 sc in the Row 2 row end (the V tip)
- 3 sc along the Row 3 outer dc
- 2 sc in the Row 4 row end
- 3 sc along the Row 5 outer dc
- 2 sc in the Row 6 row end
- 3 sc along the Row 7 outer dc
(18 sc on this side)
Bottom scallops:
- Outer fan: sc in each of the 7 dc, then sl st in the sc between fans
- Second fan: sc in each of the first 5 dc (the last 2 dc hold the trunk)
Trunk:
- 6 sc up the first side, one per row end
- 3 sc in the corner stitch, sc in the next 3 sc, 3 sc in the last corner stitch
- 6 sc up the second side
(21 sc on the trunk)
Bottom scallops, continued:
- Third fan: sc in the last 5 dc, starting from the third dc
- Sl st in the sc between fans
- Outer fan: sc in each of the 7 dc
Second side: Work the first side in reverse, with 18 sc. Sl st to the first sc of the round.
Loop: Sl st into the ch-16 loop, work 24 sc in the loop, and sl st in the sc on the other side of the loop. Fasten off.
Round total: 2 + 18 + 7 + 5 + 21 + 5 + 7 + 18 = 83 sc, plus 2 sl sts and the covered loop.
Why the math works: Each side has 4 tiers × 3 sc plus 3 tips × 2 sc, which is 18 sc. Along the bottom, 28 dc minus the 4 dc used by the trunk leaves 24 sc. The trunk needs 6 + 9 + 6 = 21 sc. At 5 sc per inch, the 18 sc on each side match the slanted side length of about 3.6 in (9.1 cm), so the edges lie flat without ruffling or pulling in. The single border round adds 0.125 in (0.3 cm) on each edge. That brings the width from 4.4 in (11.2 cm) to 4.65 in (11.8 cm) and the height from 3.75 in (9.5 cm) to 4 in (10.2 cm).
Final Blocking
- Weave in all ends, including the starting tail, along the back of the stitches.
- Mist the ornament with water until it is evenly damp, but not dripping.
- Lay it RS up on the blocking mat.
- Pin the top point, then the 3 tier tips on each side, keeping both sides symmetrical.
- Pin the bottom of each of the 4 bottom fans so the scallops are evenly rounded.
- Pin the 2 bottom corners of the trunk square.
- Check the measurements: 4.65 in (11.8 cm) wide and 4 in (10.2 cm) tall.
- Open each eyelet gently with the tip of your hook.
- Let it dry completely, then unpin.
- For a firmer ornament, mist lightly with spray starch before the final dry.
Final Quality-Control Checklist
- Tiers have 1, 2, 3 and 4 fans, with 7 dc in each fan.
- Every fan has an open eyelet at its top center.
- Row 7 has 31 stitches, and the trunk is 5 sc wide and 6 rows tall.
- The trunk is centered under the middle sc of Row 7.
- The border has 18 sc on each side and 83 sc in total.
- The loop is covered with 24 sc and stands straight up.
- The finished size is 4.65 in (11.8 cm) × 4 in (10.2 cm).
- No ends show on the RS.
Troubleshooting
Fans ruffle or cup: Your dc are too tall for the space. Use a smaller hook, or work the ch-3 links a little looser.
Tiers don’t step outward: The edge V is probably in the wrong place. It must go into the outermost dc of the row, never into the unworked sc.
Eyelets are closed: Make the ch-2 of each V a little looser so the 7 dc have room.
The tree leans to one side: You worked a 2-dc skip and a 3-dc skip the wrong way round. Recheck the link-row rule.
The trunk is off-center: Recount Row 7 from both ends. Stitch 16 must be the center sc.
The border ripples: You worked more than 3 sc along a tier side. Rip back and use the exact counts.
The loop flops over: Pack the 24 sc snugly, then starch the loop when you block.
Care
Hand wash in cool water with mild soap, and press the water out in a towel. Lay flat to dry, reshaping the scallops, and store flat between seasons.

Final Notes
Everything follows from the fan gauge. A 1.1 in (2.8 cm) fan gives tiers that are 1.1, 2.2, 3.3 and 4.4 in (2.8, 5.6, 8.4 and 11.2 cm) wide. The trunk brings the height to 3.75 in (9.5 cm). One sc border round finishes the ornament at 4.65 in (11.8 cm) × 4 in (10.2 cm), with a 1.5 in (3.8 cm) loop. If Row 1 is right, the rest of the tree will be too.
Happy crocheting!