

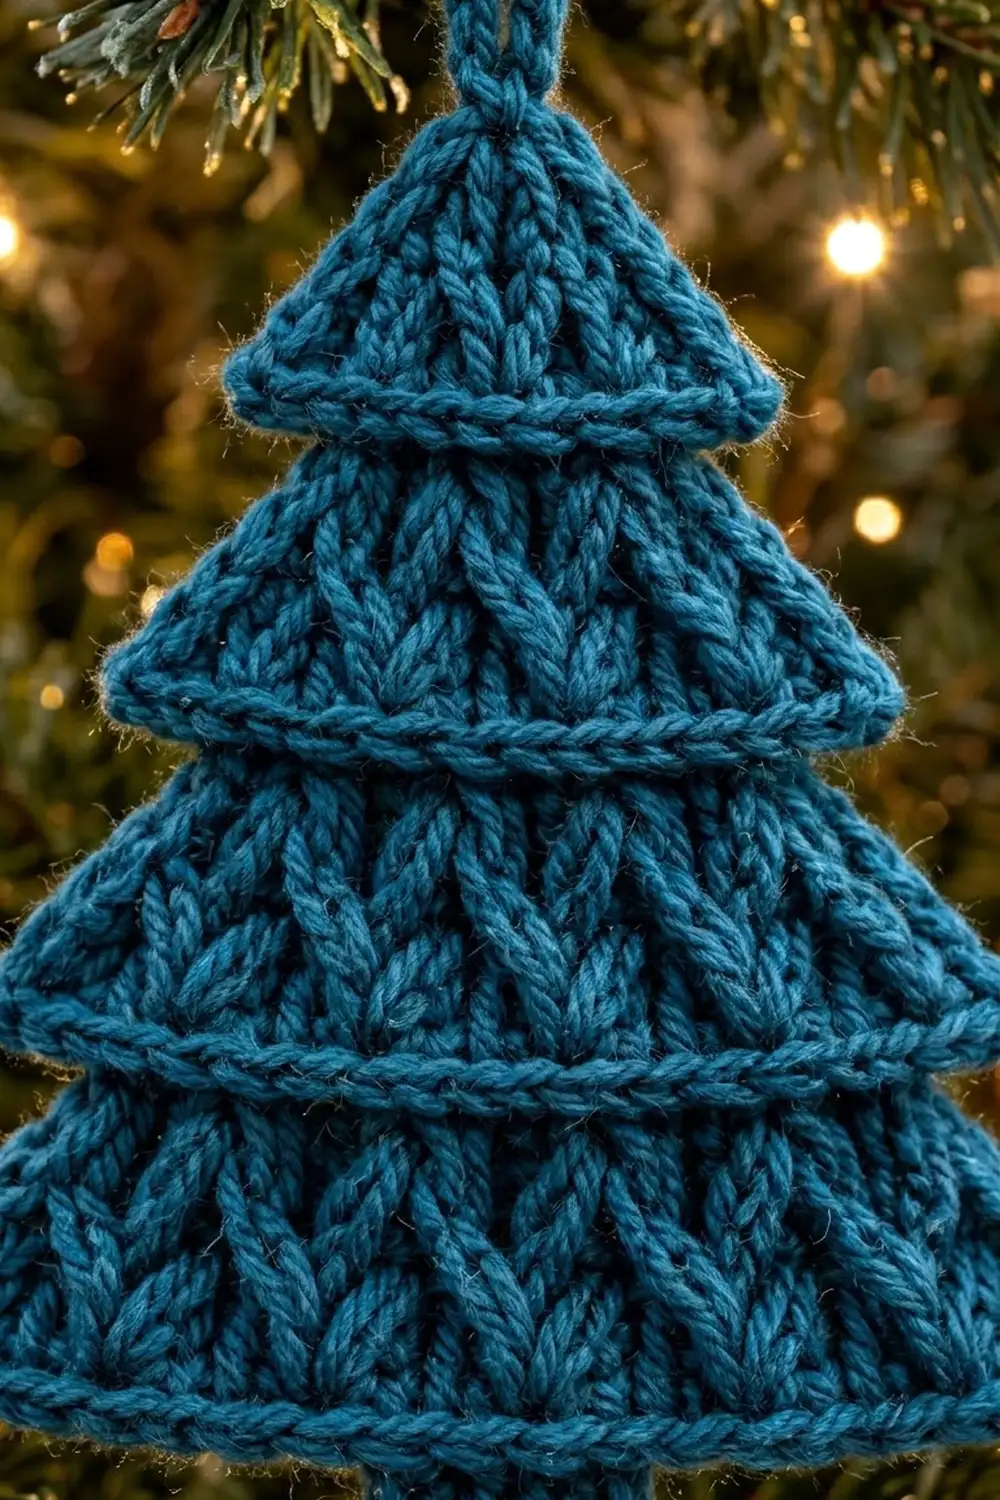
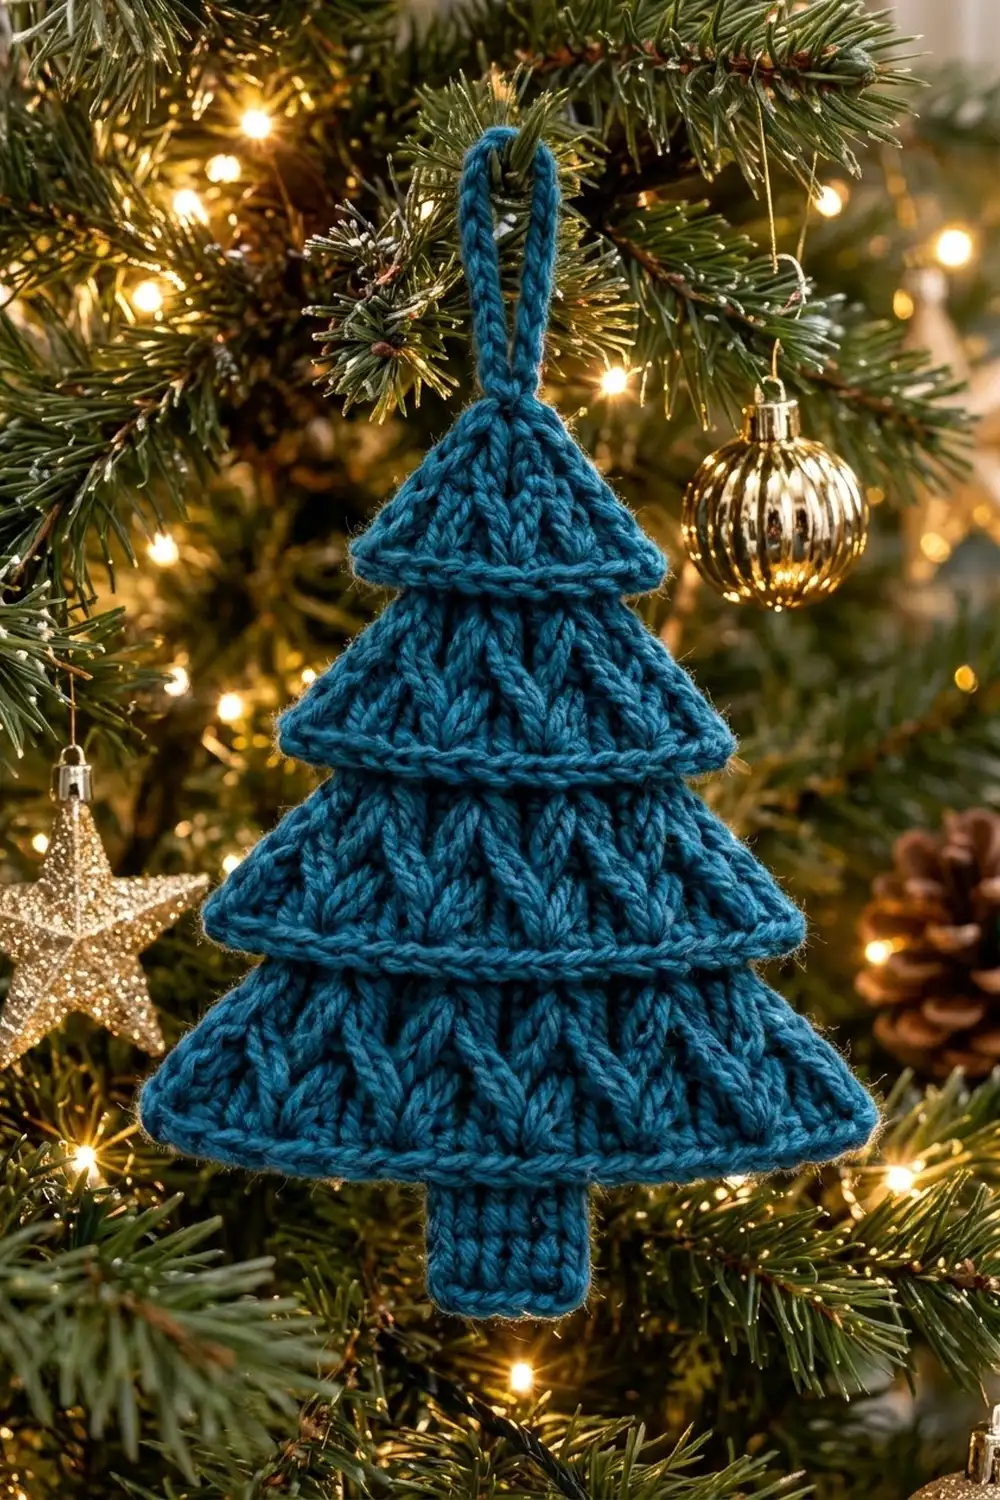
The Evergreen Tiers ornament is a flat, layered Christmas tree with a soft knit-look texture. Columns of chunky V-stitches cover four stacked tiers. A raised rope edge outlines each tier, and the bottom edge of each tier hangs a little past the top of the one below it. That overlap gives the ornament depth, even though it is a single flat piece.
The sample is worked in one deep teal / petrol blue, which looks rich against green branches and warm fairy lights. Classic forest green, cranberry red, or creamy white work just as well. It’s a simple, modern design that suits a tree, a gift tag, or a window hook.
This pattern uses US crochet terms. The finished ornament measures 4.4 in (11.2 cm) wide × 6.4 in (16.3 cm) tall, not counting the hanging loop.
Construction overview: You work the tree in one piece, in rows from the top point down. Each new tier starts in only one loop of the row before it and skips the outer stitches, which leaves the overhanging edges. The trunk is worked from the center of the bottom tier. One round of single crochet outlines the whole tree and makes the hanging loop at the top. Last, surface slip stitches finish the rope line along the base of each tier.
Finished Size and Construction
- Finished size: 4.4 in (11.2 cm) wide × 6.4 in (16.3 cm) tall, plus a loop about 1 in (2.5 cm) tall
- Skill level: Easy–Intermediate
- Terminology: US
- Yarn weight: DK (#3)
- Hook: 3.5 mm (E-4)
- Number of pieces: 1 (single flat ornament)
- Layout: 4 stacked tiers + trunk, worked top-down in rows
- Piece size before border: 4.0 in (10.2 cm) wide × 6.0 in (15.2 cm) tall
- Border depth: 1 round of sc, about 0.2 in (0.5 cm) on every edge
Materials
Yarn: Use a smooth DK yarn with good stitch definition, such as acrylic, a wool blend, or mercerized cotton. Avoid fuzzy or loosely plied yarn, because it blurs the V-stitches and the rope lines.
- Teal / petrol blue: 15 g, about 30 m (33 yd)
The quantity includes a margin for your gauge swatch and weaving in ends. The ornament itself uses a little less.
Tools:
– 3.5 mm (E-4) crochet hook
– Tapestry needle
– Scissors
– Stitch markers (2)
– Ruler or tape measure
– Blocking mat and pins
– Spray bottle
Abbreviations (US Terms)
- ch – chain
- sl st – slip stitch
- sc – single crochet
- dc – double crochet
- st(s) – stitch(es)
- sk – skip
- BLO – back loop only
- FLO – front loop only
- RS / WS – right side / wrong side
Special stitch:
– V (V-stitch): 2 dc in the same stitch. Unlike a standard V-stitch, this one has no chain between the two dc, so the texture stays dense and chunky.
Turning chain note: In V rows, the ch-3 at the start counts as a dc. On the next row, work the last stitch into the top of that ch-3.
Gauge and Checkpoints
Gauge: 20 sc × 20 rows = 4 in (10.2 cm) square.
In pattern:
– 1 sc row = 0.2 in (0.5 cm) tall
– 1 V row = 0.4 in (1.0 cm) tall
– 5 sts = 1 in (2.5 cm) wide
The tree is small, so the best test is to make it and measure as you go. Use these checkpoints:
| After | Width | Total height |
|---|---|---|
| Tier 1 (Row 4) | 1.6 in (4.1 cm) | 1.0 in (2.5 cm) |
| Tier 2 (Row 9) | 2.4 in (6.1 cm) | 2.4 in (6.1 cm) |
| Tier 3 (Row 14) | 3.2 in (8.1 cm) | 3.8 in (9.7 cm) |
| Tier 4 (Row 19) | 4.0 in (10.2 cm) | 5.2 in (13.2 cm) |
| Trunk (Row 23) | trunk 0.8 in (2.0 cm) | 6.0 in (15.2 cm) |
| Border | 4.4 in (11.2 cm) | 6.4 in (16.3 cm) |
If your tree is too big, go down to a 3.25 mm hook. If it’s too small, go up to a 3.75 mm hook. If only the height is off, look at your dc. Tall, loose dc make the V rows grow taller than 0.4 in (1.0 cm). Pull up less yarn on the first yarn-over.
Pattern
The stitch counts in brackets do not include turning chains or slip stitches. The only exception is the ch-3 at the start of V rows, which counts as a dc.
Tier 1 (Top Triangle)
Row 1 (RS): Ch 2, 2 sc in 2nd ch from hook. [2]
Row 2 (WS): Ch 1, turn, 2 sc in each st. [4]
Row 3 (RS, V row): Ch 3 (counts as dc), turn, dc in same st. Sk next st, V in next st. Work 2 dc in last st. [6]
Row 4 (WS): Ch 1, turn, 2 sc in first st, sc in each st to last st, 2 sc in top of turning ch. [8]
Checkpoint: 1.6 in (4.1 cm) wide, 1.0 in (2.5 cm) tall.
Tier 2
Row 5 (RS, set-in row): Ch 1, turn. Sl st in BLO of first 2 sts, then sc in BLO of next 4 sts. Leave the last 2 sts unworked. [4]
The 2 sts at each end of Row 4 are now the overhang. The unused front loops across the middle 4 sts sit on the RS; you’ll use them for the ridge later.
Row 6 (WS, V row): Ch 3, turn, dc in same st. Sk next st, V in next st. Work 2 dc in last st. [6]
Row 7 (RS): Ch 1, turn, 2 sc in first st, sc across to last st, 2 sc in top of turning ch. [8]
Row 8 (WS, V row): Ch 3, turn, dc in same st. Sk next st, V in next st; repeat from * 2 more times (3 V total). Work 2 dc in last st. [10]
Row 9 (RS): Ch 1, turn, 2 sc in first st, sc across, 2 sc in top of turning ch. [12]
Checkpoint: 2.4 in (6.1 cm) wide.
Tier 3
Row 10 (WS, set-in row): Ch 1, turn. Sl st in FLO of first 2 sts, then sc in FLO of next 8 sts. Leave the last 2 sts unworked. [8]
You’re on the WS here, so working in the front loops leaves the free back loops on the RS. That matches the free loops from Tier 2.
Row 11 (RS, V row): Ch 3, turn, dc in same st. Sk next st, V in next st; repeat from * 2 more times (3 V total). Work 2 dc in last st. [10]
Row 12 (WS): Ch 1, turn, 2 sc in first st, sc across, 2 sc in top of turning ch. [12]
Row 13 (RS, V row): Ch 3, turn, dc in same st. Sk next st, V in next st; repeat from * 4 more times (5 V total). Work 2 dc in last st. [14]
Row 14 (WS): Ch 1, turn, 2 sc in first st, sc across, 2 sc in top of turning ch. [16]
Checkpoint: 3.2 in (8.1 cm) wide.
Tier 4
Row 15 (RS, set-in row): Ch 1, turn. Sl st in BLO of first 2 sts, then sc in BLO of next 12 sts. Leave the last 2 sts unworked. [12]
Row 16 (WS, V row): Ch 3, turn, dc in same st. Sk next st, V in next st; repeat from * 4 more times (5 V total). Work 2 dc in last st. [14]
Row 17 (RS): Ch 1, turn, 2 sc in first st, sc across, 2 sc in top of turning ch. [16]
Row 18 (WS, V row): Ch 3, turn, dc in same st. Sk next st, V in next st; repeat from * 6 more times (7 V total). Work 2 dc in last st. [18]
Row 19 (RS): Ch 1, turn, 2 sc in first st, sc across, 2 sc in top of turning ch. [20]
Checkpoint: 4.0 in (10.2 cm) wide, 5.2 in (13.2 cm) tall.
V row formula: A V row worked over N stitches gives 2 dc at each edge plus (N − 2) ÷ 2 V-stitches in the middle, for a total of N + 2 stitches. Every row adds 2 stitches, so each tier gets 8 stitches wider from its set-in row to its base.
Trunk
Row 20 (WS, set-in row): Ch 1, turn. Sl st in FLO of first 8 sts, then sc in FLO of next 4 sts. Leave the last 8 sts unworked. [4]
Rows 21–23: Ch 1, turn, sc in each st across. [4]
Row 23 is a RS row. Do not fasten off.
Checkpoint: the trunk is 0.8 in (2.0 cm) wide × 0.8 in (2.0 cm) tall. The whole piece is 6.0 in (15.2 cm) tall.
Border
Border gauge: Work 1 sc for every 0.2 in (0.5 cm) of edge. That means:
– 1 sc per sc row-end
– 2 sc per V row-end, because a dc row is twice as tall as a sc row
– 1 sc per stitch along the overhang edges, with 1 extra sc at each outer corner
Round 1 (RS): Ch 1. Do not turn. Rotate the piece and work around the whole tree as follows.
First side, from the trunk up to the tip:
– Trunk side: 4 sc, one per row-end.
– Tier 4 overhang edge: 1 sc in each of the 7 inner free loops, then 2 sc in the outer corner st. (9)
– Tier 4 side: 1 sc in each sc row-end and 2 sc in each V row-end. (1+2+1+2+1 = 7)
– Tier 3 overhang edge: sc in inner free loop, 2 sc in outer corner st. (3)
– Tier 3 side: 7 sc.
– Tier 2 overhang edge: 3 sc.
– Tier 2 side: 7 sc.
– Tier 1 overhang edge: 3 sc.
– Tier 1 side, Rows 4 to 1: 1+2+1+1. (5)
First side total: 48 sc.
Tip: In the foundation ch at the top point, work sc, ch 20, sc. The ch-20 becomes the hanging loop.
Second side: Work down the second side in reverse order: 5, 3, 7, 3, 7, 3, 7, 9, 4. Second side total: 48 sc.
Trunk bottom: Working across the tops of Row 23, work 2 sc in first st, sc in next 2 sts, 2 sc in last st. (6)
Join with a sl st to the first sc. Total: 104 sc + ch-20 loop. Fasten off.
Why the math works: Each tier side has 3 sc rows and 2 V rows, which is 1.4 in (3.6 cm) tall. That gives 7 sc at 0.2 in (0.5 cm) each. Tier 1 is 1.0 in (2.5 cm) tall, which gives 5 sc. The extra sc at each outer corner lets the edging turn neatly without pulling. The border adds 0.2 in (0.5 cm) on every edge, so the tree grows from 4.0 × 6.0 in (10.2 × 15.2 cm) to 4.4 × 6.4 in (11.2 × 16.3 cm).
Tier Ridges (Rope Line)
The border only covers the overhang ends of each tier’s base. These ridges carry the rope line across the middle.
With RS facing, join yarn with a sl st and work loose surface sl sts into each free loop across the middle of each tier’s base:
– Tier 1: 4 sts
– Tier 2: 8 sts
– Tier 3: 12 sts
– Tier 4 (above the trunk): 4 sts
Start and end each ridge right where the border sc meet it, so the rope looks continuous across the full width of the tier. Fasten off after each ridge, and weave the tails in on the WS.
Final Blocking
- Weave in all the ends along the back of the border before you block.
- Mist the ornament until it is evenly damp, but not soaked.
- Lay it RS up on a blocking mat.
- Pin the base of Tier 4 to 4.4 in (11.2 cm) wide, and pin the tip-to-trunk height to 6.4 in (16.3 cm).
- Pin the outer corner of each tier so the overhangs sit flat and point outward.
- Square up the trunk at 0.8 in (2.0 cm) plus the border.
- Pinch the V columns lightly so they stand up, and let the ornament dry completely.
- If you used acrylic, you can steam-block it gently instead. Hold the iron above the piece and never press, so the texture stays raised.
Final Quality-Control Checklist
- Stitch counts per tier base are 8, 12, 16, and 20.
- Each set-in row skips exactly 2 sts at each end (8 at each end for the trunk).
- All free loops for the ridges are on the RS.
- The border totals 104 sc, with 48 sc on each side.
- The tree measures 4.4 in (11.2 cm) wide × 6.4 in (16.3 cm) tall.
- The hanging loop is centered and the ends are securely woven in.
- Both sides are mirror images, with matching overhang lengths.
Troubleshooting
Overhangs curl up: The set-in rows are too tight. Loosen the sl sts and block with pins at the corners.
Tiers fan out or ruffle: Your dc are too loose, or you added an extra V. Recount against the V row formula (N + 2).
Ridge loops are on the WS: You used the wrong loop on a set-in row. Use BLO on RS set-in rows and FLO on WS set-in rows.
Border puckers on the sides: You worked only 1 sc into a V row-end. Use 2 sc there.
Border ruffles at the corners: Use only one 2-sc corner per overhang edge.
Loop twists: Keep the ch-20 untwisted before you work the second sc into the tip.
Care
Hand wash in cool water, press out the water in a towel, and reshape the ornament to dry flat. Store it flat or hanging, away from heavy ornaments that could crush the texture.
Final Notes
Measure at every stage:
– Tier bases: 1.6, 2.4, 3.2, and 4.0 in (4.1, 6.1, 8.1, and 10.2 cm) wide
– Body: 5.2 in (13.2 cm) tall
– With trunk: 6.0 in (15.2 cm) tall
– With border: 4.4 × 6.4 in (11.2 × 16.3 cm)
If each checkpoint matches, the border count of 104 sc will lie flat and the overhangs will sit cleanly. Make one for every branch, or tie one to a gift. Happy crocheting!