

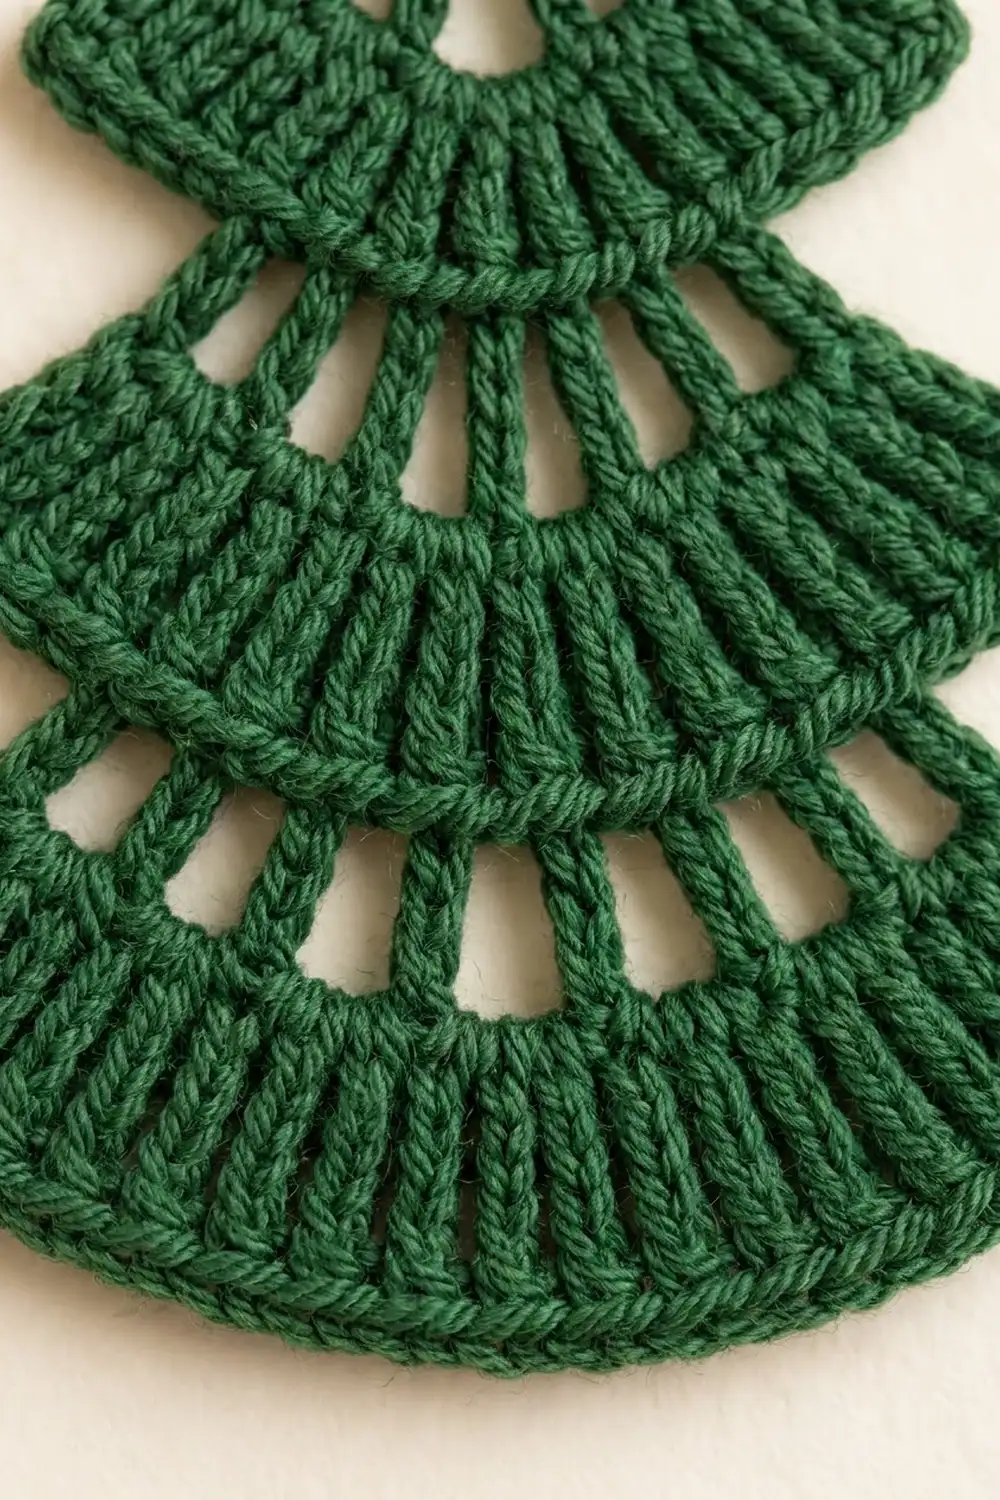
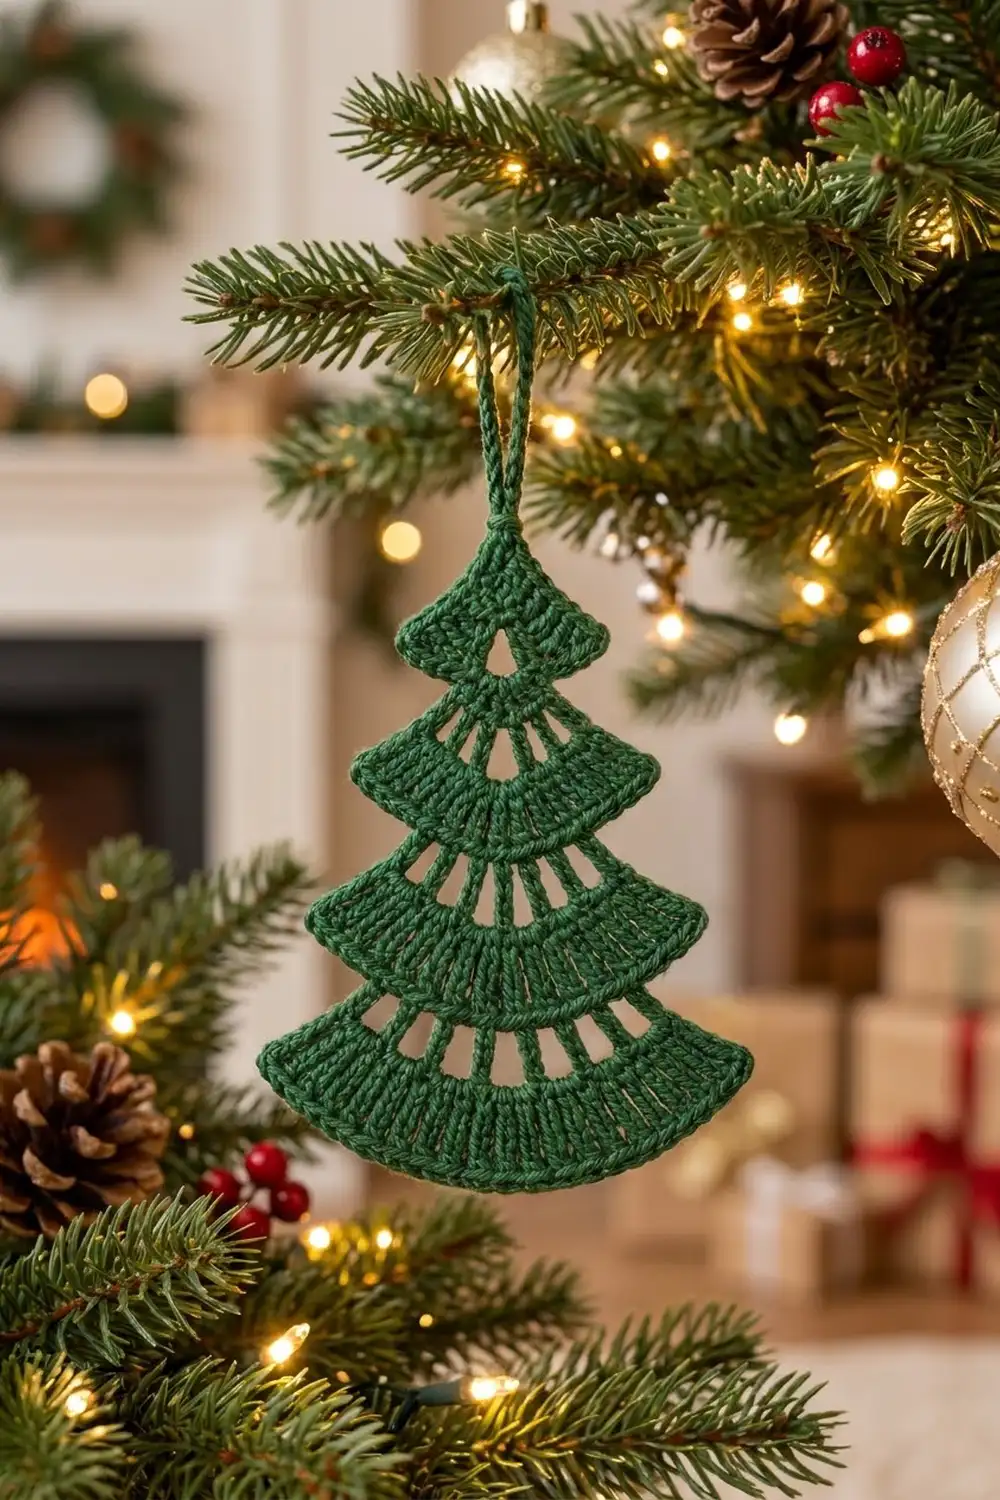
This tree ornament has four fan-shaped tiers that step down from a small peak to a wide, curved base. Each tier has a row of tall open slots near the top and a solid ribbed band along its curved lower edge. A single crochet outline runs all the way around, and a chain loop at the peak lets it hang from a branch.
The sample is worked in one forest green, so the openwork does all the decorating. It looks traditional and a little lacy, but it is quick to make. It works well on gift toppers, wreaths, windows, or a real tree.
The pattern uses US crochet terms. The finished ornament is about 4.25 in (10.8 cm) wide across the bottom tips and 4.75 in (12.1 cm) tall without the loop. With the loop, it is 6 in (15.2 cm) tall.
You make one flat piece in turned rows, from the peak down. Each new tier starts a few stitches in from the edges, which creates the stepped outline, and then fans out wider than the tier above. One edging round finishes the outline and makes the hanging loop at the same time. There is nothing to join or sew.
Finished Size and Construction
- Finished size: 4.25 in (10.8 cm) wide x 4.75 in (12.1 cm) tall, plus a 1.25 in (3.2 cm) loop
- Skill level: Easy+ (advanced beginner)
- Terminology: US crochet terms
- Yarn weight: Sport (#2), cotton or cotton blend
- Hook: 3.25 mm (US D/3)
- Number of pieces: 1
- Layout: One flat tree with 4 stacked fan tiers, worked top down
- Tier widths before edging: Tier 1 is 1.5 in (3.8 cm), Tier 2 is 2.25 in (5.7 cm), Tier 3 is 3.25 in (8.3 cm) and Tier 4 is 4 in (10.2 cm)
- Size before edging: 4 in (10.2 cm) wide x 4.5 in (11.4 cm) tall
- Edging depth: about 0.125 in (0.3 cm) on each edge
Materials
Yarn advice: Use a smooth, tightly plied sport-weight cotton. Mercerized cotton is ideal. It shows the ribbed bands and open slots clearly and holds its shape after blocking. Fuzzy or very soft yarns blur the openings and let the tree droop.
- Forest Green: 10 g, about 31 m (34 yd)
One ornament uses about 6 g. The amount above includes extra for a practice tier and for weaving in tails.
Tools:
- 3.25 mm (US D/3) crochet hook
- Tapestry needle
- Small scissors
- Ruler or tape measure
- Blocking mat or folded towel
- Rust-proof pins
- Spray bottle with water
- Optional: liquid fabric stiffener
Abbreviations (US Terms)
- ch – chain
- sl st – slip stitch
- sc – single crochet
- dc – double crochet
- tr – treble crochet: yarn over twice, insert hook, pull up a loop, then [yarn over, pull through 2 loops] 3 times
- BLO – back loop only
- sk – skip
- sp(s) – space(s)
- st(s) – stitch(es)
- tch – turning chain
- RS / WS – right side / wrong side
Special technique: tier step. This is how each new tier starts in from the edge.
- Turn, then sl st in the first few stitches as instructed.
- Ch 4 in the last stitch you slipped into. This counts as the first tr.
- At the end of the row, leave the same number of stitches unworked.
Those stitches at each end become the overhanging tips of the tier above.
Gauge and Checkpoints
Gauge: 22 dc and 10 rows = 4 in (10.2 cm) in dc, worked flat. One tr row is about 0.5 in (1.3 cm) tall.
Test first: Make Tier 1 (Rows 1–3) as your swatch before you go on. The fans cup if your tension is tight, and the slots sag if it is loose.
Checkpoints: Lay the piece flat without stretching it. Measure the height down the center. Measure the width straight across, from tip to tip.
- After Row 3 (Tier 1): 1.25 in (3.2 cm) tall, 1.5 in (3.8 cm) wide
- After Row 5 (Tier 2): 2.25 in (5.7 cm) tall, 2.25 in (5.7 cm) wide
- After Row 7 (Tier 3): 3.25 in (8.3 cm) tall, 3.25 in (8.3 cm) wide
- After Row 10 (Tier 4): 4.5 in (11.4 cm) tall, 4 in (10.2 cm) wide
If your piece is too big: Go down to a 3.0 mm hook, or make sure your tr stitches aren’t loose and loopy.
If your piece is too small: Go up to a 3.5 mm (US E/4) hook.
A difference of 0.25 in (0.6 cm) or less at Row 10 will usually block out.
Pattern
All rows are turned, and the beginning ch of each row counts as its first stitch. The fan gets wider as you work down, so the top of each row faces the bottom of the tree.
Tier 1 (Top Peak)
Foundation: Ch 4.
Row 1 (RS): Work 4 dc in the 4th ch from hook. The skipped ch count as the first dc. (5 sts)
Row 2 (WS): Ch 3 (counts as dc), turn. Dc in the first st and dc in the next st. Ch 2, then sk the next st (the center st). Dc in the next st, then work 2 dc in the top of the tch. (6 dc and 1 ch-2 sp)
The skipped center stitch and the ch-2 leave a gap. The dc on each side lean outward as the fan opens, so the gap is narrow at the top and wider at the bottom. This makes the small upward-pointing triangle.
Row 3 (RS): Ch 3 (counts as dc), turn. Dc BLO in the next 2 sts, work 3 dc in the ch-2 sp, then dc BLO in the next 2 sts. Dc in the top of the tch. (9 sts: 6 sts worked 1 per st + 3 dc in the sp)
This row is the solid band of Tier 1. Working in the back loops leaves a fine ridge of front loops on the RS.
Checkpoint: 1.25 in (3.2 cm) tall and 1.5 in (3.8 cm) wide.
Tier 2
Row 4 (WS, spoke row): Turn. Sl st in the first 2 sts, then ch 4 (counts as tr) in the same st. [Ch 2, sk the next st, tr in the next st] 3 times. Leave the last st unworked. (4 tr and 3 ch-2 sps)
This row covers 7 of the 9 sts below it, leaving 1 st free at each end. The tall tr and ch-2 gaps make 3 slots. The middle slot sits below the Tier 1 triangle.
Row 5 (RS, band): Ch 3 (counts as dc in the first tr), turn. [3 dc in the next ch-2 sp, dc BLO in the next tr] 3 times. Work the last dc in the 4th ch of the tch. (13 sts)
Count check: 4 tr x 1 dc = 4, plus 3 sps x 3 dc = 9, for 4 + 9 = 13.
Checkpoint: 2.25 in (5.7 cm) tall and 2.25 in (5.7 cm) wide.
Tier 3
Row 6 (WS, spoke row): Turn. Sl st in the first 2 sts, then ch 4 (counts as tr) in the same st. [Ch 2, sk the next st, tr in the next st] 5 times. Leave the last st unworked. (6 tr and 5 ch-2 sps)
This row covers 11 of the 13 sts below it. You skip sts 3, 5, 7, 9 and 11, so the center slot falls under st 7, lined up with the slots above.
Row 7 (RS, band): Ch 3 (counts as dc in the first tr), turn. [3 dc in the next ch-2 sp, dc BLO in the next tr] 5 times. Work the last dc in the top of the tch. (21 sts)
Count check: 6 + (5 x 3) = 6 + 15 = 21.
Checkpoint: 3.25 in (8.3 cm) tall and 3.25 in (8.3 cm) wide.
Tier 4 (Base)
Row 8 (WS, spoke row): Turn. Sl st in the first 4 sts, then ch 4 (counts as tr) in the same st. [Ch 2, sk the next st, tr in the next st] 7 times. Leave the last 3 sts unworked. (8 tr and 7 ch-2 sps)
This row covers sts 4 through 18, which is 15 sts. Three sts stay free at each end, so the base steps in deeper and the Tier 3 tips stand out clearly. The center slot falls under st 11.
Row 9 (RS, band): Ch 3 (counts as dc in the first tr), turn. [3 dc in the next ch-2 sp, dc BLO in the next tr] 7 times. Work the last dc in the top of the tch. (29 sts)
Count check: 8 + (7 x 3) = 8 + 21 = 29.
Row 10 (WS, band): Ch 3 (counts as dc), turn. Dc in each st across, through both loops. (29 sts)
This second band row makes the base band deeper. Fasten off, leaving a 6 in (15.2 cm) tail.
Checkpoint: 4.5 in (11.4 cm) tall and 4 in (10.2 cm) wide.
Edging and Hanging Loop
Edging gauge: The sc edging adds about 0.125 in (0.3 cm) to every edge. This takes the piece from 4 in x 4.5 in (10.2 cm x 11.4 cm) to 4.25 in x 4.75 in (10.8 cm x 12.1 cm).
How the counts work:
- Each stepped side: 23 sc, 5 sl sts and 4 ch-1 tips. The 23 sc include the 2 sc of that side’s bottom-corner tip. The peak is not part of either side.
- Bottom edge: 29 sc between the two corner tips. This count does not include the corner sc.
Edging round (RS): With the RS facing, join the yarn with a sl st at the peak, in the base of the Row 1 dc group.
- Loop: Ch 14, then sl st in the same place.
- Side 1, Tier 1: Work 2 sc in the side of Row 1 and 2 sc in the side of Row 2. In the side of Row 3, work (sc, ch 1, sc) for a tip.
- Overhang: Sl st in the 1 free st of Row 3.
- Tier 2: Work 3 sc in the side of Row 4. In the side of Row 5, work (sc, ch 1, sc) for a tip.
- Overhang: Sl st in the 1 free st of Row 5.
- Tier 3: Work 3 sc in the side of Row 6. In the side of Row 7, work (sc, ch 1, sc) for a tip.
- Overhang: Sl st in each of the 3 free sts of Row 7.
- Tier 4: Work 3 sc in the side of Row 8 and 2 sc in the side of Row 9. In the side of Row 10, work (sc, ch 1, sc) for the corner tip.
Side 1 total: 2 + 2 + 2 + 3 + 2 + 3 + 2 + 3 + 2 + 2 = 23 sc, with 5 sl sts and 4 tips.
- Bottom: Sc in each of the 29 sts of Row 10. (29 sc)
- Side 2: Work the same steps in reverse order, going up. (23 sc, 5 sl sts and 4 tips)
- Close: Sl st in the first sl st at the peak. Fasten off, leaving a 10 in (25.4 cm) tail.
Round total: 23 + 29 + 23 = 75 sc, plus 10 sl sts, 8 ch-1 tips and the ch-14 loop.
Finish the loop: Wrap the tail tightly 4 times around the base of the loop. Pass the needle under the wraps, then weave the tail into the top tier. This makes the small gathered knot under the loop.
Why the math works: A dc is about as tall as 2 sc, and a tr is about as tall as 3 sc. Working 2 sc into each dc row-end and 3 sc into each tr row-end keeps the sides flat, without ruffles or puckers. On the bottom, 1 sc into each of the 29 sts matches the band exactly. The ch-1 tips sharpen the tier points. The sl sts hold the inner corners in without adding bulk.
Final Blocking
- Weave in all the tails, but don’t trim them yet.
- Mist the ornament until it is damp but not dripping.
- Lay it RS up on the mat. Pin the peak, then pin the two bottom tips 4.25 in (10.8 cm) apart.
- Pin the other tips in level pairs, measured across the edging: 1.75 in (4.4 cm) for Tier 1, 2.5 in (6.4 cm) for Tier 2 and 3.5 in (8.9 cm) for Tier 3.
- Check that the center measures 4.75 in (12.1 cm) from the peak to the bottom edge.
- Ease each slot open with a fingertip so the tr stand straight. Smooth each band into an even curve.
- Let it dry completely. For a stiffer finish, brush on diluted stiffener before it dries.
- Unpin the ornament and trim the tails to 0.25 in (0.6 cm).
Final Quality-Control Checklist
- Band counts are 9, 13, 21, 29 and 29.
- Tier 1 has 1 triangle. Tiers 2, 3 and 4 have 3, 5 and 7 slots.
- All the center openings line up down the middle.
- The steps are the same depth on both sides: 1 st, 1 st and 3 sts.
- There are 8 sharp, even ch-1 tips.
- The edging has 75 sc, with 29 across the bottom.
- The finished size is 4.25 in x 4.75 in (10.8 cm x 12.1 cm).
- The loop is centered and tightly wrapped.
- No tails show on the RS.
Troubleshooting
The tiers cup: Your tension is too tight, or a sp has more than 3 dc. Recount, then block with more moisture.
The bands ruffle: You’ve added extra stitches. Check the counts after each band row: 13, 21 and 29.
The slots drift off center: A spoke row started in the wrong stitch. The sl st counts for the tier steps are 2, 2 and 4.
The steps are lopsided: The number of unworked stitches at the end of a spoke row doesn’t match the start. It should be 1, 1 and 3.
The slots look sloppy: Pull each tr up to its full height and keep the ch-2 snug.
The sides wave: Use exactly 2 sc per dc row-end and 3 sc per tr row-end.
The loop twists: Block it flat and wrap the base tightly.
Care
Hand wash in cool water with mild soap. Press out the water in a towel and dry the ornament flat in shape. If you used stiffener, dust it gently instead of washing.
Final Notes
Check your measurements as you go:
- Tier 1 is 1.25 in (3.2 cm) tall and 1.5 in (3.8 cm) wide.
- Tier 2 brings the height to 2.25 in (5.7 cm) and Tier 3 to 3.25 in (8.3 cm).
- Tier 4 brings it to 4.5 in (11.4 cm) tall and 4 in (10.2 cm) wide.
- The edging adds 0.125 in (0.3 cm) per edge, for a finished size of 4.25 in x 4.75 in (10.8 cm x 12.1 cm), plus a 1.25 in (3.2 cm) loop.
The stitch counts follow the same order: 9, 13, 21 and 29 sts, then 75 sc in the edging. If every band row is right, the tree will lie flat and symmetrical.
Happy crocheting!