

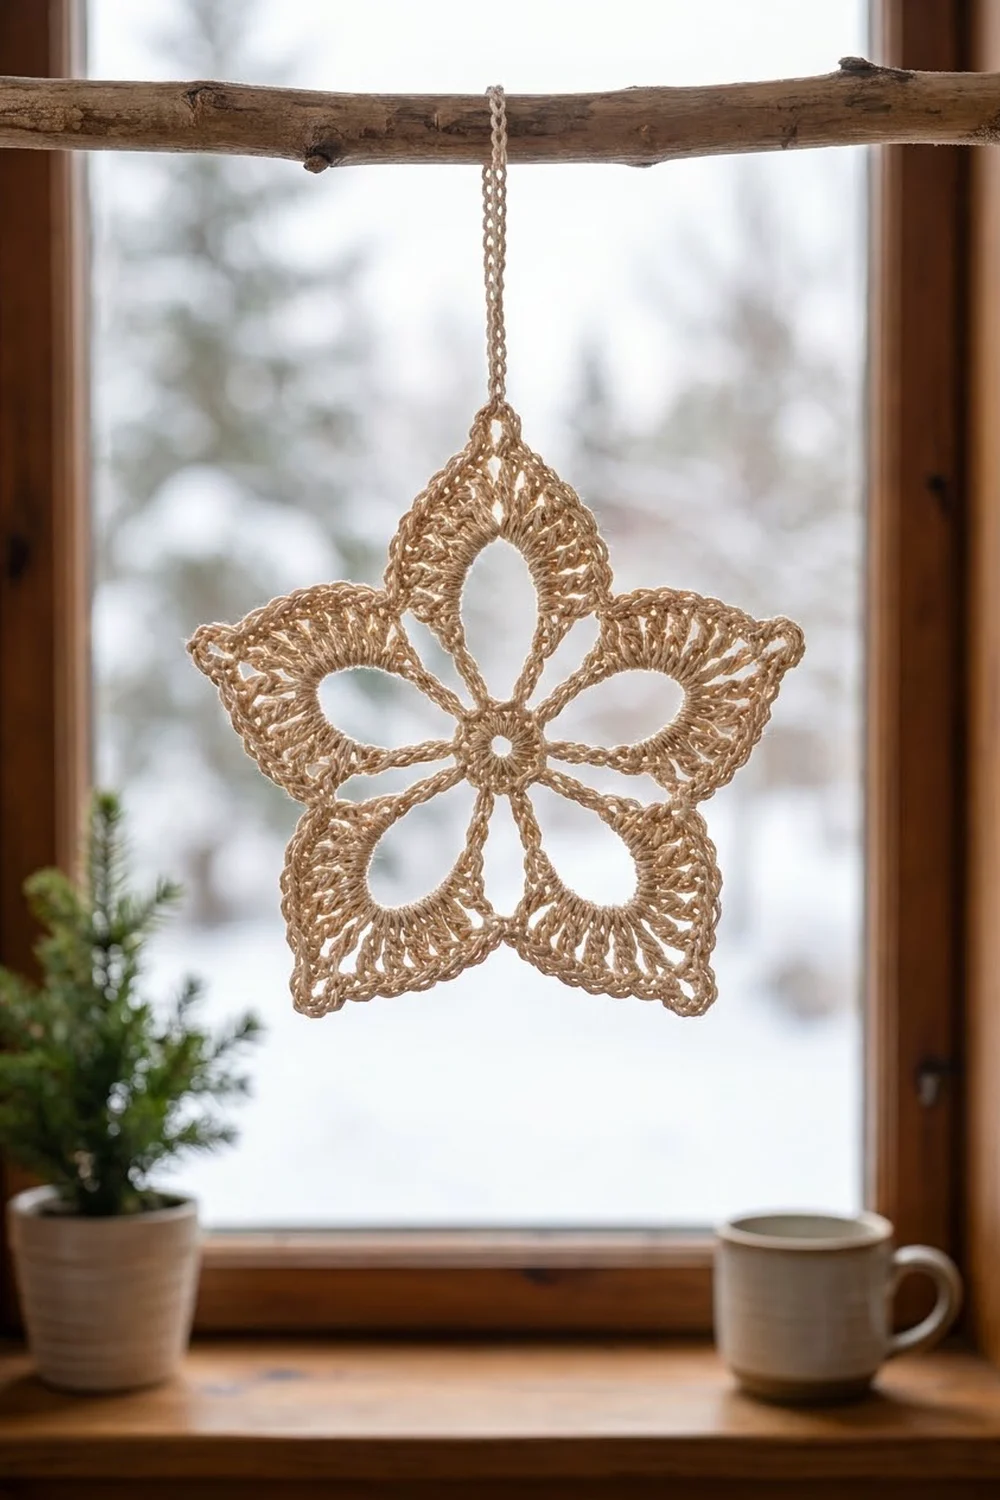
This five-point star is a single lacy motif worked in natural ecru cotton thread. Five open teardrop windows radiate from a small center ring. Each window is wrapped in a fan of tall stitches that rises into a sharp star point. A neat single crochet edge outlines the whole shape, and a small chain loop at the top point lets it hang.
The look is soft and vintage, a bit like a pressed snowflake. That makes it a good fit for a tree, a gift tag, a wreath, or a window. Using one cream color keeps the focus on the texture: chain outlines, solid fans, and open spaces.
This pattern uses US crochet terms. The finished star measures 5 in (12.7 cm) across the widest points. It’s about 4.75 in (12.1 cm) from the top point to the line between the two lower points.
The construction is simple. You work a ring of single crochet, then add five chain loops for the petals. Next you wrap each loop with a graduated fan that ends in a ch-3 point. One border round then joins the petals and shapes the valleys. The star is one piece from start to finish.
Finished Size and Construction
- Finished size: 5 in (12.7 cm) wide, 4.75 in (12.1 cm) tall
- Skill level: Intermediate (thread work, treble crochet)
- Terminology: US crochet terms
- Yarn weight: Size 3 crochet cotton thread (fingering, category 1)
- Hook: 2.25 mm (US B-1)
- Number of pieces: 1
- Layout: Single five-point star motif, worked in the round
- Piece size before border: 4.75 in (12.1 cm) across the widest points
- Border depth: 1 round of single crochet, about 0.125 in (0.3 cm) on each side
- Finished piece size: 5 in (12.7 cm) across
Materials
Choose a firm, mercerized cotton thread. It holds crisp points, shows the chain outlines clearly, and takes starch well. A soft or fuzzy yarn will blur the open windows.
- Ecru / natural cream, size 3 cotton thread: 10 g, about 40 m (44 yd) per star
One star uses about 6 g (25 m / 27 yd). The amount listed above includes extra for a gauge test, the hanging loop, and weaving in ends.
Tools:
- 2.25 mm (US B-1) crochet hook
- Tapestry needle with an eye large enough for thread
- Scissors
- 1 locking stitch marker
- Blocking mat or foam board
- Rustproof pins
- Spray starch or fabric stiffener (optional)
Abbreviations (US Terms)
- ch – chain
- sl st – slip stitch
- sc – single crochet
- hdc – half double crochet
- dc – double crochet
- tr – treble crochet
- sc2tog – single crochet 2 together
- sp – space
- st(s) – stitch(es)
- rep – repeat
Special stitch – standing sc: Put a slip knot on the hook and insert the hook into the given stitch. Yarn over and pull up a loop, then yarn over and pull through both loops. This joins new thread without a starting chain, and the standing sc counts as a stitch.
Working “around” a loop: In Round 3, work every stitch into the chain loop space, not into the separate chains. This keeps the chain outline intact and leaves the teardrop window open.
Gauge and Checkpoints
Gauge for this motif is 8 sc = 1 in (2.5 cm) with the listed thread and hook. Gauge matters less here than for a garment, but it still controls the final size and how sharp the points look.
Make one star first and measure it at each stage:
- After Round 1: the ring measures 0.75 in (1.9 cm) across.
- After Round 2: laid flat, each petal loop is about 1.5 in (3.8 cm) long from anchor to tip, and the loops span about 3.75 in (9.5 cm).
- After Round 3: the star is 4.75 in (12.1 cm) across the widest points.
- After Round 4: the star is 5 in (12.7 cm) across.
If your star is too big: go down to a 2.0 mm hook, and make sure your chains aren’t loose. Long chains make the petals floppy.
If your star is too small: go up to a 2.5 mm hook. If only the windows look small, chain more loosely in Round 2 but keep the same stitch counts.

Pattern
Round 1: Center Ring
Ch 5 and sl st to the first ch to form a ring.
Ch 1, work 15 sc into the ring, then sl st to the first sc. (15 sc)
Pull the starting tail snug so the center hole is small and round.
Round 2: Petal Loops
This round makes five closed chain loops, each anchored at one stitch.
Ch 1. *Sc in the next sc (anchor st), ch 22, sl st in the same anchor sc to close the loop, sc in each of the next 2 sc; rep from * 4 more times. Sl st to the first sc.
(15 sc and 5 ch-22 loops)
Each repeat uses 3 stitches of Round 1 (1 anchor + 2 between). Since 5 repeats × 3 = 15, the loops end up evenly spaced. Place a stitch marker in the first loop.
Lay the piece flat and check the loop length now. A twisted loop will twist the star, so straighten each loop before you go on.
Round 3: Petal Fans
Sl st into the first ch-22 loop (the marked loop).
*Work into the ch-22 loop: 3 sc, 3 hdc, 5 dc, 4 tr, ch 3, 4 tr, 5 dc, 3 hdc, 3 sc. Sl st in each of the next 2 sc of Round 2. Rep from * 4 more times, working each repeat into the next loop. Sl st into the first sl st and fasten off.
Per petal: 34 sts (3 sc + 3 hdc + 5 dc + 4 tr = 17 sts on each side), plus 1 ch-3 tip sp.
Round total: 170 sts, 5 ch-3 tip sps, and 10 sl sts between petals.
Slide the stitches along each loop so they’re spread evenly from base to tip. The short sc and hdc stay near the center, while the tall tr sit at the outer end and fan out to build the star point. The chain loop stays visible as the inner outline of each open teardrop.
At this stage the petals touch only at the center. The border round shapes the valleys between them.
Border
Border gauge: 8 sc = 1 in (2.5 cm) along the edge, the same as the motif gauge. The border is one round of sc worked into the tops of the Round 3 stitches.
In this round, skip the 3 sc at the base of each side of every petal. Skipping them leaves the V-shaped openings between the petals near the center.
Round 4: Hold the star right side up. Join the thread with a standing sc in the 2nd hdc of the first side of any petal.
Sc in the 3rd hdc. *Sc in each of the next 5 dc, sc in each of the next 4 tr, (2 sc, ch 3, 2 sc) in the ch-3 tip sp, sc in each of the next 4 tr, sc in each of the next 5 dc, and sc in each of the next 2 hdc. Sc2tog over the last hdc of this petal and the first hdc of the next petal. Sc in each of the 2nd and 3rd hdc of the next petal. Rep from * around, but on the last repeat stop after the sc2tog that joins petal 5 to petal 1. Sl st to the first sc.
Per petal repeat: 2 sc on the hdc + 5 + 4 + 4 sc in the tip + 4 + 5 + 2 sc on the hdc + 1 sc2tog.
Count per petal: 22 sc worked one-per-stitch + 1 sc2tog + 4 sc in the tip = 27 sts, plus 1 ch-3 tip.
Round total: 5 × 27 = 135 sts and 5 ch-3 tips.
Hanging loop: At the tip you want at the top, work (2 sc, ch 10, 2 sc) instead of (2 sc, ch 3, 2 sc). The ch-10 loop is about 1 in (2.5 cm) long. The stitch count stays at 135.
Fasten off and weave in all ends along the back of the fans.
Why the math works: Each Round 3 petal gives 24 stitches to the border (3 hdc + 5 dc + 4 tr on each side). Twenty-two of them get one sc each. The last hdc of one petal and the first hdc of the next share a single sc2tog, so each repeat uses 22 + 2 = 24 stitches. Across five petals, that’s 5 × 24 = 120 stitches worked. That’s every available stitch, with none left over and none worked twice.
The sc2tog pulls neighboring petals together at the hdc level, which creates the sharp inner valley. The 4 extra sc and the ch-3 at each tip add length exactly where the point needs it. The sc round adds about 0.125 in (0.3 cm) on each side, so the star grows from 4.75 in (12.1 cm) to 5 in (12.7 cm).
Final Blocking
- Soak the star in cool water for 5 minutes, then press out the water gently in a towel. Don’t wring it.
- Lay it right side up on a blocking mat.
- Pin the center ring flat first, so the hole stays round.
- Pin each ch-3 tip outward until the star measures 5 in (12.7 cm) across the widest points.
- Pin each inner valley at the sc2tog. All five valleys should sit the same distance from the center, about 1.25 in (3.2 cm).
- Pin the inside of each teardrop window open into a smooth, even shape.
- For a stiff ornament, spray it with starch or brush on fabric stiffener.
- Let it dry completely, usually 6 to 12 hours, before you unpin it.
Final Quality-Control Checklist
- Round 1 has 15 sc, and the center hole is small and round.
- There are 5 ch-22 loops, evenly spaced and untwisted.
- Each petal fan has 34 sts and a centered ch-3 tip.
- Round 4 has 135 sts and 5 ch-3 tips (one replaced by the ch-10 hanging loop).
- All five valleys are pulled in by an sc2tog and match each other.
- The V openings near the center are open and even.
- The finished star measures 5 in (12.7 cm) across.
- All ends are woven in securely and hidden on the back.
Troubleshooting
The star cups or ruffles. The chains in Round 2 are probably too short or too long compared with the fan stitches. Redo the loops with more even tension, then block firmly.
The points look blunt. Make sure there are 4 tr on each side of the tip and that the ch-3 isn’t pulled tight. Pin the tips out hard while blocking.
One petal is longer than the others. That loop probably has an extra chain. Count to 22 before you close it.
The valleys are shallow. Check that you skipped the 3 base sc on each side in Round 4 and that you worked the sc2tog across the two petals.
The windows close up. You may be working into the chains instead of around the loop. Work into the loop space so the stitches can slide.
Care
Hand wash in cool water with mild soap, press dry in a towel, and lay flat or re-pin to dry. Starch again after washing if you want a stiff finish.
Final Notes
The measurement chain is short and easy to check. The Round 1 ring is 0.75 in (1.9 cm), and each Round 2 loop is 1.5 in (3.8 cm) long. After Round 3 the star is 4.75 in (12.1 cm) across. The single sc border brings it to a finished 5 in (12.7 cm). If each checkpoint matches, your star will block crisp and even.
Happy crocheting!