

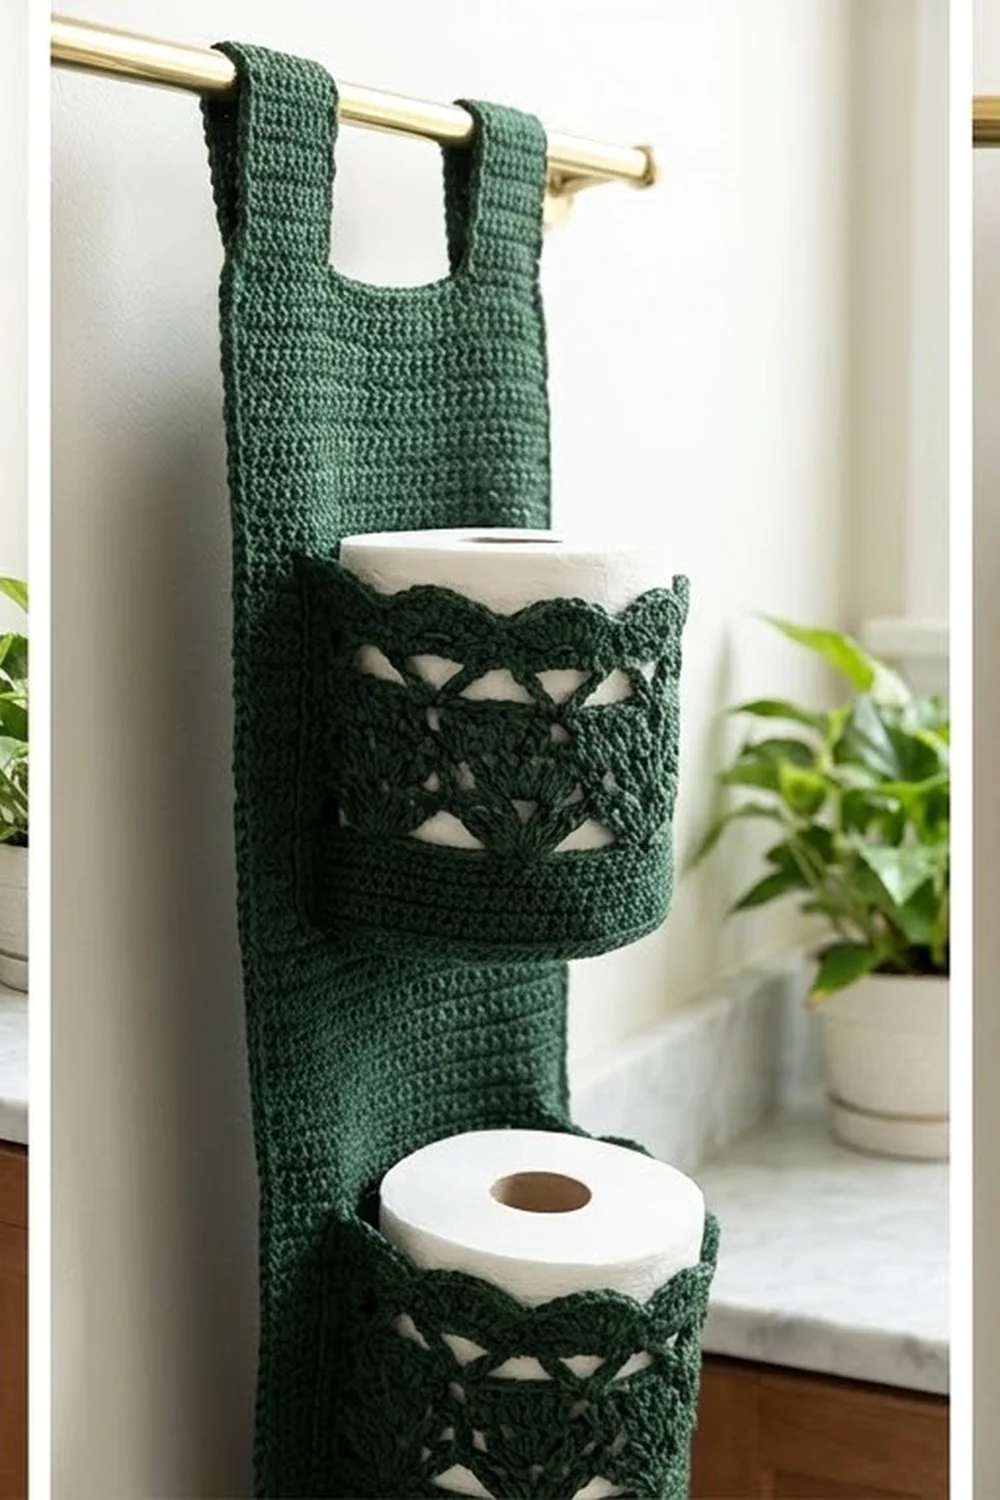
This hanging holder stores three spare rolls on a slim strip that takes up almost no wall space. It hangs from any towel bar, hook rail, or door rod by two folded tabs. Each roll sits in its own rounded pocket.
The pockets give this design its character. Each one has a solid base, a short band of plain single crochet, and then an openwork wall of fern-like fans topped with a scalloped rim. I worked the sample in deep forest green, which looks good next to brass fittings, white tile, and houseplants.
The pattern uses US crochet terms. The finished holder measures about 5.6 in (14.2 cm) wide and 27.6 in (70.1 cm) long, including the hanging loops. Each pocket is about 5.1 in (13.0 cm) across and 3.75 in (9.5 cm) tall.
You will work a single crochet backing panel in rows and add a one-round border. Then you crochet two tabs off the top edge. The three pockets are worked separately in the round, from a flat circle up through the fan rounds, and are then sewn onto the panel.
Finished Size and Construction
- Finished size: 5.6 in × 24.6 in (14.2 cm × 62.5 cm) panel, 27.6 in (70.1 cm) total length including tab loops
- Skill level: Intermediate
- Terminology: US crochet terms
- Yarn weight: #5 bulky
- Hook: 6 mm (US J-10)
- Number of pieces: 4 (1 backing panel with tabs, 3 pockets)
- Layout: 3 pockets stacked in one vertical column, spaced 7.5 in (19.1 cm) apart
- Pocket size: 5.1 in (13.0 cm) diameter, 3.75 in (9.5 cm) wall height
- Panel size before border: 5 in × 24 in (12.7 cm × 61.0 cm)
- Border depth: about 0.3 in (0.8 cm) per side, 1 round
Materials
Yarn: Choose a smooth, firm #5 bulky yarn. Cotton, a cotton blend, or a cotton cord yarn all work well. Cotton holds the pocket shape, handles bathroom humidity, and shows the cluster leaves clearly. Avoid fuzzy or very stretchy acrylic, because the pockets will sag under the weight of the rolls. The amounts below assume about 110 m per 100 g.
- Forest Green: 165 g (182 m) total
- Panel, border, and tabs: 75 g (83 m)
- Each pocket: 30 g (33 m), so 90 g (99 m) for all three
- Buy: 200 g (220 m) to be safe
The quantities already include a margin of about 20% for gauge differences and sewing tails.
Tools:
– 6 mm (US J-10) crochet hook
– Large-eye tapestry needle
– 6–8 locking stitch markers
– Measuring tape
– Scissors
– Rustproof pins and a blocking mat or towel
Abbreviations (US Terms)
- ch – chain
- sc – single crochet
- hdc – half double crochet
- dc – double crochet
- sl st – slip stitch
- st(s) – stitch(es)
- sp – space
- sk – skip
- BLO – back loop only
- RS – right side
- rep – repeat
- cl – 3-dc cluster (special stitch)
Special stitch: 3-dc cluster (cl). Work this in the indicated stitch or space. Yarn over, insert hook, yarn over and pull up a loop, yarn over and pull through 2 loops. Repeat from * to * 2 more times in the same place (4 loops on hook). Yarn over and pull through all 4 loops. Each cluster forms one slanted “leaf” of the fan.
Gauge and Checkpoints
Gauge: 12 sc × 14 rows = 4 in (10.2 cm) in sc worked in rows.
Make one pocket before you start the panel. A pocket is small and shows you both your flat-circle gauge and how the fan rounds behave. If the finished pocket is 5.1 in (13.0 cm) across, your gauge is right for everything.
Checkpoints:
– Pocket Rnd 4 (24 sts): circle about 2.5 in (6.4 cm) across
– Pocket Rnd 8 (48 sts): circle about 5.1 in (13.0 cm) across
– Pocket after Rnd 12: solid wall about 1.1 in (2.8 cm) tall
– Finished pocket: wall about 3.75 in (9.5 cm) tall
– Panel Row 14: 4 in (10.2 cm) long
– Panel Row 42: 12 in (30.5 cm) long
– Panel Row 84: 24 in (61.0 cm) long, 5 in (12.7 cm) wide
If your pieces are too big: go down to a 5.5 mm hook. A loose pocket will sag and a loose panel will stretch.
If your pieces are too small: go up to a 6.5 mm hook. A standard roll is about 4.5 in (11.4 cm) across, so the pocket base must measure at least 4.75 in (12.1 cm).

Pocket (Make 3)
You will work each pocket in joined rounds with the RS facing. Do not turn.
Rnd 1: Make a magic ring. Ch 1, 6 sc in ring, sl st to first sc. (6 sts)
Rnd 2: Ch 1, 2 sc in each st around, sl st to first sc. (12 sts)
Rnd 3: Ch 1, sc in next st, 2 sc in next st, rep 6 times, sl st to first sc. (18 sts)
Rnd 4: Ch 1, sc in next 2 sts, 2 sc in next st, rep 6 times, join. (24 sts)
Rnd 5: Ch 1, sc in next 3 sts, 2 sc in next st, rep 6 times, join. (30 sts)
Rnd 6: Ch 1, sc in next 4 sts, 2 sc in next st, rep 6 times, join. (36 sts)
Rnd 7: Ch 1, sc in next 5 sts, 2 sc in next st, rep 6 times, join. (42 sts)
Rnd 8: Ch 1, sc in next 6 sts, 2 sc in next st, rep 6 times, join. (48 sts)
Checkpoint: the flat base should measure 5.1 in (13.0 cm) across.
Rnd 9 (turning round): Ch 1, sc in BLO of each st around, join. (48 sts)
This round leaves a ridge of front loops around the base and turns the work upward to start the wall.
Rnds 10–12: Ch 1, sc in each st around, join. (48 sts)
Checkpoint: the solid wall should be about 1.1 in (2.8 cm) tall.
Rnd 13 (fan base): Ch 1, sc in next st, ch 3, sk 3 sts, (cl, ch 2, cl) in next st, ch 3, sk 3 sts, rep 6 times, sl st to first sc.
Each repeat uses 8 stitches (1 + 3 + 1 + 3). Count: 6 sc, 12 cl, 6 ch-2 sps, 12 ch-3 sps.
Rnd 14 (fan grows): Ch 1, sc in sc, ch 3, (cl, ch 2, cl, ch 2, cl) in next ch-2 sp, ch 3, rep 6 times, join to first sc.
Each new ch-3 goes over the ch-3 space below it, so the open triangles between fans stay open. Count: 6 sc, 18 cl, 12 ch-2 sps, 12 ch-3 sps.
Rnd 15 (fan opens): Ch 1, sc in sc, ch 2, (cl, ch 2, cl) in next ch-2 sp, ch 2, (cl, ch 2, cl) in next ch-2 sp, ch 2, rep 6 times, join.
Skip the ch-3 spaces in this round. The ch 2 between the two cluster pairs is the center ch-2 sp, and it sits directly above the middle cluster of Rnd 14. Each repeat now has 1 sc, 4 cl, and 5 ch-2 sps. Count: 6 sc, 24 cl, 30 ch-2 sps.
Rnd 16 (scallop): Ch 1, sc in sc, sc in first cl, hdc in second cl, 3 dc in center ch-2 sp, hdc in third cl, sc in fourth cl, rep 6 times, join.
Skip all ch-2 spaces except the center one. Each repeat has 8 sts (1 + 1 + 1 + 3 + 1 + 1). (48 sts)
The stitches rise from sc to hdc to dc and back down, so each fan gets an arched top. The sc between the arches sits over the valleys.
Rnd 17 (rim): Ch 1, sc in each st around, join. (48 sts)
This round firms up the scalloped edge without flattening it. Fasten off and leave a 24 in (61.0 cm) tail for sewing.
Why the count stays at 48: Rnd 9 through Rnd 17 all have 48 sts, or 6 repeats of 8. The rim therefore has the same circumference as the base, so the pocket stays straight-sided and does not ruffle.
Backing Panel
Foundation: Ch 16.
Row 1 (RS): Sc in 2nd ch from hook and in each ch across, turn. (15 sts)
Rows 2–84: Ch 1 (does not count as a st), sc in each st across, turn. (15 sts)
Check at Row 14 for 4 in (10.2 cm), at Row 42 for 12 in (30.5 cm), and at Row 84 for 24 in (61.0 cm). The width should stay at 5 in (12.7 cm) the whole way. If the edges start to pull in, count your stitches; the most common mistake is a missed last stitch. Do not fasten off.
Make All Pieces
- Panel: 1 piece in Forest Green, 75 g (83 m) including border and tabs
- Pockets: 3 pieces in Forest Green, 30 g (33 m) each
Layout (RS facing, measured from the bottom edge of the bordered panel):
   [Tab]                 [Tab]
+-------------------------------+  top edge, 24.6 in (62.5 cm)
|                               |
|        [ Pocket 3 ]           |  base ridge at 16 in (40.6 cm)
|                               |
|        [ Pocket 2 ]           |  base ridge at 8.5 in (21.6 cm)
|                               |
|        [ Pocket 1 ]           |  base ridge at 1 in (2.5 cm)
+-------------------------------+  bottom edge
Border
Border gauge: same as the panel, 12 sc = 4 in (10.2 cm). Along the side edges, work 6 sc for every 7 row-ends. This matches the 12 sts × 14 rows gauge, so the sides lie flat.
Rnd 1: Continue from Row 84 with the RS facing. Ch 1 and work along the top edge: (sc, ch 2, sc) in first st, sc in next 13 sts, (sc, ch 2, sc) in last st.
Rotate the work. Down the side, work 72 sc evenly across the 84 row-ends (6 sc per 7 rows, 12 times).
Along the foundation chain: (sc, ch 2, sc) in first ch, sc in next 13 ch, (sc, ch 2, sc) in last ch.
Up the second side, work 72 sc evenly across the row-ends. Sl st to the first sc. Do not fasten off.
Counts per side (each includes its own 2 corner sc):
– Top: 15 sts
– Side 1: 74 sts
– Bottom: 15 sts
– Side 2: 74 sts
– Total: 178 sc plus 4 corner ch-2 sps
Why the math works: The top and bottom have 15 sts each, which matches the panel’s 15-st rows exactly. The panel is one piece, so nothing is added for seams. On the sides, 84 rows × (6 ÷ 7) = 72 sc, which is 24 in (61.0 cm) at 3 sts per inch. Adding the 2 corner sc gives 74. The ch-2 corners let the border turn without cupping.
Tabs: Sl st into the next corner ch-2 sp so you are at the start of the top edge. You will work the tabs into the 15 top-edge sts.
Tab 1:
– Row 1: Ch 1, sc in first 4 top-edge sts, turn. (4 sts)
– Rows 2–21: Ch 1, sc in each st across, turn. (4 sts)
Fasten off with a 12 in (30.5 cm) tail.
Tab 2: Skip the next 7 top-edge sts and join yarn in the 12th st. Work Rows 1–21 as for Tab 1 over the last 4 sts.
Each tab measures 1⅓ in × 6 in (3.4 cm × 15.2 cm). Tab stitches: 4 + 7 skipped + 4 = 15 top-edge sts.
Joining
Tabs: Fold each tab to the wrong side (WS) to make a loop about 3 in (7.6 cm) tall. Whipstitch the last row of each tab to the back of the border round.
If your rod has fixed brackets, fold the tabs around the rod before sewing them.
Pockets: Turn the panel RS up. Measure from the bottom edge and pin a straight line across the panel at 1 in (2.5 cm), 8.5 in (21.6 cm), and 16 in (40.6 cm). Each line marks where one pocket’s base ridge will sit.
- Mark the back third. On one pocket, find two neighboring sc valleys from Rnd 13. Count to the valley 2 repeats away; this span is 16 sts wide, or 5.3 in (13.5 cm). Place markers at both valleys and at the matching Rnd 9 sts directly below them.
- Sew the base seam. Flatten that 16-st section against the panel and center it on the line. Using the yarn tail, whipstitch through each of the 16 Rnd 9 front loops and the panel stitch directly behind it. Make 1 stitch per pocket st, 16 in total.
- Sew the side seams. Sew straight up the panel along each marked valley column, from Rnd 9 to Rnd 17. Catch 1 stitch per round, for 9 stitches per side seam.
- Tack the rim. Tack the Rnd 17 valley sc at both seam tops and at the one valley between them, so the back of the rim does not gape.
Pull each stitch snug, but stop before it puckers the panel. The panel should stay flat between the seams.
Size checkpoint: Each pocket’s flattened back should measure 5.3 in (13.5 cm) on a 5.6 in (14.2 cm) panel, leaving about 0.15 in (0.4 cm) of panel on each side. The top pocket rim should sit at 19.75 in (50.2 cm), with 4.85 in (12.3 cm) of plain panel above it.
Final Blocking
- Weave in all ends. Hide them inside the solid sc rounds, not in the openwork.
- Lightly mist the whole holder with water. Do not soak it, because wet cotton gets heavy and stretches.
- Lay the panel flat and pin it to 5.6 in × 24.6 in (14.2 cm × 62.5 cm).
- Push a roll into each pocket, or a rolled towel of similar size, so the pocket dries in a rounded D shape.
- Use your fingers to open each fan: spread the clusters into a fan shape and round each scallop peak.
- Let it dry completely, then remove the pins.
Final Quality-Control Checklist
- Panel measures 5.6 in × 24.6 in (14.2 cm × 62.5 cm)
- Border has 15 / 74 / 15 / 74 sts and flat corners
- Both tabs have 4 sts × 21 rows, with 7 sts free between them
- Each pocket has 48 sts at Rnds 8, 9, 12, 16, and 17
- Each pocket has 6 fans and 6 scallops
- Pocket base ridges sit at 1 in, 8.5 in, and 16 in (2.5 cm, 21.6 cm, and 40.6 cm)
- Seams are straight and the panel is not puckered
- A standard roll slides in and out easily
Troubleshooting
- Pocket base cups up: Your tension is too tight on the increases. Go up a hook size for Rnds 1–8 only.
- Base ruffles: You have extra stitches. Recount each round; it should always add exactly 6.
- Fans lean to one side: In Rnd 13 you skipped a different number of sts on each side of the fan. Skip exactly 3 on each side.
- Rim flares: You worked into the ch-2 sps in Rnd 16. Only the center ch-2 sp gets stitches.
- Roll won’t fit: The base is under 4.75 in (12.1 cm). Remake the pocket with a larger hook.
- Panel sags: The yarn is too stretchy. Switch to cotton, or use a smaller hook.
- Side edges wavy: Your border sc count is off. Rework the border at 6 sc per 7 rows.
Care
Hand wash in cool water and lay the holder flat to dry, reshaping the pockets around rolls. Do not tumble dry, because heat can shrink the cotton unevenly.
Final Notes
All the measurements follow from one gauge, 12 sc × 14 rows = 4 in (10.2 cm):
- Panel: 15 sts × 84 rows gives 5 in × 24 in (12.7 cm × 61.0 cm). The border brings it to 5.6 in × 24.6 in (14.2 cm × 62.5 cm), and the tab loops bring the total length to 27.6 in (70.1 cm).
- Pockets: each one stays at 48 sts from base to rim, so the base is 5.1 in (13.0 cm) across, and 8-stitch repeats give 6 even fans.
- Placement: each pocket’s flattened back third measures 5.3 in (13.5 cm) and sits centered on the panel, with pockets 7.5 in (19.1 cm) apart.
If you check your gauge on the first pocket, the other pieces should come out the right size. Happy crocheting!