
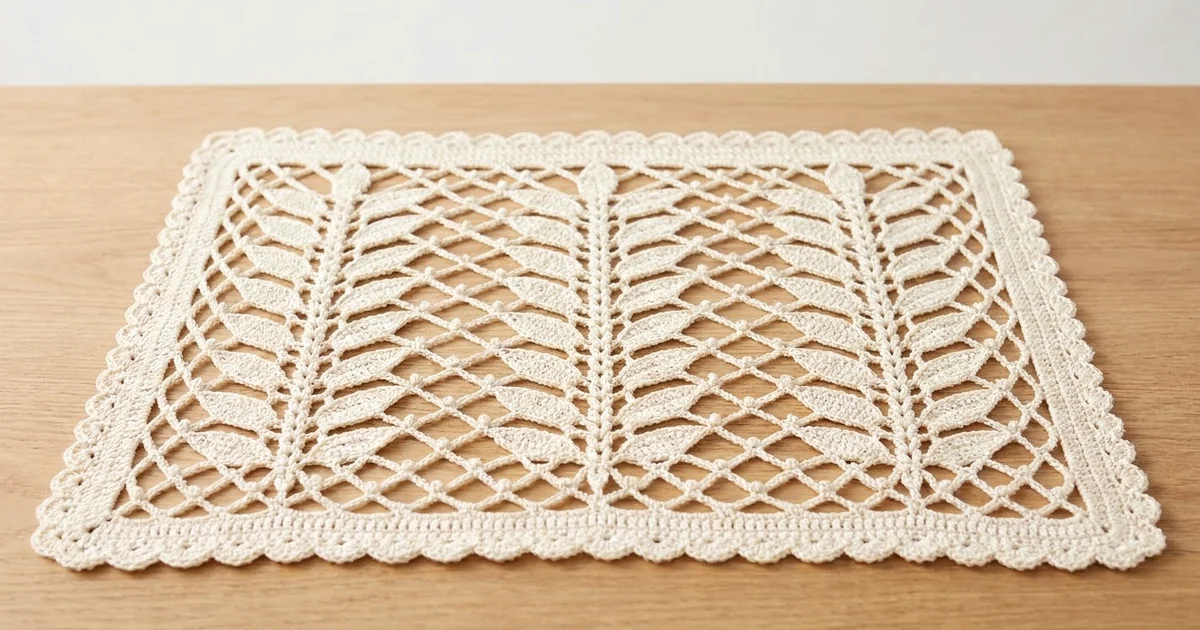
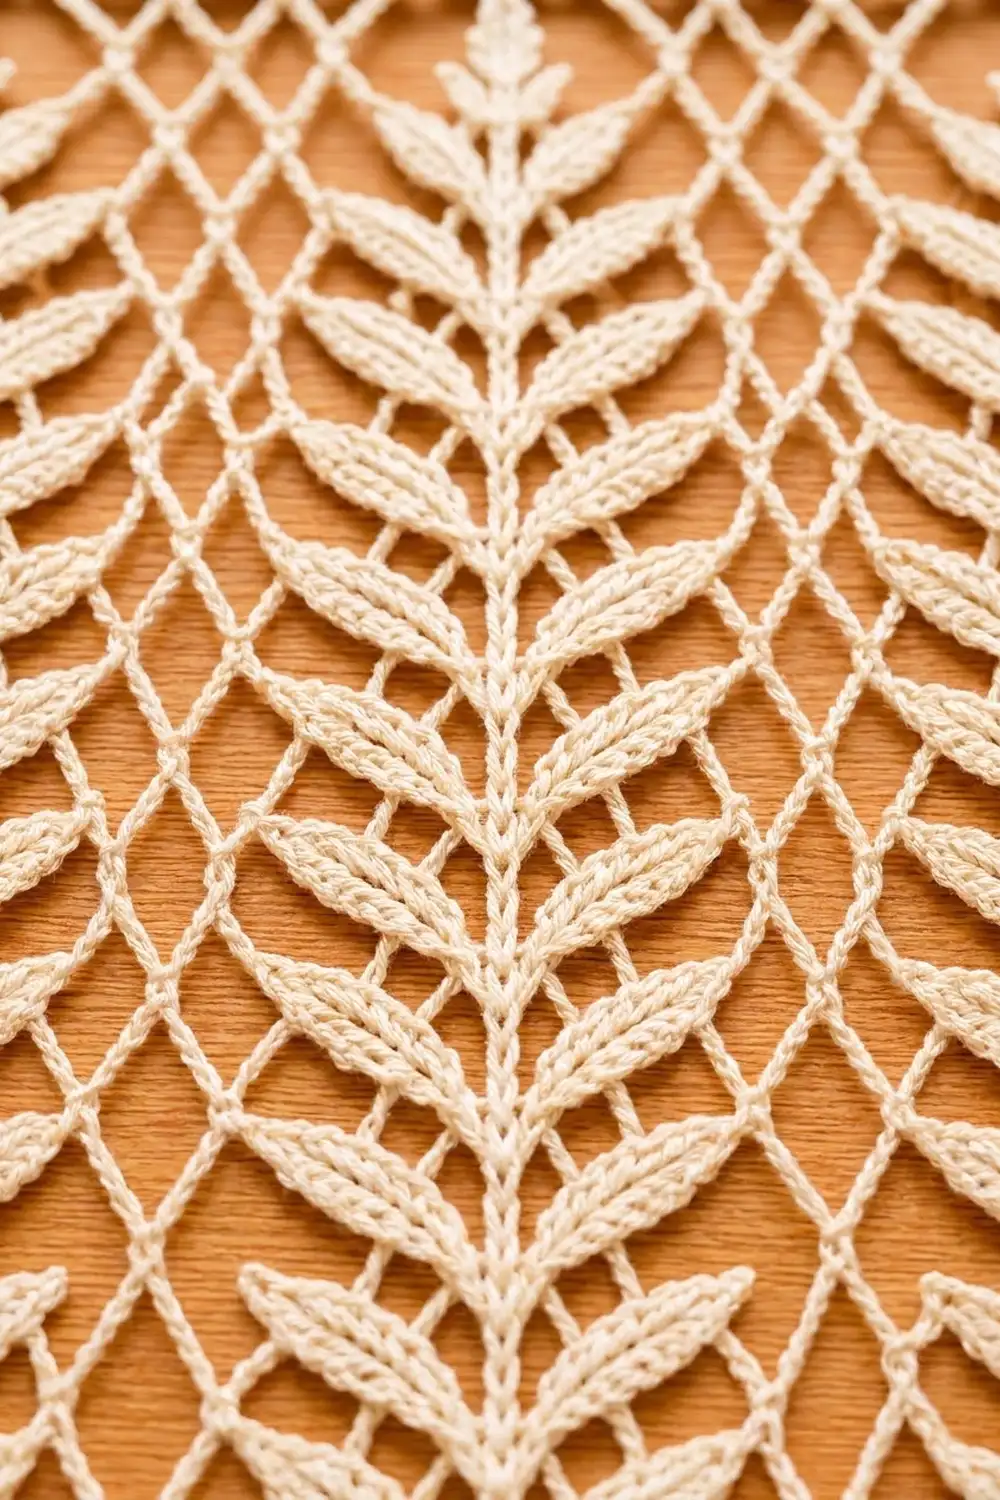
The Fern Trellis Lace Panel has three tall fern columns standing on an open diamond net. Each fern has a raised center stem and solid leaves in pairs that slant up and outward, with a small picot at the top for the tip. Picot dots mark the points where the net arcs cross. A row of soft scalloped shells frames the whole panel.
The sample is worked in a single cream cotton. The pale color lets the lace show and lets light through, so the panel works as a table mat, a wall hanging, a window panel, or a sampler for a longer curtain. This pattern uses US crochet terms throughout.
The finished panel measures 13.5 x 14 in (34.3 x 35.6 cm) after blocking. Before the border it measures 12 x 12.5 in (30.5 x 31.8 cm).
You work the panel flat in rows from the bottom up. A single-crochet foundation row sets the layout. Next come 24 pattern rows in which each fern section and each net section are worked at the same time. A plain top row closes the piece, and two border rounds finish it.
Finished Size and Construction
- Finished size: 13.5 x 14 in (34.3 x 35.6 cm)
- Skill level: Intermediate
- Terminology: US crochet terms
- Yarn weight: DK (weight 3) cotton
- Hook: 4.0 mm (G-6)
- Number of pieces: 1. There is no joining.
- Layout: 3 fern columns alternating with 4 net sections (edge net, fern, net, fern, net, fern, edge net)
- Section width: about 1.6 in (4.1 cm) each for fern and net sections
- Size before border: 12 x 12.5 in (30.5 x 31.8 cm)
- Border depth: 0.75 in (1.9 cm) on every side
Materials
Yarn: Use a smooth mercerized or combed DK cotton. Cotton gives crisp stitches, holds the picots well, and blocks flat. Avoid fuzzy or very stretchy fibers, because they blur the leaves and the net.
- Cream / Ivory: 100 g, about 220 m (240 yd)
This amount includes a margin of about 15 percent for your gauge swatch, small differences in tension, and weaving in ends.
Tools:
– 4.0 mm (G-6) crochet hook
– Tapestry needle
– Scissors
– 4–6 stitch markers
– Tape measure
– Blocking mats, rustproof pins, and a spray bottle
Abbreviations (US Terms)
- ch – chain
- sl st – slip stitch
- sc – single crochet
- hdc – half double crochet
- dc – double crochet
- tr – treble crochet
- FPdc – front post double crochet
- sk – skip
- sp – space
- st(s) – stitch(es)
- RS / WS – right side / wrong side
Special stitches
- Picot: Ch 3, sl st in the 3rd ch from the hook.
- spc (sc-picot): Sc in the indicated space, then make a picot. A picot never counts as a stitch.
- Picot shell: (2 dc, picot, 2 dc) all in the same stitch.
- Corner shell: (3 dc, picot, 3 dc) all in the same stitch.
Gauge and Checkpoints
Gauge: 17 sc = 4 in (10.2 cm). In pattern, 4 rows = 2 in (5.1 cm), so each pattern row is 0.5 in (1.3 cm) tall.
Because this is a single piece, the first rows of the panel act as your test. Work Rows 1–9 and then measure before going further.
- Checkpoint 1, after Row 1: 51 sc should measure 12 in (30.5 cm) across.
- Checkpoint 2, after Row 9: The panel should be about 4.25 in (10.8 cm) tall. That is 0.25 in (0.6 cm) for Row 1 plus 4 in (10.2 cm) for 8 pattern rows.
- Checkpoint 3, after Row 25: The panel should be 12.25 in (31.1 cm) tall.
- Checkpoint 4, after Row 26: The panel should be 12 x 12.5 in (30.5 x 31.8 cm).
If your panel is too big, change to a 3.75 mm (F-5) hook and work Rows 1–9 again. If it is too small, change to a 4.5 mm (7) hook. If only the height is off, check how long you make your chain-5 arcs. Loose chains make the rows tall, and tight chains make them short. Lightly snug chains of an even size will keep the net square.
Panel Layout
Row 1 has 51 sts, laid out from edge to edge like this:
| Position | Section | Stitches |
|---|---|---|
| St 1 | Edge stitch | 1 |
| Sts 2–8 | Net 1 | 7 |
| Sts 9–15 | Fern 1 | 7 |
| Sts 16–22 | Net 2 | 7 |
| Sts 23–29 | Fern 2 | 7 |
| Sts 30–36 | Net 3 | 7 |
| Sts 37–43 | Fern 3 | 7 |
| Sts 44–50 | Net 4 | 7 |
| St 51 | Edge stitch | 1 |
Check: 1 + (4 × 7) + (3 × 7) + 1 = 51. Place a marker in the first st of each fern section to help you keep track.
Panel Pattern
Foundation: Ch 52.
Row 1 (WS): Sc in the 2nd ch from the hook and in each ch across. Turn. (51 sc)
Row 2 (RS, first leaf row): Ch 3 (counts as dc throughout). [Ch 5, sk 3 sts, spc in next st, ch 5, sk 3 sts] (net section). Over the next 7 sts work the fern: tr in next st, dc in next st, hdc in next st, dc in next st (stem), hdc in next st, dc in next st, tr in next st. Repeat from * to * 2 more times. Work 1 more net section, then dc in the last sc. Turn.
Row 2 count: 2 edge dc, 21 fern sts, 4 spc, and 8 ch-5 arcs.
The tr–dc–hdc order makes each leaf tallest at its outer edge and shortest next to the stem. That is what gives the leaves their upward and outward slant.
Row 3 (WS, gap row): Ch 3. [Ch 3, spc in next ch-5 arc, ch 5, spc in next ch-5 arc, ch 3] (net section). For the fern: dc in tr, ch 2, sk 2 sts, dc in stem st, ch 2, sk 2 sts, dc in tr. Repeat from * to * 2 more times. Work 1 more net section, then dc in the top of the turning ch. Turn.
Row 3 count: 2 edge dc, 21 fern positions (9 dc and 6 ch-2 sps), 8 spc, 4 ch-5 arcs, and 8 ch-3 sps.
The ch-2 spaces leave small openings between the pairs of leaves. Those openings are what separate one leaf from the next.
Row 4 (RS, leaf row): Ch 3. [Ch 5, sk ch-3 sp, spc in center ch-5 arc, ch 5, sk ch-3 sp] (net section). For the fern: tr in dc, (dc, hdc) in ch-2 sp, FPdc around stem dc, (hdc, dc) in ch-2 sp, tr in dc. Repeat from * to * 2 more times. Work 1 more net section, then dc in the top of the turning ch. Turn.
Row 4 count: The same as Row 2: 2 edge dc, 21 fern sts, 4 spc, and 8 ch-5 arcs.
Row 5: Repeat Row 3.
Rows 6–25: Repeat Rows 4 and 5 ten more times. Row 25 is a gap row.
You now have 12 leaf rows (Rows 2, 4, 6 and so on up to 24), so each fern has 12 pairs of leaves. The FPdc stems stack into a raised line on the RS. The net arcs move half a diamond over on every row, so 2 rows complete one row of diamonds, and each leaf pair lines up with one diamond.
Row 26 (RS, top row): Ch 1, sc in the first dc. [2 sc in ch-3 sp, sk spc, 3 sc in ch-5 arc, sk spc, 2 sc in ch-3 sp] (7 sts per net section). For the fern: sc in dc, 2 sc in ch-2 sp, (sc, picot) in stem dc, 2 sc in ch-2 sp, sc in dc (7 sts plus the tip picot). Repeat from * to * 2 more times. Work 1 more net section, then sc in the top of the turning ch. (51 sc)
Check: 1 + (4 × 7) + (3 × 7) + 1 = 51, the same as Row 1. The picot at the stem forms the pointed tip of each fern. Fasten off.
Checkpoint 4 applies here: the panel should measure 12 x 12.5 in (30.5 x 31.8 cm).
Border
Border gauge: About 17 sc = 4 in (10.2 cm) along every edge. That matches the body gauge, so the edges stay flat and do not ripple or pull in.
Round 1 (sc round): With the RS facing, join yarn at the bottom-right corner with a sc in the first foundation ch. Work 2 more sc in the same ch to make a 3-sc corner group. The middle sc of each corner group is the corner center.
- Bottom: Sc in each of the next 49 foundation chs, then 3 sc in the last foundation ch (corner).
- First side: 1 sc in the end of Row 1, then 2 sc in each row end of Rows 2–25 (48 sc). That is 49 sc in total.
- Top corner: 3 sc in the first st of Row 26.
- Top: Sc in each of the next 49 sts, then 3 sc in the last st of Row 26 (corner).
- Second side: 2 sc in each row end of Rows 25–2 (48 sc), then 1 sc in the end of Row 1. That is 49 sc in total.
- Sl st in the first sc to join.
Round 1 count: 208 sc. Each side has 49 sc between its corner groups plus 3 sc in each of the 4 corners: (4 × 49) + (4 × 3) = 196 + 12 = 208.
Counted from one corner center to the next, each side has 53 sts: corner center + 1 + 49 + 1 + corner center. That count already includes the side’s 2 corner stitches.
The Row 26 row end gets no sc of its own because the corner group covers it. The Row 1 row end does need its own sc, because the bottom corner group is worked into the foundation chain below it.
Round 2 (picot shells): Sl st in the next sc (the corner center). Ch 3, then work (2 dc, picot, 3 dc) in the same st. This makes the first corner shell, with the ch 3 counting as the first dc.
Then work sk 1, sc in next st, sk 1, picot shell in next st along the side. Stop when 3 sts remain before the next corner center, and work sk 1, sc in next, sk 1, then a corner shell in the corner center. Repeat on all 4 sides. After the last sc, sk 1 and sl st to the top of the beginning ch 3. Fasten off.
Round 2 count: Per side, 12 picot shells and 13 sc between the corner shells. In total: 4 corner shells, 48 picot shells, and 52 sc.
Why the math works: The repeat is 4 stitches long. A side from corner center to corner center spans 52 stitch intervals, which is 53 sts minus 1. Since 52 ÷ 4 = 13 exactly, shells land on positions 0, 4, 8 … 52, so both corner centers get a shell. The sc stitches land on positions 2, 6 … 50, which gives 13 sc. All four sides have 53 sts, so the same repeat fits every side with no fudging.
Border depth: Round 1 adds about 0.25 in (0.6 cm) and Round 2 about 0.5 in (1.3 cm), so each side gains 0.75 in (1.9 cm). The finished size is 12 + 1.5 = 13.5 in (34.3 cm) wide and 12.5 + 1.5 = 14 in (35.6 cm) tall.
Final Blocking
- Weave in all ends along solid stitches, such as the fern stems or the border sc, so they don’t show in the open net.
- Soak the panel in lukewarm water for 10 minutes. Press out the water gently without wringing.
- Roll it in a towel to remove the extra moisture.
- Lay it RS up on the blocking mats. Pin the 4 corners to a 13.5 x 14 in (34.3 x 35.6 cm) rectangle.
- Pin the center of each side, then pin each picot shell outward so the scallops stay even.
- Use your fingers to open each diamond in the net so the arcs form neat points.
- Straighten each fern stem with a long pin or ruler so it runs straight up and down.
- Pull each tip picot and border picot up into a point.
- Let it dry completely before you unpin it.
Final Quality-Control Checklist
- Row 1 and Row 26 each have 51 sts.
- Each fern has 12 leaf pairs, a straight raised stem, and a tip picot.
- Every net section has the same diamonds, with a picot at each point where arcs meet.
- Round 1 has 208 sc, with 53 sts per side counted from corner center to corner center.
- Round 2 has 4 corner shells, 48 picot shells, and 52 sc.
- The blocked panel measures 13.5 x 14 in (34.3 x 35.6 cm).
- No ends show through the open net.
Troubleshooting
- Ferns pucker while the net sags: Your chain arcs are looser than your stitches. Make the ch-5 arcs a little snugger.
- Net pulls the edges inward: Your chains are too tight. Loosen them a little, or go up half a hook size for the chains only.
- Leaves slant the wrong way: Check the order. The tr belongs on the outer edge of each fern and the hdc next to the stem.
- Stem wanders sideways: Work the FPdc around the stem dc directly below it, not around a neighboring stitch.
- Stitch count is off: Count each section separately. Fern sections always have 7 positions. Net sections have 2 arcs on leaf rows and 3 spaces (ch-3, ch-5, ch-3) on gap rows.
- Border ruffles: Your Round 1 has too many sc on the sides. Recount it to 49 per side.
- Border cups: Your Round 1 has too few sc on the sides. Recount it to 49 per side.
Care
Hand wash in cool water with a mild detergent, press out the water gently, and dry flat. Re-pin it to size while it is damp if the diamonds need opening up again.

Final Notes
Here is the measurement chain for the whole panel:
- Row 1 has 51 sc and measures 12 in (30.5 cm) across.
- The 24 pattern rows add 12 in (30.5 cm) of height.
- With the two sc rows, the body measures 12 x 12.5 in (30.5 x 31.8 cm).
- Round 1 sets 53 sts per side.
- Round 2’s 4-stitch shell repeat divides evenly into those 53 sts.
- The 0.75 in (1.9 cm) border brings the panel to 13.5 x 14 in (34.3 x 35.6 cm).
To make a longer single panel, such as a curtain, repeat Rows 4 and 5 until you reach the length you want. End with a gap row, then work Row 26. Each extra pair of rows adds 1 in (2.5 cm) of height, and each extra row on a side needs 2 more border sc, so add 4 sc per pair of rows to each side. Each side must still have 1 more than a multiple of 4 stitches from corner center to corner center, so the shell repeat always lands on the corners. For example, adding 8 pairs of rows brings each side to 49 + 32 = 81 sc, or 85 sts counted from corner center to corner center.
Happy crocheting!