

The Lily Lattice Lace Panel is a light, airy rectangle of sage green picot net with lily of the valley motifs on top. Slim stems climb in four columns, pointed leaves branch out in pairs, and arched sprigs hold small cream bells with scalloped petal rims. A cream shell-scallop border frames the whole panel.
The look is cottage-garden and vintage, with soft sage and warm cream throughout. The open mesh lets light through, so the panel works well in a window or as a wall or table piece.
This pattern uses US crochet terms. The finished panel measures 14 x 18 in (35.6 x 45.7 cm) including the border.
The construction is simple. You work a sage picot net mesh in rows. Then you make the stems, sprigs, leaves, and bells separately and sew them on. Last, you work a three-round border in the round.
Finished Size and Construction
- Finished size: 14 x 18 in (35.6 x 45.7 cm)
- Skill level: Intermediate
- Terminology: US crochet terms
- Yarn weight: DK (light worsted, #3)
- Hook: 4.0 mm (G-6)
- Number of pieces: 1 mesh panel, plus sewn-on appliqués (4 stems, 20 sprigs, 40 leaves, 40 bells)
- Layout: 4 stem columns across, 5 bell tiers up
- Mesh size before border: 12 x 16 in (30.5 x 40.6 cm)
- Border depth: 1 in (2.5 cm) per side
- Size with border: 12 + 2 = 14 in wide, 16 + 2 = 18 in tall
Materials
Choose a smooth cotton or cotton-blend DK yarn. Cotton gives crisp picots and firm bells. Avoid fuzzy yarns, because they blur the open net.
- Sage green: 100 g / 225 m (mesh, stems, sprigs, leaves, border Round 1)
- Cream: 50 g / 113 m (bells, border Rounds 2–3)
These quantities include a margin of about 15 percent for your swatch and any small differences in tension.
Tools:
– 4.0 mm (G-6) crochet hook
– Tapestry needle
– Sewing pins or locking stitch markers
– Scissors
– Measuring tape
– Blocking mats and rust-proof pins
– Spray bottle
Abbreviations (US Terms)
- ch – chain
- sl st – slip stitch
- sc – single crochet
- hdc – half double crochet
- dc – double crochet
- sp – space
- st(s) – stitch(es)
- BLO – back loop only
Special stitch:
– sc-p (single crochet picot): sc in the indicated sp, ch 3, sl st into the top of the sc you just made.
– Shell: 5 dc in the indicated st or sp.
Gauge and Checkpoints
Mesh gauge: 4 ch-5 loops = 4 in (10.2 cm) wide, and 8 rows = 4 in (10.2 cm) tall, after blocking. So one loop is 1 in (2.5 cm) wide and one row is 0.5 in (1.3 cm) tall.
Border gauge: 3 sc = 1 in (2.5 cm).
Test first. Ch 18 and work Rows 1–8 of the mesh below. You will get 4 loops per row. Block the swatch lightly before measuring it, because net stretches a lot. Also make one bell and one leaf so you can check their sizes.
Checkpoints:
– After Row 8: 12 x 4 in (30.5 x 10.2 cm)
– After Row 32: 12 x 16 in (30.5 x 40.6 cm)
– After Border Round 1: 12.5 x 16.5 in (31.8 x 41.9 cm)
– After Border Round 2: 13 x 17 in (33.0 x 43.2 cm)
– After Border Round 3: 14 x 18 in (35.6 x 45.7 cm)
– Bell: about 0.75 in (1.9 cm) wide and tall
– Leaf: about 1.5 in (3.8 cm) long
If the panel is too big, go down one hook size. Or work ch 4 loops instead of ch 5, but then re-swatch, because this changes the row height.
If the panel is too small, go up one hook size.
Always correct your gauge before Row 1. The border math depends on having exactly 12 loops and 32 rows.
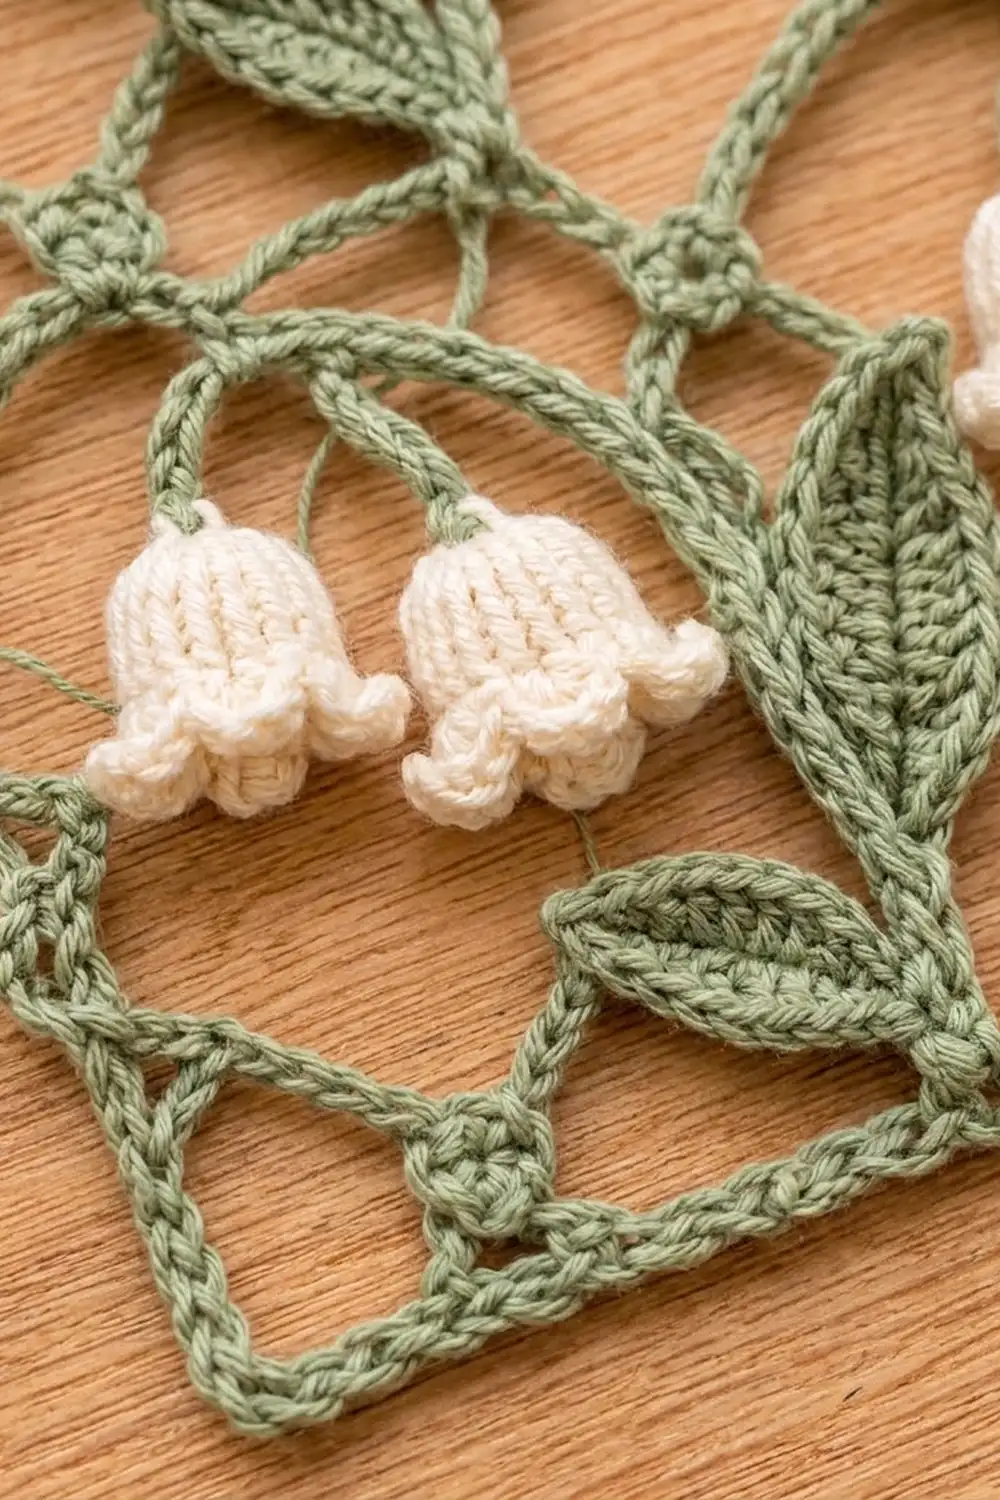
Mesh Panel (Sage)
Foundation: Ch 50.
Row 1: Sc in the 6th ch from hook. Ch 5, skip 3 ch, sc in next ch. Repeat from * 11 times. Turn.
(12 sc and 12 loops: the first 5 skipped ch form the first loop, plus 11 ch-5 loops.)
Row 2 (picot row): Ch 5, sc-p in the first ch-5 sp. Ch 5, sc-p in next ch-5 sp. Repeat from * across, working the last sc-p into the beginning loop of the row below. Turn.
(12 ch-5 loops, 12 sc-p.)
Row 3 (plain row): Ch 5, sc in the first ch-5 sp. Ch 5, sc in next ch-5 sp. Repeat from * across. Turn.
(12 ch-5 loops, 12 sc.)
Rows 4–32: Repeat Rows 2 and 3, ending after a Row 2 (picot row). Every even-numbered row is a picot row.
You now have 32 rows. Each row has 12 loops. Even rows have 12 picots, so the panel has 16 x 12 = 192 picot dots, each sitting where diamonds cross. Fasten off.
Check: 12 x 16 in (30.5 x 40.6 cm).
Stems (Sage) – Make 4
Ch 49. Sl st in the back bump of the 2nd ch from hook and in each ch across.
(48 sl st, about 16 in / 40.6 cm.)
Fasten off and leave an 18 in (45.7 cm) tail for sewing.
Bell Sprigs (Sage) – Make 20
Ch 10. Sl st in the back bump of the 2nd ch from hook and in each ch across.
(9 sl st, about 3 in / 7.6 cm.)
Fasten off and leave an 8 in (20.3 cm) tail.
Leaves (Sage) – Make 40
Ch 9. Work along one side of the chain:
1. Sl st in 2nd ch from hook.
2. Sc in next ch, hdc in next ch, dc in next 2 ch, hdc in next ch, sc in next ch.
3. Work 3 sc in the last ch. This is the base of the leaf.
Rotate and work along the other side of the chain:
1. Sc in next ch, hdc in next ch, dc in next 2 ch, hdc in next ch.
2. Sc in next ch, sl st in last ch.
Tip: Ch 2, sl st in 2nd ch from hook. This makes the pointed tip.
(7 + 3 + 7 = 17 sts, plus the tip.)
The leaf should measure about 1.5 in (3.8 cm). Fasten off and leave a 6 in (15.2 cm) tail.
Bells (Cream) – Make 40
Rnd 1: Ch 2, 6 sc in 2nd ch from hook. Do not join; work in a spiral. (6 sts)
Rnd 2: 2 sc in each st around. (12 sts)
Rnds 3–4: Sc in BLO of each st around. The BLO ridges make the ribbed bell surface. (12 sts each round)
Rnd 5 (petal rim): Sc in next st, (hdc, dc, hdc) in next st. Repeat from * 6 times. Sl st in the first sc to join.
This is a conversion round: 6 sts worked as 1 sc each + 6 sts worked as 3-st petals = 6 + 18 = 24 sts, making 6 petal points.
Fasten off and leave a 6 in (15.2 cm) tail.
To make the bell plump, push Rnd 1 outward from inside with a fingertip. The rim will curl slightly outward.
Assembly
Lay the panel flat with Row 1 at the bottom. The stems go in the middle of each 3-loop column, so place them at 1.5, 4.5, 7.5, and 10.5 in (3.8, 11.4, 19.1, and 26.7 cm) from the left edge.
- Stems: Pin each stem vertically, running from the foundation up to Row 32. Whipstitch it to the sc points it crosses, using the stem tail.
- Sprigs: Each stem gets 5 sprigs, with their tops at Rows 6, 12, 18, 24, and 30. Those rows are 3 in (7.6 cm) apart. Center each sprig over the stem and curve both ends down into an arch about 2 in (5.1 cm) wide. Tack down the center and both ends.
- Leaves: Place a pair of leaves at Rows 3, 9, 15, 21, and 27. Put one leaf on each side of the stem, with the base at the stem and the tip angled up and out. Tack down the base and tip, then catch the middle once.
- Bells: Sew one bell under each sprig end, open rim facing down. Use the bell’s top tail and take 3 small stitches through the sprig end.
Weave in all ends along the stems, where they will not show.
Border
All border counts are given per side. Corner ch-2 spaces are not counted as stitches.
Rnd 1 (sage): With RS facing, join sage at the top right corner.
– Top edge: Work 3 sc in each of the 12 loops (36 sc).
– Corner: Ch 2.
– Left side: Work 3 sc for every 2 rows, placing them over the row-end loops (32 rows ÷ 2 x 3 = 48 sc).
– Corner: Ch 2.
– Bottom edge: Work 3 sc into each of the 12 foundation spaces: the 11 ch-3 groups and the starting ch-5 (36 sc).
– Corner: Ch 2.
– Right side: 48 sc to match the left side.
– Last corner: Ch 2, then sl st in the first sc to join.
(36 / 48 / 36 / 48 = 168 sc, plus 4 corner ch-2 sps.) Fasten off.
Check: 12.5 x 16.5 in (31.8 x 41.9 cm).
Rnd 2 (cream): Join cream in any corner sp. Work sc in each sc, and (sc, ch 2, sc) in each corner sp.
Per side, the count is the stitches worked 1-per-stitch plus 1 sc added from each corner group:
– Top and bottom: 36 + 2 = 38 sc
– Sides: 48 + 2 = 50 sc
(38 / 50 / 38 / 50 = 176 sc, plus 4 corner ch-2 sps.)
Check: 13 x 17 in (33.0 x 43.2 cm).
Rnd 3 (cream scallops): Sl st into the next corner sp and work a shell (5 dc) in it.
Then along each side, number the stitches from 1:
1. Sc in st 1.
2. Skip 1 st, shell in next st, skip 1 st, sc in next st. Repeat from *.
3. Skip the last st, then work a shell in the corner sp.
- Top and bottom (38 sts): The sc fall on sts 1, 5, 9 … 37 (10 sc). The shells fall on sts 3, 7 … 35 (9 shells). Skip st 38.
- Sides (50 sts): The sc fall on sts 1 … 49 (13 sc). The shells fall on sts 3 … 47 (12 shells). Skip st 50.
Join with a sl st to the top of the first dc and fasten off.
(Shells: 9 + 9 + 12 + 12 + 4 corner shells = 46. Sc: 10 + 10 + 13 + 13 = 46.)
Why the math works: In Rnd 3, sc and shells alternate every 2 stitches, so each 4-stitch repeat holds one of each. A side of 4n + 2 stitches starts with sc and ends with a skip: 38 = 4 x 9 + 2, and 50 = 4 x 12 + 2. That makes each corner sp land exactly where the next shell is due, so the rhythm never breaks at the corners. Rnd 2 adds the 2 stitches per side that create this fit.
Rnds 1 and 2 add 0.25 in (0.6 cm) each and Rnd 3 adds 0.5 in (1.3 cm), for a border depth of 1 in (2.5 cm). That gives 12 + 2 = 14 in (35.6 cm) wide and 16 + 2 = 18 in (45.7 cm) tall.
Final Blocking
- Soak the panel in cool water for 10 minutes, then press out the water gently. Do not wring it.
- Roll it in a towel to absorb the extra moisture.
- Lay it face up on blocking mats.
- Pin the four corners to 14 x 18 in (35.6 x 45.7 cm).
- Pin each mesh crossing so the diamonds are even and the stems sit straight.
- Pin the tip of every scallop so each one opens into a round fan.
- Shape the bells with your fingertips so they are rounded, with the rims flared.
- Let it dry completely, usually 24 hours, before unpinning.
Final Quality-Control Checklist
- [ ] The mesh has 12 loops in every row and 32 rows in total.
- [ ] Every even row has 12 picots.
- [ ] The stems are vertical and 3 in (7.6 cm) apart.
- [ ] There are 5 sprig tiers, 3 in (7.6 cm) apart.
- [ ] Each sprig holds 2 bells (40 bells total).
- [ ] There are 40 leaves, in pairs, angled upward.
- [ ] Rnd 1 has 36 / 48 / 36 / 48 sc.
- [ ] Rnd 2 has 38 / 50 / 38 / 50 sc.
- [ ] There are 46 shells, including a shell at each corner.
- [ ] The finished size is 14 x 18 in (35.6 x 45.7 cm).
- [ ] All ends are hidden behind stems.
Troubleshooting
The mesh slants or the edges wander: Check that you work the last sc of each row into the turning loop. Count 12 loops at the end of every row.
The picots look flat: Make the ch 3 snug, and sl st through the top of the sc, not the ch.
The border ruffles: Your border sc are too loose, or you have too many. Recount against 36 / 48 per side.
The border cups: Your tension is too tight. Go up a hook size for the border only.
The scallops don’t line up at a corner: The Rnd 2 side count is off. It must be 38 or 50 sts between corner sps.
The bells are floppy: Work Rnds 3–4 more tightly, or stuff each bell with a small wisp of cream yarn.
The leaves curl: Steam them lightly and pin them flat while they dry.
Care
Hand wash in cool water with a mild soap, then lay flat and reshape to 14 x 18 in (35.6 x 45.7 cm) to dry. Do not tumble dry, because heat can distort the mesh and flatten the bells.

Final Notes
Here is the full measurement chain:
– Gauge: 1 loop = 1 in (2.5 cm), 1 row = 0.5 in (1.3 cm), so 12 loops x 32 rows = 12 x 16 in (30.5 x 40.6 cm).
– Border Rnd 1: 3 sc per inch = 36 / 48 sc per side.
– Border Rnd 2: adds 2 sts per side, for 38 / 50 sts.
– Border Rnd 3: these counts are 4n + 2, so 46 scallops fit exactly.
– With the 1 in (2.5 cm) border, the finished panel is 14 x 18 in (35.6 x 45.7 cm).
If you check each stage against these numbers, your panel will block out square, even, and full of bells.
Happy crocheting!