

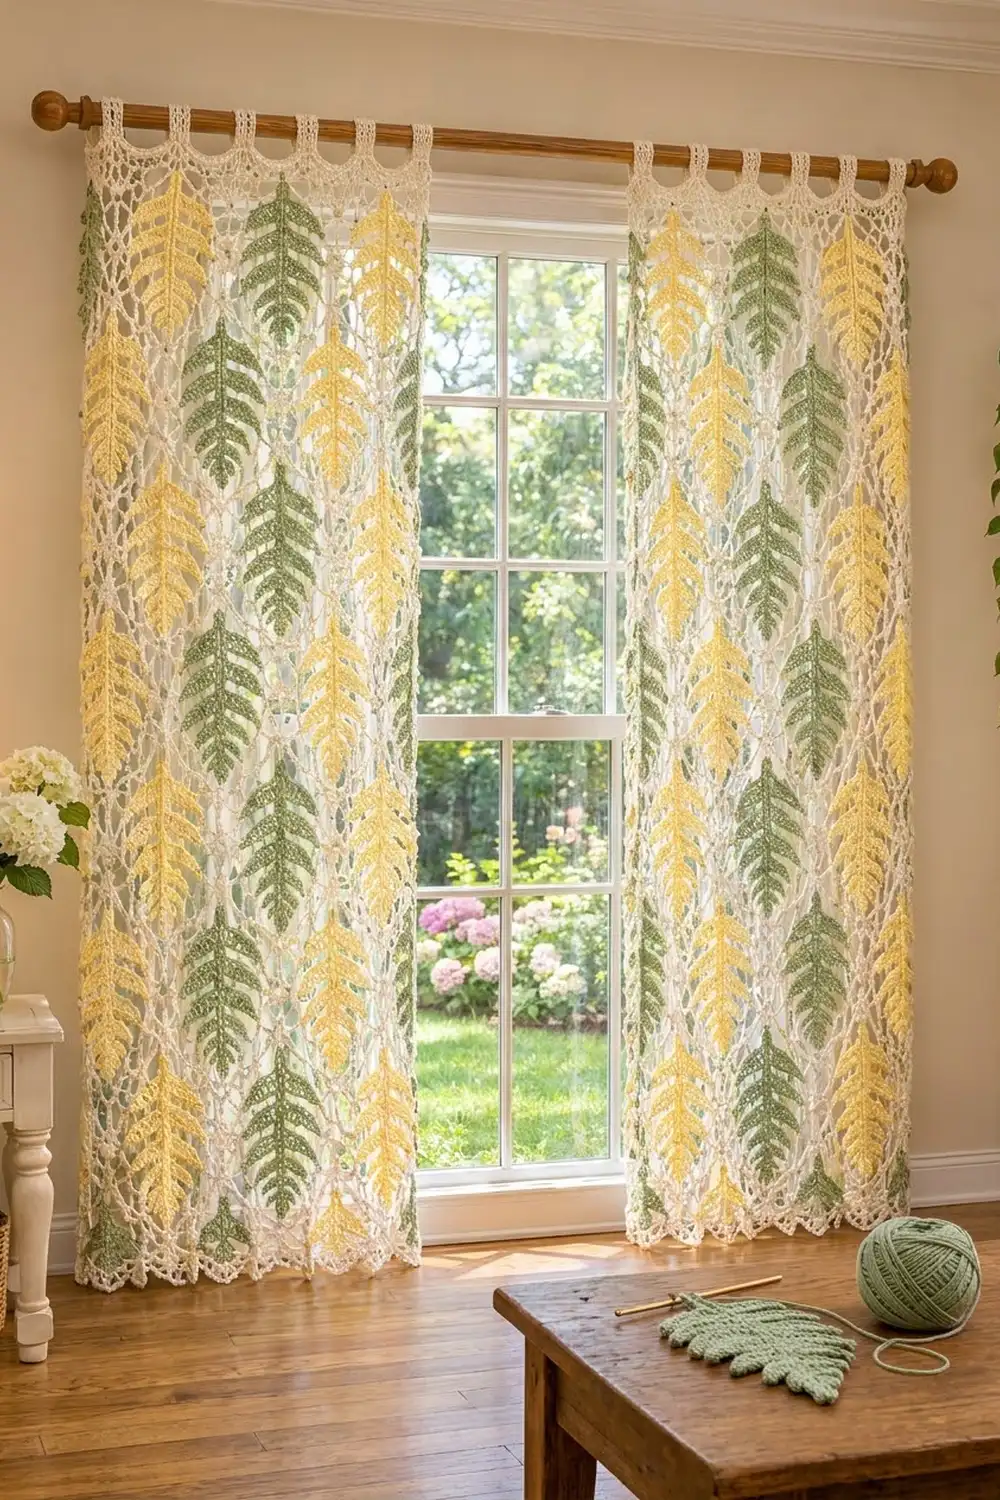
The Fernlight curtains are a pair of airy cream lace panels with long fern leaves crocheted separately and sewn on. Light comes through the open diamond net, and the leaves stand out in solid columns of butter yellow and sage green.
The look is cottage-garden and botanical without being busy. The yellow and green columns alternate across each panel, and every other column is dropped half a step, so the leaves look staggered like fronds in a border bed. The second panel mirrors the first, so the pair frames a window symmetrically.
This pattern uses US crochet terms. Each finished panel measures 31 in (78.7 cm) wide × 74.5 in (189.2 cm) long from the top edge to the hem points. The tab loops add 3.5 in (8.9 cm) above the rod line.
To make each panel, you crochet one rectangle of chain-loop mesh, make 30 fern leaves and sew them on in a set grid. Then you add a two-round single crochet border, a shell hem along the bottom and nine tabs along the top.
Finished Size and Construction
- Finished panel size: 31 in × 74.5 in (78.7 cm × 189.2 cm), plus 3.5 in (8.9 cm) tab loops
- Skill level: Intermediate
- Terminology: US crochet terms
- Yarn weight: Worsted (#4) cotton
- Hook: 5.0 mm (US H-8)
- Number of pieces: 2 mesh panels + 60 fern leaves (32 yellow, 28 sage)
- Layout: 4 leaf columns per panel, alternating colors, half-drop offset
- Leaf size: 8 in × 5 in (20.3 cm × 12.7 cm)
- Mesh size before border: 30 in × 72.75 in (76.2 cm × 184.8 cm)
- Border depth: 0.5 in (1.3 cm) on all sides, plus a 0.75 in (1.9 cm) shell hem at the bottom
Materials
Use a smooth, mercerized or matte worsted-weight cotton of about 155 m per 100 g. Cotton holds the open mesh crisply and doesn’t stretch out on the rod the way acrylic can.
- Cream (mesh, border, tabs): 720 g / 1,115 m
- Butter yellow (leaves): 240 g / 372 m
- Sage green (leaves): 210 g / 325 m
These quantities cover both panels and include a margin of about 15%.
Tools:
– 5.0 mm (US H-8) hook
– Tapestry needle
– Locking stitch markers (at least 20)
– Rust-proof pins
– Measuring tape
– A large blocking surface (a bed, or interlocking foam mats)
– Spray bottle
Abbreviations (US Terms)
- ch – chain
- sl st – slip stitch
- sc – single crochet
- hdc – half double crochet
- dc – double crochet
- sk – skip
- sp – space
- st(s) – stitch(es)
- RS / WS – right side / wrong side
Special stitch – Frond (L): Ch L+1. Sc in 2nd ch from hook, hdc in next ch, dc in each of the next L−2 ch, then sl st into the same midrib ch the frond started from. This gives L stitches. Because one side of the frond is taller than the other, it curves naturally toward the leaf tip.
Gauge and Checkpoints
Test one leaf first. Make one complete fern leaf before starting anything else. It should measure 8 in × 5 in (20.3 cm × 12.7 cm) after light steaming.
Mesh gauge (blocked): 4 ch-5 loops = 6 in (15.2 cm) wide, and 8 rows = 6 in (15.2 cm) tall. Each loop is 1.5 in (3.8 cm) wide and each row is 0.75 in (1.9 cm) tall.
To make a swatch, ch 18 and work Rows 1–3 of the mesh until you have 9 rows, then pin it out gently.
Border gauge: 4 sc = 1 in (2.5 cm).
Checkpoints:
– Leaf foundation chain of 34 ch: about 8.5 in (21.6 cm) relaxed
– Leaf after Side 1: about 2.5 in (6.4 cm) from midrib to the longest frond tip
– Mesh after Row 1: 30 in (76.2 cm) wide
– Mesh after Row 17: 12.75 in (32.4 cm) tall
– Finished mesh: 30 in × 72.75 in (76.2 cm × 184.8 cm)
If your pieces are too big, go down 0.5 mm. If they are too small, go up 0.5 mm. Don’t add or remove mesh loops: the leaf grid depends on exactly 20 loops across.
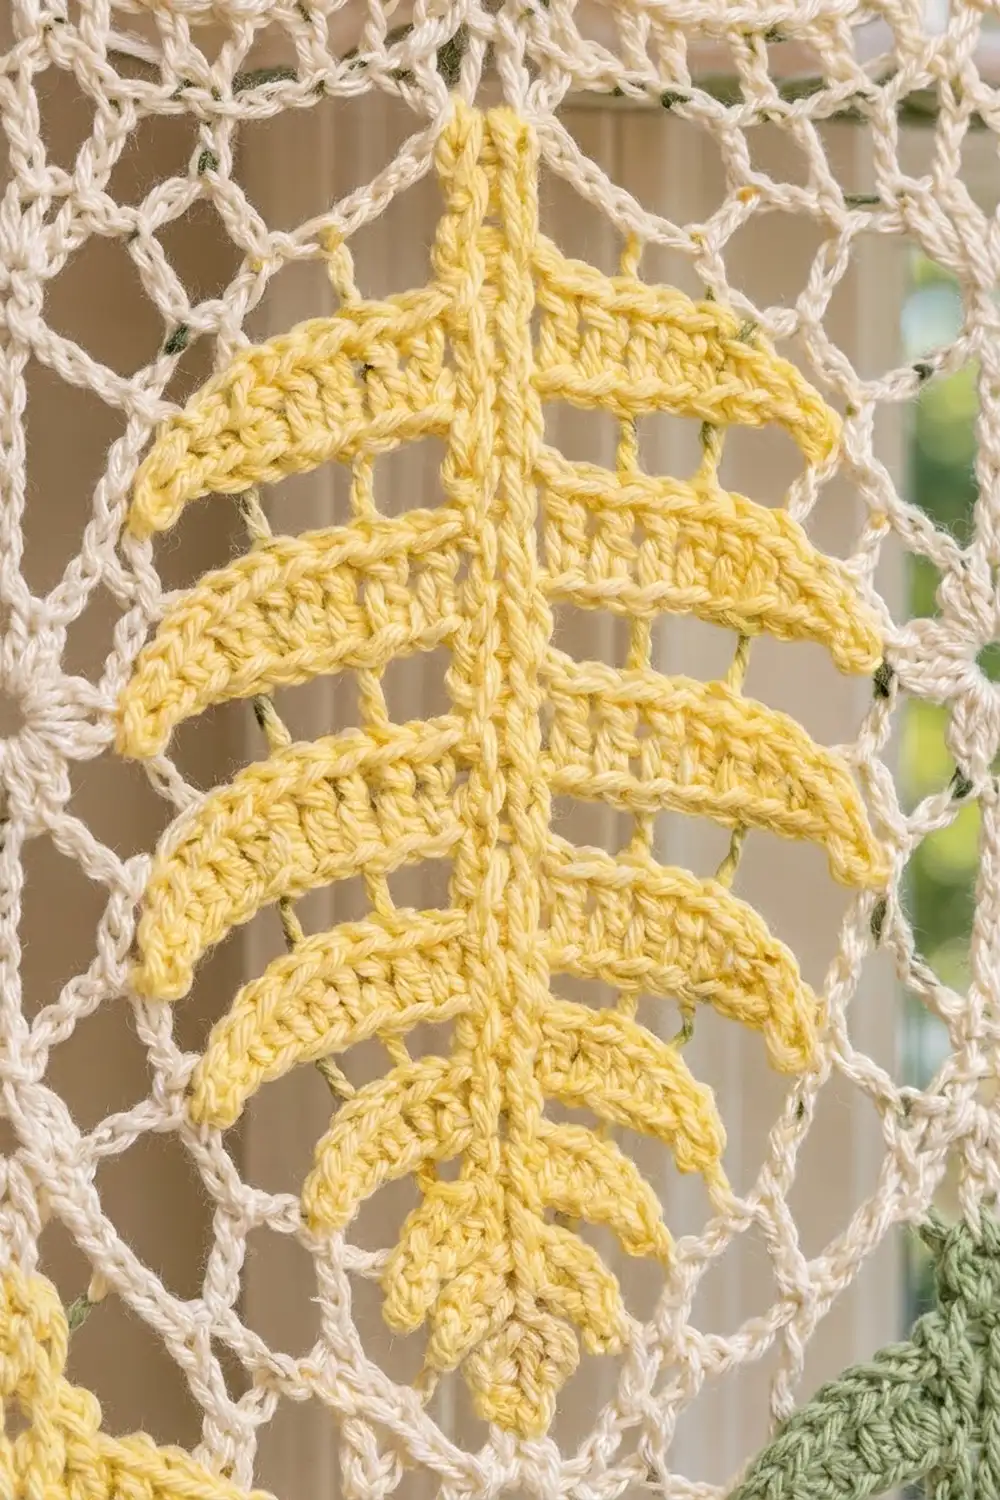
Fern Leaf (make 60)
Each leaf has a 34-ch midrib. The fronds are worked up one side of it, and then the leaf continues around the stalk and down the other side.
Frond lengths, tip to base (Frond 1 to Frond 9): 3, 4, 6, 7, 8, 9, 10, 10, 8.
Foundation: Ch 34.
Tip: Sl st in 2nd ch from hook. That leaves 32 midrib ch, counting toward the stalk.
Side 1 (tip to base): Sl st in each of next 3 ch, work Frond (next length on the list). Repeat from * 9 times in total, working Frond 1 through Frond 9. You have used 27 ch. Sl st in each of the last 5 ch to make the stalk.
Count: 32 sl st and 9 fronds (65 frond sts).
Turn at the base: Ch 1 and rotate the piece so you’re working into the remaining loops on the other side of the foundation chain.
Side 2 (base to tip): Sl st in each of the first 5 ch (stalk). Sl st in next ch, work Frond (next length in reverse order: 8, 10, 10, 9, 8, 7, 6, 4, 3), sl st in each of next 2 ch. Repeat from * 9 times in total. Each Side 2 frond lines up with its Side 1 partner on the same midrib ch.
Count: 32 sl st and 9 fronds (65 frond sts).
Finish: Sl st into the tip sl st. Fasten off, leaving a 24 in (61.0 cm) tail for sewing.
Leaf total: 18 fronds, 130 frond sts, 66 sl sts. Steam lightly and ease each frond into an upward curve.
Mesh Panel (make 2)
With cream, ch 82.
Row 1 (RS): Sc in 2nd ch from hook. Ch 5, sk 3 ch, sc in next ch. Repeat from * 20 times. Turn.
Count: 20 ch-5 loops, 21 sc.
Row 2: Ch 5 (counts as dc + ch 2). Sc in first ch-5 loop. Ch 5, sc in next ch-5 loop. Repeat from * 19 times. Ch 2, dc in last sc. Turn.
Count: 19 ch-5 loops, 2 half loops (ch-2), 20 sc.
Row 3: Ch 1, sc in first dc, sk the ch-2. Ch 5, sc in next ch-5 loop. Repeat from * 19 times. Ch 5, sc in 3rd ch of turning ch. Turn.
Count: 20 ch-5 loops, 21 sc.
Rows 4–97: Repeat Rows 2–3 another 47 times, ending with an odd row. Don’t fasten off.
The loops shift half a step every row, which makes the diamond lattice.
Size checkpoint: 97 rows × 0.75 in = 72.75 in (184.8 cm). Width is 20 loops × 1.5 in = 30 in (76.2 cm). Fasten off for now; you’ll rejoin for the border after the leaves are attached.
Make All Pieces
- Panel 1: 16 yellow + 14 sage = 30 leaves
- Panel 2: 16 yellow + 14 sage = 30 leaves
- Total: 32 yellow, 28 sage, 2 mesh panels
The four leaf columns sit centered over loops 3, 8, 13 and 18 (counting from the right edge with the RS facing you). Their centers are 3.75 in, 11.25 in, 18.75 in and 26.25 in (9.5 cm, 28.6 cm, 47.6 cm, 66.7 cm) from the edge, so the columns are 7.5 in (19.1 cm) apart.
Each leaf is centered on the mesh row given below, and every tip points up toward Row 97. Leaves in the same column are 12 rows (9 in / 22.9 cm) apart.
PANEL 1            Loop 3   Loop 8   Loop 13  Loop 18
Row 90               Y        -        Y        -
Row 84               -        G        -        G
Row 78               Y        -        Y        -
Row 72               -        G        -        G
Row 66               Y        -        Y        -
Row 60               -        G        -        G
Row 54               Y        -        Y        -
Row 48               -        G        -        G
Row 42               Y        -        Y        -
Row 36               -        G        -        G
Row 30               Y        -        Y        -
Row 24               -        G        -        G
Row 18               Y        -        Y        -
Row 12               -        G        -        G
Row 6                Y        -        Y        -
Panel 2 is the mirror image of Panel 1. Sage leaves go in loops 3 and 13 at Rows 12–84, and yellow leaves go in loops 8 and 18 at Rows 6–90.
Joining (Appliqué)
Lay the mesh flat with the RS up and pin it out to 30 in × 72.75 in (76.2 cm × 184.8 cm). Place a locking marker at each leaf’s center point from the grid.
- Center each leaf with its midrib running straight up the marked loop column, the leaf’s midpoint on the marked row and the tip toward Row 97. Each leaf covers about 10.7 rows: 8 in ÷ 0.75 in.
- With the leaf’s own tail, whipstitch the midrib to the mesh. Catch every mesh strand the midrib crosses, plus one sl st of the midrib in between. That’s roughly one stitch every 0.25 in (0.6 cm).
- Tack the tip of each of the 18 fronds to the nearest mesh strand with 2 small stitches.
- Weave in the ends along the midrib on the WS.
Tension: Keep your sewing stitches snug but not tight. If the mesh puckers around a leaf, those stitches are too tight; snip and redo them.
Checkpoint: After all 30 leaves are on, the panel should still lie flat at 30 in × 72.75 in (76.2 cm × 184.8 cm).
Border
Border gauge: 4 sc = 1 in (2.5 cm).
Round 1: With the RS facing, join cream in the last sc of Row 97.
– Top edge (Row 97): 3 sc in the first sc (corner), 5 sc in next ch-5 loop, sc in next sc 19 times, 5 sc in last loop, 3 sc in last sc (corner).
– Side edge: 3 sc in each row-end of Rows 96 down to 2. That’s 95 row-ends, or 285 sc.
– Bottom edge (working in the remaining loops of the foundation chain): 3 sc in the base of the first sc (corner), 5 sc in next ch-3 sp, sc in base of next sc 19 times, 5 sc in last sp, 3 sc in base of last sc (corner).
– Second side: Same as the first side.
Sl st to the first sc. The middle sc of each 3-sc group is the corner stitch.
Counts, each including both corner stitches: top 123, bottom 123, each side 289. Total: 123 + 123 + 289 + 289 − 4 shared corners = 820 sts.
Round 2: Ch 1. Sc in each st around, working 3 sc in each corner st. Sl st to the first sc.
Counts: top 125, bottom 125, each side 291. Total: 820 + 8 = 828 sts.
Why the math works: Along the top and bottom you work 6 sc per 1.5 in loop (5 in the loop + 1 in the sc), which is exactly 4 sc per inch. Along the sides you work 3 sc per 0.75 in row, which is also 4 sc per inch. Every edge matches the border gauge, so the border won’t ruffle or pull in. The 3-sc corners give exactly +2 sts per side in each round.
Shell Hem (bottom edge only): Join cream in the bottom-left corner st of Round 2. Sc in that st. Sk 1, 5 dc in next st, sk 1, sc in next st. Repeat from * 31 times, ending in the opposite corner st. Fasten off.
Count: 1 + (31 × 4) = 125 sts used, giving 31 shells and 32 sc.
Tabs (top edge, make 9): Number the 125 top sts of Round 2 from the right-hand corner. Tab k starts at st 1 + 15(k − 1), so the tabs start at sts 1, 16, 31, 46, 61, 76, 91, 106 and 121. Each tab is 5 sts wide, and there are 10 sts between tabs.
9 tabs × 5 sts + 8 gaps × 10 sts = 125 sts.
- Row 1: Join cream in the starting st. Ch 1, sc in the same st and the next 4 sts. Turn. (5 sc)
- Rows 2–28: Ch 1, sc in each st across. Turn. (5 sc)
Fasten off, leaving a 12 in (30.5 cm) tail. Each tab measures 7 in (17.8 cm) long. Fold it to the WS and whipstitch Row 28 to the back of Round 1. This makes a 3.5 in (8.9 cm) loop.
Final Blocking
- Soak the panel in cool water and press out the water in a towel. Don’t wring it.
- Lay it RS up on your blocking surface.
- Pin the corners to 31 in × 74.5 in (78.7 cm × 189.2 cm), measuring to the hem points.
- Pin along each side every 4 in (10.2 cm), keeping the diamond mesh even.
- Pin each shell point and each frond tip.
- Check that all leaf columns are straight and parallel, then let the panel dry completely.
- Repeat for Panel 2.
Final Quality-Control Checklist
- 20 loops across and 97 rows in each mesh
- 30 leaves on each panel, placed exactly as in the grid, all tips up
- Panel 2 mirrors Panel 1
- Border counts of 820 and 828; 31 shells; 9 tabs per panel
- Both panels measure 31 in × 74.5 in (78.7 cm × 189.2 cm)
- No puckers around the appliqués; all ends woven in on the WS
Troubleshooting
- The leaf curls or cups: Your sl sts are too tight. Loosen them, or work the midrib sl sts with the next hook size up.
- The fronds lie flat instead of arching: Check that you finished each frond with a dc section and not hdc.
- The mesh slants: Make sure the ch-2 and dc are at both ends of every even row.
- The border ruffles: You probably worked more than 3 sc per row-end. Recount against 289.
- The tabs twist: Fold every tab to the WS at the same depth.
Care
Hand wash cool and dry flat, reshaping and pinning if needed. Take the panels off the rod before washing, because wet cotton mesh stretches under its own weight.
Final Notes
Here is the measurement chain:
– A 1.5 in (3.8 cm) loop × 20 gives 30 in (76.2 cm).
– A 0.75 in (1.9 cm) row × 97 gives 72.75 in (184.8 cm).
– Leaves spaced every 12 rows (9 in / 22.9 cm) fit the four-column grid.
– A border worked at 4 sc per inch (2.5 cm) adds 0.5 in (1.3 cm) on every side, and the hem adds 0.75 in (1.9 cm).
– Together, that gives a 31 in × 74.5 in (78.7 cm × 189.2 cm) panel.
Check your gauge at each link in the chain and the pair will hang evenly.
Happy crocheting!