

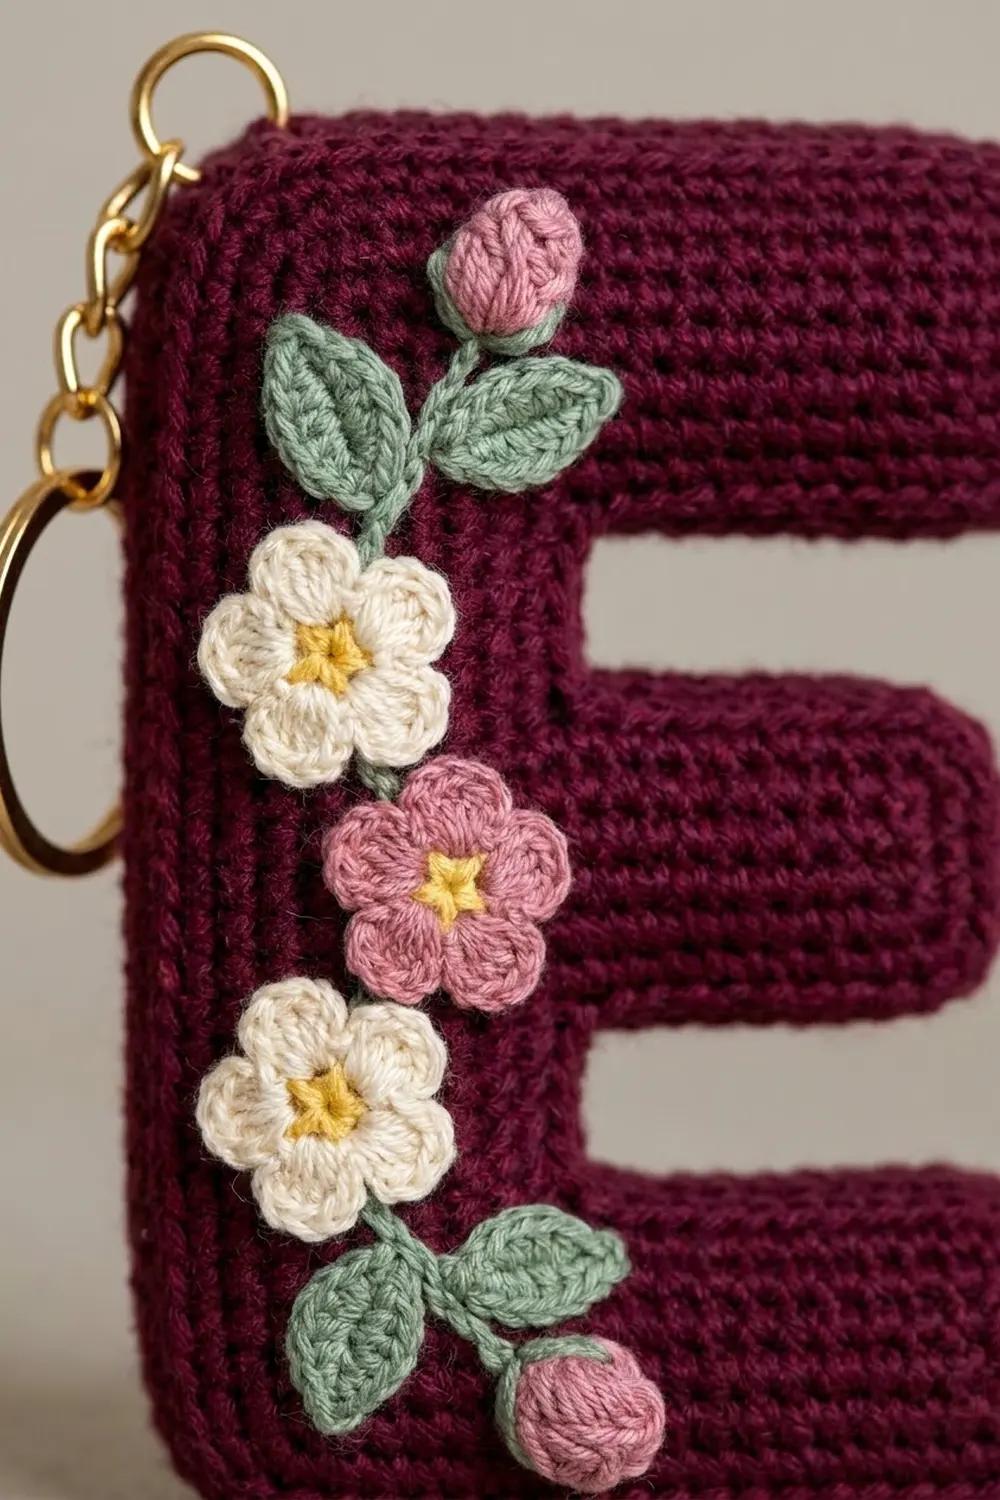
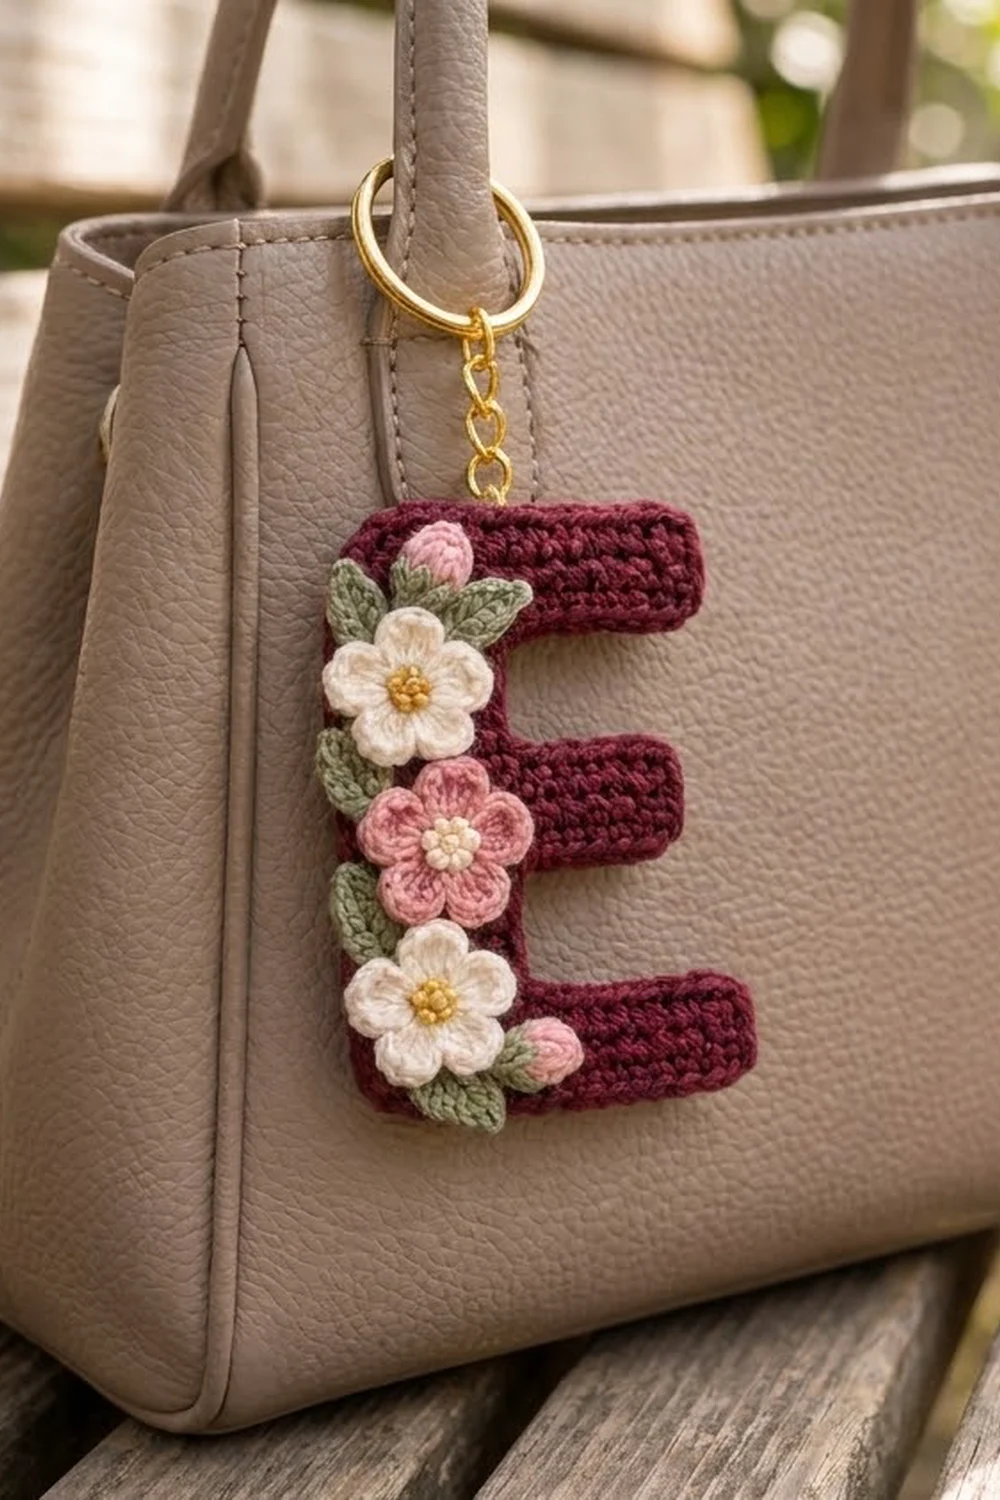
This little keychain is a flat, solid letter E in deep burgundy single crochet. It has soft rounded corners and a vine of tiny flowers running down its spine. Two cream blossoms and one dusty-pink blossom, each with a sunny yellow center, sit between sage-green leaves, with a small pink bud at each end of the vine.
The style is sweet and cottage-inspired but still neat and graphic. The dense fabric keeps the letter crisp, so it reads clearly on a bag, a set of keys or a zipper pull.
This pattern uses US crochet terms. The finished letter measures 2.7 in (6.9 cm) wide by 3.8 in (9.7 cm) tall, not including the hardware.
You work the E as one flat piece in rows from the bottom arm up, adding the middle and top arms with short chains. One round of single crochet tidies the outline. The flowers, buds and leaves are made separately and sewn down the left side of the letter. The hardware attaches at the top-left corner.
Finished Size and Construction
- Finished size: 2.7 in (6.9 cm) x 3.8 in (9.7 cm)
- Skill level: Easy / advanced beginner
- Terminology: US crochet terms
- Yarn weight: DK (#3), cotton or cotton blend
- Hook: 3.0 mm (C/2–D/3)
- Number of pieces: 1 letter piece, plus 3 flowers, 2 buds and 6 leaves sewn on as appliqués
- Layout: One letter, with the appliqués stacked down the left spine
- Letter size before border: 2.4 in (6.1 cm) x 3.5 in (8.9 cm)
- Border depth: about 0.15 in (0.4 cm) per edge, 1 round of sc
- Finished letter size: 2.7 in (6.9 cm) x 3.8 in (9.7 cm)
Materials
Choose a smooth, tightly plied DK cotton. It holds the letter’s corners and stands up to daily handling. Acrylic also works, but the letter will be softer.
- Burgundy (main color): 8 g / about 18 m (20 yd)
- Cream (flowers): 2 g / about 4 m (4.5 yd)
- Dusty pink (flower and buds): 2 g / about 4 m (4.5 yd)
- Yellow (flower centers): 1 g / about 2 m (2.5 yd)
- Sage green (leaves): 2 g / about 4 m (4.5 yd)
These quantities include a margin of about 20 percent for swatching and sewing tails.
Tools:
- 3.0 mm crochet hook
- Tapestry needle and scissors
- 2 stitch markers
- Gold split ring, 1 in (2.5 cm)
- Gold chain, about 1 in (2.5 cm), and 2 gold jump rings, 0.25 in (0.6 cm)
- 2 pairs of flat-nose pliers
- Blocking mat, rust-proof pins and a spray bottle
Abbreviations (US Terms)
- ch – chain
- sl st – slip stitch
- sc – single crochet
- hdc – half double crochet
- dc – double crochet
- sc2tog – single crochet 2 stitches together
- MR – magic ring
- st(s) – stitch(es)
- RS – right side
Special stitch: 4-dc bobble. (Yo, insert hook in ring, yo and pull up a loop, yo and pull through 2 loops) 4 times, then yo and pull through all 5 loops on the hook.
Working into row ends: Insert the hook under the outer 2 strands at the side of each row so that no holes show.
Gauge and Checkpoints
Gauge: 10 sc and 12 rows = 2 in (5.1 cm) square, worked in rows with a 3.0 mm hook. That is 5 sc and 6 rows per 1 in (2.5 cm).
The letter shape comes entirely from stitch and row counts, so gauge matters. Test first: work Rows 1–5 of the letter and measure.
Checkpoints:
- After Row 1: width 2.4 in (6.1 cm)
- After Row 5: bottom arm height about 0.8 in (2.0 cm)
- After Row 8: spine width 1.0 in (2.5 cm); lower gap 0.5 in (1.3 cm)
- After Row 13: total height about 2.2 in (5.6 cm); middle arm width 2.0 in (5.1 cm)
- After Row 21: total height 3.5 in (8.9 cm)
- After the border: 2.7 in (6.9 cm) x 3.8 in (9.7 cm)
If the piece is too big, use a 2.75 mm hook. If it is too small, use a 3.25 mm hook. Keep the stitch counts the same so the proportions stay correct.
Letter E
If you crochet right-handed, Row 1 ends at the left edge, and that edge becomes the spine. If you crochet left-handed, your E will be mirrored. Flip it over when it’s finished, since single crochet looks almost the same on both sides.
The ch 1 at the start of a row does not count as a stitch.
Bottom arm
Foundation: With burgundy, ch 13.
Row 1: Sc in 2nd ch from hook and in each ch across, turn. (12 sts)
Rows 2–5: Ch 1, sc in each st across, turn. (12 sts)
Row 5 ends at the left edge. Place a marker in the last st of Row 5 to mark the spine side.
Lower gap
Row 6: Ch 1, sc in first 5 sts, turn, leaving the other 7 sts unworked. (5 sts)
Rows 7–8: Ch 1, sc in each st across, turn. (5 sts)
Row 8 ends at the inner edge of the spine.
Middle arm
Row 9: Ch 6, turn. Sc in 2nd ch from hook and in next 4 ch, then sc in each of the 5 spine sts, turn. (10 sts: 5 on the chain + 5 spine sts)
Rows 10–13: Ch 1, sc in each st across, turn. (10 sts)
Row 13 ends at the left edge.
Upper gap
Row 14: Ch 1, sc in first 5 sts, turn, leaving the other 5 sts unworked. (5 sts)
Rows 15–16: Ch 1, sc in each st across, turn. (5 sts)
Row 16 ends at the inner edge of the spine.
Top arm
Row 17: Ch 8, turn. Sc in 2nd ch from hook and in next 6 ch, then sc in each of the 5 spine sts, turn. (12 sts: 7 on the chain + 5 spine sts)
Rows 18–21: Ch 1, sc in each st across. (12 sts)
Row 21 ends at the top-left corner. Don’t fasten off. Turn the work 90 degrees and continue straight into the border.
The middle arm is 2 sts shorter than the top and bottom arms, which gives the E its classic shape.
Flowers (Make 3: 2 Cream, 1 Pink)
Rnd 1: With yellow, MR, ch 1, 5 sc in ring, sl st to first sc. Pull the ring tight and fasten off. (5 sts)
Rnd 2: Join cream or pink in any st, ch 1, 2 sc in each st around, sl st to first sc. (10 sts)
Rnd 3: *Sl st in next st, (hdc, 2 dc, hdc) in next st; rep from * 4 more times, sl st to first sl st. (25 sts: 5 petals of 4 sts + 5 sl sts)
Fasten off, leaving a 10 in (25.4 cm) tail. Each flower measures about 0.9 in (2.3 cm) across.
Buds (Make 2, Pink)
MR, ch 2, work one 4-dc bobble into the ring, then ch 1 to lock it. Pull the ring tight so the bud curls into a rounded teardrop. Fasten off, leaving an 8 in (20.3 cm) tail. Each bud measures about 0.4 in (1.0 cm).
Leaves (Make 6, Green)
Foundation: Ch 6.
Side 1: Sl st in 2nd ch from hook, sc in next ch, hdc in next ch, dc in next ch, sc in last ch. (5 sts)
Base: Ch 1, then rotate the work to crochet along the free loops of the foundation chain.
Side 2: Sc in first free loop, dc in next, hdc in next, sc in next, sl st in last. (5 sts)
Sl st into the tip and fasten off, leaving an 8 in (20.3 cm) tail. Each leaf is about 0.6 in (1.5 cm) long, with a pointed tip.
Border
Border gauge: Work 1 sc in each stitch and 1 sc in each row end. At 6 rows per 1 in (2.5 cm), one sc per row end lies flat in this tight fabric.
Rnd 1 (RS): Ch 1, then work around the letter in this order:
- Left edge: Sc in each of the 21 row ends down the spine. (21 sc)
- Bottom edge: 3 sc in first free loop of the foundation ch, sc in next 10 loops, 3 sc in last loop. (16 sc)
- Right end of bottom arm: Sc in each of 5 row ends. (5 sc)
- Top of bottom arm: 3 sc in first exposed st of Row 5, sc in next 5 sts. (8 sc)
- Inner corner: Sc2tog over the last exposed st of Row 5 and the Row 6 row end. (1 st)
- Lower gap: Sc in the Row 7 row end. (1 sc)
- Inner corner: Sc2tog over the Row 8 row end and the first free loop of the middle-arm chain. (1 st)
- Underside of middle arm: Sc in next 3 loops, 3 sc in last loop. (6 sc)
- Right end of middle arm: Sc in each of 5 row ends. (5 sc)
- Top of middle arm: 3 sc in first exposed st of Row 13, sc in next 3 sts. (6 sc)
- Inner corner: Sc2tog over the last exposed st of Row 13 and the Row 14 row end. (1 st)
- Upper gap: Sc in the Row 15 row end. (1 sc)
- Inner corner: Sc2tog over the Row 16 row end and the first free loop of the top-arm chain. (1 st)
- Underside of top arm: Sc in next 5 loops, 3 sc in last loop. (8 sc)
- Right end of top arm: Sc in each of 5 row ends. (5 sc)
- Top edge: 3 sc in first st of Row 21, sc in next 10 sts, 3 sc in last st. (16 sc)
Sl st to first sc, fasten off and weave in the end. (102 sts total)
Why the math works: The outline has 21 + 12 + 5 + 7 + 3 + 5 + 5 + 5 + 3 + 7 + 5 + 12 = 90 edge stitches and row ends. Working 3 sc into each of the 8 outer corners adds 2 sts per corner, for +16. A sc2tog at each of the 4 inner corners removes 1 st per corner, for −4. That gives 90 + 16 − 4 = 102, which matches the 16 steps above. The extra stitches round the outer corners, and the sc2togs stop the inner corners from puckering.
Final Blocking
- Weave in all burgundy ends.
- Lay the letter RS up on the blocking mat.
- Pin the outline to 2.7 in (6.9 cm) x 3.8 in (9.7 cm).
- Pin the tips of the three arms so they sit parallel and square to the spine, with the two gaps even.
- Mist the piece until it is damp but not soaked.
- Let it dry completely, at least 4 hours.
- Block the flowers and leaves at the same time, pinning each petal and each leaf tip.
- Arrange and sew on the appliqués, from top to bottom:
- A bud at the top-left of the spine, with a leaf on each side
- A cream flower, then a leaf at the left edge
- The pink flower, then a leaf at the left edge
- The second cream flower near the bottom of the spine
- The second bud at the lower right of that flower, plus the last leaf at its lower left
- Let the flowers overlap the left border by about 0.1 in (0.3 cm). Whipstitch through the outer stitches of each piece, catching only the front layer of the letter so nothing shows on the back.
- Open a jump ring and thread it through the border 2 sts in from the top-left corner. Add the chain and close the ring. Then use the second jump ring to join the split ring to the top of the chain.
Final Quality-Control Checklist
- The letter measures 2.7 in (6.9 cm) x 3.8 in (9.7 cm).
- All three arms are square to the spine, and the middle arm is visibly shorter.
- The border has 102 sts, with no gaps at the inner corners.
- The outer corners are smoothly rounded, not flared.
- Each flower has 5 even petals and a tight yellow center.
- All appliqués are stitched down securely.
- No sewing stitches show on the back.
- The jump rings are fully closed.
- All ends are woven in and trimmed.
Troubleshooting
The arms slant. Your tension is uneven. Count stitches at each checkpoint and re-block.
The middle arm is too long. Check Row 9. The ch 6 should give exactly 5 new sts.
The inner corners gap. Work each sc2tog across both edges instead of skipping a row end.
The outer corners flare. Work the 3-sc corners more tightly.
The border ruffles along the spine. Your row gauge is looser than 6 rows per 1 in (2.5 cm). Skip 1 row end evenly along the left edge and adjust the total.
The flower center has a hole. Pull the magic ring tighter before you join the petal color.
Care
Spot clean with mild soap and cool water, then dry flat. Take off the metal hardware before any deeper wash so it doesn’t leave tarnish marks.
Final Notes
The size of this design depends on one chain of measurements. A gauge of 5 sc and 6 rows per 1 in (2.5 cm) gives a 12-st, 21-row letter of 2.4 in (6.1 cm) x 3.5 in (8.9 cm). One 102-st border round adds about 0.15 in (0.4 cm) on each side, for a finished letter of 2.7 in (6.9 cm) x 3.8 in (9.7 cm). Three flowers, two buds and six leaves then turn a plain initial into a personal gift.
Check your measurements at every checkpoint and the letter will come out crisp and true.
Happy crocheting!