
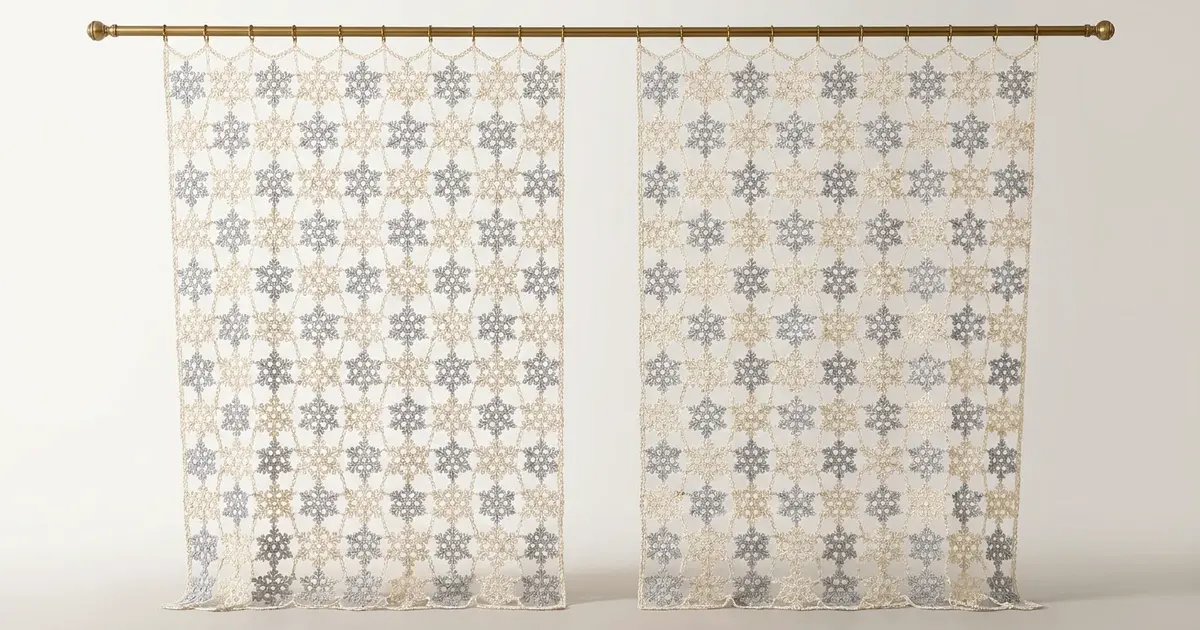
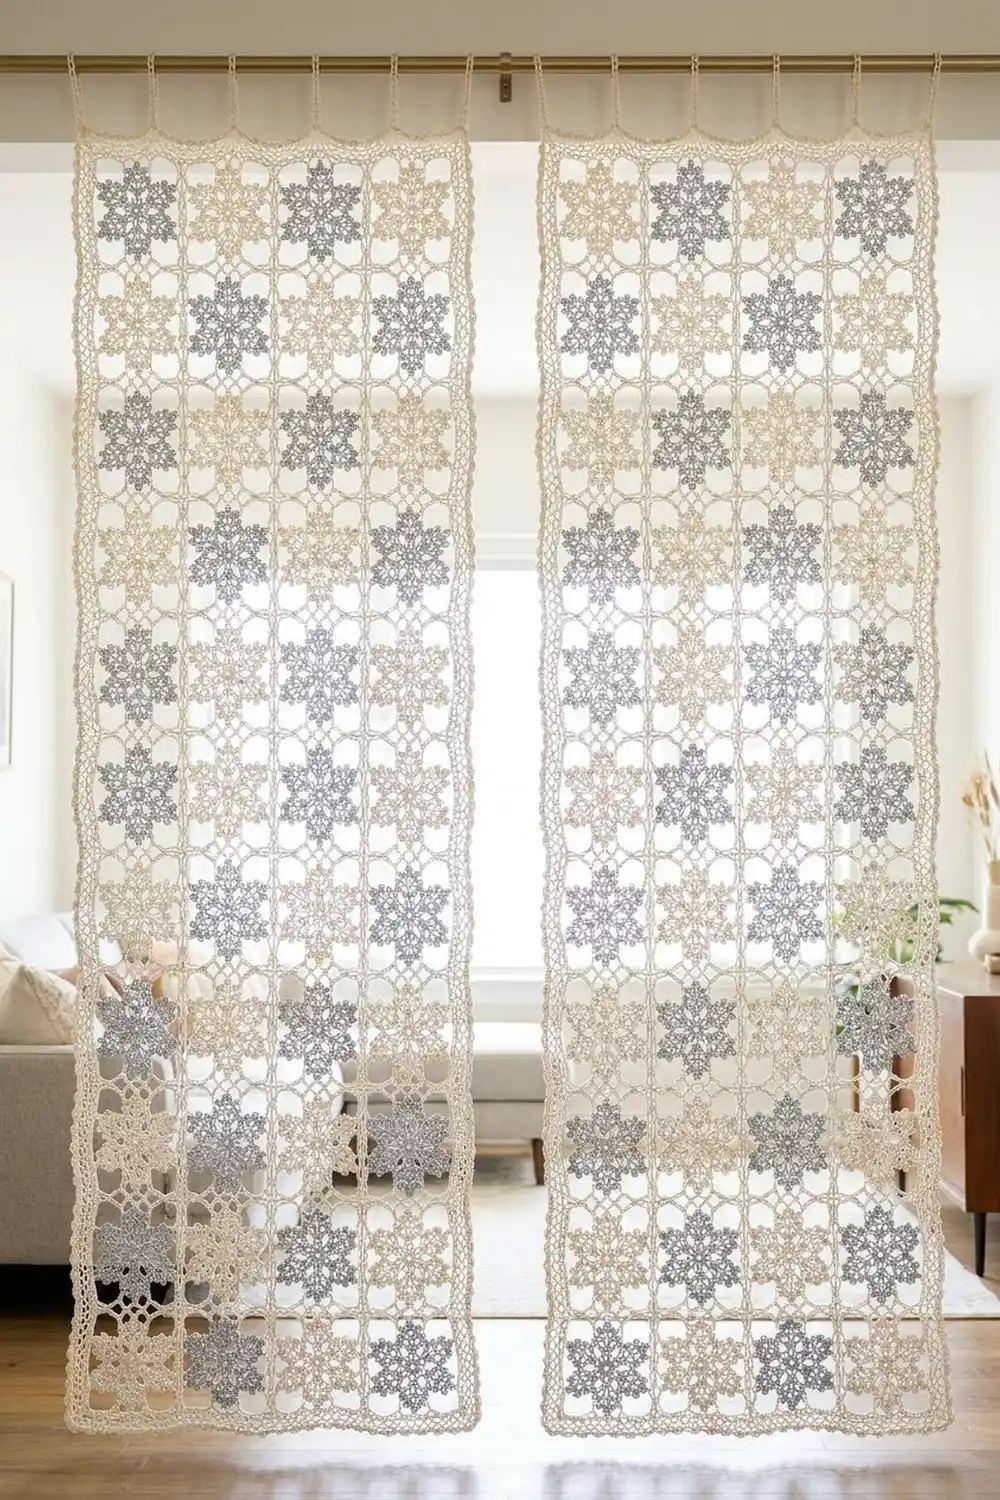
The Frost Lattice Curtain is a lace panel made from small snowflake motifs, each set inside a square cream frame. Silver-gray and cream snowflakes alternate in a checkerboard, and the cream frames link into one airy lattice that lets daylight through. Hung on a brass rod, it softens a window without hiding the view.
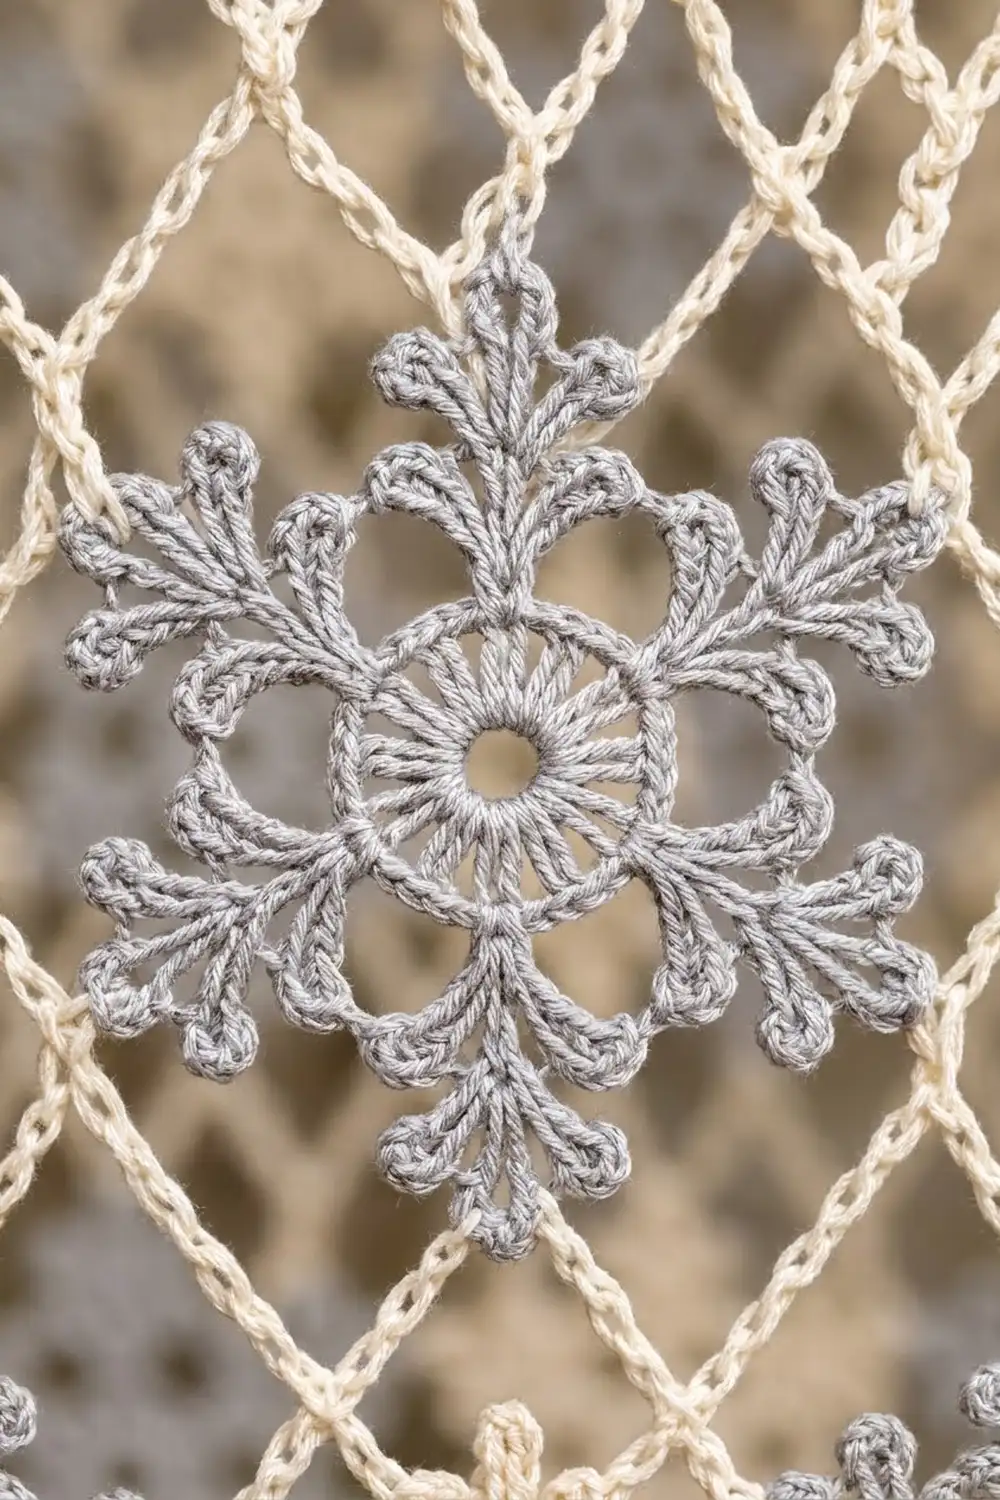
Each snowflake has six arms with trefoil tips and curled side branches around a scalloped center. The look is wintery, but it works all year, especially in neutral rooms.
This pattern uses US crochet terms. One finished panel measures 36 x 76 in (91.4 x 193.0 cm), not counting the hanging loops. Make two panels for a pair.
Construction is easy to follow. You crochet 105 snowflake motifs, square each one with a cream frame and slip-stitch them together in a 7 x 15 grid. Then you add a three-round border and a row of hanging loops along the top.
Finished Size and Construction
- Finished panel: 36 x 76 in (91.4 x 193.0 cm), plus hanging loops about 2.25 in (5.7 cm) tall
- Skill level: Intermediate
- Terminology: US
- Yarn weight: #2 fine (sport) mercerized cotton
- Hook: 3.25 mm (D)
- Number of pieces: 105 motifs (53 gray, 52 cream)
- Layout: 7 motifs wide x 15 motifs tall, checkerboard
- Motif size: 5 x 5 in (12.7 x 12.7 cm) square; snowflake alone 4.5 in (11.4 cm) tip to tip
- Size before border: 35 x 75 in (88.9 x 190.5 cm)
- Border depth: about 0.5 in (1.3 cm) per side
Materials
Choose a smooth, mercerized cotton. It keeps picots crisp, resists sagging on a long hanging piece and stands up to sun better than acrylic. The amounts below assume about 155 m per 50 g ball.
- Color A, silver gray: 225 g, about 698 m (5 balls)
- Color B, cream: 550 g, about 1,705 m (11 balls)
Cream is the main color. It is used for half the snowflakes, all 105 frames, all joining and the border.
Tools:
– 3.25 mm (D) crochet hook
– Tapestry needle
– Stitch markers
– Rustproof pins and a large blocking surface (foam mats, or a carpeted floor covered with a sheet)
– Spray bottle
– Measuring tape
The quantities include a margin of about 15 to 20 percent for gauge swatches and differences in tension.
Abbreviations (US Terms)
- ch – chain
- sl st – slip stitch
- sc – single crochet
- hdc – half double crochet
- dc – double crochet
- sk – skip
- sp – space
- st(s) – stitch(es)
- BLO – back loop only
- Rnd – round
Special stitches
- Picot: Ch 4, sl st in 4th ch from hook.
- Trefoil: Sl st in 4th ch from hook, (ch 4, sl st in same ch) twice. Makes three small lobes.
- Branch: Ch 6, sl st in 4th ch from hook, ch 2, sl st in the same stem ch you started from. Makes a curled loop with a picot at its tip.
- Corner ring: Ch 5, sl st in 5th ch from hook.
Gauge and Checkpoints
Gauge: 20 sc and 22 rows = 4 in (10.2 cm) in cream cotton with a 3.25 mm hook.
Before anything else, make one complete motif through Rnd 7 and block it. This tells you more than a swatch.
Checkpoints:
– After Rnd 1: about 1 in (2.5 cm) across.
– After Rnd 3: about 2.25 in (5.7 cm) across the petals.
– After Rnd 5: about 4.5 in (11.4 cm) tip to tip, blocked.
– After Rnd 7: 5 x 5 in (12.7 x 12.7 cm), blocked.
If your blocked motif is larger than 5.25 in (13.3 cm), go down a hook size. If it is smaller than 4.75 in (12.1 cm), go up a size. Small differences multiply by 15 along the length, so adjust now.
Snowflake Motif
Make 53 motifs with Rnds 1–5 in Color A (gray) and 52 with Rnds 1–5 in Color B (cream). Rnds 6–7 are always worked in Color B.
Rnd 1: Ch 8, sl st in first ch to form a ring. Ch 3 (counts as dc), 23 dc in ring, sl st in top of ch-3. (24 dc)
The ring stays open and becomes the visible center hole.
Rnd 2: Ch 1, sc in same st, ch 5, sk 3 sts, sc in next st; repeat from * 4 more times, ch 5, sk 3 sts, sl st in first sc. (6 sc, 6 ch-5 loops)
Rnd 3: Sl st in first ch-5 loop. In each ch-5 loop work (sc, hdc, 5 dc, hdc, sc). Sl st in first sc. (6 petals of 9 sts each = 54 sts)
The 3rd dc of each petal (its 5th st) is the petal center.
Rnd 4 (arms): Sl st in next 4 sts to reach the center dc of the first petal. Ch 1.
Sc in center dc of petal. Ch 9. Work a Trefoil. Sl st in next 2 ch down the stem. Work a Branch twice in the same stem ch, one falling to each side. Sl st in next 3 ch. Ch 7.
Repeat from * 5 more times, working each sc into the center dc of the next petal. Sl st in first sc to finish. (6 arms, 6 ch-7 arcs)
Each arm has a 6-ch stem, a trefoil tip and one pair of curled side branches. Each ch-7 arc spans the 9 sts between petal centers and sits behind the arms.
Rnd 5: Sl st in first ch-7 arc. In each arc work (4 sc, Picot, 4 sc), leaving the arms free. Sl st in first sc. (48 sc, 6 picots)
These picots make the small points between the arms. Fasten off gray motifs here. On cream motifs you can keep going without cutting the yarn.
Rnd 6 (frame scaffold, Color B): Hold the motif with one arm pointing straight up (A1). Going clockwise, the arms are A1 (top), A2 (upper right), A3 (lower right), A4 (bottom), A5 (lower left) and A6 (upper left).
Join Color B in the middle lobe of the A1 trefoil. Ch 1, sc in same lobe.
Ch 11, Corner ring, ch 6, sc in middle lobe of A2, ch 9, sc in middle lobe of A3, ch 6, Corner ring, ch 11, sc in middle lobe of A4, ch 11, Corner ring, ch 6, sc in middle lobe of A5, ch 9, sc in middle lobe of A6, ch 6, Corner ring, ch 11, sl st in first sc.
(6 sc, 4 corner rings; chains: 4 x ch-11, 4 x ch-6, 2 x ch-9 = 86 ch)
There are 23 stitches between each pair of corner rings. Top and bottom: 11 + 1 + 11 = 23. Sides: 6 + 1 + 9 + 1 + 6 = 23.
Rnd 7 (frame): Ch 1, sc in same sc. Sc in each ch and each sc around, working (sc, ch 2, sc) in each corner ring. Sl st in first sc. Fasten off.
Count: 92 sc worked one per existing st + 8 corner sc = 100 sc, plus 4 ch-2 corner sps. Each side has 25 sc, including its 2 corner sc.
The scaffold chains run at an angle from the arm tips to the corners, which creates the diamond-like struts of the lattice.
Make All Pieces
- Gray-center motifs: 53
- Cream-center motifs: 52
- Total: 105
Lay them out in 15 rows of 7, starting with gray at the top left (G = gray, C = cream):
Row 1:  G C G C G C G
Row 2:  C G C G C G C
Row 3:  G C G C G C G
...continue alternating...
Row 15: G C G C G C G
The 8 odd rows each have 4 gray and 3 cream. The 7 even rows each have 3 gray and 4 cream. That gives 32 + 21 = 53 gray and 24 + 28 = 52 cream.
Block all motifs to 5 x 5 in (12.7 x 12.7 cm) before joining. It makes joining much easier.
Joining
Use Color B and a flat slip-stitch join through BLO. It leaves a neat, low seam on both sides of the curtain.
Horizontal seams first: Place Row 1 above Row 2, right sides up. Insert your hook in the ch-2 corner sp of both motifs and sl st. Sl st through the back loop of each of the next 25 sts on both motifs, matching stitch to stitch. Then sl st in the next pair of corner sps and carry straight on into the next pair of motifs. Each motif pair takes 25 sl sts plus its corner sps. Join all 14 horizontal seams this way.
Vertical seams next: Work the 6 long seams the same way. Where a vertical seam crosses a horizontal one, sl st through the joined corner sps and keep going.
Tension: Keep each sl st as tall as the sc beneath it. Tight joins pucker the lattice and shorten the panel. If you’re unsure, go up one hook size for joining only.
Checkpoint: The joined panel should measure 35 x 75 in (88.9 x 190.5 cm), within 0.5 in (1.3 cm) each way.
Border
Border gauge: Same as the main gauge, 5 sc per inch (2.5 cm).
Rnd 1: Join Color B in the top-right corner ch-2 sp of the panel. Ch 1, (sc, ch 2, sc) in same sp. Sc in each sc along each side. Don’t work any sts into the joined corner sps at the seams. Work (sc, ch 2, sc) in each outer corner sp. Sl st in first sc.
- Top and bottom: 7 x 25 = 175 sc worked one per st + 2 corner sc = 177 sc each
- Long sides: 15 x 25 = 375 sc worked one per st + 2 corner sc = 377 sc each
Rnd 2: Sl st in corner sp, ch 1, (sc, ch 2, sc) in same sp. Sc in each sc around, with (sc, ch 2, sc) in each corner sp. Sl st in first sc.
- Top and bottom: 177 + 2 corner sc = 179 sc each
- Long sides: 377 + 2 corner sc = 379 sc each
Rnd 3 (loop edging): Ch 1. On each side: sc in first sc, ch 3, sk 1, sc in next; repeat to the last sc of the side. At each corner: ch 3, sc in corner ch-2 sp, ch 3. Sl st in first sc.
- Top and bottom: (179 − 1) ÷ 2 = 89 ch-3 loops each
- Long sides: (379 − 1) ÷ 2 = 189 ch-3 loops each
- Corners: 2 loops each, 8 total
- Total: 178 + 378 + 8 = 564 ch-3 loops
Rnd 4 (top edge only, hanging loops): Join Color B with sc in the first ch-3 loop of the top edge. Ch 25, sc in same loop (hanging loop made), (ch 3, sc in next ch-3 loop) 11 times; repeat from * 7 more times. Ch 25, sc in same loop (the 89th). Fasten off. (9 hanging loops)
Why the math works: Each edge starts at exactly the number of pieces x 25, with nothing added at the seams. Rnds 1 and 2 each add only the 2 corner sc per side. That keeps every side count odd, so the sk-1 pattern starts and ends on a corner sc. Along the top, 1 + 8 x 11 = 89, so the first and last hanging loops land on the first and last ch-3 loops. The hanging loops are 22 sts apart, about 4.4 in (11.2 cm). Each ch-25 loop folds to about 2.25 in (5.7 cm) and fits a rod up to 1 in (2.5 cm) in diameter.
Final Blocking
- Soak the panel in cool water with a little wool wash for 15 minutes.
- Press out the water gently in a towel. Never wring it.
- Lay it flat, right side up, on mats or a floor covered with a sheet.
- Pin the four corners to 36 x 76 in (91.4 x 193.0 cm).
- Pin along each seam line so every motif square is 5 in (12.7 cm).
- Pin each snowflake’s trefoil tips out toward their frame anchors and open out the side branches.
- Pin each border ch-3 loop into a small point.
- Mist lightly and leave until completely dry, at least 24 hours.
Final Quality-Control Checklist
- 53 gray and 52 cream snowflakes, in checkerboard order
- Every frame is cream with 25 sc per side
- Seams lie flat with no puckers
- Panel measures 36 x 76 in (91.4 x 193.0 cm)
- 89 loops on top and bottom, 189 on each long side, plus corner loops
- 9 evenly spaced hanging loops
- All ends woven in securely along frame lines
Troubleshooting
- Arms curl forward: The sl sts down the stem are too tight. Loosen them, then block with a pin at each tip.
- Frame ripples: The scaffold chains are too loose. Chain more firmly, or go down a hook size for Rnd 6 only.
- Frame pulls the snowflake into a cup: The chains are too tight. Go up a hook size for Rnd 6.
- Wrong count on Rnd 7: Recount the Rnd 6 chains. Each side must have 23 sts between corner rings.
- Panel too short: The joins are too tight. Redo them with a larger hook.
- Border flares: Check that no sts went into the seam corner sps on Rnd 1.
Care
Hand wash in cool water and dry flat, re-pinning lightly to shape. Don’t put it in a dryer, and turn the panel around now and then so the gray fades less in the sun.
Final Notes
Here is the measurement chain. Each snowflake reaches 4.5 in (11.4 cm). Its frame squares it to 5 in (12.7 cm) with 25 sc per side. 7 x 15 motifs give 35 x 75 in (88.9 x 190.5 cm), and the border adds about 0.5 in (1.3 cm) per side for a finished panel of 36 x 76 in (91.4 x 193.0 cm). If you check each step as you go, the whole curtain will hang straight and even.
Happy crocheting!