

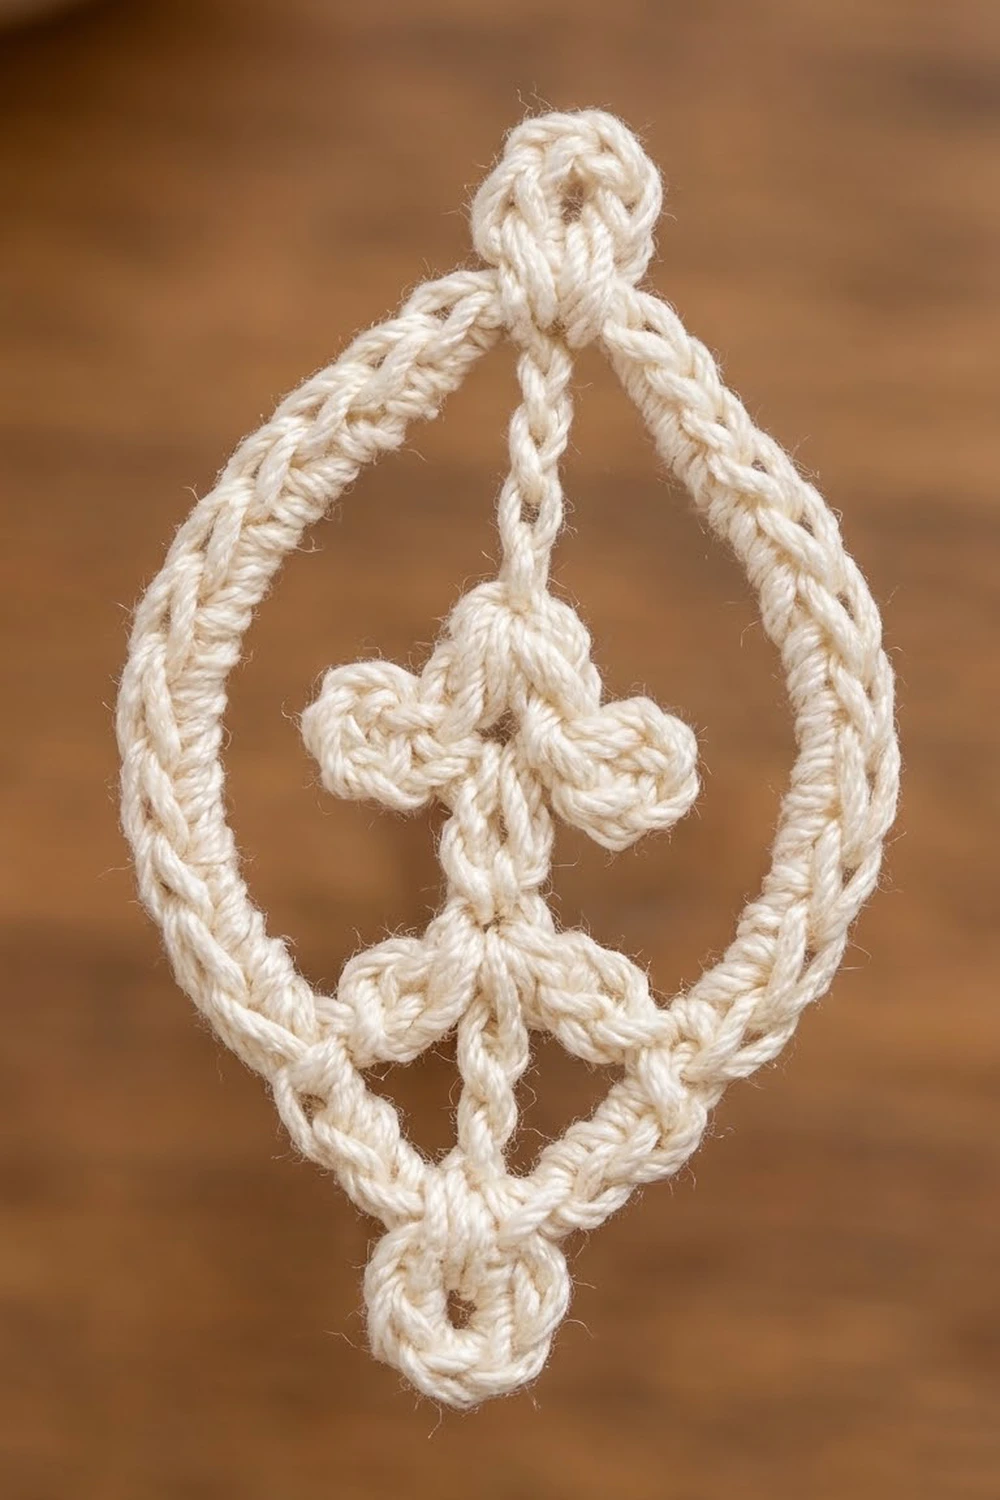
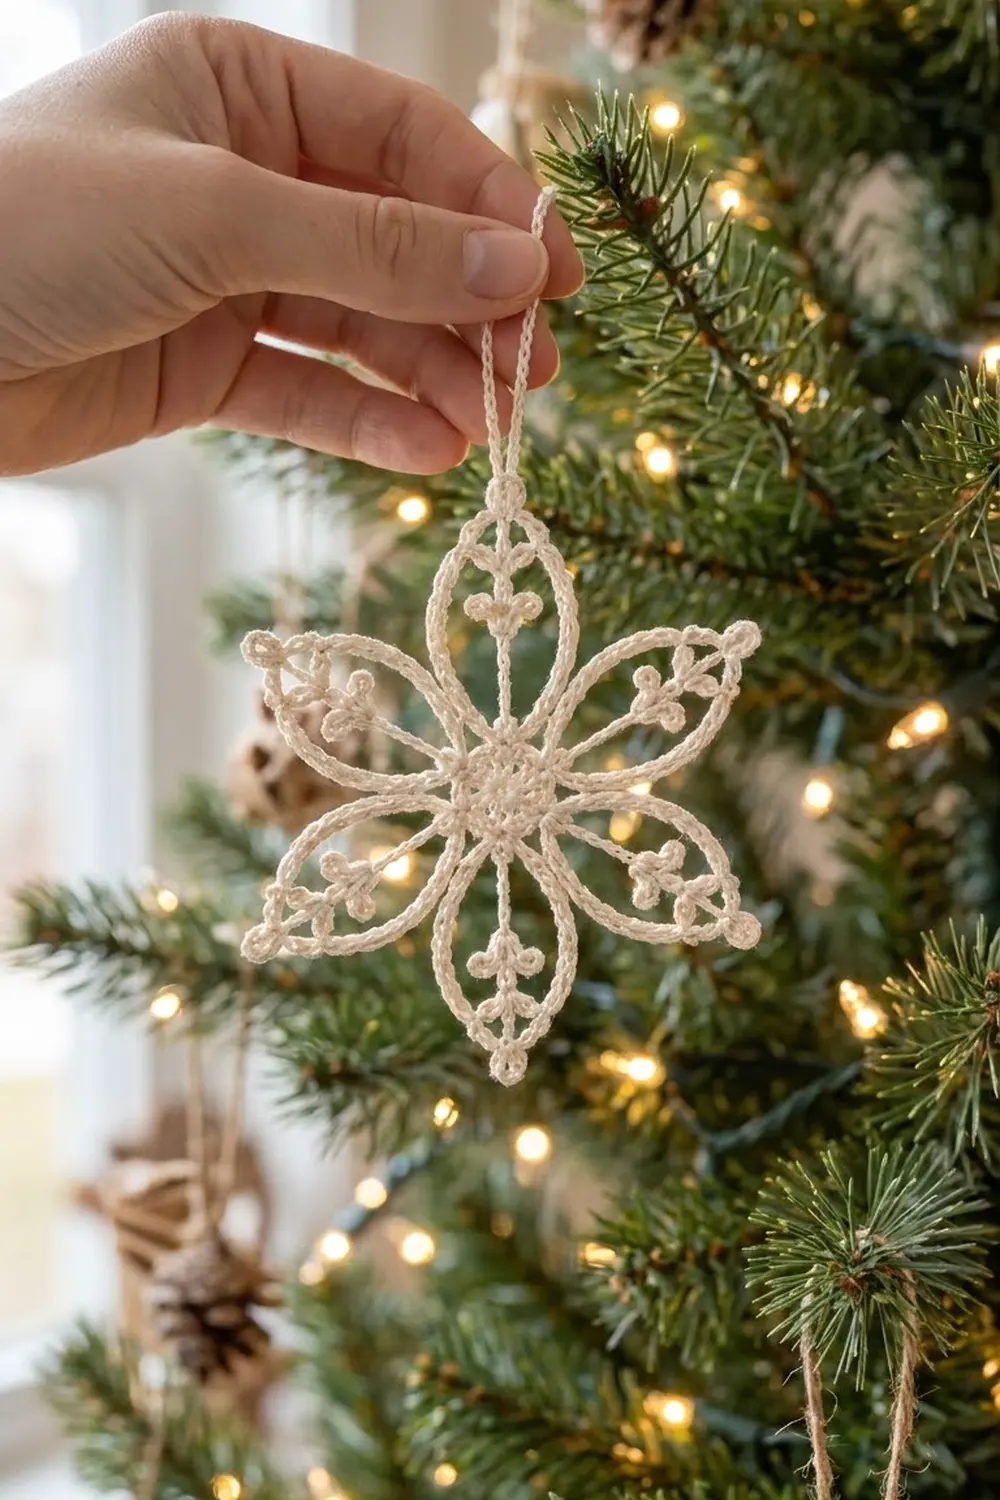
The Frost Lily Snowflake is a light, airy ornament with six open petals arranged like a star. Each petal has a smooth, raised outline, and a thin chain spoke runs up its middle, decorated with a three-picot trefoil and a single picot knot. The piece is open and lacy, but the corded edges keep it holding its shape.
The sample uses one color, a soft cream cotton thread that looks good against green branches and warm lights. It works well for heirloom-style decorations, gift toppers, or a matching set of ornaments. This pattern uses US crochet terms throughout.
The finished snowflake is about 4 in (10.2 cm) from one petal tip to the opposite tip. The hanging loop adds about 1.75 in (4.4 cm) above the top petal.
Construction overview: you work a small solid center in the round, then chain six long petal loops. Next you add a chain spoke inside each petal and anchor it at the tip. Finally you cover every petal loop with single crochet to make the corded edge. The ornament is one piece, with no sewing and no joining.
Finished Size and Construction
- Finished size: 4 in (10.2 cm) point to point
- Skill level: Intermediate (thread work, picots, working into chains)
- Terminology: US crochet terms
- Yarn weight: Size 10 cotton crochet thread (Lace, weight 0)
- Hook: 1.75 mm (US steel 4)
- Number of pieces: 1
- Layout: Single six-petal motif, petals spaced evenly around the center
- Center size: 0.75 in (1.9 cm) across after Round 2
- Size before border: 3.75 in (9.5 cm) point to point after Round 4
- Border depth: 0.125 in (0.3 cm) on each side (Round 5 corded edge)
Materials
Thread: Use mercerized cotton crochet thread in size 10. Mercerized cotton has a slight sheen, shows the picots clearly, and holds starch well. Avoid fuzzy or acrylic threads, because they blur the fine detail and don’t block crisply.
- Cream / ivory: 3 g, about 25 m (27 yd)
This amount includes a generous margin for your gauge swatch, weaving in ends, and the hanging loop. One finished ornament uses roughly 2 g.
Tools:
- 1.75 mm (US steel 4) crochet hook
- Fine tapestry needle or sewing needle with a large eye
- Small sharp scissors
- Blocking board or foam mat
- Rust-proof pins
- Fabric stiffener, liquid starch, or a 1:1 mix of white glue and water
- Ruler or tape measure
Abbreviations (US Terms)
- ch – chain
- sl st – slip stitch
- sc – single crochet
- dc – double crochet
- st(s) – stitch(es)
- sk – skip
- sp – space
- picot – ch 3, sl st in 3rd ch from hook
- ( ) – work everything inside the parentheses in the same stitch or space
Special stitch: Trefoil
Work a trefoil at the end of a chain section. The last chain made before you start the trefoil is the base ch.
- Ch 3, sl st in the base ch (first picot).
- Ch 4, sl st in the same base ch (center picot, slightly taller).
- Ch 3, sl st in the same base ch (third picot).
This makes three small loops fanned out around one point, like a tiny fleur.
Gauge and Checkpoints
Gauge: 10 sc = 1 in (2.5 cm) when worked into a foundation chain.
Gauge matters here because the spokes must reach exactly to the petal tips. Work one test ornament through Round 3 before you commit to a full set.
Checkpoints:
- After Round 1: the center measures 0.5 in (1.3 cm) across.
- After Round 2: the center measures 0.75 in (1.9 cm) across.
- After Round 4: lay the piece flat without stretching it. The ornament measures 3.75 in (9.5 cm) from tip to opposite tip, and each spoke lies straight without pulling the tip inward.
- After Round 5: the ornament measures 4 in (10.2 cm) from tip to opposite tip. Each petal side measures about 1.7 in (4.3 cm) along its curve.
If your piece is too big: change to a 1.5 mm hook. If it is still large, chain 31 instead of 33 for each petal loop in Round 3, then work 15 sc on each side before the tip in Round 5.
If your piece is too small: change to a 2.0 mm hook. Don’t add chains to the petals until you have tried the larger hook, because longer loops tend to flop.
Pattern
Center
Round 1: Make a magic ring. Ch 3 (counts as first dc), work 11 dc into the ring. Join with sl st to the top of the beginning ch-3. Pull the ring closed tightly. (12 dc)
Round 2: Ch 1 (does not count as a stitch), 2 sc in each st around. Join with sl st to the first sc. (24 sc)
Checkpoint: the center is 0.75 in (1.9 cm) across and lies flat. If it ruffles, your Round 1 ring is too loose. Pull the tail again before you go on.
Number the Round 2 stitches 1 to 24 in your head, starting with the first sc. The petals start from sts 1, 5, 9, 13, 17, and 21. The spokes start from sts 3, 7, 11, 15, 19, and 23, which sit exactly in the middle of each petal.
Petal Frames
Round 3: Ch 1. Sc in the next st, ch 33, sk next 3 sts. Repeat from * to * 5 more times. Join with sl st to the first sc. (6 sc and 6 ch-33 loops)
Each loop starts at one sc and ends next to the sc that starts the following petal. This makes the petals touch at the center the way they do in the photo. Don’t twist the chains. Let each loop lie flat as a long, narrow oval.
Locate the tip of each loop now: it is the 17th ch of the 33. You have 16 ch on one side, the tip ch, and 16 ch on the other side. Place a removable marker or a scrap of contrasting thread in each tip ch.
Spokes
Round 4: Sl st in the next 2 sts of Round 2 to reach st 3, the middle of the first petal’s skipped stitches.
Work one spoke: ch 8, Trefoil (the 8th ch is the base ch), ch 6, picot, ch 3. Sl st into the back bump of the marked tip ch of the petal loop directly above you.
Return down the spoke: sl st into each ch of the spoke back toward the center, working only into the spoke chains and skipping over the trefoil and picot loops. Sl st into the base st of Round 2 where the spoke started.
Move to the next petal: sl st in the next 4 sts of Round 2 to reach the middle st of the next petal.
Repeat the spoke and the return 5 more times, for 6 spokes in total.
After the 6th spoke, you are on st 23. Don’t work the 4 moving sl sts. Instead, sl st in the next 2 sts (st 24 and st 1). You finish at the Round 3 sc that starts the first petal. (6 spokes, each with 1 trefoil and 1 picot)
Spoke length check: each spoke has 17 chains plus its clusters, which reaches about 1.5 in (3.8 cm) from the center ring to the tip. If a spoke pulls the tip inward, work ch 4 instead of ch 3 before you anchor it. If the spoke sags, work ch 2.
Checkpoint: lay the piece flat. It measures 3.75 in (9.5 cm) from tip to opposite tip. The trefoil sits a little past the halfway point of each petal, and the single picot sits just below the tip.
Border: Corded Petal Edge
This round covers each petal loop with single crochet. It creates the thick, raised outline and the tiny tip picot.
Border gauge: 10 sc = 1 in (2.5 cm). This is the same as the main gauge, because you are working into a chain.
Round 5: Sl st into the Round 3 sc (if you aren’t already there). Ch 1.
For each petal:
- Sc in each of the first 16 ch of the loop. (16 sc)
- In the tip ch, work (sc, ch 3, sc). (2 sc + 1 ch-3 tip picot)
- Sc in each of the last 16 ch. (16 sc)
- Sl st in the next Round 3 sc.
Work each sc into the top loop of the chain, on the outer edge of the loop, so the stitches roll outward like a cord. The spoke’s sl st sits in the back bump of the tip ch, so the top loop is still free for your border stitches.
Repeat for all 6 petals. Join with sl st to the first sl st. Don’t fasten off yet if you plan to add the hanging loop from this point. Otherwise, fasten off with an 8 in (20.3 cm) tail.
Count per petal: 33 sc (one worked into each existing chain) + 1 extra sc (the second sc in the tip ch) = 34 sc, plus 1 ch-3 tip picot.
Count per side: 17 sc. That is 16 sc along the side plus the 1 sc on that side of the tip ch. These 17 sc already include the tip stitch, so don’t count it again.
Round total: 6 petals × 34 sc = 204 sc, 6 ch-3 tip picots, and 6 sl sts between petals.
Why the math works: The 33-ch loop is symmetrical, with 16 ch, 1 tip ch, and 16 ch. Putting 2 sc into the tip ch splits the tip evenly, so each side gets exactly 17 sc. At 10 sc per inch, each side is 1.7 in (4.3 cm) along its curve. This is a little longer than the straight petal length, so the petal relaxes into a gentle oval. The covering adds 0.125 in (0.3 cm) at each outer edge, which brings the piece from 3.75 in (9.5 cm) to 4 in (10.2 cm) point to point.
Hanging Loop
Join the thread with a sl st in the ch-3 tip picot of any petal. That petal is now the top. Ch 40, then sl st in the same tip picot. Fasten off.
The loop hangs about 1.75 in (4.4 cm) above the top tip. For a longer loop, add 12 ch for every extra 0.5 in (1.3 cm) of hanging length.
Final Blocking
- Weave in all ends along the back of the border sc. Don’t trim them yet.
- Soak the ornament in stiffener or starch until it is fully saturated. Gently press out the excess between two layers of towel.
- Pin the center ring flat in the middle of your board.
- Pin each tip picot so opposite tips are 4 in (10.2 cm) apart. Check all three pairs of opposite tips.
- Check that the petals are 60 degrees apart. A quick way is to draw a 4 in (10.2 cm) circle and mark six evenly spaced points on it before you pin.
- Pin each spoke straight, and fan the three trefoil picots open with a pin tip.
- Shape each petal outline into a smooth oval, adding pins at the widest point if needed.
- Pin the hanging loop out straight.
- Let it dry completely, at least 12 hours, then unpin it and trim the ends close.
Final Quality-Control Checklist
- The center has 12 dc and 24 sc, and it lies flat.
- There are 6 petals, each with 34 sc and 1 tip picot.
- Each petal side has exactly 17 sc.
- There are 6 spokes, each with 1 trefoil and 1 picot.
- Each spoke is anchored to its petal tip and runs straight down the middle of the petal.
- The ornament is 4 in (10.2 cm) point to point on all three axes.
- The hanging loop is secure and about 1.75 in (4.4 cm) long.
- No ends are visible from the front.
Troubleshooting
Petals twist or flip over: a chain in Round 3 was twisted. Undo that loop and make sure the chain lies flat before you join it.
The spoke pulls the tip in: the spoke is too short. Add 1 ch before the anchor, or loosen your chains.
The spoke sags or zigzags: the spoke is too long. Remove 1 ch before the anchor.
The border ruffles: your sc are too loose compared with the chain. Change down a hook size for Round 5 only.
The border cups the petal inward: you skipped chains. Recount for 16 sc on each side of the tip.
The trefoil picots collapse: they need firmer starch. Re-wet them, fan them open with a pin, and let them dry again.
Uneven petal lengths: count each loop to 33 ch before you join it. The rest of the pattern depends on that count.
Care
To clean, hand wash gently in cool water with mild soap, re-block, and re-stiffen as needed. Store flat in tissue paper so the petals and picots don’t get crushed.
Final Notes
The measurement chain is simple. The 12-dc ring grows to a 0.75 in (1.9 cm) center with 24 sc. Six 33-ch loops and 6 spokes take the piece to 3.75 in (9.5 cm). The 204-sc corded border adds 0.125 in (0.3 cm) at each edge, for a finished 4 in (10.2 cm) snowflake with a 1.75 in (4.4 cm) hanging loop. If you check your gauge at the center, the rest falls into place. One ornament makes a lovely gift, and a handful makes a full winter tree.
Happy crocheting!