

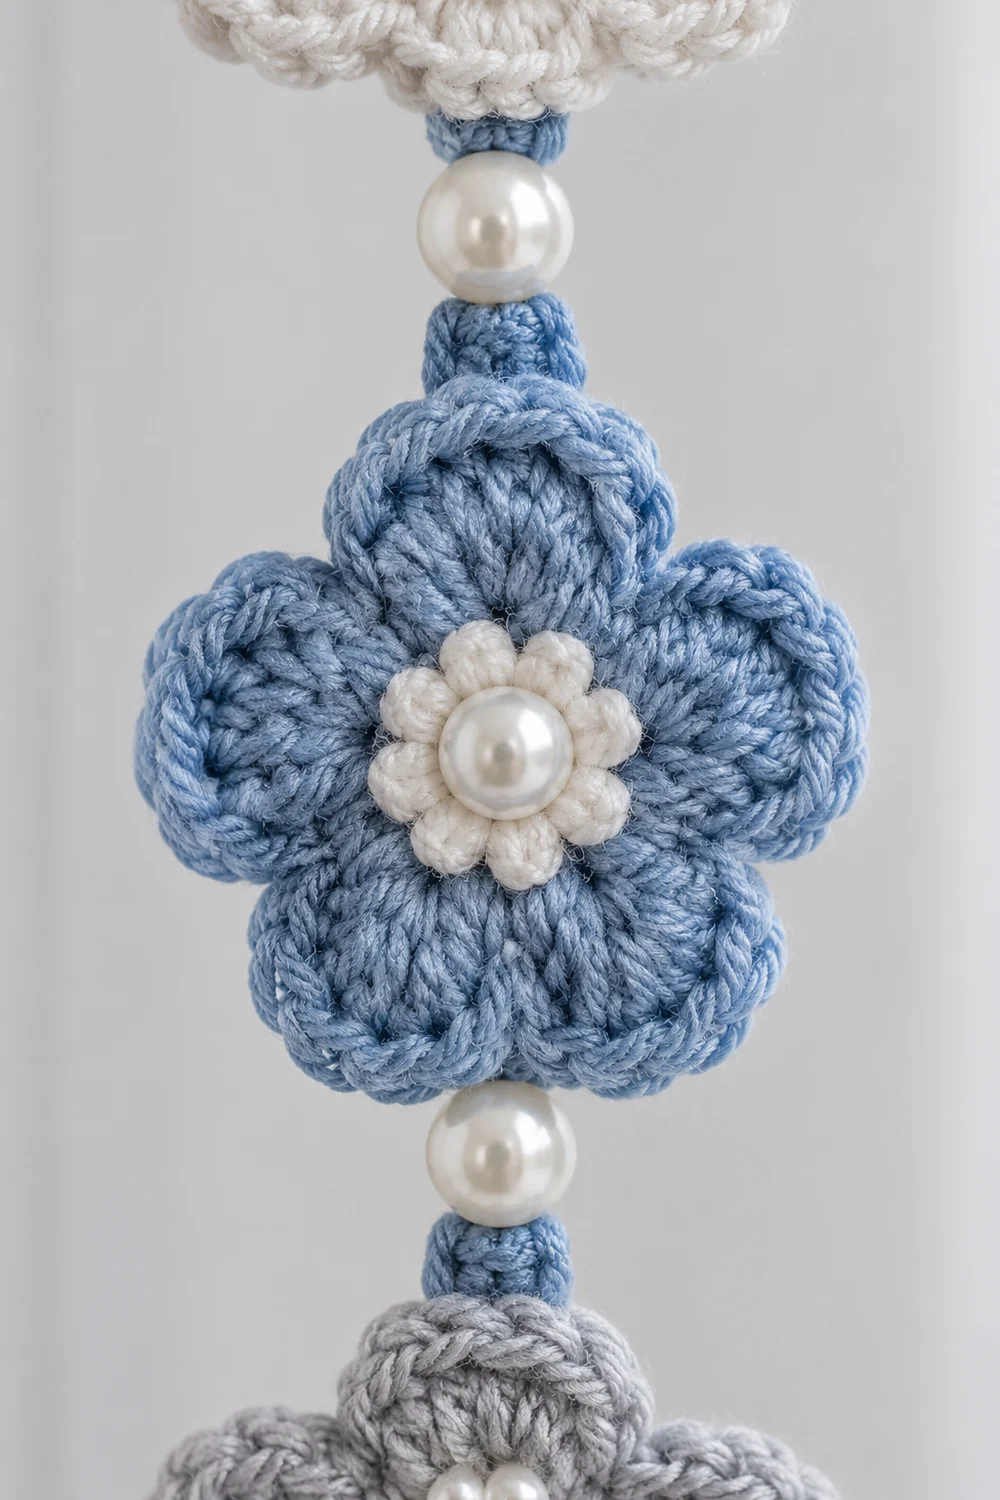
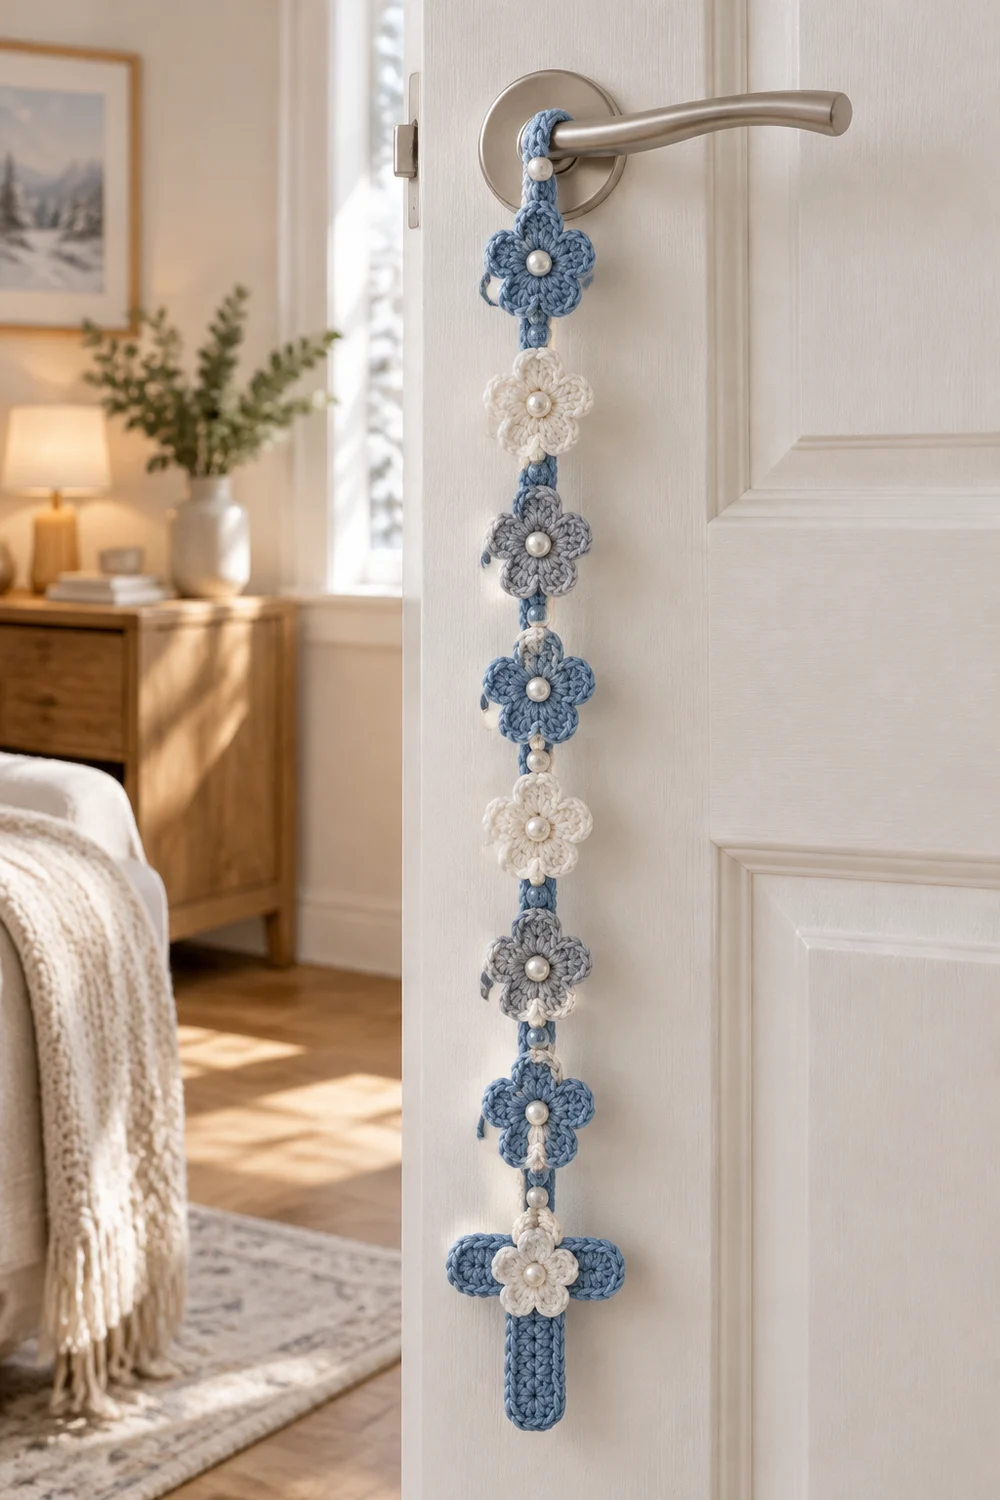
This door hanger is a single vertical strand of small crochet flowers. Each flower is a flat, five-petaled daisy with a small pearl at its center. The flowers alternate dusty blue, cream, and light gray, and small rectangular dusty blue spacers link them into an evenly spaced, chain-like column.
The style is soft and wintry, and it suits a door or window handle in the holiday season. The strand hangs straight down over the handle, with every flower facing forward and none of them twisted or folded.
This pattern uses US crochet terms. The finished strand is 27.65 in (70.2 cm) long and 2.5 in (6.4 cm) wide at the flowers.
You make 9 flowers and 9 spacer cores, sew the pearls on, and join everything into one column. A single sc border round is then worked around each spacer. This border neatens the spacers and hides the seams.
Finished Size and Construction
- Finished size: 27.65 in (70.2 cm) long x 2.5 in (6.4 cm) wide
- Skill level: Easy/Intermediate
- Terminology: US crochet terms
- Yarn weight: DK (#3, light) cotton
- Hook: 3.5 mm (E-4)
- Number of pieces: 18 (9 flowers + 9 spacers)
- Layout: single vertical strand, spacer at top, then flower, spacer, flower, ending with a flower
- Piece size: flower 2.5 in (6.4 cm) across, 2.25 in (5.7 cm) from top petal tip to bottom valley. Spacer core 0.4 x 0.8 in (1.0 x 2.0 cm). Bordered spacer 0.8 x 1.2 in (2.0 x 3.0 cm).
- Size before border: 27.45 in (69.7 cm) long
- Border depth: 0.2 in (0.5 cm) per side, 1 round of sc on each spacer
Materials
Choose a smooth, mercerized DK cotton. It holds crisp petal shapes and shows stitch definition well. Use one yarn line for all three colors so that every flower comes out the same size.
Yarn (DK cotton, about 2.3 m per gram):
– Dusty blue: 20 g (about 46 m) for 3 flowers and 9 spacers
– Cream: 15 g (about 35 m) for 3 flowers
– Light gray: 15 g (about 35 m) for 3 flowers
Quantities include a margin of about 40% for tails, swatching, and frogging.
Tools:
– 3.5 mm (E-4) crochet hook
– 9 pearl beads, 8 mm, with holes
– Sewing needle and white sewing thread
– Tapestry needle
– Scissors
– Rust-proof pins and a blocking mat
– Ruler or tape measure
– Spray bottle
Abbreviations (US Terms)
- ch – chain
- sl st – slip stitch
- sc – single crochet
- hdc – half double crochet
- dc – double crochet
- st(s) – stitch(es)
- MR – magic ring
- rnd – round
- FLO / BLO – front loop only / back loop only
Special stitch – Petal: Work this over 4 stitches.
1. Sl st in the next st.
2. Work (hdc, 2 dc) in the next st.
3. Work (2 dc, hdc) in the next st.
4. Sl st in the next st.
Each petal uses 4 stitches of the previous round and contains 8 stitches. The petal tip is the gap between the 2nd and 3rd dc.
Gauge and Checkpoints
Gauge: 5 sc and 5 sc rows = 1 in (2.5 cm) with a 3.5 mm hook.
Test one piece first. Make one flower and one spacer core, then measure them before you continue.
Flower checkpoints (measured flat):
– After Rnd 1: 0.6 in (1.5 cm) across
– After Rnd 2: 1.25 in (3.2 cm) across
– After Rnd 3: 2.5 in (6.4 cm) across tips, and 2.25 in (5.7 cm) from top tip to opposite valley
Spacer core checkpoint: 0.4 in (1.0 cm) wide x 0.8 in (2.0 cm) long
If your pieces are too big: go down to a 3.25 mm hook. Also check that you are not loosening up on the dc.
If your pieces are too small: go up to a 3.75 mm hook.
Size errors multiply. Nine flowers that are each 0.1 in (0.3 cm) too tall add 0.9 in to the strand. Fix the gauge now, before you make all the pieces.
Flower (make 9)
Leave a 6 in (15.2 cm) starting tail.
Rnd 1: MR, ch 1, 10 sc in ring. Pull the ring tight and sl st to the first sc. (10 sc)
Rnd 2: Ch 1, 2 sc in each st around. Sl st to the first sc. (20 sc)
This is a growth round. Each of the 10 stitches becomes 2, so the round’s own total is 20.
Rnd 3: Work 1 Petal over each set of 4 sts, 5 times. Sl st into the first sl st. (5 petals, 40 sts)
This is a shaping round, not a growth round in the usual sense. The 20 stitches of Rnd 2 are split into 5 groups of 4 (5 x 4 = 20). Each group becomes one petal of 8 stitches, so the total is 5 x 8 = 40.
Between petals, two sl sts sit side by side and form the valley.
Fasten off and weave in the ends on the back. Keep the center ring closed tight.
Pearl center: Sew one 8 mm pearl over the closed magic ring with doubled sewing thread. Pass through the bead three times and knot on the back. The pearl should sit snugly with no wobble.
The flower should lie completely flat. It has five rounded, evenly spaced petals.
Spacer (make 9)
The spacers are small rectangles worked in rows. Make only the core now. The border is added after joining.
Leave an 8 in (20.3 cm) starting tail.
Ch 3.
Row 1: Sc in the 2nd ch from the hook and in the next ch. (2 sc)
Rows 2–4: Ch 1, turn, sc in each st. (2 sc)
Fasten off and leave an 8 in (20.3 cm) tail.
You now have a core 2 sts wide and 4 rows long, measuring 0.4 x 0.8 in (1.0 x 2.0 cm).
The foundation-chain end is the bottom of the spacer and the Row 4 end is the top. Keep both tails, because you will use them for sewing.
Make All Pieces
Quantities per color:
– Dusty blue: 3 flowers + 9 spacers
– Cream: 3 flowers
– Light gray: 3 flowers
Layout, top to bottom:
TOP:        SPACER (BLUE)
POSITION 1: FLOWER BLUE   + SPACER
POSITION 2: FLOWER CREAM  + SPACER
POSITION 3: FLOWER GRAY   + SPACER
POSITION 4: FLOWER BLUE   + SPACER
POSITION 5: FLOWER CREAM  + SPACER
POSITION 6: FLOWER GRAY   + SPACER
POSITION 7: FLOWER BLUE   + SPACER
POSITION 8: FLOWER CREAM  + SPACER
POSITION 9: FLOWER GRAY   (bottom, free)
That gives 9 flowers and 9 spacers. There is 1 spacer at the top and 8 between flowers.
Lay all pieces out on a flat surface in this order, right sides up, before joining.
Joining
Method: Whipstitch with the spacer tails. Use a tapestry needle and dusty blue yarn.
Flower orientation: Turn each flower so one petal points straight up.
– The top joining point is that petal’s tip.
– The bottom joining point is the valley directly opposite, between the 3rd and 4th petals counting clockwise from the top.
Stitch-to-stitch logic:
– Spacer bottom (foundation end) to the flower below. Sew through the back loops of the 2 foundation chains, then through the petal tip. That is the 2nd and 3rd dc of the top petal, which are the 2 stitches on either side of the tip. This makes 2 spacer sts to 2 petal sts.
– Spacer top (Row 4 end) to the flower above. Sew through the BLO of the 2 Row 4 sts, then through the 2 sl sts of the bottom valley. This also makes 2 spacer sts to 2 flower sts.
– Top spacer. Join only its foundation end to Flower 1. Leave its Row 4 end free.
Sewing through back loops leaves the front loops free. The border round is worked into those front loops.
Tension: Pull each whipstitch just snug so that the edges butt together without overlapping. Do not pucker the petal tip. Pass through each pair of stitches twice, then knot on the back and weave the tail into the spacer.
Size checkpoint before border:
– 9 flowers x 2.25 in = 20.25 in (51.4 cm)
– 9 spacer cores x 0.8 in = 7.2 in (18.3 cm)
– Total: 27.45 in (69.7 cm)
Hang the strand and measure it. If it is more than 0.5 in (1.3 cm) off, check whether the seams are overlapping or gapping.
Border
The border is a single round of sc worked around each spacer. It turns each narrow core into a neat rectangle and covers the seams.
Border gauge: The border uses the same gauge as the pieces, 5 sc per inch (2.5 cm). It is not worked tighter or looser.
Corner rule: Each core stitch at a corner gets 3 sc. The middle sc of those 3 is the corner stitch. It is shared by the two sides it touches and is counted once in each side’s total.
Border Round (each spacer):
1. With dusty blue, join with a sc in the FLO of the first Row 4 st (top right corner). Work 2 more sc in the same st. (corner: 3 sc)
2. Work 3 sc in the FLO of the second Row 4 st. (corner: 3 sc)
3. Work 1 sc in the end of Row 3 and 1 sc in the end of Row 2. (2 sc)
4. Work 3 sc in the free front loop of the first foundation ch. (corner: 3 sc)
5. Work 3 sc in the free front loop of the second foundation ch. (corner: 3 sc)
6. Work 1 sc in the end of Row 2 and 1 sc in the end of Row 3. (2 sc)
7. Sl st to the first sc. Fasten off and weave in the ends.
Round count: (4 corner sts x 3 sc) + (2 long-side row ends x 1 sc x 2 sides) = 12 + 4 = 16 sc
Per side, corners included:
– Short side: corner + 1 + 1 + corner = 4 sc
– Long side: corner + 1 + 2 + 1 + corner = 6 sc
– Check: (2 x 4) + (2 x 6) – 4 shared corners = 16 sc
Why the math works: The sc stitch line sits about 0.1 in (0.3 cm) outside the core. That gives a stitch-line rectangle of 0.6 x 1.0 in, with a perimeter of 3.2 in (8.1 cm). At 5 sc per inch, 3.2 in x 5 = 16 sc, which matches the round exactly. The 3-sc corners keep the rectangle flat and square.
Effect on size:
– Width: Each spacer grows from 0.4 in to 0.8 in (1.0 to 2.0 cm).
– Joined short ends: The border sc lie flat over the seam and the flower edge. They hide the join without adding length.
– Top spacer: Only its free top end adds length, 0.2 in (0.5 cm).
– Finished length: 27.45 in + 0.2 in = 27.65 in (70.2 cm)
Final Blocking
- Lay the strand right side up on a blocking mat in a straight line.
- Pin each flower to 2.5 in (6.4 cm) across, with one pin at each petal tip. Keep the top petal aligned with the strand.
- Pin each spacer flat to 0.8 x 1.2 in (2.0 x 3.0 cm), with a pin at each corner.
- Measure the full length and adjust the pins until it reads 27.65 in (70.2 cm).
- Mist the piece evenly with water until it is damp, not soaked. Avoid soaking the pearls.
- Let it dry completely, usually overnight, before unpinning.
- Hang the strand by draping the top spacer over the door handle. Let it fall straight so all the flowers face forward.
Final Quality-Control Checklist
- 9 flowers alternate blue, cream, gray from top to bottom
- Each flower has exactly 5 even, rounded petals and lies flat
- Each flower measures 2.5 in (6.4 cm) across
- Each pearl is centered and secure
- 9 dusty blue spacers, each 0.8 x 1.2 in (2.0 x 3.0 cm) with 16 border sc
- Every flower is joined at its top petal tip and bottom valley
- No seams are visible from the front
- All ends are woven in on the back
- The strand hangs straight with no twist, at 27.65 in (70.2 cm) long
Troubleshooting
Flower cups into a bowl. Rnd 2 is too tight. Recheck that you worked 20 sc, or loosen your tension slightly.
Flower ruffles. You have extra stitches. Count Rnd 2 again; it should have 20, not 21 or more.
Petals are uneven sizes. You may have skipped or doubled a stitch in Rnd 3. Each petal must use exactly 4 sts.
Strand twists when hung. One flower was joined off-axis. Re-sew it so the top tip and bottom valley line up vertically.
Seams show at the spacer ends. Make sure the border’s short-end sc are worked in the front loops and lie over the joint.
Pearl droops. Add one or two more passes of thread and pull them snug against the fabric.
Strand is too long or too short. Check the flower tip-to-valley height first. That measurement drives most of the total length.
Care
Hand wash in cool water with mild soap. Press out the water in a towel, then reshape and dry the strand flat. Spot cleaning is best, to protect the pearls.
Final Notes
The measurement chain is simple:
- Gauge of 5 sc per inch gives flowers 2.5 in (6.4 cm) across and 2.25 in (5.7 cm) tall on the strand.
- Spacer cores are 0.4 x 0.8 in (1.0 x 2.0 cm).
- Nine of each join into 27.45 in (69.7 cm).
- The 16-sc border widens the spacers to 0.8 in (2.0 cm) and adds 0.2 in (0.5 cm) at the top, for a finished length of 27.65 in (70.2 cm).
If you check the gauge on the first flower, the rest of the strand will follow.
Optional: if you want a shorter hanger for a cabinet knob, simply use fewer flower-and-spacer pairs.
Happy crocheting!