

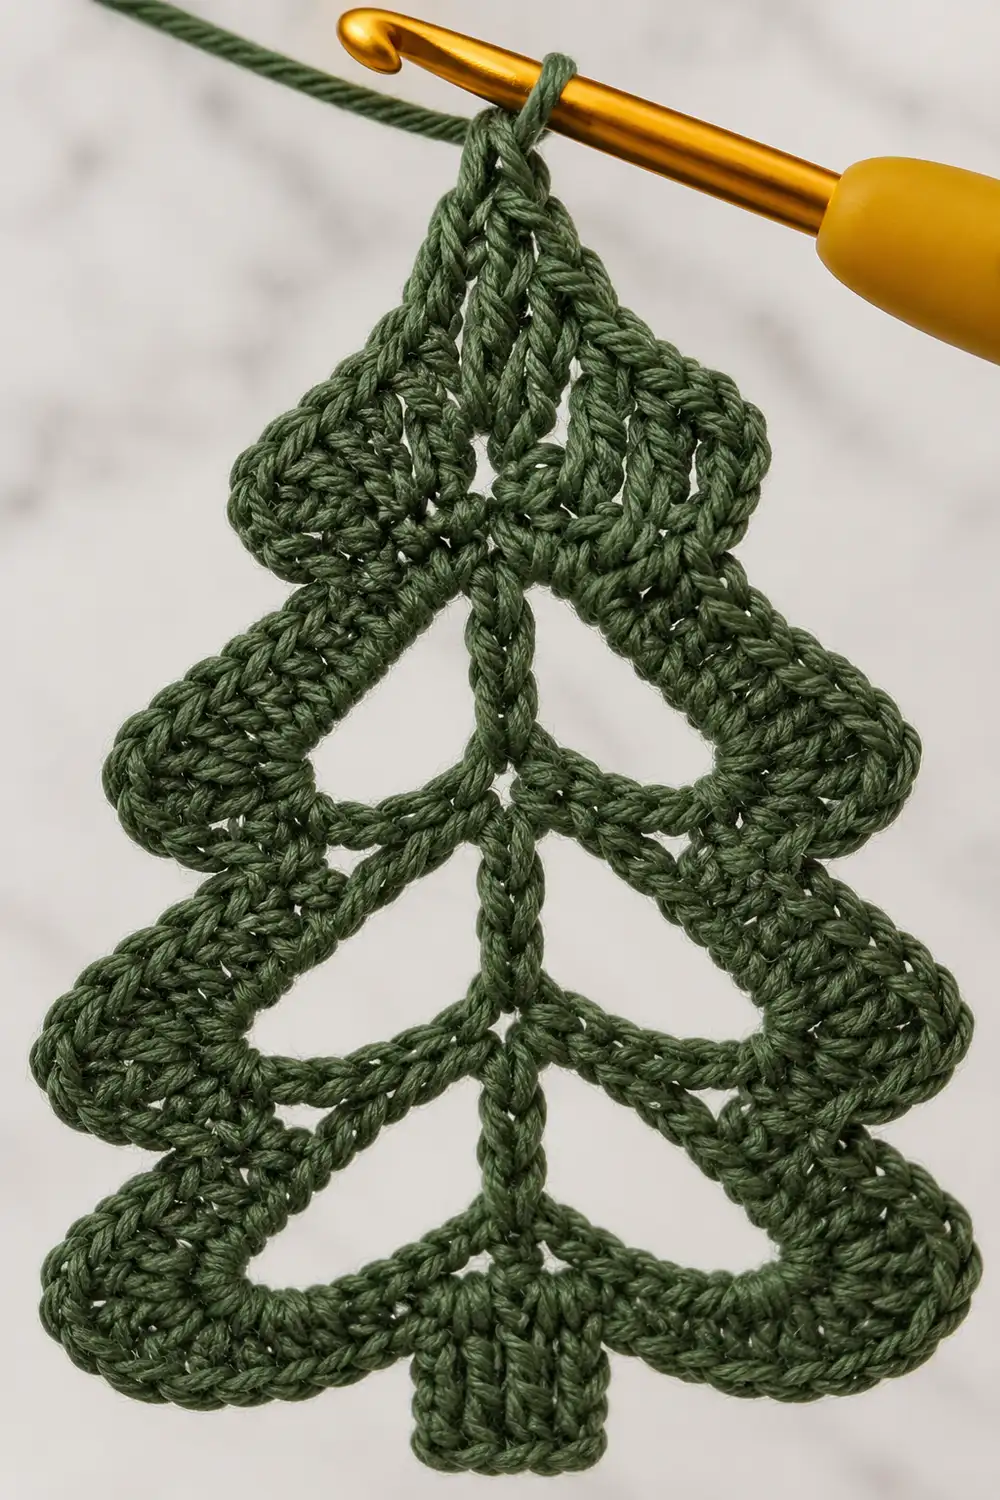
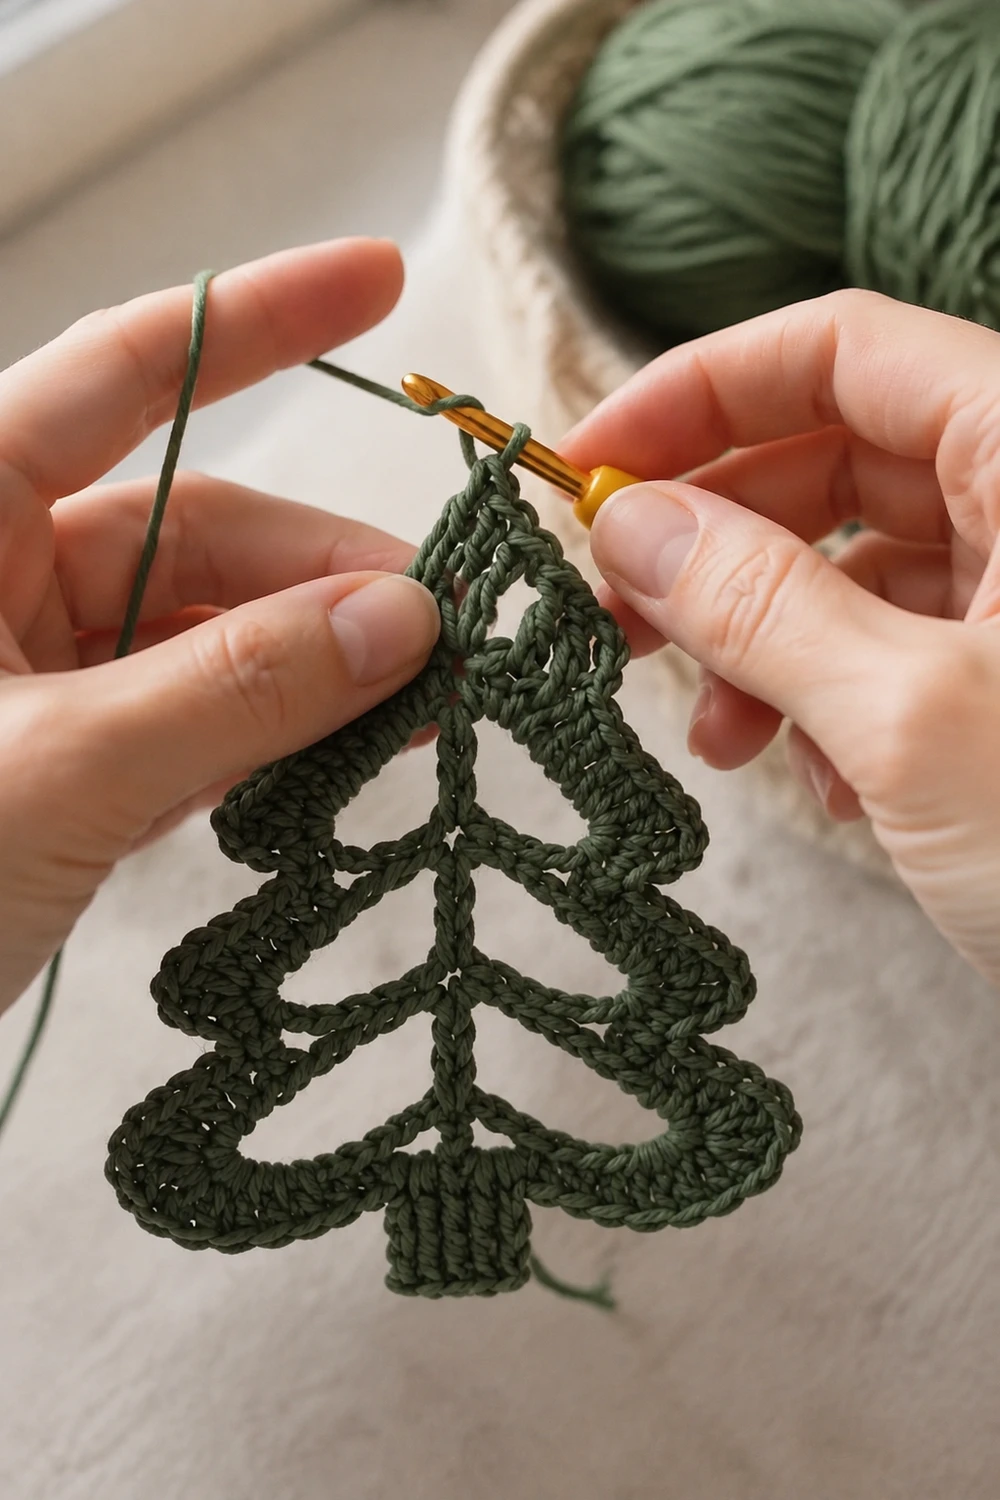
The Sage Lace Pine is a single openwork Christmas tree motif worked in one dark sage green yarn. Three stacked scalloped tiers form a classic triangular tree shape. Each tier is a curved loop with an open space inside, and a small rectangular trunk sits at the base.
The style is lacy and minimal. A thin chain spine runs up the center, short chain branches connect it to the notches between tiers, and a smooth band of single crochet outlines the silhouette. Because it uses only one color, the shape and the open spaces do all the work.
This pattern uses US crochet terms. The finished motif measures 3.75 in (9.5 cm) tall and 3.25 in (8.3 cm) wide at the bottom tier.
Construction overview: you work a tiny trunk in rows, chain a center spine, and build a chain skeleton of arcs and branches down one side and up the other. One outline round of single crochet fills the arcs and forms the scallops. One border round sharpens the tips and notches.
Finished Size and Construction
- Finished size: 3.75 in (9.5 cm) tall x 3.25 in (8.3 cm) wide
- Skill level: Advanced beginner
- Terminology: US crochet terms
- Yarn weight: DK / light worsted (#3), cotton recommended
- Hook: 3.5 mm (E-4)
- Number of pieces: 1
- Layout: Single motif, no joining
- Piece size: Same as finished size
- Size before border: 3.4 in (8.6 cm) tall x 2.9 in (7.4 cm) wide
- Border depth: 1 round, about 0.2 in (0.5 cm)
Materials
Yarn advice: Choose a smooth, mercerized or matte DK cotton. Cotton holds the open loops crisply and blocks into sharp points. Avoid fuzzy or very stretchy yarns, which blur the openwork.
Color:
- Dark sage green: 8 g (about 18 m / 20 yd)
The motif itself uses about 5 g (about 12 m / 13 yd). The quantity above includes a margin for your swatch, tails, and any frogging.
Tools:
- 3.5 mm (E-4) crochet hook
- Tapestry needle
- Scissors
- 3 locking stitch markers
- Blocking mat or folded towel
- Rust-proof pins
- Spray bottle with water
- Ruler or tape measure
Abbreviations (US Terms)
- ch = chain
- sl st = slip stitch
- sc = single crochet
- hdc = half double crochet
- sc2tog = single crochet 2 together
- st(s) = stitch(es)
- RS = right side
Special stitches:
- Tip group: 3 sc worked into the same stitch or chain. It creates a pointed tier tip or corner.
- sc2tog: Insert hook in next st, yarn over, pull up a loop. Insert hook in following st, yarn over, pull up a loop. Yarn over, pull through all 3 loops. Used at inner notches.
- Branch junction: The chain where a branch leaves the outer edge. You skip it in the outline round.
Gauge and Checkpoints
Gauge: 20 sc and 22 rows = 4 in (10.2 cm) in sc worked in rows.
A full 4 in (10.2 cm) swatch is larger than the motif, so work a mini swatch instead. Ch 11, then sc in 2nd ch from hook and across (10 sc). Work 11 rows total. It should measure 2 in (5.1 cm) square.
This is a one-piece project, so your test piece is the motif itself. Measure at every checkpoint before moving on.
Checkpoints:
- Trunk: 0.6 in (1.5 cm) wide x 0.5 in (1.3 cm) tall
- Spine: 2.5 in (6.4 cm) long, held gently straight
- Skeleton: 3.0 in (7.6 cm) tall x 2.5 in (6.4 cm) wide, arcs laid flat
- After outline round: 3.4 in (8.6 cm) x 2.9 in (7.4 cm)
- After border: 3.75 in (9.5 cm) x 3.25 in (8.3 cm)
If too big: Go down one hook size to 3.25 mm (D-3) and restart.
If too small: Go up one hook size to 3.75 mm (F-5) and restart.
Chain tension matters most here. If your arcs are tight, the open spaces shrink even when your sc gauge is correct.
Part 1: Trunk
Ch 5.
Row 1: Hdc in 3rd ch from hook and in next 2 ch. (3 hdc; the beginning ch-2 does not count as a st)
Row 2: Ch 2 (does not count), turn, hdc in each st across. (3 hdc)
Checkpoint: 0.6 in (1.5 cm) wide x 0.5 in (1.3 cm) tall.
The trunk is reversible. Treat the side facing you after the next step as the RS for the rest of the motif.
Move to center: Ch 1, turn, sl st in first 2 hdc. Your hook is now on the center hdc.
Place a marker in the first sl st. This is Corner E. Place a second marker in the unworked third hdc. This is Corner F.
Part 2: Spine
Ch 14. This is the spine. Number the chains from the base: the chain closest to the trunk is ch 1, and the chain on your hook is ch 14 (the tip).
Place a marker in spine ch 5. Note spine ch 10 as well; you can move the marker up later.
- Spine ch 5 = lower branch anchor
- Spine ch 10 = upper branch anchor
- Spine ch 14 = tree tip
Checkpoint: about 2.5 in (6.4 cm) long.
Part 3: First Side (Working Down from the Tip)
Work these steps without turning, continuing from the top of the spine.
Arc 1 (top tier): Ch 8.
Upper branch: Ch 3, sl st in spine ch 10. Sl st in each of the 3 branch chains, back toward the arc. Your hook is now at the branch junction.
Arc 2 (middle tier): Ch 10.
Lower branch: Ch 3, sl st in spine ch 5. Sl st in each of the 3 branch chains back. You are at the next branch junction.
Arc 3 (bottom tier): Ch 12, sl st in the marked sl st at Corner E.
Fasten off, leaving a short tail.
Part 4: Second Side (Working Up to the Tip)
Join yarn with a sl st in the marked hdc at Corner F.
Arc 3 (bottom tier): Ch 12.
Lower branch: Ch 3, sl st in spine ch 5 (the same chain used on the first side). Sl st in each of the 3 branch chains back.
Arc 2 (middle tier): Ch 10.
Upper branch: Ch 3, sl st in spine ch 10. Sl st in each of the 3 branch chains back.
Arc 1 (top tier): Ch 8, sl st in spine ch 14 (the tip). Do not fasten off.
Skeleton check: Per side, you should have arcs of 8, 10, and 12 ch. There are 4 branches of 3 ch each and a 14-ch spine. Lay it flat with the arcs bowed outward into lobes. It should measure 3.0 in (7.6 cm) tall x 2.5 in (6.4 cm) wide.
Part 5: Outline Round
This is a conversion round. You work 1 sc into each arc chain, trunk row end, and foundation loop, and add extra stitches only in the tip groups. Work into each chain under the top loop and back bump. Count the chains of each arc from the end where you start working it.
Ch 1.
- Tip: 3 sc in the tip sl st. (3 sc)
- First side, Arc 1: Sc in ch 1–5, 3 sc in ch 6, sc in ch 7–8. (10 sc)
- Skip the branch junction.
- First side, Arc 2: Sc in ch 1–6, 3 sc in ch 7, sc in ch 8–10. (12 sc)
- Skip the branch junction.
- First side, Arc 3: Sc in ch 1–6, 3 sc in ch 7, sc in ch 8–12. (14 sc)
- Skip the Corner E sl st.
- Trunk side: 2 sc in side of Row 2, 1 sc in side of Row 1. (3 sc)
- Trunk bottom: Working in free loops of the foundation ch, 3 sc in first loop, sc in next loop, 3 sc in last loop. (7 sc)
- Trunk side: 1 sc in side of Row 1, 2 sc in side of Row 2. (3 sc)
- Skip the Corner F sl st.
- Second side, Arc 3: Sc in ch 1–5, 3 sc in ch 6, sc in ch 7–12. (14 sc)
- Skip the branch junction.
- Second side, Arc 2: Sc in ch 1–3, 3 sc in ch 4, sc in ch 5–10. (12 sc)
- Skip the branch junction.
- Second side, Arc 1: Sc in ch 1–2, 3 sc in ch 3, sc in ch 4–8. (10 sc)
Join with a sl st to the first sc.
Round total: 88 sc.
How the count builds: 68 stitches are worked 1 per existing base point. That is 1 tip sl st, 60 arc chains, 4 trunk row ends, and 3 foundation loops. Add 18 extra from 9 tip groups (2 each), plus 2 extra from the doubled trunk row ends. 68 + 18 + 2 = 88.
The tip groups sit off-center on Arcs 1 and 2 on purpose. They place each point near the notch below it, giving the tiers their swept, scalloped look.
Checkpoint: 3.4 in (8.6 cm) tall x 2.9 in (7.4 cm) wide.
Border
Border gauge: The border is worked at the same gauge as the motif, 5 sc per in (20 sc = 4 in / 10.2 cm). Work with the RS facing. Do not turn.
Border Round
Ch 1. For each section below, work sc in each st and 3 sc in the center sc of every tip group.
Each notch is worked as sc2tog over the last st of one section and the first st of the next. There are 6 notches: the 2 branch notches on each side, plus the inner corner where Arc 3 meets the trunk on each side.
Section counts:
- Tip: Sc, 3 sc in center sc, sc. (5 sts)
- First side, Arc 1: (11 sts)
- Notch: sc2tog (1 st)
- First side, Arc 2: (12 sts)
- Notch: sc2tog (1 st)
- First side, Arc 3: (14 sts)
- Corner E inner corner: sc2tog over last Arc 3 st and first trunk-side st (1 st)
- Trunk side: Sc in remaining 2 sts (2 sts)
- Trunk bottom: Sc, 3 sc in center, sc, sc, sc, 3 sc in center, sc (11 sts)
- Trunk side: Sc in next 2 sts (2 sts)
- Corner F inner corner: sc2tog over last trunk-side st and first Arc 3 st (1 st)
- Second side, Arc 3: (14 sts)
- Notch: sc2tog (1 st)
- Second side, Arc 2: (12 sts)
- Notch: sc2tog (1 st)
- Second side, Arc 1: (11 sts)
Join with a sl st to the first sc. Fasten off.
Each side totals 40 sts: 11 + 1 + 12 + 1 + 14 + 1.
Round total: 100 sts. Tip 5 + first side 40 + trunk side 2 + bottom 11 + trunk side 2 + second side 40 = 100.
Why the Math Works
You work into all 88 outline stitches. Each of the 9 tip groups gains 2 stitches, adding 18. Each of the 6 sc2tog notches combines 2 stitches into 1, removing 6. So 88 + 18 − 6 = 100.
Convex points have a larger outer edge, so they need extra stitches to lie flat. Concave notches have a shorter outer edge, so they need fewer. Balancing both keeps the scallops flat with no ruffling or cupping.
Each border round adds about 0.2 in (0.5 cm) per edge. That brings 3.4 in (8.6 cm) to 3.75 in (9.5 cm) tall, and 2.9 in (7.4 cm) to 3.25 in (8.3 cm) wide.
Final Blocking
- Weave in all ends along the outline band, not across the open spaces.
- Lightly mist the motif until damp, not soaked.
- Lay it RS up on your blocking mat.
- Pin the tip first, then the bottom center of the trunk. Check that the spine runs straight between them.
- Pin the six tier tips symmetrically. The bottom tips should span 3.25 in (8.3 cm).
- Pin each notch inward slightly so the branches lie taut and straight.
- Square the trunk corners with one pin each.
- Measure: 3.75 in (9.5 cm) x 3.25 in (8.3 cm). Adjust pins if needed.
- Let it dry completely before unpinning.
Final Quality-Control Checklist
- [ ] Outline round has 88 sc; border round has 100 sts
- [ ] Each side has 3 clearly pointed tier tips
- [ ] 6 notches are visibly indented
- [ ] Spine is straight and centered over the trunk
- [ ] All 4 branches lie flat with no slack
- [ ] Each tier has a clear open space inside
- [ ] Trunk is rectangular with square bottom corners
- [ ] Finished size is 3.75 in (9.5 cm) x 3.25 in (8.3 cm)
- [ ] All ends woven in securely and invisibly
Troubleshooting
Tiers cup or curl: The arc chains are too tight. Rework the skeleton with looser chains, or go up a hook size for the chains only.
Tiers ruffle: The sc are too loose. Tighten your tension in the outline round, or check that you didn’t add extra sc.
Open spaces look small: Loose chains collapse when pulled by the sc. Make every arc chain the same even size.
Tree leans to one side: You likely anchored a branch in the wrong spine chain. Both sides must use spine ch 5 and ch 10.
Notches look blunt: Make sure you skipped the branch junctions in the outline round and worked sc2tog at every notch in the border.
Stitch count off: Recount by section using the lists above. Most errors are a missed tip group or an extra sc at a junction.
Trunk flares: Your hdc are loose. Work the trunk with a 3.25 mm (D-3) hook.
Care
Hand wash in cool water with mild soap, press out the water in a towel, and reshape. Lay flat or re-pin to dry.
Final Notes
The measurement chain keeps this motif predictable:
- Gauge of 20 sc = 4 in (10.2 cm)
- Trunk at 0.6 in (1.5 cm) x 0.5 in (1.3 cm)
- Skeleton at 3.0 in (7.6 cm) x 2.5 in (6.4 cm)
- Outline round of 88 sc at 3.4 in (8.6 cm) x 2.9 in (7.4 cm)
- Border round of 100 sts at 3.75 in (9.5 cm) x 3.25 in (8.3 cm)
If each checkpoint matches, the finished tree will too. Optional: a ch-15 loop sl stitched at the tip turns it into an ornament or gift tag.
Happy crocheting!