

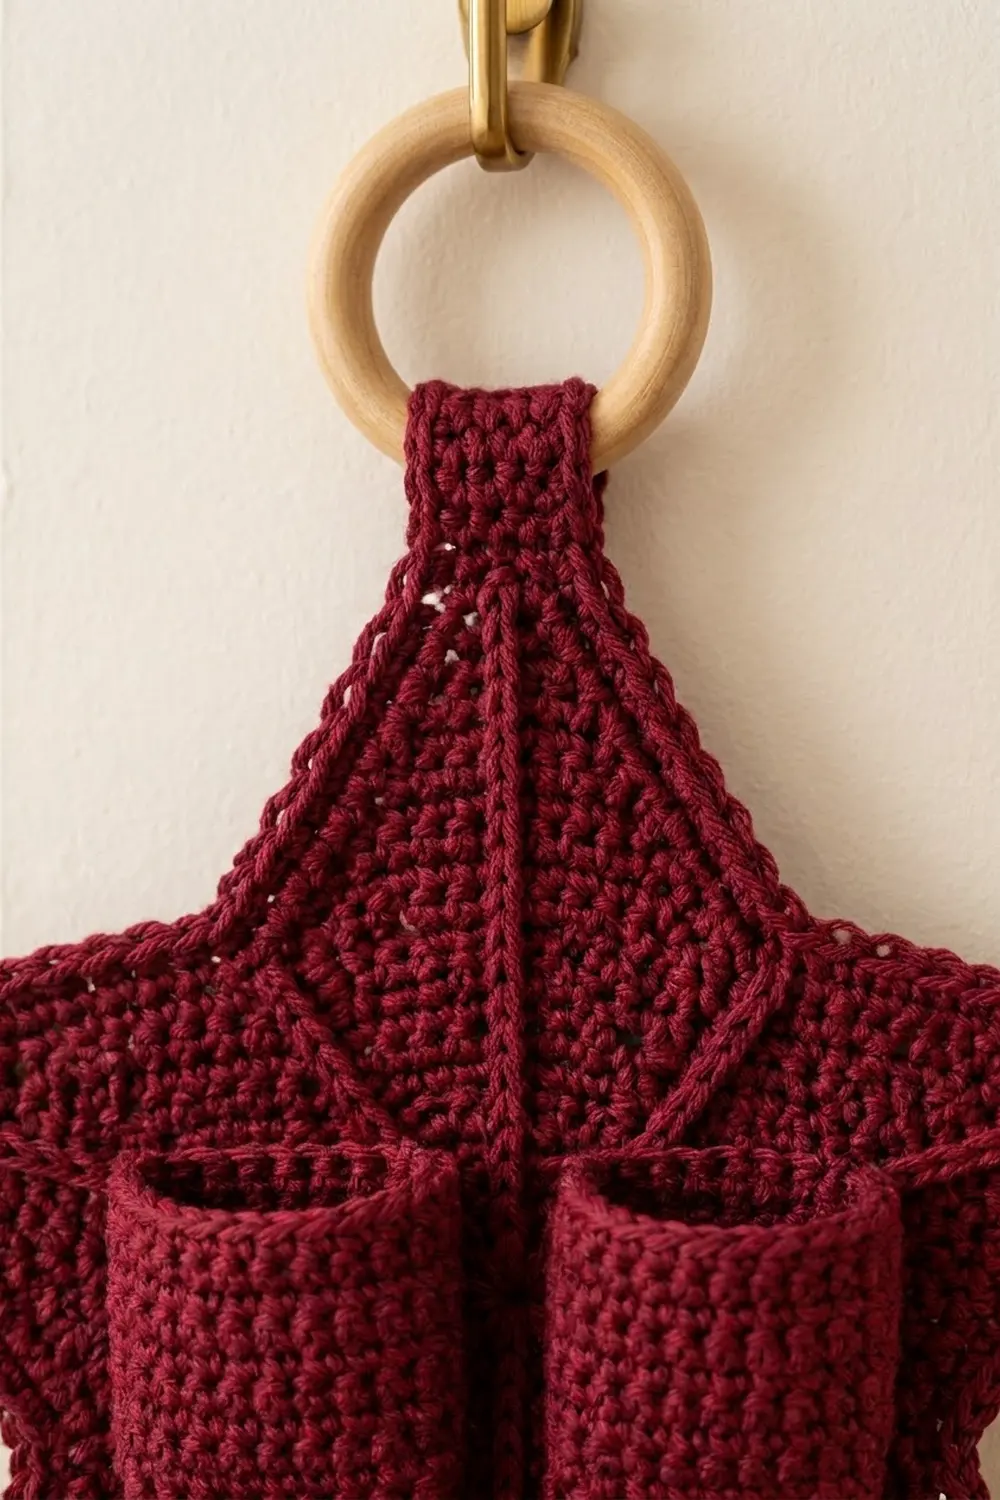
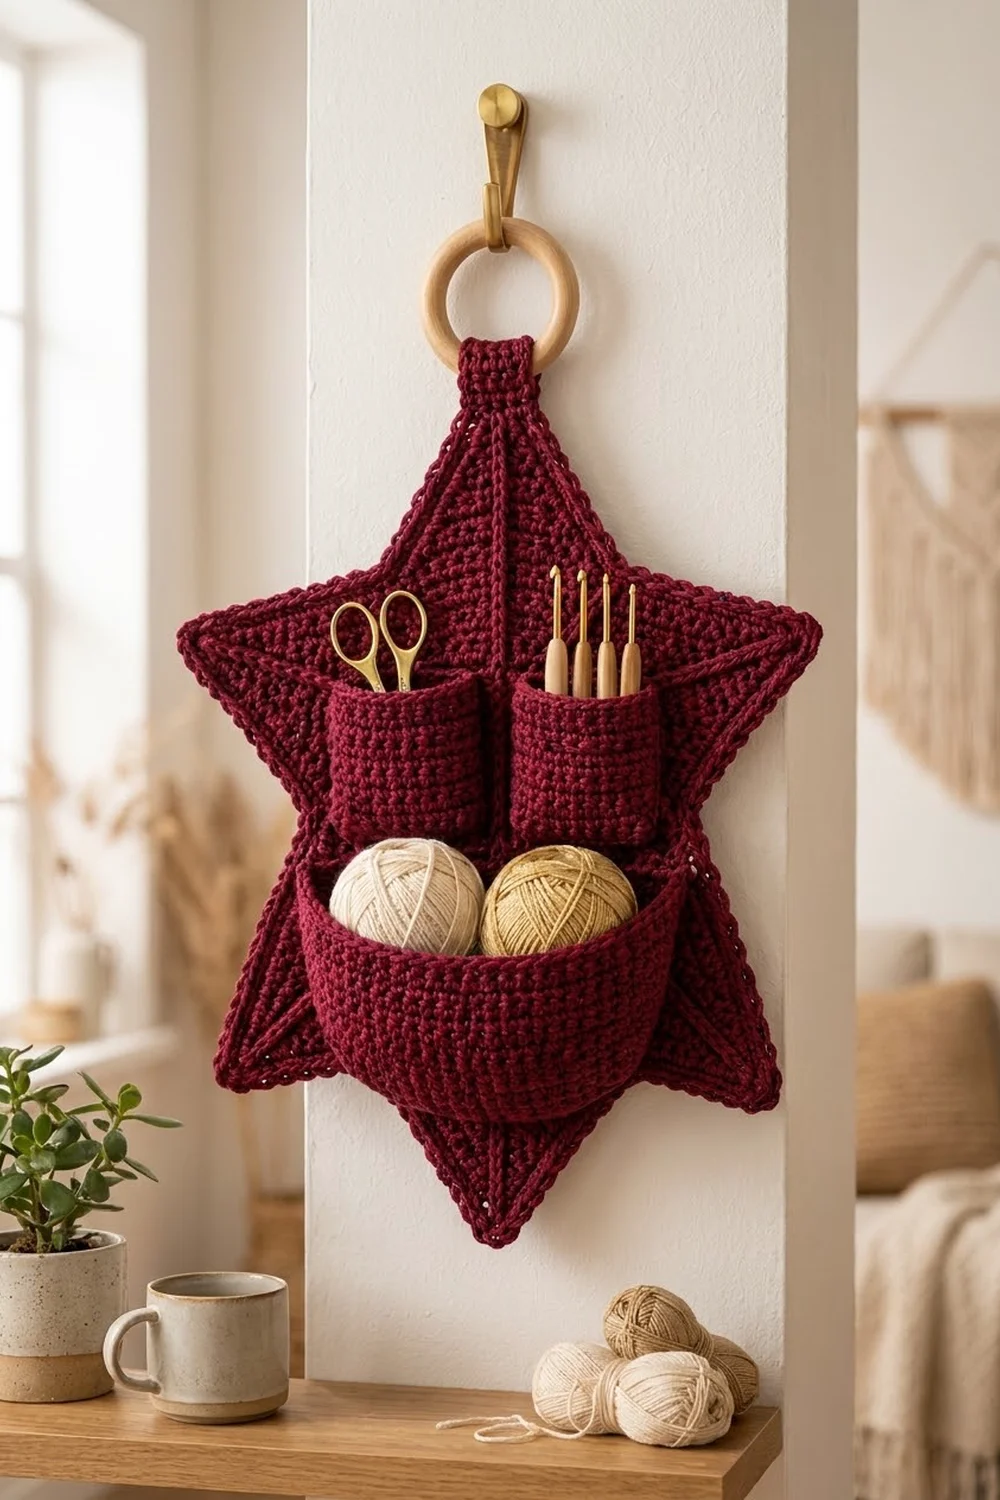
This star organizer is a wall hanging that also stores your tools. A deep wine-red five-pointed star forms the back panel. Ten fine raised lines run out from the center, five to the tips and five to the valleys, and a twisted rope edge frames the outline. On the front are two small cups for scissors and hooks, and below them a wide basket pocket for yarn balls.
The whole piece is one color, a rich burgundy. It’s worked in worsted-weight yarn so the fabric stays firm enough to hold tools. The look is cozy and festive, which suits a holiday craft corner, but it’s useful all year. It hangs from a short tab looped through a wooden ring.
The pattern uses US crochet terms. The finished star measures about 13 in (33.0 cm) wide from side tip to side tip. It’s about 12.25 in (31.1 cm) tall from the top tip to the line across the two lower tips.
Here’s how it’s built:
– Star center: a flat 10-wedge circle in half double crochet.
– Points: five points worked in rows straight off the circle’s edge.
– Border: two rounds that make the rope edge.
– Spokes: surface slip stitches that sharpen the ten lines.
– Pockets: small baskets with oval bases, worked in the round and sewn flat against the star.
– Tab: a short strip, folded through the ring.
Finished Size and Construction
- Finished size: 13 in (33.0 cm) wide x 12.25 in (31.1 cm) tall, not counting the tab and ring
- Skill level: Intermediate
- Terminology: US crochet terms
- Yarn weight: Worsted (#4)
- Hook: 5.0 mm (H-8)
- Number of pieces: 5 (1 star panel, 1 large pocket, 2 small pockets, 1 hanging tab), sewn into one finished organizer
- Layout: Star with one point up; two small pockets side by side above the center; large pocket across the center
- Star size before border: about 12.25 in (31.1 cm) wide x 11.5 in (29.2 cm) tall
- Border depth: about 0.4 in (1.0 cm), 2 rounds
- Large pocket: 7.25 in (18.4 cm) wide x 3 in (7.6 cm) tall
- Small pockets: 3 in (7.6 cm) wide x 2.75 in (7.0 cm) tall each
Materials
Yarn: Pick a smooth worsted-weight yarn that shows stitches clearly, such as acrylic, a cotton-acrylic blend, or a firm wool blend. Avoid fuzzy or very drapey yarn. The spokes and rope edge show best on crisp stitches, and the pockets need some stiffness.
- Burgundy (only color): 110 g, about 220 m
How the yarn splits by piece:
– Star panel and border: about 45 g (90 m)
– Large pocket: about 30 g (60 m)
– Both small pockets: about 20 g (40 m)
– Tab, spokes, and sewing: about 15 g (30 m)
Tools:
- 5.0 mm (H-8) crochet hook
- Tapestry needle
- 10 stitch markers
- Wooden ring, 3 in (7.6 cm) outer diameter
- Straight pins or clips
- Blocking mat and rust-proof pins
- Spray bottle, scissors, and measuring tape
These quantities include a margin of about 25% to cover gauge differences, your gauge test, and weaving in ends.
Abbreviations (US Terms)
- ch – chain
- sl st – slip stitch
- sc – single crochet
- hdc – half double crochet
- sc2tog – single crochet 2 together
- hdc2tog – half double crochet 2 together
- rev sc – reverse single crochet (crab stitch)
- BLO – back loop only
- st(s) – stitch(es)
- RS / WS – right side / wrong side
Special stitches:
- Reverse single crochet (rev sc): Work from left to right (if you’re right-handed). Insert the hook in the next stitch to the right, yarn over, and pull up a loop. Yarn over again and pull through both loops. This makes the twisted rope edge.
- Surface slip stitch: Hold the yarn behind the fabric. Insert the hook from front to back, pull up a loop, then insert at the next point along the line and pull a loop through the fabric and through the loop on the hook.
Gauge and Checkpoints
- Hdc gauge: 14 hdc and 10 rounds or rows = 4 in (10.2 cm)
- Sc gauge: 16 sc and 18 rounds = 4 in (10.2 cm)
Test one piece first: work the star center through Round 4 and measure it before you go on.
Checkpoints:
- After Round 2: 1.6 in (4.1 cm) across
- After Round 4: 3.2 in (8.1 cm) across
- After Round 6: 4.8 in (12.2 cm) across
- After Round 8: 6.4 in (16.3 cm) across, lying flat
- Each point: 3.2 in (8.1 cm) tall, from the circle’s edge to the tip
- Star before border: 12.25 in (31.1 cm) wide
If your piece is too big, go down a hook size, to 4.5 mm. If it’s too small, go up to 5.5 mm.
If the circle cups (curls up into a bowl), your stitches are too tight. Loosen up or go up a hook size. If it ruffles, go down a size.
Check gauge again on your first pocket base, because single crochet often works up tighter than half double crochet.
Star Panel
Star Center (10-Wedge Circle)
The paired increases at the end of each wedge stack on top of each other, round after round. That stacking forms the ten straight spokes. Join each round into its first stitch. The ch 2 at the start of each round does not count as a stitch.
Round 1: Make a magic ring. Ch 2, work 10 hdc in the ring. Join with a sl st to the first hdc. Pull the ring closed. (10 sts)
Round 2: Ch 2, 2 hdc in each st around. Join. (20 sts)
Round 3: Ch 2, hdc in next st, 2 hdc in next st; repeat from * 9 more times. Join. (30 sts)
Round 4: Ch 2, hdc in next 2 sts, 2 hdc in next st; repeat 9 more times. Join. (40 sts)
Round 5: Ch 2, hdc in next 3 sts, 2 hdc in next st; repeat 9 more times. Join. (50 sts)
Round 6: Ch 2, hdc in next 4 sts, 2 hdc in next st; repeat 9 more times. Join. (60 sts)
Round 7: Ch 2, hdc in next 5 sts, 2 hdc in next st; repeat 9 more times. Join. (70 sts)
Round 8: Ch 2, hdc in next 6 sts, 2 hdc in next st; repeat 9 more times. Join. (80 sts) Fasten off.
You now have 10 wedges of 8 sts each. Each wedge ends with two stitches worked into the same stitch. We’ll call these two stitches the “increase pair.” Place a marker in the second stitch of every increase pair.
Points (Make 5)
Each point is worked over 16 sts: one marked stitch plus the next 15 sts. Starting there puts the next increase pair in the middle of the point, so that spoke runs up to the tip. Remove that middle marker. The point ends halfway through the following increase pair, and that spot becomes a valley.
The turning ch 1 does not count as a stitch.
Row 1 (RS): Join yarn in a marked st. Ch 1, hdc2tog over the marked st and the next st, hdc in next 12 sts, hdc2tog. Turn. (14 sts)
Row 2: Ch 1, hdc2tog, hdc across to the last 2 sts, hdc2tog. Turn. (12 sts)
Rows 3–6: Repeat Row 2. (10, 8, 6, 4 sts)
Row 7: Ch 1, hdc2tog twice. Turn. (2 sts)
Row 8: Ch 1, hdc2tog. (1 st) Fasten off.
To start the next point, join in the next marked stitch, which is the first unworked stitch after the point you just finished. When all 5 points are done, all 80 sts of Round 8 are used (5 x 16 = 80). Weave in ends on the WS.
Spokes
With RS facing, work surface slip stitches from the center ring outward:
- 5 tip spokes: Go up through the middle of each increase pair that sits in the center of a point, then straight up the point to its tip.
- 5 valley spokes: Go up through the middle of each increase pair that was split between two points, out to its valley.
Make each slip stitch about as long as one hdc round, about 0.4 in (1.0 cm). Keep the yarn relaxed, or the panel will pucker.
Make All Pieces
All pieces use the same burgundy yarn.
- 1 star panel (above), about 45 g
- 1 large pocket, about 30 g
- 2 small pockets, about 10 g each
- 1 hanging tab, about 5 g
Large Pocket (Make 1)
Round 1: Ch 26. Sc in 2nd ch from hook, sc in next 23 ch, 3 sc in last ch. Turn your work and continue along the other side of the chain: sc in next 23 ch, 2 sc in the first ch. Join. (52 sts: 1 + 23 + 3 + 23 + 2)
Round 2: Ch 1, 2 sc in first st, sc in next 23 sts, 2 sc in each of next 3 sts, sc in next 23 sts, 2 sc in each of last 2 sts. Join. (58 sts: 2 + 23 + 6 + 23 + 4)
Round 3: Ch 1, sc BLO in each st around. Join. (58 sts) This round turns the wall up from the base.
Rounds 4–14: Ch 1, sc in each st around. Join. (58 sts each round)
Round 15: Sl st loosely in each st around. (58 sts) Fasten off, leaving a 36 in (91.4 cm) tail.
Flattened, the pocket has 29 sts on each face. At 4 sc per inch, that’s 7.25 in (18.4 cm) wide.
Small Pockets (Make 2)
Round 1: Ch 9. Sc in 2nd ch from hook, sc in next 6 ch, 3 sc in last ch. Turn your work and continue along the other side of the chain: sc in next 6 ch, 2 sc in the first ch. Join. (18 sts)
Round 2: Ch 1, 2 sc in first st, sc in next 6 sts, 2 sc in each of next 3 sts, sc in next 6 sts, 2 sc in each of last 2 sts. Join. (24 sts)
Round 3: Ch 1, sc BLO in each st around. Join. (24 sts)
Rounds 4–13: Ch 1, sc in each st. Join. (24 sts each round)
Round 14: Sl st loosely in each st. (24 sts) Fasten off, leaving a 24 in (61.0 cm) tail.
Flattened, each pocket has 12 sts on each face, which is 3 in (7.6 cm) wide.
Hanging Tab (Make 1)
Row 1: Ch 7. Sc in 2nd ch from hook and in each ch across. Turn. (6 sts)
Rows 2–20: Ch 1, sc in each st. Turn. (6 sts each row)
Fasten off, leaving a long tail. The tab is 1.5 in (3.8 cm) wide and 4.5 in (11.4 cm) long.
Placement Layout
              [ tab + ring ]
                  /\
          _______/  \_______
          \   [S1]  [S2]   /
           \ [  LARGE   ] /
           / [  POCKET  ] \
          /   /\     /\   \
         /___/  \   /  \___\
S1 and S2 are the small pockets. Leave 1 in (2.5 cm) between them, so each sits 0.5 in (1.3 cm) from the vertical center line. Their bottom 0.5 in (1.3 cm) tucks behind the large pocket’s back wall. The top rim of the large pocket sits level with the star center.
Joining
Sew the pockets on after the border and blocking are finished, so the panel is already flat.
Method: Whipstitch with the yarn tail. Sew through the pocket’s back wall and only the front loops of the star’s stitches, so no stitching shows on the back.
Stitch-to-stitch logic: Lay each flattened pocket’s back face directly on the panel. Sew across its rim: 29 sts for the large pocket, 12 sts for each small pocket. Then sew down both sides, about one sewing stitch per round, and across the base edge. Leave the front face free so the pocket opens.
Order:
- Pin the small pockets in place and sew them on all the way around.
- Pin the large pocket so its back wall covers the lower 0.5 in (1.3 cm) of the small pockets, then sew it on.
Tension: Sewing stitches should be snug but flat. If you pull them tight, the star will dimple around the pocket edges.
Size checkpoint: After sewing, the star should still measure 13 in (33.0 cm) wide. If it measures less, a seam is too tight. Take it out and sew it again more loosely.
Tab: Fold the tab through the ring. Lay one end 1 in (2.5 cm) down the front of the top tip and the other end 1 in (2.5 cm) down the back. Sew through all layers.
Border
Border gauge: About 4 sc per 1 in (2.5 cm) along the slanted edges of the points. Each side of a point has 8 hdc row ends, and you work 2 sc into each row end.
Round 1 (sc): With RS facing, join at any valley.
- *Sc2tog, working one half into the last row end of the previous point and the other half into the first row end of the next point.
- Work 1 sc in that same first row end, then 2 sc in each of the next 7 row ends. (15 sc up the side)
- Work 3 sc in the tip stitch.
- Work 2 sc in each of the next 7 row ends, then 1 sc in the last row end. (15 sc down the side)*
- Repeat from * 4 more times. Join to the first sc2tog.
Each point gets 1 + 15 + 3 + 15 = 34 sts. (170 sts)
Round 2 (rev sc): Ch 1. Work 1 rev sc in each st around, except work 2 rev sc in the center sc at each tip. Join and fasten off. Each point now has 1 valley st + 15 + 4 at the tip + 15 = 35 sts. (175 sts)
Why the math works: Each side of a point has 8 row ends, which gives 16 places to work at 2 per row end. The 15 sc on each side fill 15 of those places. The sixteenth is the half of a valley sc2tog that lands on that side. The sc2tog also keeps the valley pulled in. The 3 sc at the tip (4 after Round 2) turn the sharp corner without curling.
Final Blocking
- Weave in all ends except the sewing tails.
- Lay the bordered star on the mat, RS up.
- Pin the top tip, then the four other tips, each 6.8 in (17.3 cm) from the center.
- Check the width: 13 in (33.0 cm) from side tip to side tip.
- Pin each valley 3.6 in (9.1 cm) from the center so all five points match.
- Mist the panel until it’s damp, then use your fingers to straighten the spokes.
- Let it dry completely, then sew on the pockets and tab.
- To shape the pockets, fill them lightly with plastic bags and mist only the rims.
Final Quality-Control Checklist
- Star is 13 in (33.0 cm) wide and 12.25 in (31.1 cm) tall
- All five points are the same height and each ends in one stitch
- Border rounds have 170 and 175 sts, with no skipped valleys
- All ten spokes run straight, with no puckering
- Large pocket has 58 sts around; small pockets have 24 sts
- Pockets are level and centered, and they open easily
- Tab is sewn through all layers, and the ring hangs straight
- No yarn ends show on the front
Troubleshooting
- Circle cups or ruffles: Make sure each round adds exactly 10 sts, then check your hook size.
- Points lean sideways: The point started on the wrong stitch. Each point must start at a marked stitch.
- Tips curl after the border: Use only 3 sc at each tip in Round 1, and pin the tips firmly when blocking.
- Valleys gape: Check that each valley sc2tog is worked into both row ends.
- Pockets droop: Sew the full width of the rim, not just the corners. For firmer walls, go down a hook size.
- Star tilts on the wall: Re-center the tab on the top tip.
Care
Spot clean with a damp cloth, or hand wash in cool water. Lay it flat to dry, reshaping the points and pockets, and don’t hang it until it’s fully dry.
Final Notes
The measurements build on each other. A 6.4 in (16.3 cm) center plus 3.2 in (8.1 cm) points makes a star about 12.25 in (31.1 cm) wide. The 0.4 in (1.0 cm) rope border brings it to 13 in (33.0 cm). The 7.25 in (18.4 cm) basket pocket and the two 3 in (7.6 cm) cups fit inside that outline. Check your gauge at Round 4, match the border counts, and everything else will line up.
Happy crocheting!