
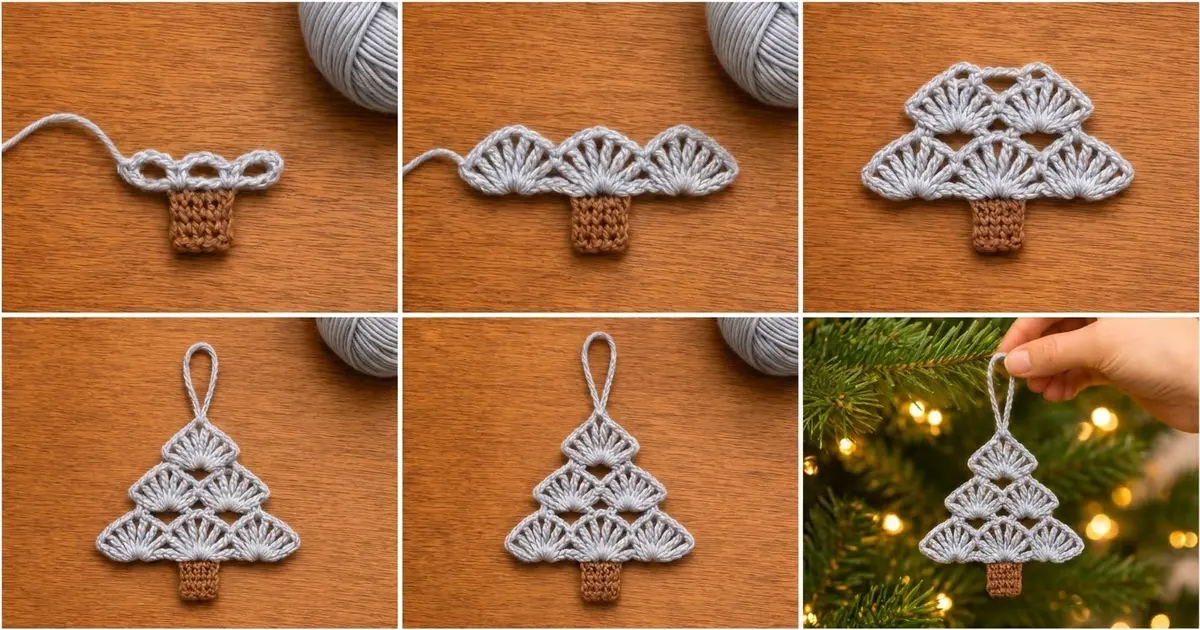
This little tree is built from fans. Three gray shells sit along the bottom, two nest above them and one sits on top. Stacked this way, the shells form a clean triangle with small diamond windows between the tiers. A neat rust-brown trunk hangs below, and a slim chain loop lets you hang the tree straight on a branch.
The palette is quiet and wintry: pale frosty gray for the tree and warm brown for the trunk. It suits a Scandinavian-style tree, a gift tag or a wreath accent. Once you know the rhythm, it takes well under an hour.
The pattern uses US crochet terms. The finished ornament measures about 4.6 in (11.7 cm) wide and 4.2 in (10.7 cm) tall from trunk to apex, not counting the hanging loop. With the loop it is about 6.2 in (15.7 cm) tall.
The construction is simple and all in one piece. You chain a foundation, work a row of chain loops, then fill the loops with shells tier by tier, narrowing to one shell at the top. The trunk is worked straight down from the foundation chain. A single border row then edges the sides and base and adds the hanging loop.
Finished Size and Construction
- Finished size: 4.6 in (11.7 cm) wide x 4.2 in (10.7 cm) tall, plus a 2 in (5.1 cm) hanging loop
- Skill level: Easy
- Terminology: US crochet terms
- Yarn weight: Worsted (#4), cotton or cotton blend
- Hook: US G-6 (4.0 mm)
- Number of pieces: 1
- Layout: Three shell tiers (3, 2, 1) over a centered trunk
- Shell size: about 1.4 in (3.6 cm) wide x 0.7 in (1.8 cm) tall
- Trunk size: 1.1 in (2.8 cm) wide x 1.4 in (3.6 cm) tall
- Tree size before border: 4.2 in (10.7 cm) wide x 2.6 in (6.6 cm) tall (gray section only)
- Border depth: 0.2 in (0.5 cm), one row of single crochet
Materials
Choose a smooth, firmly plied worsted cotton. Cotton shows the shell spokes clearly and holds its shape on a branch. Acrylic works too, but it may need a light starch to stay flat.
- Color A, pale gray: 6 g, about 12 m
- Color B, rust brown: 2 g, about 4 m
These quantities include a margin for a gauge swatch and for weaving in ends. Leftover worsted from a larger project is plenty.
Tools:
- US G-6 (4.0 mm) crochet hook
- Tapestry needle
- Scissors
- 1 locking stitch marker
- Rust-proof pins and a foam blocking mat
- Spray starch (optional)
Abbreviations (US Terms)
- ch: chain
- sl st: slip stitch
- sc: single crochet
- dc: double crochet
- st(s): stitch(es)
- sp: space
- RS: right side
Special stitch, Shell: Work 9 dc into the same chain loop. The center (5th) dc of each shell is where the next tier is anchored.
Standing sc: With a slip knot on the hook, insert the hook into the stitch, yarn over and pull up a loop, then yarn over and pull through both loops.
Gauge and Checkpoints
Gauge: 9 sc and 10 rows = 2 in (5.1 cm) in single crochet, unblocked.
Since this is a single piece, the trunk can serve as your gauge test. It is 5 sc wide and should measure 1.1 in (2.8 cm). If you’d rather swatch first, chain 10, work 10 rows of 9 sc and measure.
Checkpoints along the way:
- After Row 2 (bottom tier): 4.2 in (10.7 cm) wide, 0.9 in (2.3 cm) tall
- After Row 4 (middle tier): 1.75 in (4.4 cm) tall
- After Row 6 (top shell): 2.6 in (6.6 cm) tall
- Each single shell: about 1.4 in (3.6 cm) wide
- After the trunk: 1.1 in (2.8 cm) wide, 1.4 in (3.6 cm) long
- After the border: 4.6 in (11.7 cm) wide, 4.2 in (10.7 cm) tall
If your piece is too big: go down to a US F-5 (3.75 mm) hook and keep the chain loops snug.
If your piece is too small: go up to a US 7 (4.5 mm) hook. If your shells cup instead of lying flat, the chain loops are usually too tight, so check those before changing hooks.
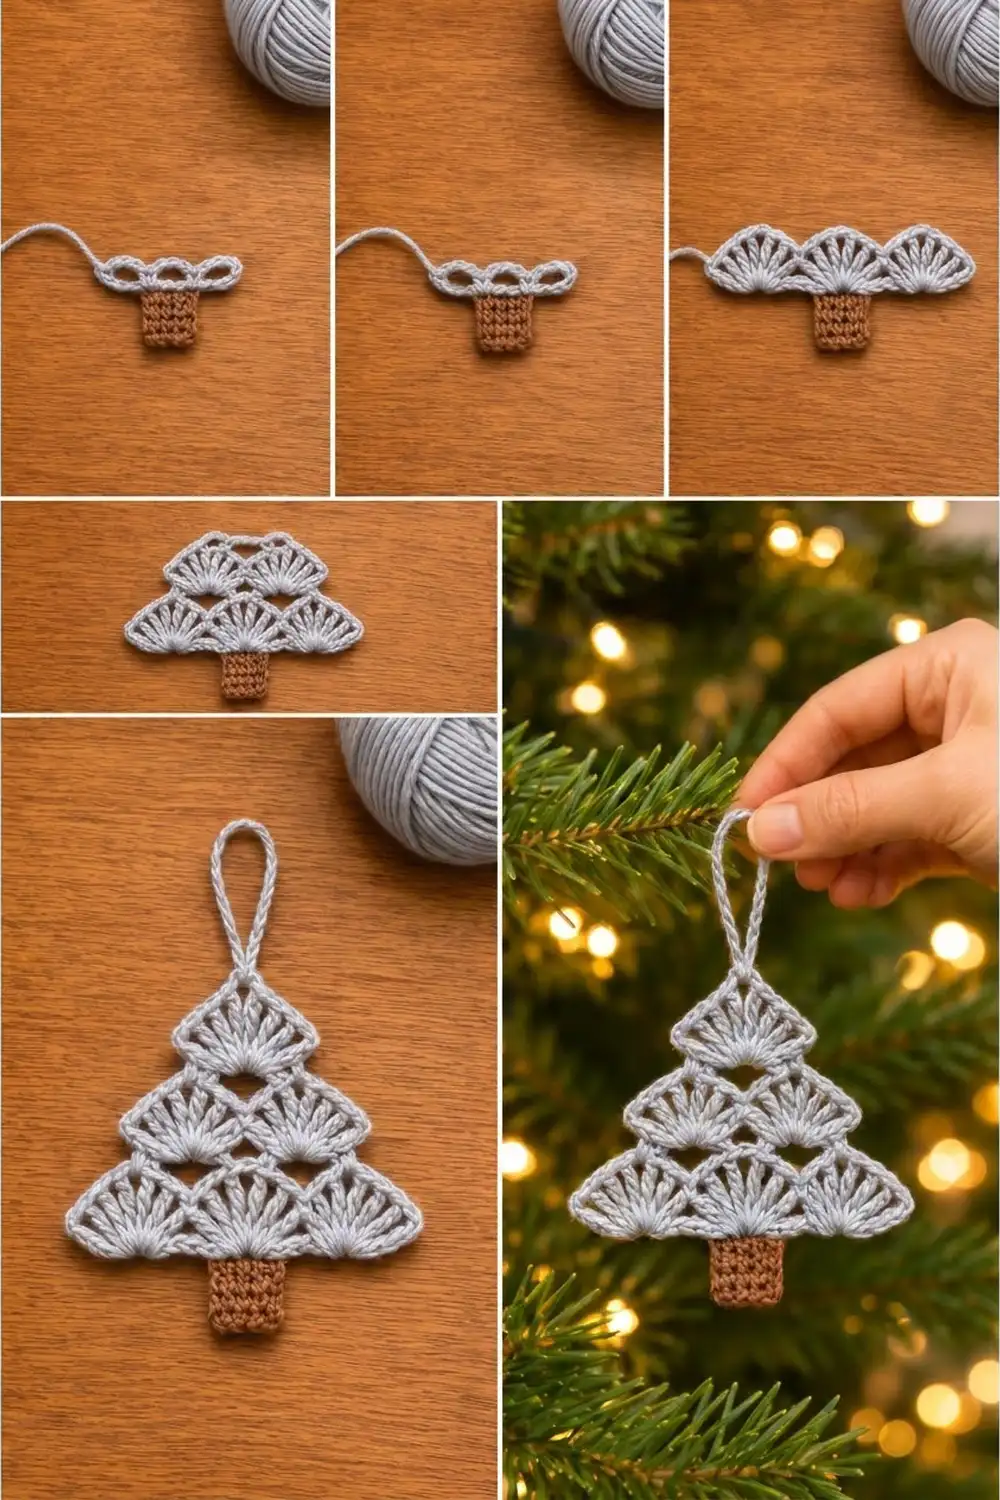
Pattern
Foundation and Row 1: Loop Row (Color A)
With gray, ch 20.
Row 1: Sc in 2nd ch from hook, ch 5, skip next 5 ch, sc in next ch; repeat from * 2 more times. Turn.
(4 sc, 3 ch-5 loops)*
You have used 19 chains: 4 hold sc and 15 are skipped under the loops. Place the stitch marker in the bottom of the 3rd skipped chain of the middle loop. That chain marks the center of the trunk, which you’ll work later into the 5 skipped chains under the middle loop.
Keep the ch-5 loops relaxed but even, because they set the width of the whole tree. Tight loops make the shells cup instead of fan.
Row 2: Bottom Tier (3 Shells)
Row 2: Ch 1 (does not count as a st), sc in first sc, Shell in next ch-5 loop, sc in next sc; repeat from * 2 more times. Turn.
(27 dc + 4 sc = 31 sts; 3 shells)*
Spread each shell with your fingers so the 9 dc fan out evenly. Checkpoint: 4.2 in (10.7 cm) wide.
Row 3: Middle Loop Row
Row 3: Sl st in each of next 5 dc (you are now in the center dc of the first shell). Ch 1, sc in same dc, ch 6, skip next 9 sts (4 dc, 1 sc, 4 dc), sc in center dc of next shell, ch 6, skip next 9 sts, sc in center dc of last shell. Turn.
(3 sc, 2 ch-6 loops; slip stitches not counted)
Leave the last 4 dc of the final shell unworked. The ch-6 loops arch from shell top to shell top, and the open space under each loop becomes a diamond window. There are always 9 stitches between one center dc and the next.
Row 4: Middle Tier (2 Shells)
Row 4: Ch 1, sc in first sc, Shell in next ch-6 loop, sc in next sc; repeat from * once more. Turn.
(18 dc + 3 sc = 21 sts; 2 shells)*
Checkpoint: 1.75 in (4.4 cm) tall from the foundation chain to the top of the middle shells.
Row 5: Top Loop Row
Row 5: Sl st in each of next 5 dc. Ch 1, sc in same dc, ch 6, skip next 9 sts, sc in center dc of next shell. Turn.
(2 sc, 1 ch-6 loop)
Row 6: Top Tier (1 Shell)
Row 6: Ch 1, sc in first sc, Shell in ch-6 loop, sc in last sc.
(9 dc + 2 sc = 11 sts; 1 shell)
Fasten off and weave in the end. Checkpoint: 2.6 in (6.6 cm) tall, 4.2 in (10.7 cm) wide.
Trunk (Color B)
Turn the tree upside down so the foundation chain is on top. Find the middle loop and its 5 skipped chains.
Row 1: With brown, join with a standing sc in the bottom of the first of the 5 skipped chains under the middle loop, then sc in the bottom of each of the next 4 chains. Turn.
(5 sc)
Check that the 3rd sc sits in the marked chain, so the trunk is centered, then remove the marker. The trunk and the middle bottom shell share the same chains, which helps the tree hang straight.
Rows 2–7: Ch 1, sc in each sc across. Turn.
(5 sc each row)
Fasten off after Row 7. Checkpoint: 1.1 in (2.8 cm) wide and 1.4 in (3.6 cm) long. Weave the brown ends in along the trunk sides so they don’t show on the gray.
Border
Border gauge: One sc per stitch top on the shells and one sc per chain bottom along the base, at 4.5 sc per inch (1.8 sc per cm) and 0.2 in (0.5 cm) deep.
Work with the Row 6 side facing you; this is the RS. The border is one long row that goes around the tree and stops at the other side of the trunk, so the trunk itself gets no gray edging. Where a dc top has a slip stitch on it from Row 3 or Row 5, work into the dc top under the slip stitch.
Border Row: With gray, join with a standing sc in the bottom of the foundation chain right next to the trunk (the chain under a Row 1 sc). Then work as follows:
- Base, first half: Sc in the bottom of each of the next 5 chains. (6 sc on this stretch, including the joining sc)
- First corner: 3 sc in the bottom of the last foundation chain.
- First slanted side: Sc in each of the 4 free dc of the bottom corner shell, 1 sc in the end sc where the middle tier begins, sc in each of the 4 free dc of the middle corner shell, 1 sc in the end sc where the top tier begins, sc in each of the next 4 dc of the top shell. (14 sc)
- Apex and hanging loop: In the center dc of the top shell, work sc, ch 20, sc. Make sure the chain isn’t twisted before you work the second sc, so the loop hangs flat. (2 sc + ch-20 loop)
- Second slanted side: Sc in each of the next 4 dc of the top shell, 1 sc in the junction sc, sc in each of the 4 free dc of the middle shell, 1 sc in the junction sc, sc in each of the 4 free dc of the bottom shell. (14 sc)
- Second corner: 3 sc in the bottom of the first foundation chain.
- Base, second half: Sc in the bottom of each of the next 6 chains, ending at the trunk. (6 sc)
Fasten off and weave the end into the edge of the trunk.
(Total: 6 + 3 + 14 + 2 + 14 + 3 + 6 = 48 sc, plus the ch-20 loop)
Why the math works: Each slanted side passes three shells, and each shell has 4 free outer dc: 3 x 4 = 12 sc. Add 2 junction sc where one tier sits on the next, and you get 14. The base uses the 19 foundation chains. Five hold the trunk, 2 are the corners (3 sc each), and the remaining 12 split evenly into 6 per side. One sc per stitch keeps the edge flat. The 3-sc corners turn the sharp base points without pulling. The 0.2 in (0.5 cm) border on each side brings the width from 4.2 in (10.7 cm) to 4.6 in (11.7 cm).
Final Blocking
- Soak the ornament in cool water for 5 minutes, then press out the water in a towel. Do not wring.
- Lay it RS up on the blocking mat.
- Pin the two base corners 4.6 in (11.7 cm) apart.
- Pin the apex so the tree measures 4.2 in (10.7 cm) from trunk bottom to apex.
- Open each diamond window with a pin and fan out the dc of each shell evenly.
- Pin the trunk square at 1.1 in (2.8 cm) wide.
- Pin the hanging loop straight up, about 2 in (5.1 cm) tall.
- Mist with spray starch if you want a crisp ornament. Let it dry completely before unpinning, then measure again, because cotton can relax slightly.
Final Quality-Control Checklist
- Three tiers of shells (3, 2, 1), each shell with 9 dc
- Two diamond windows above the bottom tier and one above the middle tier
- Trunk is 5 sc wide, 7 rows long and centered under the middle bottom shell
- Border has 14 sc on each slanted side and 6 sc on each half of the base
- Corners have 3 sc and lie flat
- Hanging loop is centered on the top shell
- Size is 4.6 in (11.7 cm) wide x 4.2 in (10.7 cm) tall
- All ends woven in, none visible from the RS
Troubleshooting
Shells cup or curl upward: The chain loops are too tight. Rework them with looser chains, or go up a hook size for the loop rows only.
Shells ruffle: Your dc are too loose for the loop size. Go down a hook size or tighten your tension slightly.
Middle tier pulls the bottom shells together: Your ch-6 loops are too short for your tension. Try ch 7 and keep the 9-dc Shell.
Trunk sits off-center: You started in the wrong chain. Check that the 3rd trunk sc lands in the marked chain.
Border waves along the sides: You probably added extra sc at the junctions. Use exactly 1 sc per junction and 14 per side.
Hanging loop twists: Block it straight and starch it, or work a sl st back along each chain for a firmer cord.
Care
Hand wash in cool water and lay flat to dry. Reshape it, and starch again if you want the crisp finish back.
Final Notes
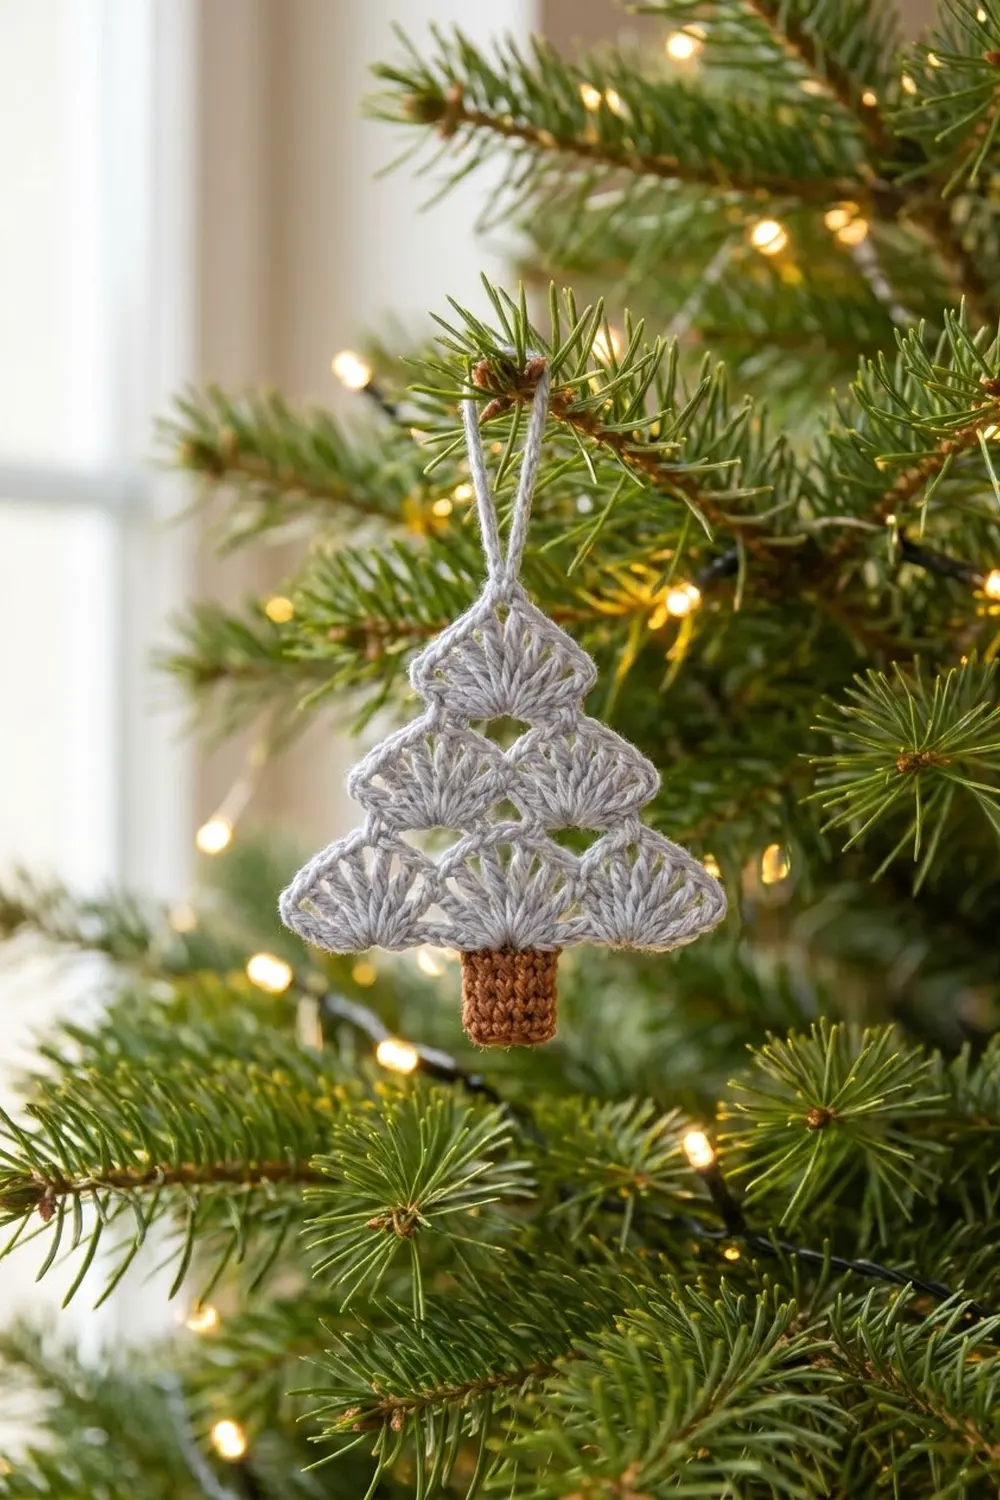
Each measurement builds on the one before. A 5-sc trunk at 1.1 in (2.8 cm) confirms your gauge. Each 9-dc shell measures 1.4 in (3.6 cm), three shells make a 4.2 in (10.7 cm) base, and the tiers stack to 2.6 in (6.6 cm). The trunk adds 1.4 in (3.6 cm), and the 0.2 in (0.5 cm) border brings the finish to 4.6 in (11.7 cm) wide and 4.2 in (10.7 cm) tall. If every checkpoint matches, the finished size will too.
Happy crocheting!