

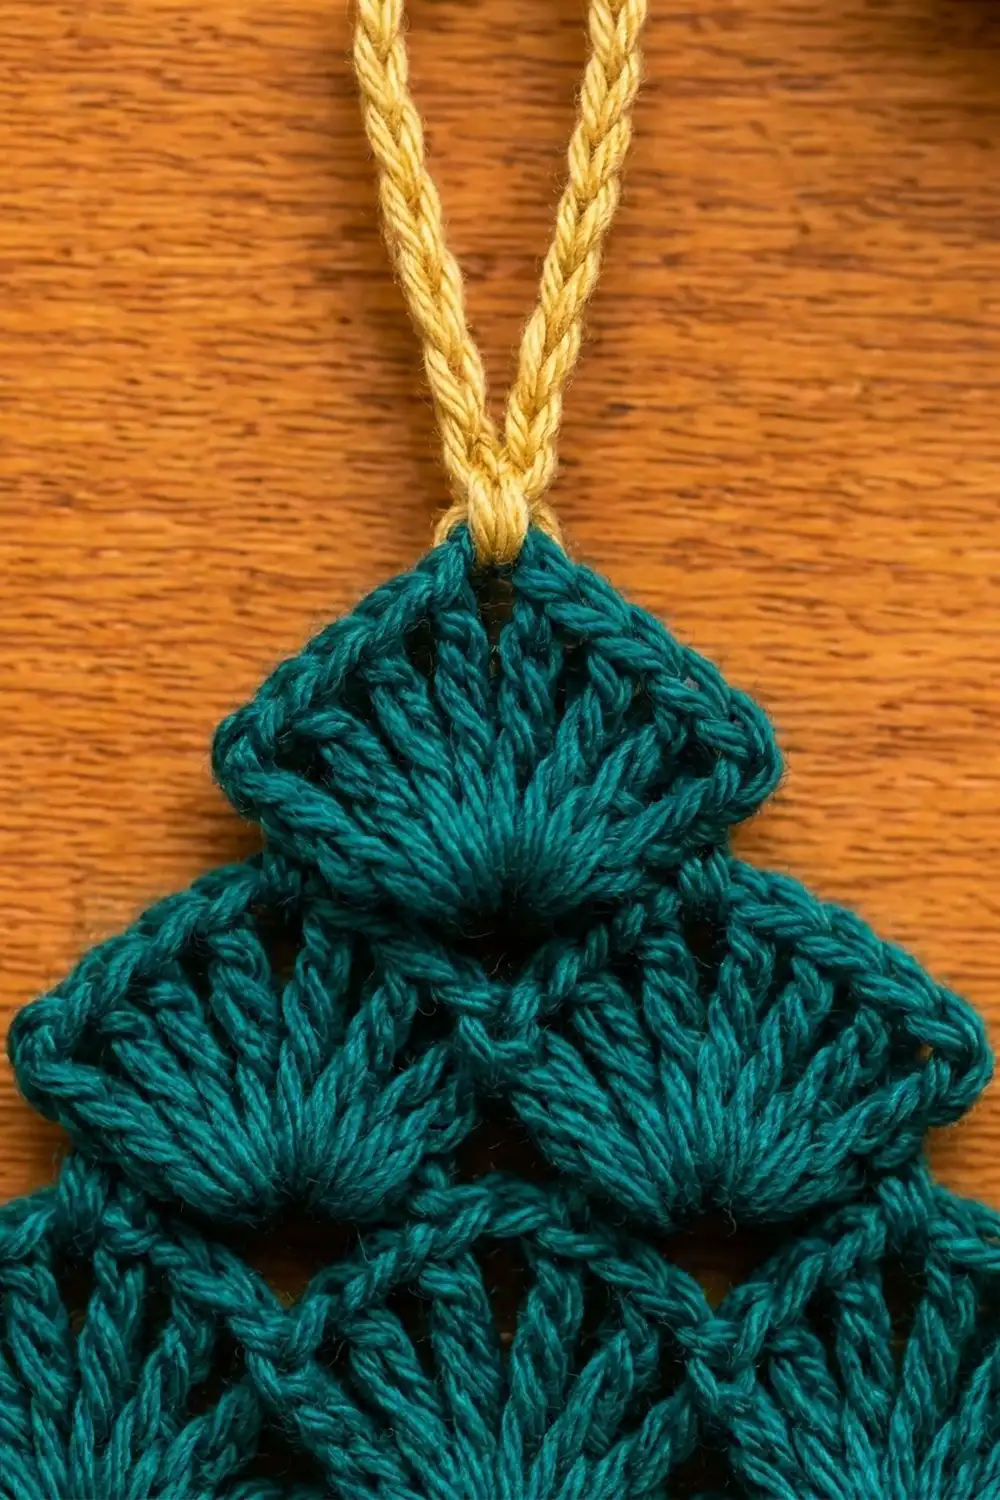
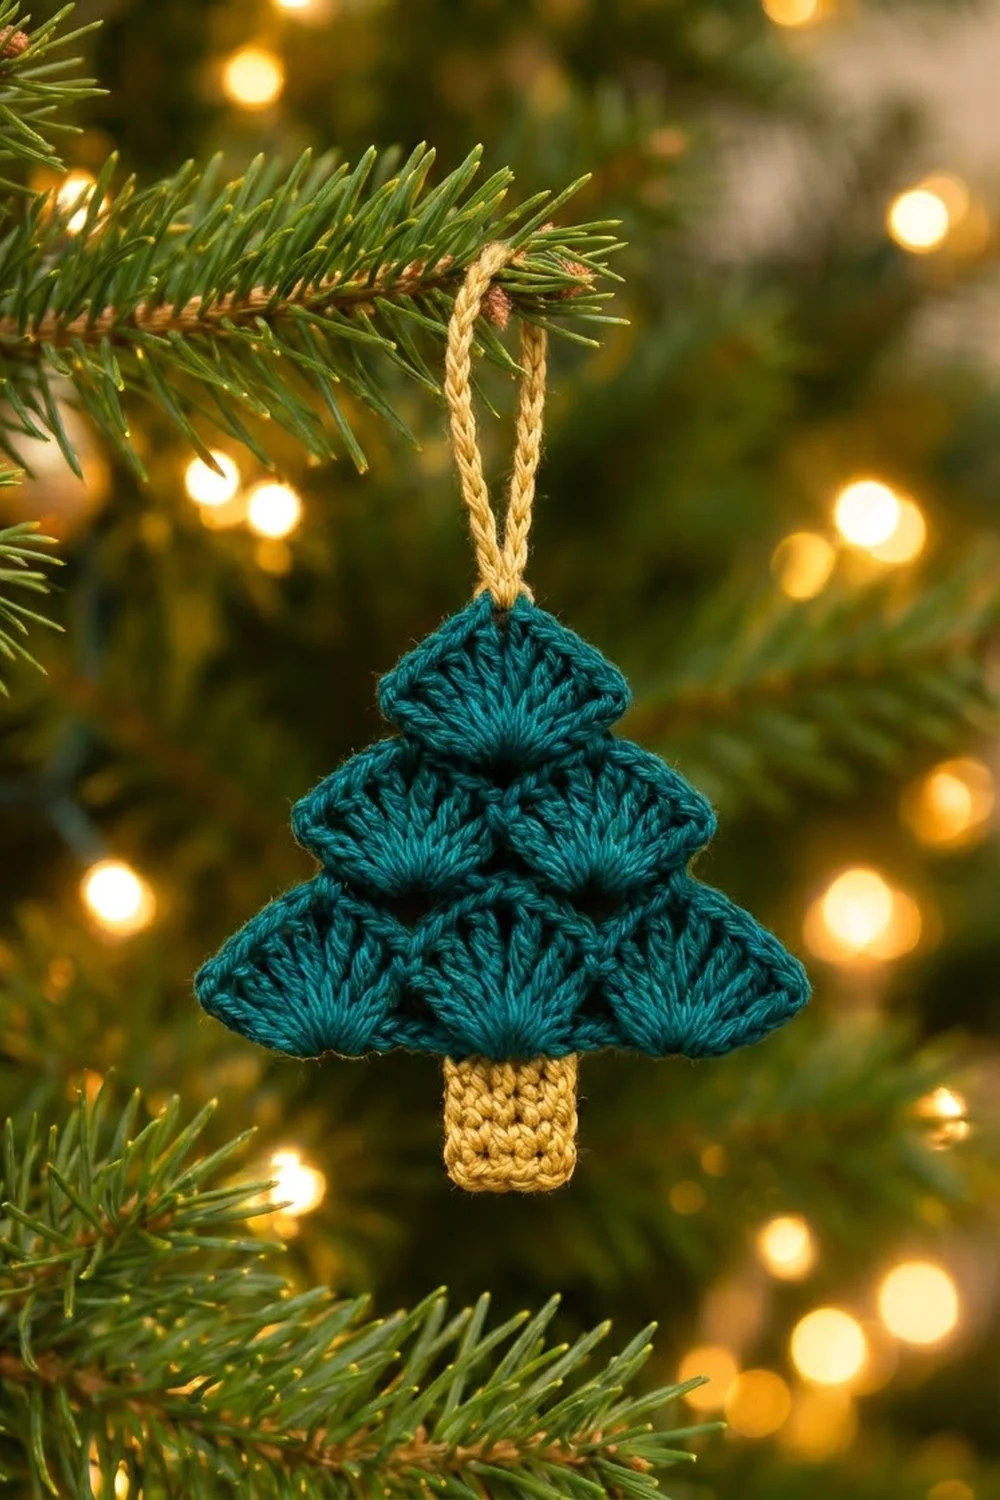
This little Christmas tree ornament is made from fan stitches stacked in three tiers: three fans across the bottom, two in the middle and one at the top. Each fan opens out from a narrow point into a peaked top, so the tiers overlap like scales. A mustard trunk and a sturdy mustard hanging loop finish it.
The tree is a deep teal, and the trunk and loop are a warm mustard gold. It looks classic and a bit vintage. It works on a real tree, as a gift tag or on a window hook.
The pattern uses US crochet terms. The finished ornament is about 4.25 in (10.8 cm) wide and about 4.5 in (11.4 cm) tall from the tip to the bottom of the trunk. The hanging loop adds about 1.75 in (4.4 cm) above that.
Everything is made in one piece:
- Four short teal rows of fans, worked from a foundation chain.
- One teal sc border round.
- A mustard trunk, worked straight down from the bottom of the border.
- A mustard loop at the tip.
There are no separate pieces to sew together.
Finished Size and Construction
- Finished size: 4.25 in (10.8 cm) wide x about 4.5 in (11.4 cm) tall, not counting the loop
- Skill level: Easy (advanced beginner)
- Terminology: US crochet terms
- Yarn weight: Medium / worsted (#4)
- Hook: 4.0 mm (US G-6)
- Number of pieces: 1 (worked continuously)
- Layout: fan tiers of 3, 2 and 1, with a trunk below and a loop at the tip
- Tree size before border: 4 in (10.2 cm) wide x 3 in (7.6 cm) tall
- Border depth: 1 round of sc, about 0.125 in (0.3 cm)
- Tree size after border: 4.25 in (10.8 cm) wide x 3.25 in (8.3 cm) tall
- Trunk: 1.1 in (2.8 cm) wide x 1.2 in (3.0 cm) tall
- Loop: about 1.75 in (4.4 cm) long
Materials
Choose a smooth, tightly plied worsted cotton or cotton blend so the fan stitches stand out clearly. Acrylic also works, but it is a little softer and needs firmer blocking. Avoid fuzzy or brushed yarn because it blurs the fan lines. Leftovers are perfect for this project, since a single ornament uses very little yarn.
- Teal (tree and border): 10 g, about 18 m
- Mustard (trunk and loop): 4 g, about 7 m
These amounts include a safety margin. The ornament itself uses about 7 g of teal and 3 g of mustard.
Tools:
- 4.0 mm (US G-6) crochet hook
- Tapestry needle
- Scissors
- Stitch marker
- Ruler or tape measure
- Blocking mat and rust-proof pins
- Spray bottle with water
Abbreviations (US Terms)
- ch = chain
- sl st = slip stitch
- sc = single crochet
- dc = double crochet
- tr = treble crochet
- st(s) = stitch(es)
- sk = skip
- rep = repeat
Special stitch: Fan. Work (2 dc, 5 tr, 2 dc) into the same stitch, for 9 sts. The center of the fan is the 5th stitch, which is the 3rd tr. The tr stitches raise the middle, so the fan gets a peaked, diamond-like top above a narrow point.
Gauge and Checkpoints
Gauge: 18 sc and 20 rows = 4 in (10.2 cm) in sc with the 4.0 mm hook.
Because the ornament is one small piece, the piece itself is your gauge test. Work Row 1 and measure it before going further.
Checkpoints:
- After Row 1: 4 in (10.2 cm) wide and about 1 in (2.5 cm) tall. Each fan is about 1.3 in (3.3 cm) across its top.
- After Row 3: about 2.75 in (7.0 cm) tall at the center.
- After Row 4 (before border): 4 in (10.2 cm) wide x 3 in (7.6 cm) tall.
- After border: 4.25 in (10.8 cm) wide x 3.25 in (8.3 cm) tall.
- After trunk: about 4.5 in (11.4 cm) total height.
If Row 1 is too wide (over 4.25 in / 10.8 cm), switch to a 3.75 mm hook and start again. If it is too narrow (under 3.75 in / 9.5 cm), switch to a 4.5 mm hook. Check the foundation chain in particular, because a tight chain makes the bottom edge pucker.
Tree (Teal)
The tree is worked in rows. Each new row starts with slip stitches up the side of the previous row to the center of an outer fan, so each tier has one fan fewer than the tier below.
Foundation: With teal, ch 20.
Row 1 (3 fans): Sc in 2nd ch from hook. Sk 2 ch, Fan in next ch, sk 2 ch, sc in next ch. Rep from * to * 2 more times.
(31 sts: 3 Fans = 27 sts, plus 4 sc.)
This row uses all 19 working chains. The sc stitches sit at the low valley points, and the fans open upward. Check your width now: it should be 4 in (10.2 cm).
Row 2 (2 fans): Turn. Sl st in the first sc and in the next 4 sts of the first fan (5 sl st). Ch 1 (does not count as a stitch). Sc in the next st, which is the center tr of that fan. Sk the next 4 sts, Fan in the next sc (the valley sc), sk the next 4 sts, sc in the center tr of the next fan. Rep from * to * once more.
(21 sts: 2 Fans = 18 sts, plus 3 sc.)
The last 4 fan sts and the end sc of Row 1 stay unworked. Each new fan sits in a valley between two Row 1 fans, with its narrow point nested between them. That is what creates the overlapping-scale look.
Row 3 (1 fan): Turn. Sl st in the first sc and in the next 4 sts (5 sl st). Ch 1, sc in the center tr of the fan. Sk 4 sts, Fan in the next sc, sk 4 sts, sc in the center tr of the last fan.
(11 sts: 1 Fan = 9 sts, plus 2 sc.)
Row 4 (tip): Turn. Sl st in the first sc and in the next 4 sts (5 sl st). Ch 1, sc in the center tr of the top fan.
(1 sc: the tip.)
Do not fasten off. The tree now measures 4 in (10.2 cm) wide x 3 in (7.6 cm) tall.
Tip: Keep your slip stitches loose. Tight slip stitches pull the outer fans inward and make the slanted sides harder to work into during the border.
Border (Teal)
The border is one round of sc. It outlines the outer fans, firms up the slanted sides and squares off the bottom so the trunk has a stable base.
Border gauge: the same as the main gauge, 18 sc = 4 in (10.2 cm). One sc round adds about 0.125 in (0.3 cm) to every edge.
How the slanted sides are counted: Going down one side from the tip, you pass these stitches:
- the outer half of the top fan (4 sts)
- the end sc of Row 3 (1 st)
- the outer half of a Row 2 fan (4 sts)
- the end sc of Row 2 (1 st)
- the outer half of a Row 1 fan (4 sts)
That makes 4 + 1 + 4 + 1 + 4 = 14 sts. In some places a sl st from the next row sits on top of these stitches. Work into that sl st and count each one as one stitch.
Border Round: Ch 1, do not turn. Sc in the same st as the tip sc (tip sc 1 of 3).
- First slanted side: sc in each of the next 14 sts, as counted above. (14 sc)
- Bottom corner: 3 sc in the end sc of Row 1. (3 sc)
- Bottom edge: working into the free loops of the foundation chain, sc in each of the next 17 ch. (17 sc)
- Bottom corner: 3 sc in the end sc of Row 1 at the other end. (3 sc)
- Second slanted side: sc in each of the next 14 sts. (14 sc)
- Tip: 2 sc in the tip st, so the tip has 3 sc in total. Join with a sl st to the first sc.
Total: 54 sc. Fasten off the teal and weave in the end.
Why the math works:
- The foundation chain has 19 working chains. The two outer chains hold the end sc of Row 1, and the corner groups go into those sc. That leaves 19 − 2 = 17 chains for the bottom edge.
- Each slanted side gives exactly 14 stitches, and each of the three corners (two at the bottom, one at the tip) gets 3 sc. So 14 + 14 + 17 + (3 x 3) = 54.
- The 3-sc corner groups keep the corners sharp and flat without making the sides ruffle.
- At 18 sc per 4 in, the 17 bottom sc measure about 3.8 in (9.7 cm). With the two corner groups added, the bottom edge matches the 4.25 in (10.8 cm) bordered width.
Checkpoint: 4.25 in (10.8 cm) wide x 3.25 in (8.3 cm) tall.
Trunk (Mustard)
The trunk is worked straight down from the center of the bottom border edge. Count the 17 bottom-edge sc, leaving out the corner sc. The 9th sc is the center, so the trunk uses the 7th through 11th sc. Place a marker in the 7th sc before joining.
Row 1: With the right side facing, join mustard with a sl st in the 7th bottom-edge sc. Ch 1, sc in the same st and in each of the next 4 sc.
(5 sc)
Rows 2–6: Ch 1, turn, sc in each sc across.
(5 sc per row)
Fasten off and weave in the ends.
Checkpoint: The trunk is 1.1 in (2.8 cm) wide x 1.2 in (3.0 cm) tall. Total ornament height is now about 4.5 in (11.4 cm).
Hanging Loop (Mustard)
Round 1: Join mustard with a sl st in the center sc of the 3-sc tip group. Ch 20, then sl st in the same tip sc to close the loop.
Round 2: Sl st in each ch around the loop (20 sl st), then sl st in the tip sc.
Fasten off, leaving a 6 in (15.2 cm) tail. Weave the tail down through the top fan on the wrong side and back up again so the loop is firmly anchored. The second round of sl sts gives the loop a firm, rope-like texture that won’t stretch on a branch.
Checkpoint: The loop hangs about 1.75 in (4.4 cm) above the tip.
Final Blocking
- Weave in all ends, hiding each one inside fan stitches of the same color.
- Lay the ornament flat, wrong side up, on a blocking mat.
- Spray it lightly until it is damp but not soaking.
- Pin the three corners first: the tip and the two bottom corners, with the bottom corners 4.25 in (10.8 cm) apart.
- Pin the trunk square at 1.1 in (2.8 cm) wide.
- Gently spread each fan with your fingertips so the tr stitches fan out evenly and each top comes to a soft peak.
- Pin the loop straight up.
- Let it dry completely, about 4–6 hours.
- Unpin and check the final measurements.
Final Quality-Control Checklist
- The tiers read 3, 2, 1 from the bottom up.
- Every fan has 9 sts, with the center tr in the middle.
- Each fan’s point sits neatly in a valley.
- The border has 54 sc, with 3 sc at each corner.
- The bottom edge lies flat with no puckering.
- The trunk is 5 sc wide, 6 rows tall and centered.
- The loop is firm, centered and anchored.
- The ornament measures 4.25 in (10.8 cm) wide x about 4.5 in (11.4 cm) tall.
- No teal ends show through the mustard, and no mustard ends show through the teal.
Troubleshooting
The fans look flat and rounded instead of peaked. Check that the middle 5 stitches are tr, not dc. Pull each tr up to its full height.
The tree leans to one side. This is normal with turned rows. Block it straight, pinning the tip directly above the center of the trunk.
The bottom edge puckers. The foundation chain is too tight. Redo it with a hook one size larger for the chain only.
The border ruffles on the slanted sides. You have extra stitches. Recount to exactly 14 per side.
The border pulls in at the corners. Make sure there are 3 sc in each corner stitch.
The trunk is off-center. Recount the bottom edge. The trunk starts in the 7th of the 17 edge sc.
The loop is floppy. Add Round 2 of sl sts, or work the loop with a smaller hook.
Care
Hand wash in cool water with mild soap, press out the water in a towel, and dry flat while reshaping the fans. Do not tumble dry, and do not iron directly on the stitches.
Final Notes
Each stage builds on the last measurement:
- Row 1 sets the width at 4 in (10.2 cm).
- Rows 2–4 bring the tree to 3 in (7.6 cm) tall.
- The 54-sc border brings it to 4.25 in (10.8 cm) x 3.25 in (8.3 cm).
- The 6-row trunk adds 1.2 in (3.0 cm), for about 4.5 in (11.4 cm) overall.
- The loop hangs another 1.75 in (4.4 cm) above the tip.
If Row 1 measures correctly, everything after it falls into place.
Make one in teal for a classic look, or try other greens, cream or metallic yarn for a set of matching tree ornaments.
Happy crocheting!