

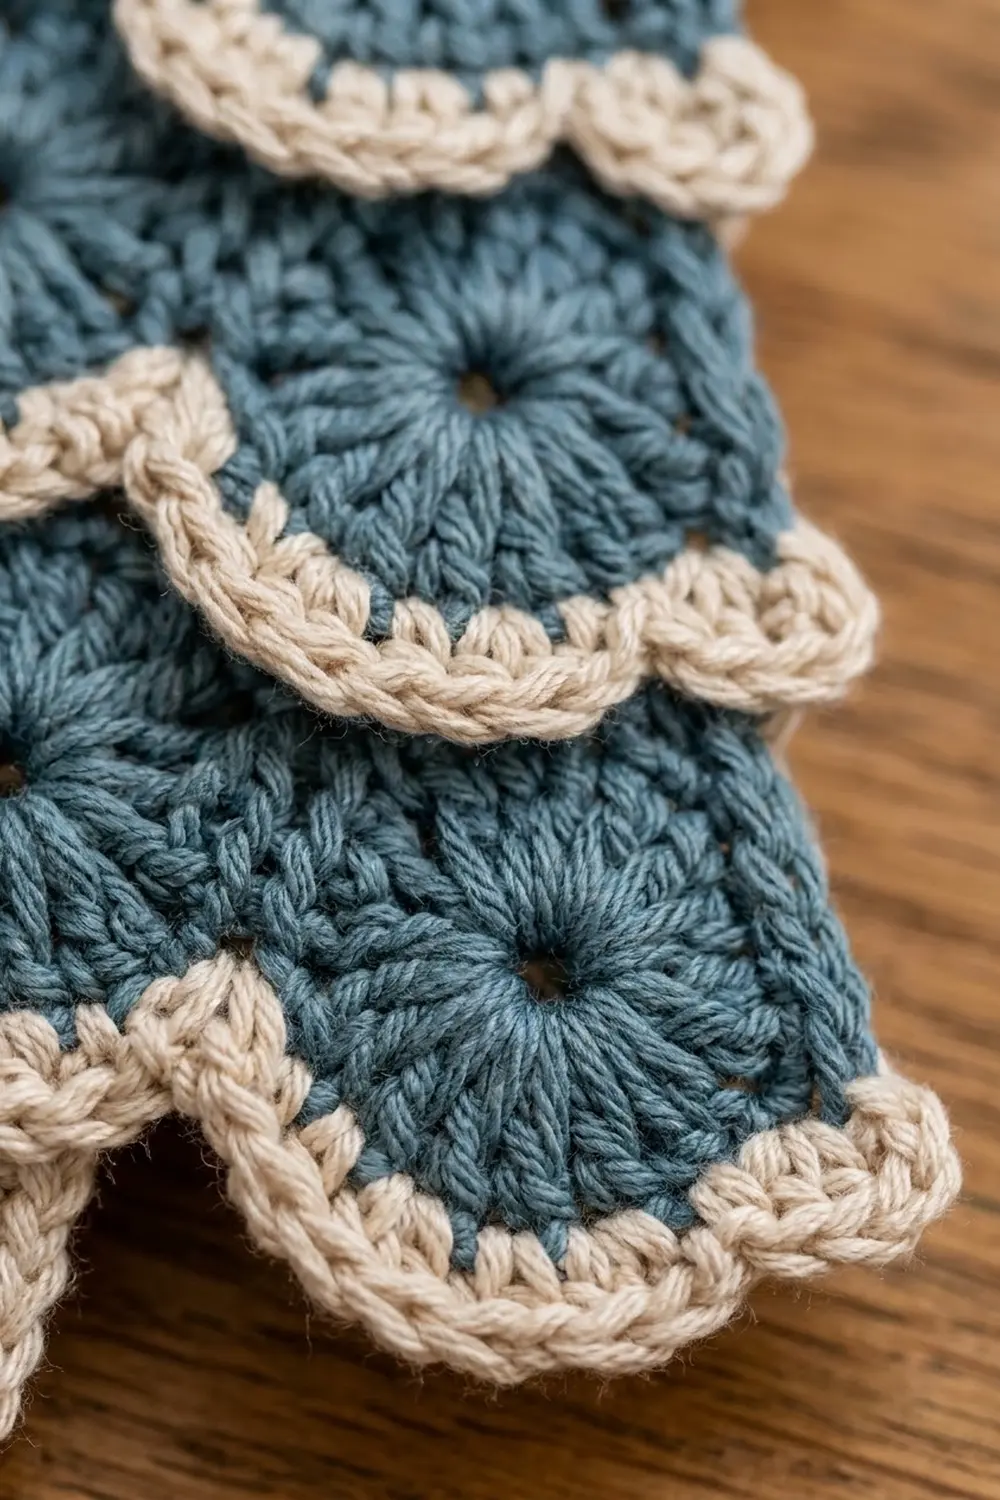
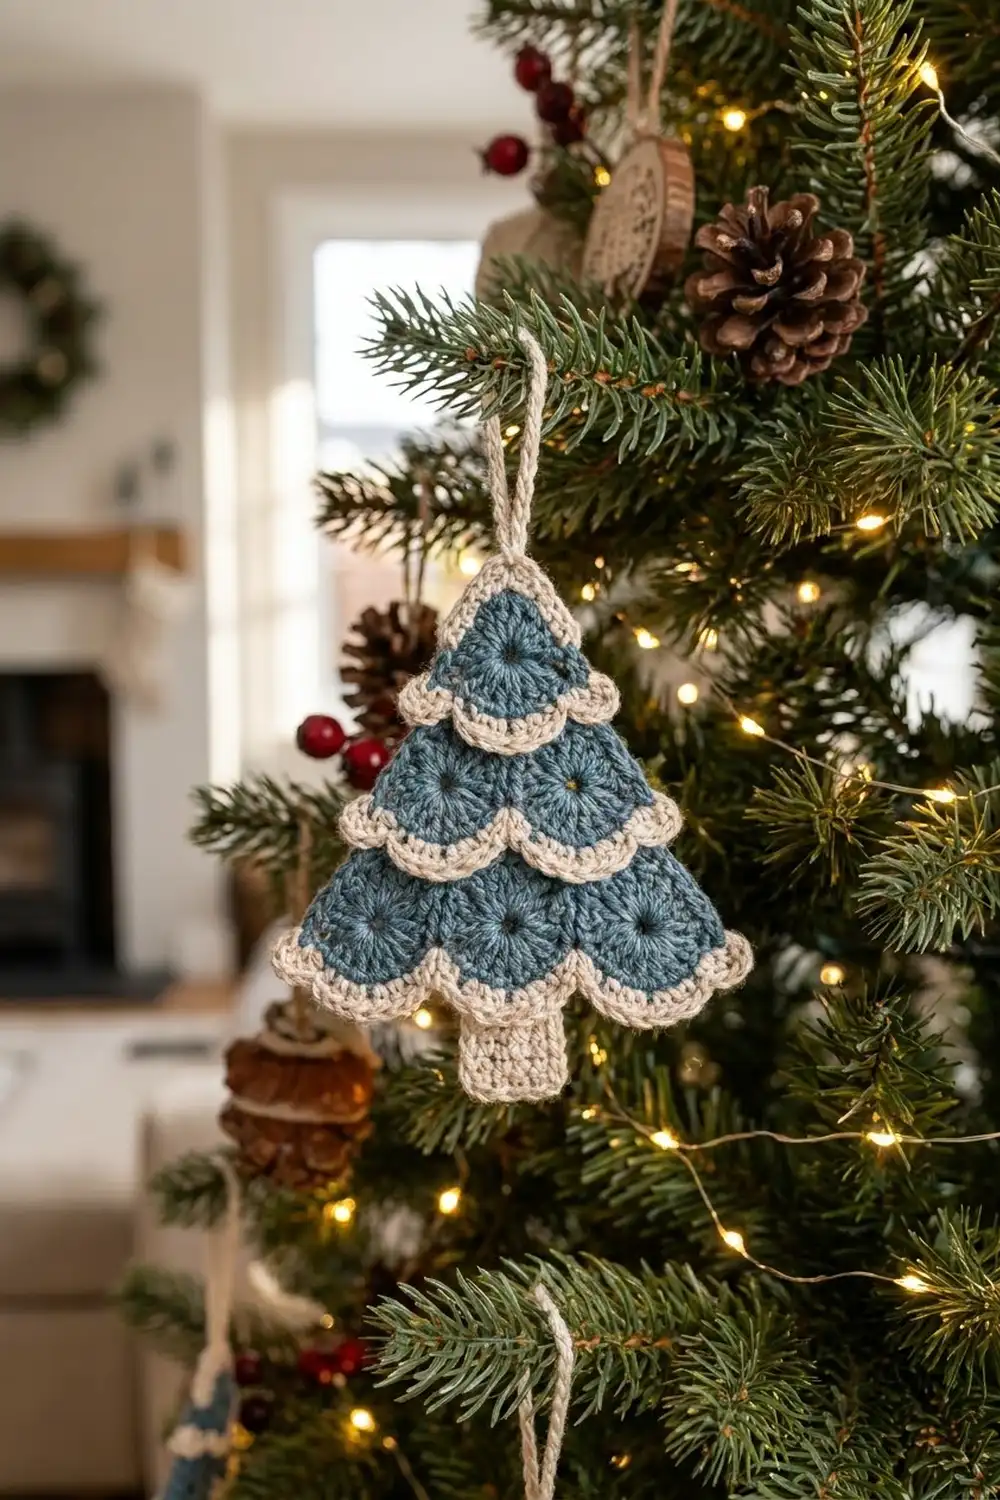
The Frosted Fir is a small, flat Christmas tree ornament with three layered tiers of scalloped fans. Each tier hangs over the one below it like a little skirt, so the tree has real depth even though it is only one piece of crochet.
The palette is quiet: a dusty denim blue for the branches and a warm cream for the tip, the scalloped edging, the trunk and the hanging loop. The rope-like cream edge comes from a row of reverse single crochet, which outlines every scallop.
This pattern uses US crochet terms. The finished ornament is about 5.5 in (14.0 cm) wide and 5.2 in (13.2 cm) tall without the loop. The loop adds 2 in (5.1 cm).
The tree is worked top-down in rows as one piece. Each tier’s fans are worked into the front loops of a body row. The next tier continues in the back loops of that same row, which is what creates the overlapping flaps. Then you add the trunk, the cream edging and the hanging loop.
Finished Size and Construction
- Finished size: 5.5 in (14.0 cm) wide x 5.2 in (13.2 cm) tall, plus a 2 in (5.1 cm) loop
- Skill level: Easy-Intermediate
- Terminology: US terms
- Yarn weight: DK (light worsted, #3)
- Hook: 3.5 mm (E-4)
- Number of pieces: 1
- Layout: 3 stacked tiers (1, 2 and 3 fans), a cream tip, a trunk and a loop
- Piece size: 5.5 in (14.0 cm) x 5.2 in (13.2 cm)
- Size before border: 5.2 in (13.2 cm) wide x 5.2 in (13.2 cm) tall
- Border depth: 0.3 in (0.8 cm) on every scallop
Materials
Use a smooth DK cotton or cotton blend. Cotton keeps the fans crisp and holds the scallops well after blocking. Acrylic also works, but it may need a light spray starch.
- Color A, dusty denim blue: 10 g / 23 m (25 yd)
- Color B, cream: 8 g / 18 m (20 yd)
These quantities include a margin of about 25 percent for your gauge swatch and weaving in ends.
Tools:
– 3.5 mm (E-4) crochet hook
– Tapestry needle
– Scissors
– Rust-proof pins and a blocking mat
– Spray bottle, plus spray starch if you want it
Abbreviations (US Terms)
- ch: chain
- sl st: slip stitch
- sc: single crochet
- dc: double crochet
- rev sc: reverse single crochet (crab stitch)
- sk: skip
- st(s): stitch(es)
- FLO / BLO: front loop only / back loop only
- RS / WS: right side / wrong side
Special stitches
Fan: Work 9 dc into the same stitch.
Reverse sc: Work from left to right without turning. Insert the hook into the next stitch to the right, yarn over and pull up a loop, then yarn over and pull through both loops.
Turning chain note: In body rows, ch 3 counts as the first dc. In fan rows and trunk rows, ch 1 does not count as a stitch.
Gauge and Checkpoints
- Gauge: 20 dc x 10 rows = 4 in (10.2 cm), and 20 sc x 20 rows = 4 in (10.2 cm)
- Per stitch: 1 dc is 0.2 in (0.5 cm) wide and 0.4 in (1.0 cm) tall; 1 sc row is 0.2 in (0.5 cm) tall
The cap and Tier 1 make a quick test piece. Work through the Tier 1 fan rows, then measure before going on.
Checkpoints:
– After Row 4: 1.8 in (4.6 cm) wide, 1.2 in (3.0 cm) tall from the tip
– After Row 6: 3.4 in (8.6 cm) wide, 2.0 in (5.1 cm) tall
– After Row 8: 5 in (12.7 cm) wide, 2.8 in (7.1 cm) tall
– Each fan flap before border: about 0.9 in (2.3 cm) deep
If your Row 4 is wider than 1.9 in (4.8 cm), go down half a hook size. If it is narrower than 1.7 in (4.3 cm), go up half a size. Row height matters most here, because it decides how far each flap overlaps the next tier.
Pattern
Tip and Tier 1 Body
Row 1 (RS): With B, ch 2. Work 3 sc in the 2nd ch from the hook. (3 sts)
Row 2 (WS): Ch 1, turn. Work 2 sc in the first st, sc in the next st, 2 sc in the last st. Change to A on the last yarn over. (5 sts, 1 in / 2.5 cm wide)
Row 3 (RS): Ch 3, turn. Work dc in the first st, dc in the next 3 sts, 2 dc in the last st. (7 sts, 1.4 in / 3.6 cm)
Row 4 (WS): Ch 3, turn. Work dc in the first st, dc in the next 5 sts, 2 dc in the last st. (9 sts, 1.8 in / 4.6 cm)
Tier 1 Fans
Row 4 is the base row for Tier 1. Each fan uses 8 stitches of the base row, plus 1 stitch to finish, so 1 fan needs 9 sts.
Fan Row A (RS): Ch 1, turn. Work all stitches in FLO. Sc in the first st, sk 3 sts, Fan in the next st, sk 3 sts, sc in the last st. (1 fan; 9 dc + 2 sc = 11 sts)
Fan Row B (WS): Ch 1, turn. Sc in the first sc, then work (dc in the next dc, 2 dc in the next dc) 4 times, dc in the last dc, and sc in the last sc. (13 dc + 2 sc = 15 sts)
Do not fasten off. Turn so the RS faces you and fold the flap down toward you. Sl st into the unused back loop of the first stitch of Row 4.
Tier 2 Body and Fans
Row 5 (RS): Work in BLO of Row 4. Ch 3, then 2 dc in the same st, dc in the next 7 sts, 3 dc in the last st. (13 sts, 2.6 in / 6.6 cm)
Row 6 (WS): Ch 3, turn. Work 2 dc in the first st, dc in the next 11 sts, 3 dc in the last st. (17 sts, 3.4 in / 8.6 cm)
Fan Row A (RS): Ch 1, turn. Work in FLO. Sc in the first st, then sk 3, Fan in the next st, sk 3, sc in the next st, and repeat from * once more. (2 fans; 18 dc + 3 sc = 21 sts)
Fan Row B (WS): Ch 1, turn. Sc in the first sc, then (dc in the next dc, 2 dc in the next dc) 4 times, dc in the next dc, sc in the next sc, and repeat from * once more. (26 dc + 3 sc = 29 sts)
Fold the flap down and sl st into the back loop of the first stitch of Row 6, as before.
Tier 3 Body and Fans
Row 7 (RS): Work in BLO of Row 6. Ch 3, then 2 dc in the same st, dc in the next 15 sts, 3 dc in the last st. (21 sts, 4.2 in / 10.7 cm)
Row 8 (WS): Ch 3, turn. Work 2 dc in the first st, dc in the next 19 sts, 3 dc in the last st. (25 sts, 5 in / 12.7 cm)
Fan Row A (RS): Ch 1, turn. Work in FLO. Sc in the first st, then sk 3, Fan, sk 3, sc, and repeat from * 2 more times. (3 fans; 27 dc + 4 sc = 31 sts)
Fan Row B (WS): Ch 1, turn. Sc in the first sc, then (dc, 2 dc) 4 times, dc, sc in the next sc, and repeat from * 2 more times. (39 dc + 4 sc = 43 sts)
Fasten off A. The body now measures 2.8 in (7.1 cm) from the tip to Row 8.
Count check: each base row must equal (8 x number of fans) + 1. That gives 9, 17 and 25 sts. Each body row adds exactly 4 sts (2 at each edge), so 9 → 13 → 17 → 21 → 25 lines up with all three tiers.
Trunk
With the RS facing, find the remaining back loops of Row 8. Count to the 11th stitch, which leaves 10 stitches on each side.
Trunk Row 1 (RS): Join B in the BLO of the 11th st. Ch 1, then sc in the same st and the next 4 sts. (5 sts, 1 in / 2.5 cm)
Trunk Rows 2–12: Ch 1, turn, sc in each st across. (5 sts)
Fasten off. The trunk is 2.4 in (6.1 cm) long. About 1.2 in (3.0 cm) of it sits under the Tier 3 flap, and 1.2 in (3.0 cm) shows below it.
Border: Scalloped Cream Edge
Border gauge: 5 sc = 1 in (2.5 cm). Each flap’s edging is worked separately on its free hanging edge, in two rows.
On each flap, work Row C and then Row D:
Row C (RS): Join B in the first sc at the right end of the flap and ch 1. Sc in the same sc. Then work 2 sc in the next dc, sc in the next 11 dc, 2 sc in the next dc, sc in the next sc across the flap.
– That makes 15 sc per fan, plus 1 sc at each valley and at each end.
Row D (RS): Do not turn. Ch 1, then work rev sc in each st back to the start. Fasten off.
Counts per tier (Rows C and D are the same):
– Tier 1: (1 x 15) + 2 = 17 sts
– Tier 2: (2 x 15) + 3 = 33 sts
– Tier 3: (3 x 15) + 4 = 49 sts
Why the math works: After Fan Row B, each fan’s outer arc is about 0.8 in (2.0 cm) from its center. Row C sits about 1 in (2.5 cm) out, so a half-circle at that distance measures about 3.1 in (7.9 cm). The 15 sc measure 3.0 in (7.6 cm) at border gauge, which is just slightly snug. That keeps each scallop curving neatly instead of ruffling. The single sc at each valley keeps the dip between fans sharp.
The edging adds about 0.15 in (0.4 cm) at each side, which takes the width from 5.2 in (13.2 cm) to 5.5 in (14.0 cm).
Hanging Loop
- Join B at the tip, in the foundation chain of Row 1.
- Ch 24, then sl st back into the same spot to form a ring.
- Ch 1 and work 30 sc over the ring, which covers the chains completely.
- Sl st to the tip and fasten off.
The finished loop stands 2 in (5.1 cm) tall and is thick and corded, like the body edging.
Final Blocking
- Weave in all ends behind the flaps, using matching colors.
- Spray the ornament until it is damp, but not soaked.
- Pin the tip, the two outer points of Tier 3 and the trunk corners. Aim for 5.5 in (14.0 cm) across and 5.2 in (13.2 cm) from tip to trunk.
- Lay each flap flat so it overlaps the tier below by about 0.4 in (1.0 cm).
- Pin each scallop at its lowest point, and pin each valley.
- Shape the loop so it stands straight up.
- If you like, add a light mist of starch.
- Let it dry completely before unpinning.
Final Quality-Control Checklist
- Tiers have 1, 2 and 3 fans, and each fan has a visible center hole.
- Base rows count 9, 17 and 25 sts.
- Fan Row B counts are 15, 29 and 43 sts.
- Border Row C/D counts are 17, 33 and 49 sts.
- Each flap hangs freely and covers the top of the next tier.
- The trunk is 5 sts wide and centered, with 10 unused loops on each side.
- The ornament measures 5.5 in (14.0 cm) x 5.2 in (13.2 cm).
- The loop is firm and centered at the tip.
Troubleshooting
Fans ruffle: Your hook is too large, or you added extra dc in Fan Row B. Recount to 13 dc per fan.
Fans cup or pull: Work Fan Row B more loosely, or go up half a hook size for the fan rows only.
The flap doesn’t separate from the body: You worked the next body row through both loops. Body rows 5 and 7 must go into the back loops only.
Off-center fans: Recount the base row. It must be exactly 8 x the number of fans + 1.
The trunk is lopsided: Re-count to the 11th back loop before joining.
The edge looks thin: Work the reverse sc a little more loosely so it can twist into a cord.
Care
Hand wash in cool water and lay flat to dry. Reshape the scallops while damp, and store flat or hang the ornament by its loop.
Final Notes
The size chain is short and reliable:
- 20 dc = 4 in (10.2 cm) gives base rows of 1.8 in (4.6 cm), 3.4 in (8.6 cm) and 5 in (12.7 cm).
- Fans worked over those base rows give a body 5.2 in (13.2 cm) wide.
- The edging is 0.3 in (0.8 cm) deep and adds 0.15 in (0.4 cm) at each side, for 5.5 in (14.0 cm) total.
- The 2.4 in (6.1 cm) trunk brings the height to 5.2 in (13.2 cm).
If you check Row 4 against the first checkpoint, everything after it will fall into place.
Happy crocheting!