

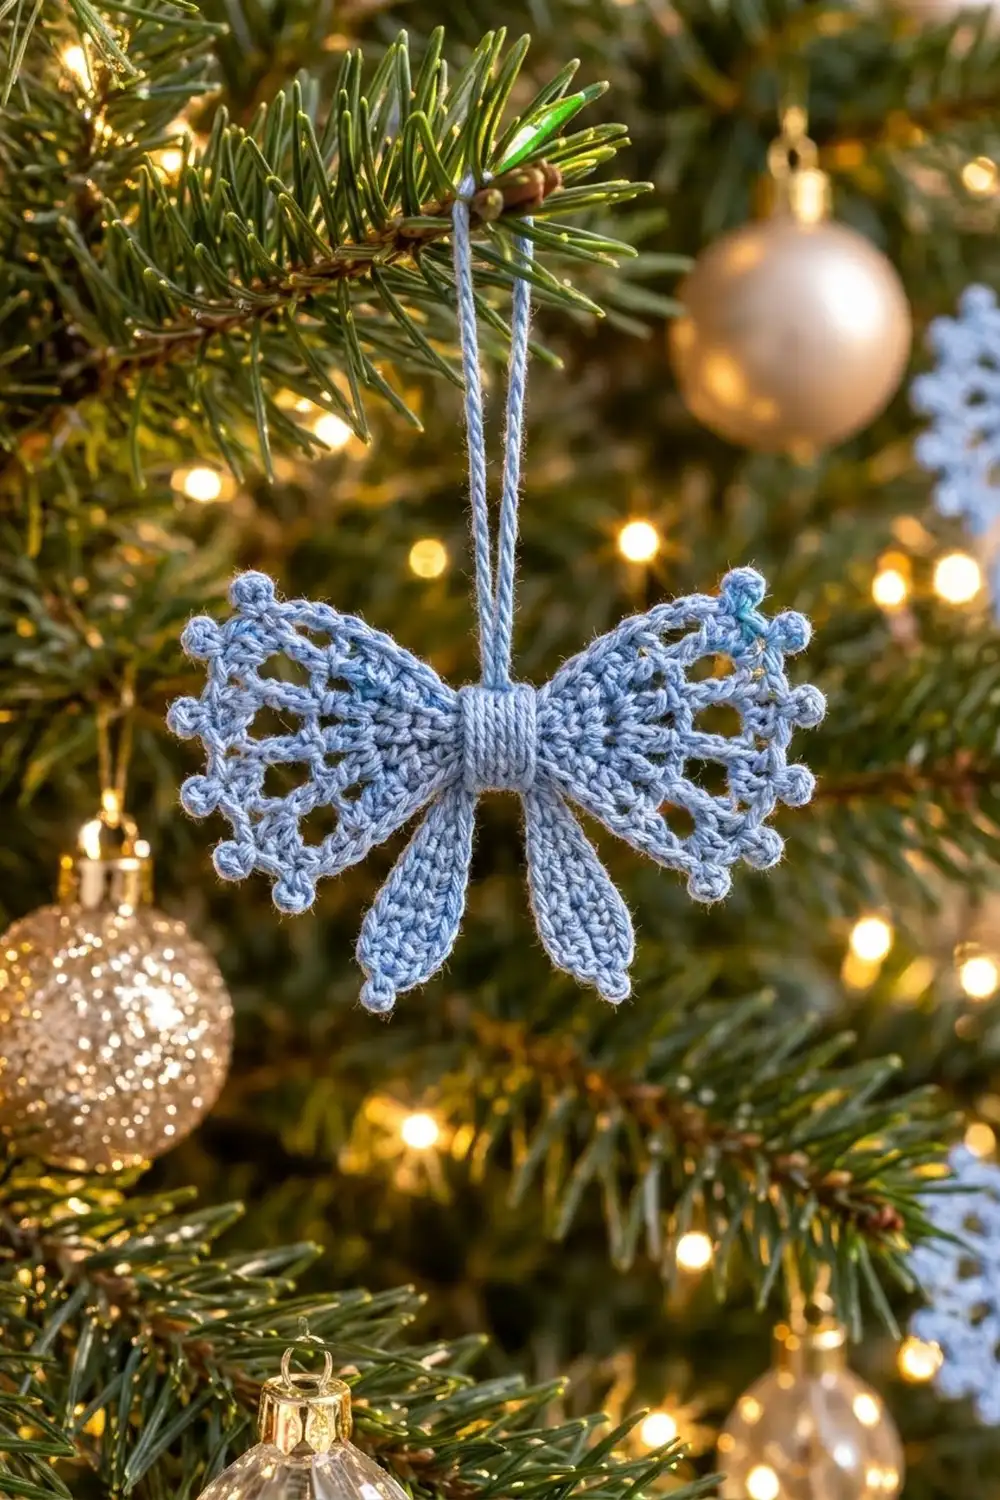
This little bow ornament is light, lacy, and quick to make. Each wing is a small openwork fan with radiating spokes and a picot edge. Two slim tails hang below, and a tightly wrapped center pinches everything together.
The sample is worked in a single soft powder blue cotton thread. One color keeps the lace easy to read and gives the bow a frosty, vintage look on a tree, a gift, or a wreath. You can use white, silver gray, or blush with the same instructions.
The pattern is written in US crochet terms. The finished bow measures about 3.5 in (8.9 cm) wide and 2.75 in (7.0 cm) tall, with a hanging loop that adds about 2 in (5.1 cm).
Construction is simple. You crochet two fan wings, two tails, a small center square, and a slip-stitch cord. Each wing gets a picot border. Then you gather the wing bases, stack the pieces, wrap the center tightly with thread, and sew the square and loop in place.
Finished Size and Construction
- Finished bow: 3.5 in (8.9 cm) wide x 2.75 in (7.0 cm) tall, plus a 2 in (5.1 cm) loop
- Skill level: Intermediate (thread work, picots, working into a ring)
- Terminology: US crochet terms
- Yarn weight: Size 3 cotton crochet thread (lace weight)
- Hook: 2.0 mm steel hook
- Number of pieces: 6 (2 wings, 2 tails, 1 center square, 1 loop)
- Layout: Wings left and right, tails down from the center, square on the front, loop at the top
- Piece size (wing): 1.5 in (3.8 cm) radius, 3 in (7.6 cm) across the straight edge
- Wing size before border: 1.2 in (3.0 cm) radius
- Border depth: 0.3 in (0.8 cm)
Materials
Choose a smooth, tightly twisted mercerized cotton thread. Mercerized thread shows the lace spokes clearly and holds its shape after blocking. Avoid fuzzy or very soft yarns, which blur the picots.
- Powder blue, size 3 cotton thread: about 10 g (approximately 60 m) for one bow
One bow uses roughly 4 g (about 25 m). The quantity above includes a generous margin for a test wing, the thread wrap at the center, and sewing tails.
Tools:
- 2.0 mm steel crochet hook
- Tapestry needle with a small eye
- Sharp scissors
- Rust-proof pins and a foam blocking mat
- Spray starch or fabric stiffener (optional)
- Measuring tape or ruler
Abbreviations (US Terms)
- ch – chain
- sl st – slip stitch
- sc – single crochet
- hdc – half double crochet
- dc – double crochet
- st(s) – stitch(es)
- sp(s) – space(s)
- rep – repeat
Special stitch – picot: Ch 3, sl st in the 3rd ch from hook (the first ch made). The picot sits as a tiny round knob on the edge and does not count as a stitch.
Gauge and Checkpoints
Gauge: 10 sc and 11 sc rows = 1 in (2.5 cm) with size 3 thread and a 2.0 mm hook.
Make one wing first, including its border, and measure it before making anything else. Lay it flat and measure from the center of the ring to the tip of a middle picot.
Wing checkpoints (radius from ring center):
- After Row 1: 0.4 in (1.0 cm)
- After Row 2: 0.6 in (1.5 cm)
- After Row 3: 0.9 in (2.3 cm)
- After Row 4: 1.2 in (3.0 cm)
- After Row 5 (border): 1.5 in (3.8 cm)
Other checkpoints:
- Tail: 1.5 in (3.8 cm) long x 0.5 in (1.3 cm) wide
- Center square: 0.6 in (1.5 cm) square
- Loop cord: 4 in (10.2 cm) before folding
If your wing is too big, go down to a 1.75 mm hook. If it is too small, go up to a 2.25 mm hook. If the wing radius is off by 0.3 in (0.8 cm) or more, the bow’s proportions will change, so adjust before you go on. If the wing ruffles a lot after Row 3, your chains are too loose. Make them a little tighter rather than changing the counts.
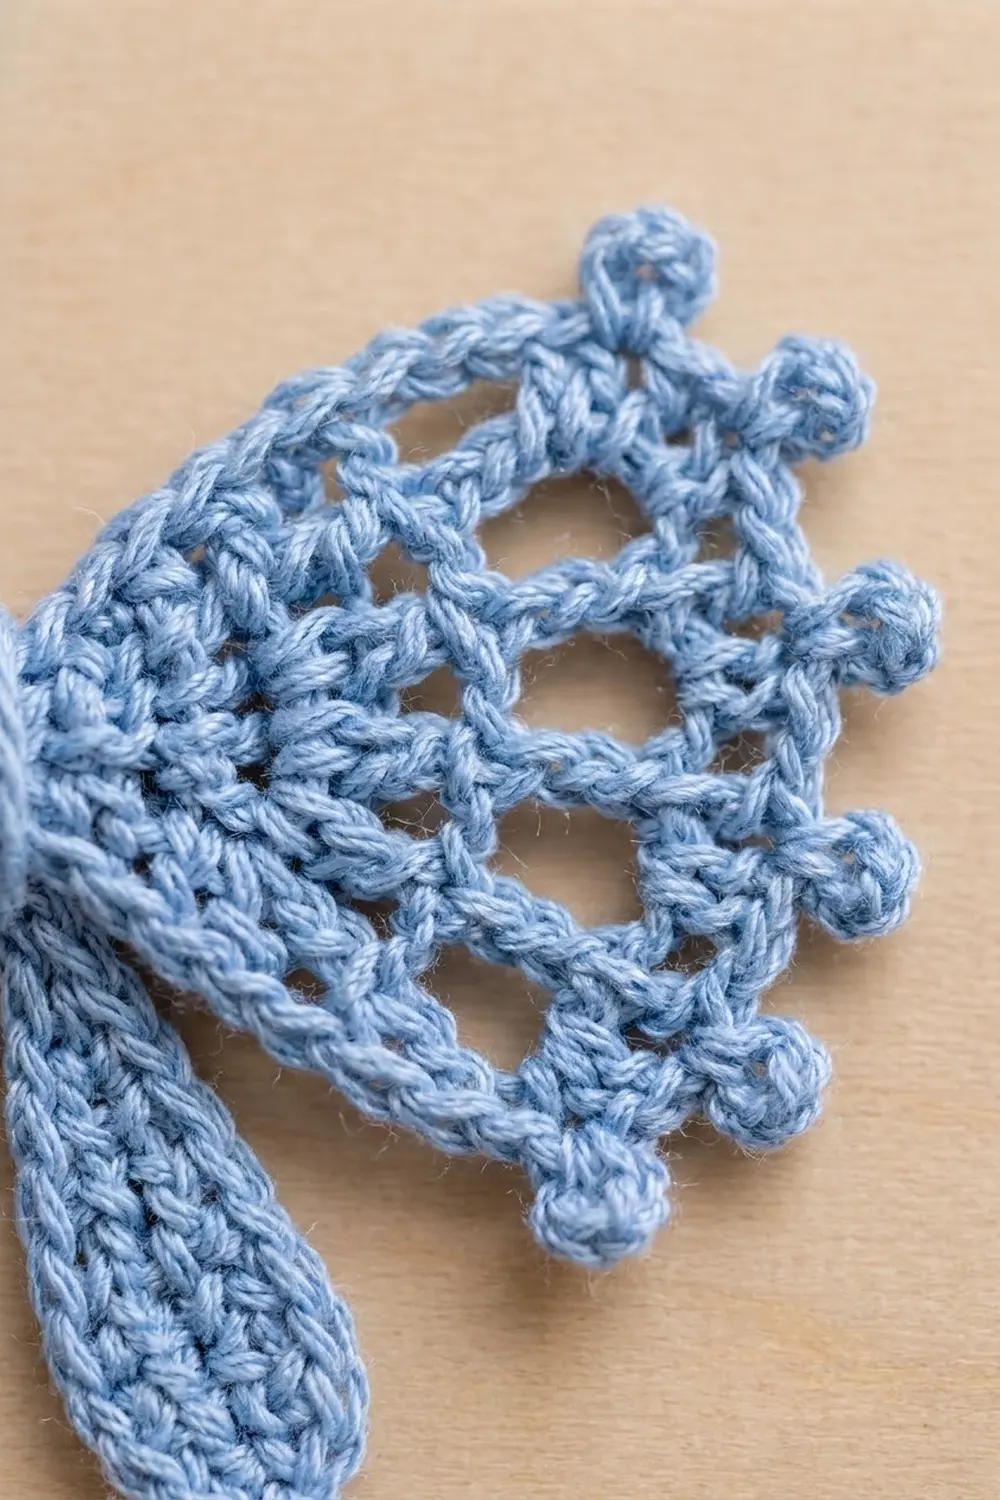
Wing (Make 2)
The wing is worked in turned rows over a ring, forming a semicircle. The straight edge (the ring plus the row ends) becomes the base of the wing, and the curved edge becomes the outer edge.
Foundation: Ch 4, sl st in the first ch to form a ring.
Row 1: Ch 3 (counts as dc), 6 dc in ring. Turn. (7 dc)
The stitches fan into a half circle. Do not join into a round.
Row 2: Ch 4 (counts as dc and ch 1), dc in first st; *ch 1, (dc, ch 1, dc) in next st; rep from * across, working the last repeat in the top of the turning ch. Turn. (14 dc, 13 ch-1 sps)
Every stitch of Row 1 now holds 2 dc, which doubles the spokes.
Row 3: Ch 5 (counts as dc and ch 2), *dc in next dc, ch 2; rep from * 11 more times, dc in 3rd ch of turning ch. Turn. (14 dc, 13 ch-2 sps)
This row lengthens the spokes and opens the lace without adding stitches.
Row 4: Ch 1, sc in first dc, *ch 3, sc in next dc; rep from * 11 more times, ch 3, sc in 3rd ch of turning ch. Turn. (14 sc, 13 ch-3 loops)
The ch-3 loops form the arc of small windows just inside the edge. Check the 1.2 in (3.0 cm) radius here. Do not fasten off; the border follows directly as Row 5 (see Border section).
Tail (Make 2)
The tail is worked around both sides of a foundation chain, like a leaf. The slip-stitch end is the narrow top; the chain-space point is the bottom.
Foundation: Ch 13.
Round 1: Working into the 2nd ch from hook: sl st, sc in next 3 ch, hdc in next 4 ch, dc in next 3 ch, (2 dc, ch 2, 2 dc) in last ch. Rotate and work along the other side of the foundation ch: dc in next 3 ch, hdc in next 4 ch, sc in next 3 ch, sl st in last ch. (26 sts and 1 ch-2 point)
The count per side is 1 sl st + 3 sc + 4 hdc + 3 dc = 11 sts, twice, plus the 4 dc at the tip. Fasten off, leaving an 8 in (20.3 cm) tail at the top for sewing. Check: 1.5 in (3.8 cm) long, 0.5 in (1.3 cm) wide at the widest point.
Center Square (Make 1)
Foundation: Ch 7.
Row 1: Sc in 2nd ch from hook and in each ch across. Turn. (6 sc)
Rows 2–7: Ch 1, sc in each st across. Turn. (6 sc)
Fasten off, leaving a 10 in (25.4 cm) tail. Check: 0.6 in (1.5 cm) square.
Hanging Loop (Make 1)
Foundation: Ch 41.
Row 1: Sl st in the back bump of the 2nd ch from hook and in the back bump of each ch across. (40 sl st)
Fasten off, leaving a 6 in (15.2 cm) tail at each end. The cord is about 4 in (10.2 cm) long and firm enough to hold a round, open loop.
Make All Pieces
All pieces use the same powder blue thread.
- Wings: 2
- Tails: 2
- Center square: 1
- Hanging loop: 1
Layout (front view):
            [ LOOP ]
[ WING L ] [ SQUARE ] [ WING R ]
       [ TAIL L ] [ TAIL R ]
Lay the pieces out like this before sewing, with all right sides facing up. The wings’ straight edges face the square, and the tails’ narrow tops meet under the square.
Joining
Assembly is done with the tapestry needle and lengths of the same thread. Finish the border on both wings before you start.
1. Gather each wing base. Thread a 12 in (30.5 cm) length. Work a running stitch along the straight edge, going through each row end in order: Row 5, 4, 3, 2, and 1 ends on one side, through the ring, then Row 1 to Row 5 ends on the other side. That is 10 row ends plus the ring. Pull firmly until the 3 in (7.6 cm) straight edge closes to 0.5 in (1.3 cm), and knot. The fan now opens into a wedge.
2. Stack the wings. Place the two gathered bases side by side, touching, so the wings point left and right. Stitch the bases together with 3 to 4 whipstitches through both gathered edges.
3. Add the tails. Lay both tails behind the wings, narrow tops at the center, angled slightly apart in an upside-down V. Use each tail’s sewing end to tack its top 0.2 in (0.5 cm) to the back of the gathered bases.
4. Wrap the center. Thread a 24 in (61.0 cm) length. Wrap it tightly around the center 8 times, pulling each wrap snug so the bases pinch in. Lay the wraps side by side, not stacked. Secure with a few stitches through the back.
5. Add the square. Place the square on the front, over the wraps. Fold its left and right edges around to the back. Whipstitch the side edges together on the back, 1 stitch per row end, 7 stitches total.
6. Attach the loop. Fold the cord in half. Push both ends down behind the square at the top and stitch them securely to the back of the wraps. Weave in all ends inside the wraps.
Tension advice: Pull the gathering and wraps firmly, but sew the square and loop with moderate tension so the square stays flat and square.
Size checkpoint: The assembled bow should measure 3.5 in (8.9 cm) from wing tip to wing tip and 2.75 in (7.0 cm) from the top of the wings to the tail points.
Border
The border is Row 5 of each wing, worked directly after Row 4 along the curved edge only.
Border gauge: each ch-3 loop takes 3 sc, or 4 sc plus a picot. The border adds 0.3 in (0.8 cm) to the radius.
Row 5: Ch 1, sc in first sc; *(2 sc, picot, 2 sc) in next ch-3 loop, sc in next sc, 3 sc in next ch-3 loop, sc in next sc; rep from * 5 more times, (2 sc, picot, 2 sc) in last ch-3 loop, sc in last sc. Fasten off and weave in. (60 sc, 7 picots)
Why the math works: Row 4 has 14 sc and 13 loops. The 14 sc each take 1 sc, giving 14. The 13 loops alternate, starting and ending with a picot loop: 7 picot loops x 4 sc = 28, plus 6 plain loops x 3 sc = 18. That gives 14 + 28 + 18 = 60 sc. Because 13 is odd, the first and last loops both carry picots, so a picot sits at each corner of the fan and 5 more are spaced evenly between them.
Final Blocking
- Wet the finished bow in cool water and press out the excess in a towel. Do not wring.
- Lay it right side up on the blocking mat.
- Pin each wing tip so the bow measures 3.5 in (8.9 cm) across.
- Pin each picot so it sits round and points outward.
- Open the lace windows of Rows 2 to 4 by gently spreading each spoke.
- Pin the tails straight and pin each tail point.
- Spray lightly with starch if you want a crisper ornament.
- Let dry completely, then remove the pins.
Final Quality-Control Checklist
- Both wings have 14 spokes, 13 loops, 60 border sc, and 7 picots.
- Both wings measure 1.5 in (3.8 cm) radius before gathering.
- Both tails measure 1.5 in (3.8 cm) long and point downward.
- The center wrap is tight and fully covered by the square at the front.
- The loop is centered and stands about 2 in (5.1 cm) tall.
- The bow measures 3.5 in (8.9 cm) x 2.75 in (7.0 cm).
- No ends are visible from the front.
Troubleshooting
Wing cups instead of lying flat: Your dc stitches are tight. Loosen the ch-1 and ch-2 spaces slightly, or go up a hook size.
Wing ruffles: Your chains are loose. Make tighter chains, then block firmly.
Picots flatten into loops: Pull the picot sl st snug and pin it round while blocking.
Tail curls: Block it pinned flat and use a little starch.
Wings slip at the center: Add 2 or 3 more wraps and stitch through all layers at the back.
Square looks stretched: Re-sew the back seam with looser stitches.
Care
Hand wash in cool water and lay flat to dry, pinning lightly to restore the shape. Store flat or hanging, away from heavy ornaments that could crush the picots.
Final Notes
Everything in this bow follows one measurement chain. The 10 sc to 1 in (2.5 cm) gauge gives a 1.2 in (3.0 cm) wing before the border, and the border brings it to 1.5 in (3.8 cm). Gathering the 3 in (7.6 cm) base to 0.5 in (1.3 cm) shapes the wedge, and two wedges plus the center give the 3.5 in (8.9 cm) width. The 1.5 in (3.8 cm) tails set the 2.75 in (7.0 cm) height, and the 4 in (10.2 cm) cord folds into a 2 in (5.1 cm) loop. Check each step, and the finished bow will match.
Happy crocheting!