

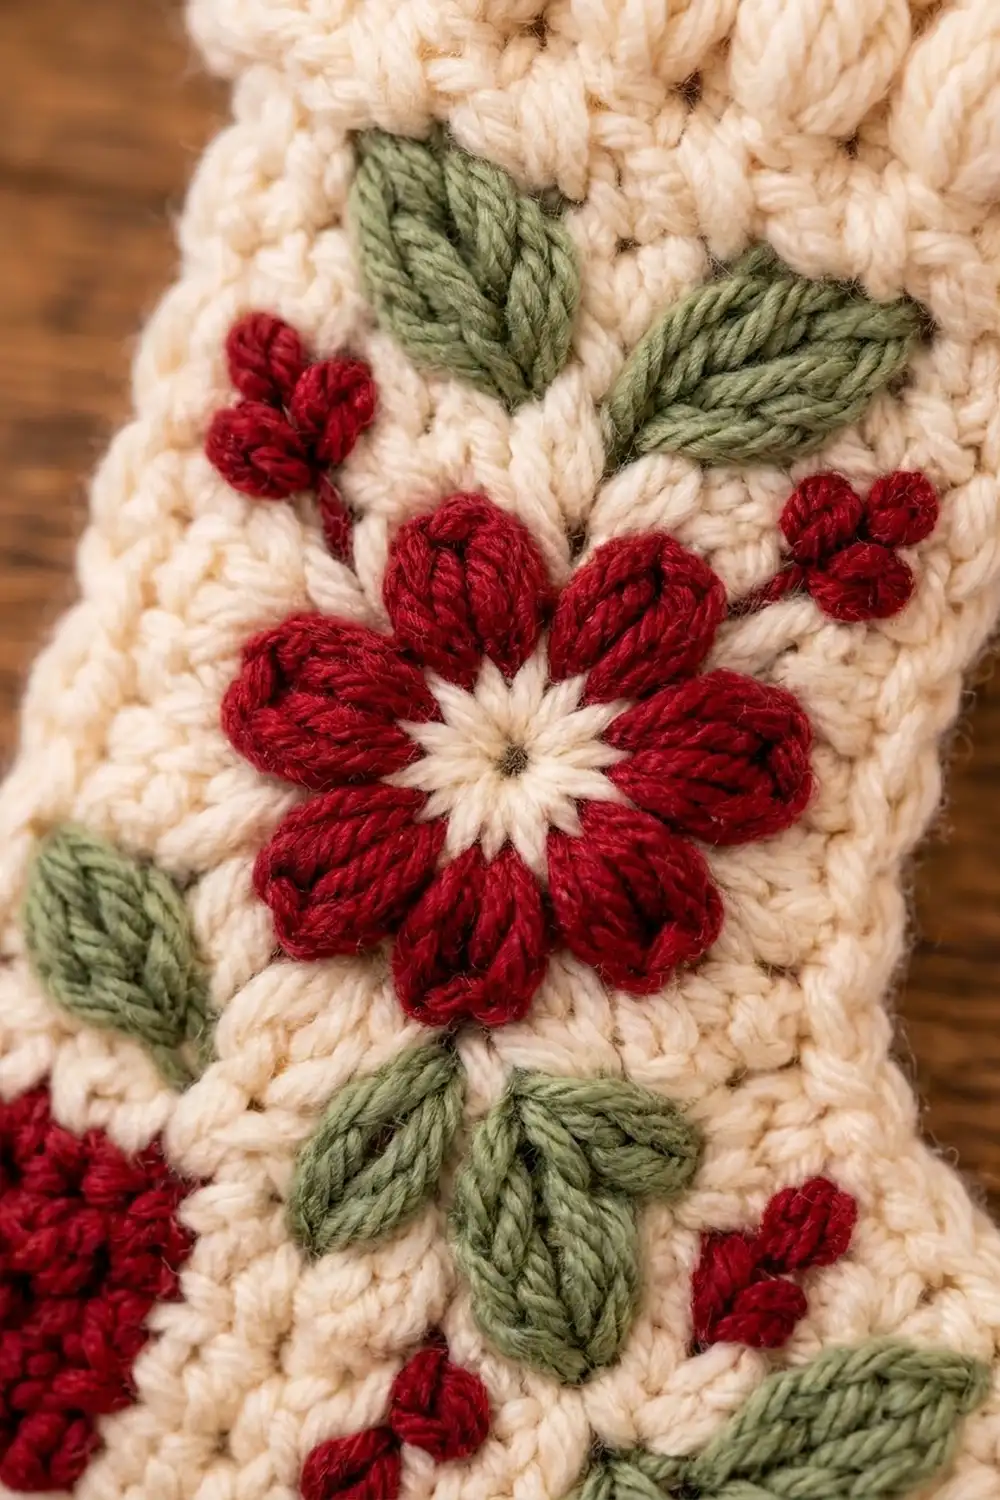
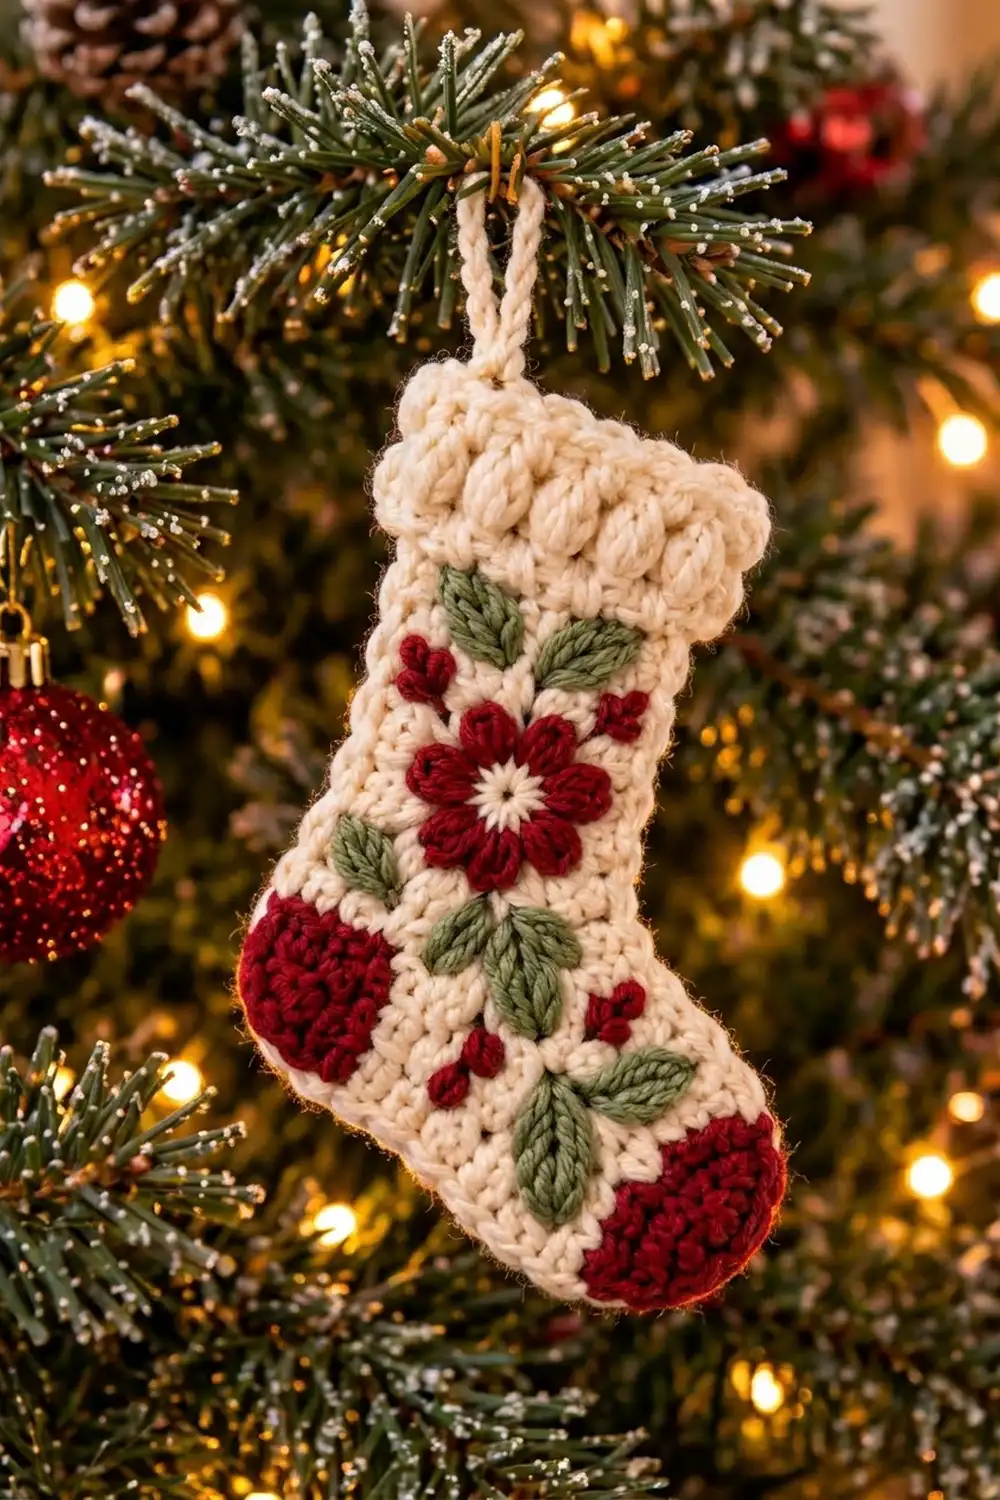
The Winter Bloom Stocking is a small, flat Christmas ornament with a cozy, cottage-style look. The body is creamy white. The cuff has two rows of raised bobbles, and deep red patches cover the heel and toe. A red flower with a cream center sits on the leg, with sage-green leaves and tiny red berries around it.
The palette is classic and soft: cream, deep cranberry red, and muted sage green. The style looks like folk embroidery, but every motif is crocheted and sewn on, apart from simple French-knot berries.
This pattern uses US crochet terms. The finished ornament measures 3.6 in (9.1 cm) wide by 4.6 in (11.7 cm) tall, not counting the hanging loop.
You’ll work the stocking body flat in rows of single crochet, from the bottom of the foot up to the cuff. The bobbles are worked on wrong-side rows so they pop to the front. Next comes one round of edging with the hanging loop. Then you make the heel patch, toe patch, flower, and leaves separately and sew them on, and finish with embroidered berries.
Finished Size and Construction
- Finished size: 3.6 in x 4.6 in (9.1 cm x 11.7 cm), plus a 1 in (2.5 cm) loop
- Skill level: Easy-Intermediate
- Terminology: US
- Yarn weight: DK / light worsted (#3)
- Hook: 3.5 mm (E-4)
- Number of pieces: 1 ornament: 1 body plus 11 small appliqués (heel, toe, flower, 8 leaves)
- Layout: Single flat stocking, leg on the left and foot pointing right
- Body size before border: 3.2 in (8.1 cm) wide at the foot x 4.2 in (10.7 cm) tall
- Border depth: 0.2 in (0.5 cm) on every side
Materials
Choose a smooth DK cotton or cotton-blend yarn. A smooth yarn shows bobbles and petals clearly and blocks crisply. Acrylic works too, but it may need steam blocking to lie flat.
- Cream: 10 g / about 24 m (body, cuff, edging, loop, flower center)
- Deep red: 5 g / about 12 m (heel, toe, flower petals, berries)
- Sage green: 3 g / about 7 m (leaves)
These amounts are for one ornament and include a safety margin of roughly 20%.
Tools:
– 3.5 mm (E-4) crochet hook
– Tapestry needle
– Scissors
– Stitch marker
– Blocking mat and rustproof pins
– Spray bottle or steamer
Abbreviations (US Terms)
- ch – chain
- sl st – slip stitch
- sc – single crochet
- hdc – half double crochet
- dc – double crochet
- sc2tog – single crochet 2 together
- MR – magic ring
- st(s) – stitch(es)
- RS / WS – right side / wrong side
Special stitch – Bobble (bob): Work the following 4 times, all into the same stitch: yarn over, insert hook, yarn over and pull up a loop, yarn over and pull through 2 loops. You now have 5 loops on the hook. Yarn over and pull through all 5 loops. Each bobble counts as 1 stitch.
Gauge and Checkpoints
Gauge: 5 sc and 5 rows = 1 in (2.5 cm).
For a swatch, ch 11 and work 10 sc per row for 10 rows. It should measure 2 in x 2 in (5.1 cm x 5.1 cm). The gauge is square on purpose, so the edging can use exactly one stitch per row end.
Make one complete body before you make any appliqués. Check these measurements:
- After Row 3: 3.2 in (8.1 cm) wide
- After Row 8: foot is 1.6 in (4.1 cm) tall
- After Row 16: body is 3.2 in (8.1 cm) tall, leg is 2.2 in (5.6 cm) wide
- After Row 21: body is 4.2 in (10.7 cm) tall, cuff is 2.6 in (6.6 cm) wide
- After edging: 3.6 in x 4.6 in (9.1 cm x 11.7 cm)
Too big? Go down to a 3.25 mm hook. Too small? Go up to a 3.75 mm hook. Don’t change stitch counts, because the edging and appliqué placement depend on them.
Stocking Body
Use cream. Row 1 is the RS. Odd (RS) rows travel from the heel edge to the toe edge, and even (WS) rows travel from the toe edge back to the heel edge. Ch 1 at the start of each row does not count as a stitch.
Row 1 (RS): Ch 13. Sc in the 2nd ch from hook and in each ch across. (12 sc)
Place a marker on the RS so you can track the direction.
Row 2 (WS): Ch 1, turn. 2 sc in the first st, sc in the next 10 sts, 2 sc in the last st. (14 sc)
Row 3 (RS): Ch 1, turn. 2 sc in the first st, sc in the next 12 sts, 2 sc in the last st. (16 sc)
These two increase rows round both the heel and the toe. The foot now measures 3.2 in (8.1 cm) wide.
Rows 4–5: Ch 1, turn. Sc in each st across. (16 sc)
Instep Shaping
All decreases fall on the toe edge, so the leg stays lined up with the heel.
Row 6 (WS, starts at the toe edge): Ch 1, turn. Sc2tog twice, sc in the remaining 12 sts. (14 sc)
Row 7 (RS, ends at the toe edge): Ch 1, turn. Sc in the next 10 sts, sc2tog twice. (12 sc)
Row 8 (WS, starts at the toe edge): Ch 1, turn. Sc2tog, sc in the remaining 10 sts. (11 sc)
The foot is 8 rows, or 1.6 in (4.1 cm) tall. The leg rises from the heel side, and the foot sticks out 1 in (2.5 cm) past it toward the toe.
Leg
Rows 9–16: Ch 1, turn. Sc in each st across. (11 sc)
The body now measures 3.2 in (8.1 cm) tall.
Bobble Cuff
Row 17 (RS): Ch 1, turn. Sc in the first st, 2 sc in the next st, sc in the next 7 sts, 2 sc in the next st, sc in the last st. (13 sts) This is 11 existing sts plus 2 increases. The cuff now sits 0.2 in (0.5 cm) wider than the leg.
Row 18 (WS): Ch 1, turn. Sc in the first st, (bob in next st, sc in next st) 6 times. (13 sts: 6 bobbles + 7 sc)
Row 19 (RS): Ch 1, turn. Sc in each st across. (13 sc) Push each bobble to the front as you go.
Row 20 (WS): Ch 1, turn. Sc in the first 2 sts, (bob in next st, sc in next st) 5 times, sc in the last st. (13 sts: 5 bobbles + 8 sc) These bobbles sit between the bobbles of Row 18, which gives the staggered texture.
Row 21 (RS): Ch 1, turn. Sc in each st across. (13 sc)
Fasten off. The body measures 3.2 in (8.1 cm) at its widest by 4.2 in (10.7 cm) tall, and the cuff is 1.0 in (2.5 cm) deep.
Heel Patch (Make 1)
Use red. This is a rounded rectangle.
Row 1: Ch 5. Sc in the 2nd ch from hook and across. (4 sc)
Row 2: Ch 1, turn. 2 sc in the first st, sc in the next 2 sts, 2 sc in the last st. (6 sc)
Rows 3–4: Ch 1, turn. Sc across. (6 sc)
Row 5: Ch 1, turn. Sc2tog, sc in the next 2 sts, sc2tog. (4 sc)
Fasten off and leave an 8 in (20.3 cm) tail. The patch measures 1.2 in x 1.0 in (3.0 cm x 2.5 cm).
Toe Patch (Make 1)
Use red. This is a flat half-circle.
Row 1: MR. Ch 1, 6 sc into the ring. Do not join. Pull the ring closed. (6 sc)
Row 2: Ch 1, turn. 2 sc in each st. (12 sc)
Row 3: Ch 1, turn. (Sc in next st, 2 sc in next st) 6 times. (18 sc)
Fasten off and leave an 8 in (20.3 cm) tail. The patch measures 1.4 in (3.6 cm) along the straight edge and 0.7 in (1.8 cm) deep.
Flower (Make 1)
Round 1 (cream): MR. Ch 1, 8 sc into the ring. Sl st to the first sc. Pull tight. (8 sc) Fasten off.
Round 2 (red): Join red in any sc. (Sl st, ch 2, dc, ch 2, sl st) all in the same st, then move to the next st. Repeat in each st around. (8 petals) Fasten off and leave an 8 in (20.3 cm) tail.
The flower measures about 1.1 in (2.8 cm) across. The cream center stays visible in the middle like a small star.
Leaves (Make 8)
Use green.
Ch 5. Starting in the 2nd ch from hook, work sc, hdc, hdc, sc. (4 sts)
Ch 1 for the tip. Rotate and work along the other side of the chain: sc, hdc, hdc, sc. (4 sts)
Sl st into the first sc. Fasten off and leave a 6 in (15.2 cm) tail.
Each leaf is a pointed oval about 0.8 in (2.0 cm) long. The base chain forms a raised center spine.
Edging and Hanging Loop
Use cream, with the RS of the body facing you.
Border gauge: The edging uses 1 sc per stitch along the top and bottom, and 1 sc per row end along the sides. The sides use the row ends of Rows 2–20. The row ends of Rows 1 and 21 sit in the corner stitches, so they are covered by the 3-sc corner groups.
Round 1: Join cream in the first st of Row 21 (the top heel-side corner). Ch 1.
- Top: 3 sc in the same st, sc in the next 11 sts, 3 sc in the last st. (17 sc)
- Toe side: Sc in each row end from Row 20 down to Row 2. (19 sc)
- Bottom: Work into the free loops of the foundation chain. 3 sc in the first loop, sc in the next 10 loops, 3 sc in the last loop. (16 sc)
- Heel side: Sc in each row end from Row 2 up to Row 20. (19 sc)
Sl st to the first sc. (71 sc total)
Hanging loop: Ch 12 and sl st into the same corner st. Fasten off and weave in the ends.
Why the math works:
– The gauge is square, so one sc per row end lies flat, just like one sc per stitch.
– The top count of 17 is the 13 stitches of Row 21, plus 2 extra sc at each corner.
– The bottom count of 16 is the 12 chain loops, plus 2 extra sc at each corner.
– Each side has 19 sc because only Rows 2–20 are worked as row ends. Rows 1 and 21 belong to the corners.
– No stitch is counted twice: 17 + 19 + 16 + 19 = 71.
The edging adds 0.2 in (0.5 cm) on every side. That makes 3.2 + 0.4 = 3.6 in (9.1 cm) wide and 4.2 + 0.4 = 4.6 in (11.7 cm) tall.
Appliqué Assembly
Pin each piece first and check the layout before you sew. Use matching yarn tails and small whipstitches through the outer loops only.
- Heel patch: Place it in the bottom heel corner, just inside the edging. Its 1.2 in (3.0 cm) side runs along the bottom.
- Toe patch: Place the curved edge so it follows the toe curve inside the edging. The straight edge faces the heel.
- Flower: Center it on the leg, with its center about 0.6 in (1.5 cm) below the cuff.
- Leaves:
- Two leaves angle up and out above the flower.
- One leaf sits to the left of the flower.
- Two leaves point down from the flower in a V.
- Three leaves spread across the top of the foot toward the toe.
- Leave about 0.1 in (0.3 cm) between pieces.
- Berries: Make 4 clusters of 3 French knots in red, 12 knots in total. Wrap the yarn twice for each knot. Place clusters beside the upper leaves, between the heel and the lower leaves, and next to the toe patch.
Final Blocking
- Lightly mist the ornament with water. If you used acrylic, hover steam over it instead and don’t touch the iron to the yarn.
- Pin it RS up to 3.6 in x 4.6 in (9.1 cm x 11.7 cm).
- Ease the heel and toe into smooth curves with your fingers.
- Pin the hanging loop straight up, 1 in (2.5 cm) tall.
- Don’t press the bobbles flat. Pin only around the edges of the cuff.
- Leave it to dry completely, about 2–4 hours.
- Unpin and check the measurements again.
Final Quality-Control Checklist
- Body has exactly 71 edging stitches, with 3-sc groups at all four corners
- Size is 3.6 in x 4.6 in (9.1 cm x 11.7 cm)
- Cuff shows 6 bobbles over 5, staggered, all popping to the front
- Heel and toe patches sit inside the edging, not over it
- Flower has 8 even petals and a visible cream center
- 8 leaves and 12 berries are sewn on securely
- Loop is firmly anchored at the top heel-side corner
- All tails are woven in on the back
Troubleshooting
- Bobbles on the back: They were worked on RS rows. Bobble rows must be Rows 18 and 20 (WS).
- Leg sits off-center: You decreased on the heel edge. The decreases in Rows 6–8 belong on the toe edge only.
- Edging ripples: Your row gauge is shorter than 5 rows per 1 in (2.5 cm). Skip 1 row end per side, or use a smaller hook for the edging.
- Edging puckers: Your rows are taller than gauge. Go up half a hook size for the edging only.
- Toe patch cups: Block it flat before sewing, or work the edge with sl sts instead of sc.
- Flower petals curl: Steam the flower face down before you attach it.
Care
Spot clean with cool water and mild soap, then lay flat to dry. Store the ornament flat in tissue paper so the cuff and loop keep their shape.
Final Notes
The measurements build on each other:
– Gauge: 5 sc and 5 rows = 1 in (2.5 cm)
– Foot: 16 stitches, 3.2 in (8.1 cm) wide
– Leg: 11 stitches, 2.2 in (5.6 cm) wide
– Cuff: 13 stitches, 2.6 in (6.6 cm) wide
– Body: 21 rows, 4.2 in (10.7 cm) tall
– Edging: 71 stitches, 0.2 in (0.5 cm) deep on every side
– Finished ornament: 3.6 in x 4.6 in (9.1 cm x 11.7 cm)
If your gauge matches, every appliqué will fit exactly where it should. Make one, then make a whole set for the tree.
Happy crocheting!