

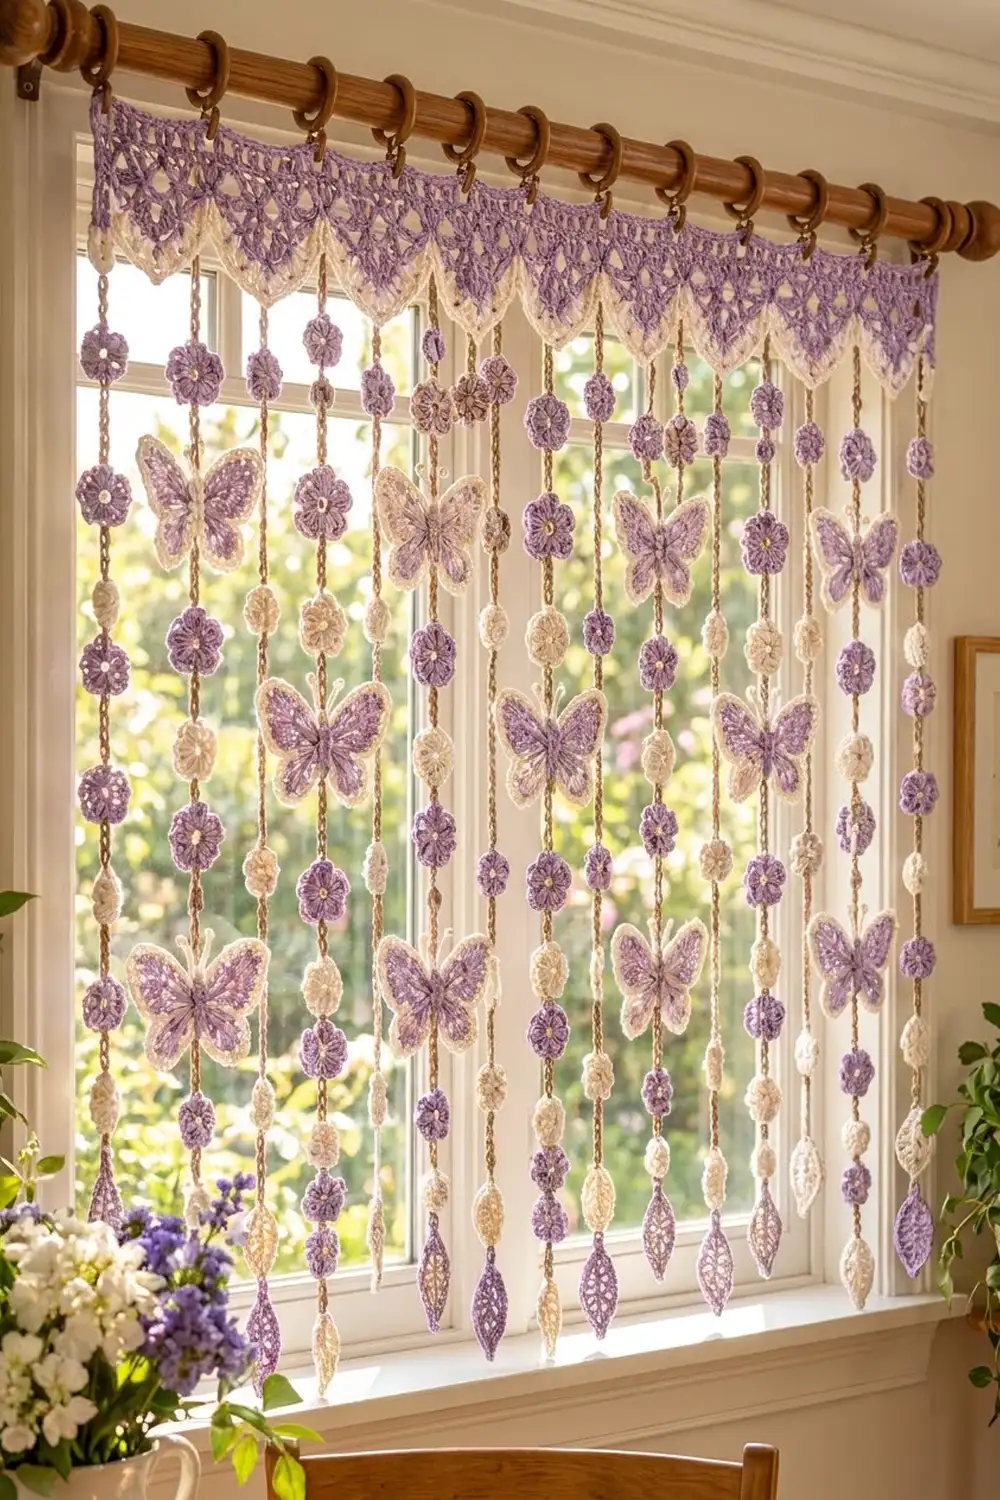
This lavender butterfly curtain turns a plain window into a soft, garden-style focal point. A lacy lavender valance with pointed scallops hangs from the rod, trimmed with a cream shell edge. Below it hang 15 tan cords. Each cord carries lavender flowers, cream bobble balls, a butterfly, and a leaf-shaped drop.
The colors are gentle. Lavender is used for the lace, petals, and wings. Cream is used for the edging, balls, and butterfly outlines. A warm tan is used for the cords and flower centers. The style is cottage romantic, and the curtain is light enough to let sunshine through.
The pattern uses US crochet terms. The finished curtain measures 36.25 in (92.1 cm) wide and 38.25 in (97.2 cm) long at the longest strands. The valley strands end 2.25 in (5.7 cm) higher, which gives a gently staggered hem.
You will crochet one valance header in rows, add eight lacy points to its lower edge, and finish with a two-row cream border. Then you make the small motifs, chain 15 cords from the border, and sew the motifs onto the cords at measured positions.
Finished Size and Construction
- Finished size: 36.25 in (92.1 cm) wide x 38.25 in (97.2 cm) long
- Skill level: Intermediate
- Terminology: US
- Yarn weight: DK (3) cotton
- Hook: 4 mm (G-6)
- Number of pieces: 1 header, 15 cords, 60 flowers, 45 balls, 15 butterflies, 15 leaves
- Layout: 15 strands alternate between A (point tips) and B (valleys): A-B-A-B…A
- Piece size:
- Header body: 36.25 x 3.5 in (92.1 x 8.9 cm)
- Each point: 4.5 in (11.4 cm) wide x 2 in (5.1 cm) deep
- Each strand: 32 in (81.3 cm), including the leaf
- Header size before border: 36.25 x 5.5 in (92.1 x 14.0 cm), measured at the tips
- Border depth: 0.75 in (1.9 cm), which makes the header 6.25 in (15.9 cm) deep
Materials
Choose a smooth DK-weight cotton, either mercerized or matte. Cotton keeps the lace points crisp and the balls firm. Avoid fuzzy yarns, because they blur the mesh.
- Lavender (A): 250 g, about 600 m
- Cream (B): 150 g, about 360 m
- Tan (C): 75 g, about 180 m
These amounts include a margin of about 25% for swatching and sewing tails.
Tools:
– 4 mm (G-6) crochet hook
– Yarn needle
– Polyester fiberfill (a small amount)
– Stitch markers (at least 20)
– Measuring tape and scissors
– Blocking mats and rust-proof pins
– 9 curtain clip rings
Abbreviations (US Terms)
- ch – chain
- sl st – slip stitch
- sc – single crochet
- hdc – half double crochet
- dc – double crochet
- tr – treble crochet
- sk – skip
- sp – space
- st(s) – stitch(es)
- MR – magic ring
- sc2tog – single crochet 2 together
- dc2tog / dc3tog / dc4tog – double crochet 2, 3, or 4 together
Special stitches:
– Beginning dc3tog: ch 2, then dc2tog over the next 2 sts. Together these use 3 sts and count as 1 st.
– Shell: 5 dc in the same st.
Gauge and Checkpoints
Gauge: 16 dc and 8 dc rows = 4 in (10.2 cm). Chain gauge: 4 ch = 1 in (2.5 cm).
Make a swatch first. Ch 17, then sc in the 2nd ch from the hook and in each ch across (16 sc). Work 7 rows of dc, block lightly, and measure.
Next, test one of each motif before making them in bulk:
– Flower: 1.25 in (3.2 cm) across
– Ball: 1 in (2.5 cm) across
– Butterfly: 3 in (7.6 cm) wide x 2.5 in (6.4 cm) tall
– Leaf: 2 in (5.1 cm) long x 1 in (2.5 cm) wide
Header checkpoints:
– After Row 2: 36.25 in (92.1 cm) wide
– After Row 7: 3.5 in (8.9 cm) deep
– After the points: 5.5 in (14.0 cm) deep at the tips
– After the border: 6.25 in (15.9 cm) deep
If your swatch has more than 16 sts per 4 in, go up one hook size. If it has fewer, go down one hook size. Each motif can be off by up to ±0.25 in (0.6 cm). The header width should land within ±0.5 in (1.3 cm).
Valance Header
With A, ch 146.
Row 1: Sc in the 2nd ch from the hook and in each ch across, turn. (145 sc)
Row 2: Ch 4 (counts as dc + ch 1), sk next st, dc in next st, ch 1, sk next st, dc in next st; rep from * across, turn. (73 dc + 72 ch-1 sps = 145 sts) Later, the clip rings slip through these spaces.
Row 3: Ch 1, sc in first dc, ch 5, sk next ch-1 sp, dc, and ch-1 sp, sc in next dc; rep from * across, turn. (37 sc + 36 ch-5 loops)
Row 4: Ch 5 (counts as dc + ch 2), sc in first ch-5 loop, ch 5, sc in next ch-5 loop; rep from * across, ch 2, dc in last sc, turn. (36 sc + 35 ch-5 loops + 2 half loops)
Row 5: Ch 1, sc in first dc, ch 5, sc in next ch-5 loop; rep from * 34 more times, ch 5, sc in 3rd ch of turning ch, turn. (37 sc + 36 ch-5 loops)
Row 6 (conversion row): Ch 3 (counts as dc), 3 dc in next ch-5 loop, dc in next sc; rep from * across, turn. (37 dc in sc + 108 dc in loops = 145 dc)
Row 7: Ch 1, sc in each st across. Fasten off. (145 sc)
Checkpoint: the header should measure 36.25 x 3.5 in (92.1 x 8.9 cm).
Lacy Points
On Row 7, mark the 9 valley sts: sts 1, 19, 37, 55, 73, 91, 109, 127, and 145. Each point is worked over the 17 sts between two valleys. Leave the valley sts unworked.
Point Row 1: Join A with sl st in the first st after a valley. Work a beginning dc3tog over sts 1–3 of the point, dc in next st, ch 1, sk 1, dc in next st; rep from * 4 more times, dc3tog over the last 3 sts, turn. (1 + 6 dc + 5 ch + 1 = 13 sts)
Point Row 2: Beginning dc3tog over the first 3 sts, dc in next dc, ch 1, dc in next dc; rep from * 2 more times, dc3tog over the last 3 sts, turn. (1 + 4 dc + 3 ch + 1 = 9 sts)
Point Row 3: Beginning dc3tog over the first 3 sts, dc in next dc, ch 1, dc in next dc, dc3tog over the last 3 sts, turn. (1 + 2 dc + 1 ch + 1 = 5 sts)
Point Row 4: Ch 2, dc4tog over the next 4 sts. (1 st) Fasten off.
Each row loses 2 sts on each side, so the mesh stays centered and each dc lands on a dc. Repeat for all 8 points. Each point base is 4.25 in (10.8 cm) wide. Add its valley st and the repeat is 4.5 in (11.4 cm).
Make All Pieces
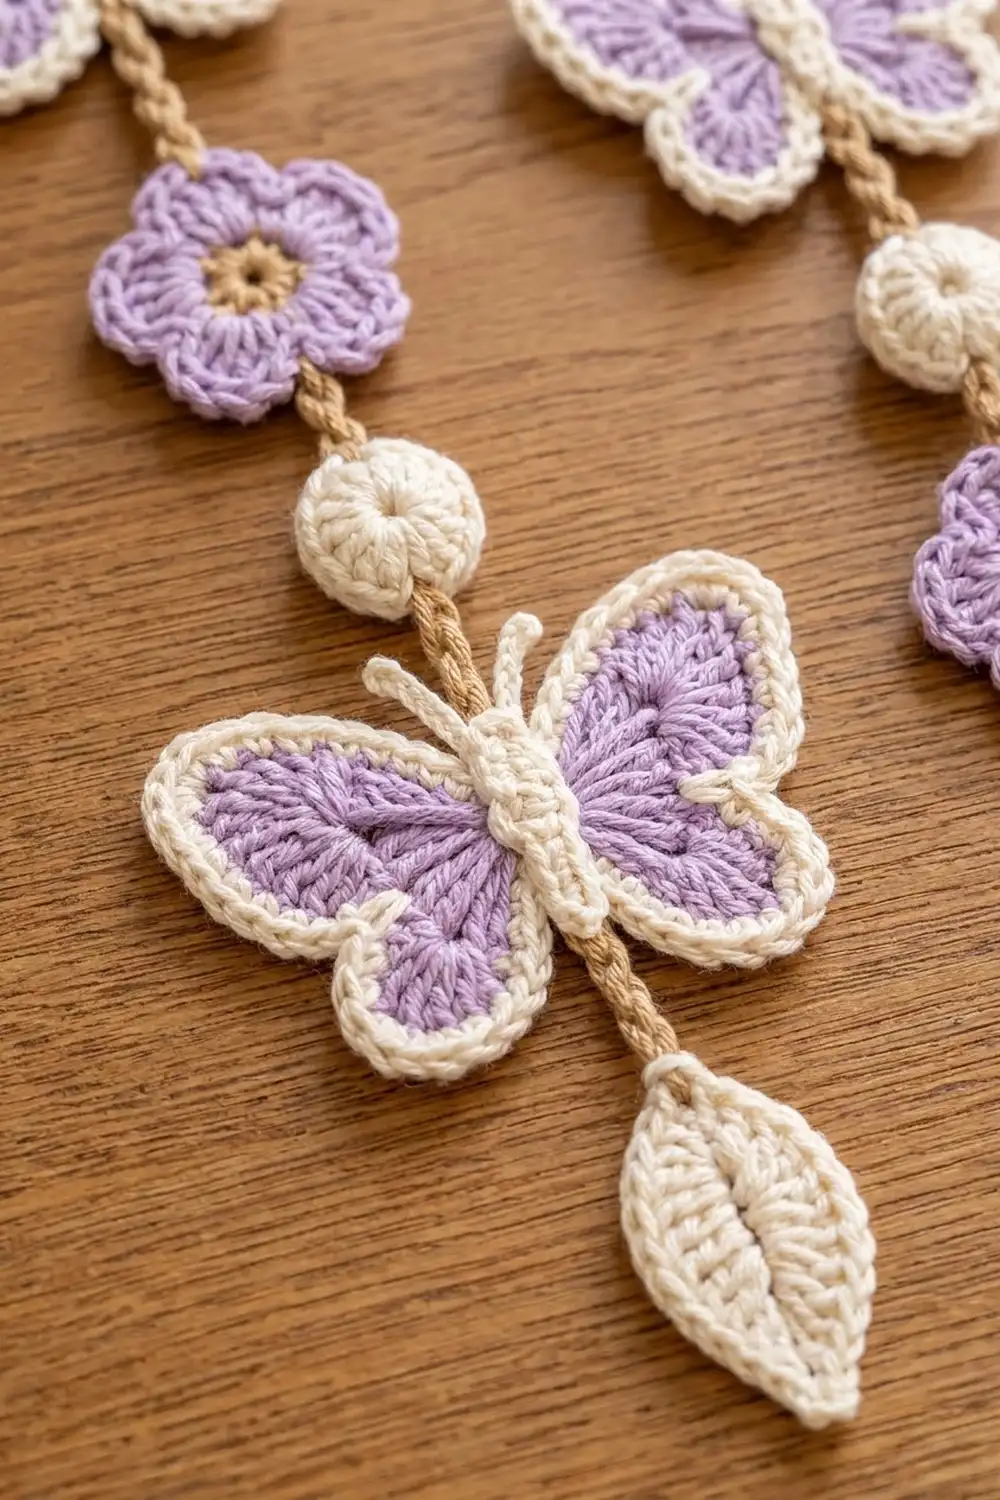
Flower (make 60): With C, make a MR, ch 1, work 6 sc in the ring, and sl st to the first sc. (6 sc) Fasten off C. Join A in any sc. Work (sl st, ch 2, 2 dc, ch 2, sl st) in the same sc, then move to the next sc; rep around. (6 petals) Fasten off and leave a 10 in (25.4 cm) tail.
Ball (make 45): With B, make a MR.
– Rnd 1: 6 sc in ring. (6)
– Rnd 2: 2 sc in each st. (12)
– Rnd 3: Sc in each st. (12)
– Rnd 4: Sc2tog 6 times. (6)
Stuff firmly, close the hole, and leave a 10 in (25.4 cm) tail.
Butterfly (make 15): With A, make a MR.
– Rnd 1: Work an upper wing into the ring: (ch 3, 6 tr, ch 3, sl st). Then work a lower wing: (ch 2, 4 dc, ch 2, sl st). Repeat both wings once more. Pull the ring tight and fasten off A.
– Rnd 2: Join B in the first upper-wing ch-3 sp.
– Upper wing: 3 sc in ch-3 sp, 2 sc in each tr, 3 sc in ch-3 sp. (18 sc) Sl st in the center.
– Lower wing: 2 sc in ch-2 sp, 2 sc in each dc, 2 sc in ch-2 sp. (12 sc) Sl st in the center.
– Repeat for the second pair of wings. (60 sc total) Fasten off.
– Body: With B, ch 7, then sc in the 2nd ch from the hook and in the next 5 chs. (6 sc) Sew it vertically over the center. It should be 1.5 in (3.8 cm) long.
– Antennae: Knot two 3 in (7.6 cm) pieces of B at the top of the body. Trim them to 0.75 in (1.9 cm).
Leaf drop (make 8 in A and 7 in B): Ch 9. Starting in the 2nd ch from the hook, work sc, hdc, dc, dc, tr, dc, hdc, sc. (8) Work (sc, ch 2, sc) in the end ch. Then work along the other side of the chain: sc, hdc, dc, tr, dc, dc, hdc, sc. (8) Sl st to the first sc and fasten off.
Strand layout grid (left to right, seen from the front):
Valley:  V  .  V  .  V  .  V  .  V  .  V  .  V  .  V  .  V
Strand:     A  B  A  B  A  B  A  B  A  B  A  B  A  B  A
The A strands hang from the 8 point tips and get lavender leaves. The B strands hang from the 7 inner valleys and get cream leaves. The two end valleys have no strand.
Motif positions, measured from the top of the cord:
| Strand A | Strand B |
|---|---|
| Flower 1.5 in (3.8 cm) | Flower 1.5 in (3.8 cm) |
| Butterfly 6 in (15.2 cm) | Ball 4.5 in (11.4 cm) |
| Flower 10.5 in (26.7 cm) | Flower 8 in (20.3 cm) |
| Ball 14 in (35.6 cm) | Ball 11 in (27.9 cm) |
| Flower 17 in (43.2 cm) | Butterfly 16 in (40.6 cm) |
| Ball 21 in (53.3 cm) | Flower 21 in (53.3 cm) |
| Flower 24 in (61.0 cm) | Ball 24 in (61.0 cm) |
| Ball 27 in (68.6 cm) | Flower 27 in (68.6 cm) |
| Leaf (A) at 30 in (76.2 cm) | Leaf (B) at 30 in (76.2 cm) |
Each strand uses 4 flowers, 3 balls, 1 butterfly, and 1 leaf. Across 15 strands, that is 60 flowers, 45 balls, 15 butterflies, and 15 leaves.
Border
The border gauge matches the header: 2 sc per dc row-end. Work in rows along the lower edge only, with the right side facing.
Border Row 1: Join B in valley st 1 and sc in that valley. Work 2 sc in each of the 4 row-ends on the first side of the point (8 sc). Work 3 sc in the top of the Point Row 4 st. Work 2 sc in each of the 4 row-ends on the second side (8 sc). Sc in the next valley st. Rep from * across, then turn. (8 points x 19 sc + 9 valley sc = 161 sc)
Border Row 2: Ch 1, sc in the first sc (valley). Then work each point as follows, and rep across. Fasten off at the end. (8 points x 32 sts + 9 valley sc = 265 sts)
– First side: Sk 1, shell in next, sk 1, sc in next; rep from * once more.
– Tip: Sk 1, (3 dc, ch 2, 3 dc) in the center tip sc, sk 1.
– Second side: Sc in next, sk 1, shell in next, sk 1, sc in next, sk 1, shell in next, sk 1.
– Valley: Sc in the valley sc.
Why the math works: Each 8-sc side divides into exactly two 4-st shell repeats. The 3 sc at each tip center the tip shell. On each point, the 19 sts of Row 1 become 12 + 8 + 12 = 32 sts in Row 2, and the 9 valley sc stay single. The border adds 0.75 in (1.9 cm), so the header becomes 6.25 in (15.9 cm) deep.
Joining
Cords: With C, join with a sl st in a Border Row 2 attachment point. For A strands, use the ch-2 tip sp. For B strands, use the valley sc. Ch 120, then sl st in the back bump of each ch all the way back up to the border. (120 ch + 120 sl st) Fasten off and weave in the end. Each cord should measure 30 in (76.2 cm) when relaxed.
Stitch-to-stitch logic: 8 point tips + 7 inner valleys = 15 attachment points. Neighboring strands hang 2.25 in (5.7 cm) apart.
Attaching motifs:
1. Mark each motif position on the cord with a stitch marker.
2. Center each motif over the cord. Use the motif’s tail to sew through the cord twice, then weave the tail into the motif.
3. Place the butterfly body over the cord so the cord is hidden behind it.
4. Sew the leaf’s top sc to the end of the cord.
Tension advice: Keep the cord chain relaxed. A tight chain shortens and twists the strand. Sew the motifs on snugly, but don’t pull the cord tight.
Size checkpoint: Hang the curtain. Each A strand should hang 32 in (81.3 cm) below its tip, for a total length of 38.25 in (97.2 cm). Each B strand should end 36 in (91.4 cm) below the top edge.
Final Blocking
- Weave in all ends.
- Lay the header face down on the blocking mats.
- Mist it with water until it is damp.
- Pin the top edge straight at 36.25 in (92.1 cm).
- Pin each point tip 6.25 in (15.9 cm) below the top edge, and open each tip shell.
- On a separate mat, pin the butterfly wings flat and the flowers into round shapes. Don’t block the balls.
- Let everything dry fully before you hang the curtain.
Final Quality-Control Checklist
- The header is 36.25 in (92.1 cm) wide.
- All 8 points are the same size and symmetrical.
- Border Row 2 has 265 sts, and the shells are even.
- There are 15 cords, each 30 in (76.2 cm) long.
- Every strand has 4 flowers, 3 balls, 1 butterfly, and 1 leaf.
- All motifs sit at their measured positions.
- All tails are hidden.
- The curtain hangs without twisting.
Troubleshooting
- Header too wide: Go down one hook size and start again. Blocking can’t shrink the width much.
- Points lean sideways: Make sure each row has a dc3tog at both ends.
- Shells ruffle: In Border Row 1, use 2 sc per row-end, not 3.
- Cords twist: Let the strands hang for a day with a small weight on each leaf.
- Lumpy balls: Add stuffing in small pieces and crochet more tightly.
- Curling wings: Wet the butterflies again and pin them flat to dry.
Care
Hand wash in cool water with mild soap, then press the water out in a towel. Lay flat to dry, and pin the points again if needed.
Final Notes
The measurements build on each other. A gauge of 16 dc per 4 in (10.2 cm) gives a 145-st header that is 36.25 in (92.1 cm) wide. Eight 17-st points and nine valley sts fit that width exactly. The border turns 161 sc into 265 sts and adds 0.75 in (1.9 cm) of depth. Finally, 15 cords of 30 in (76.2 cm), with leaves, bring the curtain to 38.25 in (97.2 cm). If you check each stage as you go, every part will fit together.
Happy crocheting!