
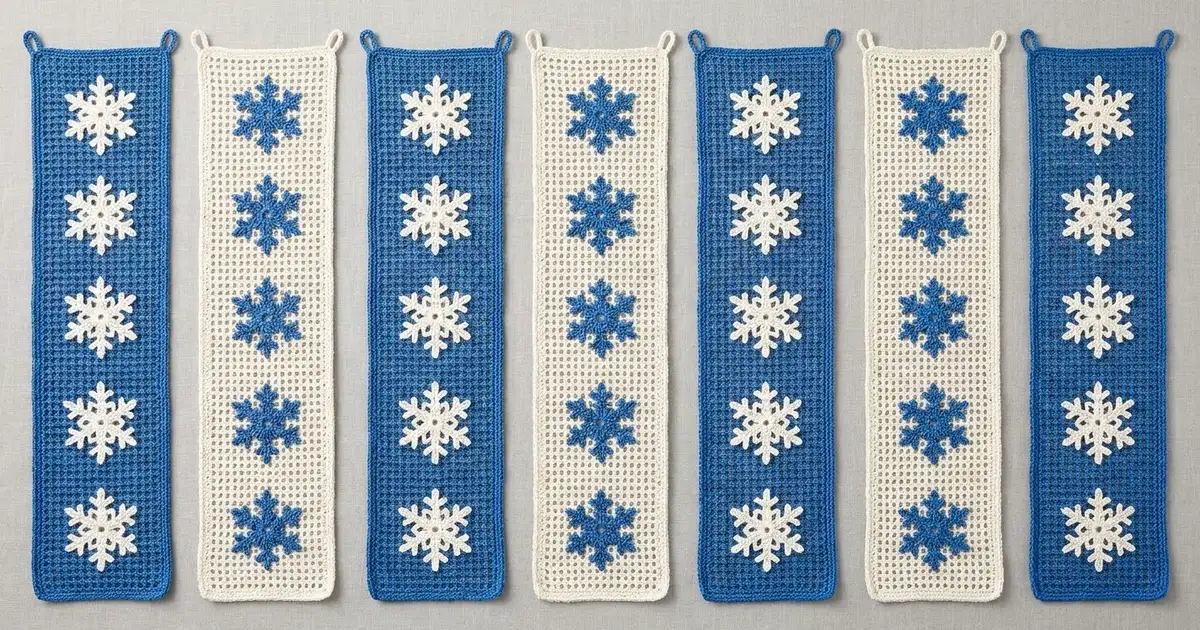
This curtain is made of seven long, narrow strips of open filet mesh that hang side by side from a rod in a doorway. The strips alternate soft sky blue and creamy white, and each strip carries a vertical column of twelve six-armed snowflakes in the opposite color. A blue strip gets white snowflakes and a white strip gets blue ones.
The style is light, wintry, and graphic. The open grid lets light and air through, and the raised snowflakes give the flat mesh some texture. It works as a seasonal door curtain, a room divider, or a window panel.
All instructions use US crochet terms. Each finished strip measures 5.2 in (13.2 cm) wide by 72.8 in (184.9 cm) long, plus two hanging loops of 1.5 in (3.8 cm). Seven strips hung edge to edge span 36.4 in (92.5 cm).
Construction is simple and repetitive. You work each strip as a flat rectangle of dc-and-ch-2 filet mesh, add a two-round corded border, and finish with two hanging loops. You crochet the snowflakes separately and sew them flat onto the mesh. The strips are not sewn to each other. The rod holds them together.
Finished Size and Construction
- Finished strip size: 5.2 x 72.8 in (13.2 x 184.9 cm), plus loops
- Full curtain: 36.4 in (92.5 cm) wide when the strips hang edge to edge
- Skill level: Easy intermediate
- Terminology: US
- Yarn weight: Worsted (#4)
- Hook: 5.0 mm (H-8)
- Number of pieces: 7 strips and 84 snowflake appliqués
- Layout: 7 strips in a row, starting and ending with blue (B, W, B, W, B, W, B)
- Strip mesh before border: 4.4 x 72 in (11.2 x 182.9 cm), 7 mesh squares wide by 120 rows
- Border depth: 0.4 in (1.0 cm) on every side
- Snowflake size: 3.6 in (9.1 cm) tip to tip
Materials
Smooth worsted cotton or a cotton-acrylic blend works best. It keeps the mesh squares crisp and the snowflake arms well defined. Avoid fuzzy or very splitty yarns, because they blur the grid. The quantities below assume about 200 yd (183 m) per 100 g.
- Blue (Color B): about 950 g / 1,900 yd (1,737 m), for 4 strips and 36 snowflakes
- White (Color W): about 900 g / 1,800 yd (1,646 m), for 3 strips and 48 snowflakes
These quantities include a margin of about 10% for gauge swatches and sewing tails.
Tools
- 5.0 mm (H-8) crochet hook
- Tapestry needle
- Stitch markers (at least 4)
- Rust-proof pins and a blocking surface at least 76 in (193.0 cm) long, or a sheet on the floor
- Tape measure
- Curtain rod, plus clip rings if you want them
Abbreviations (US Terms)
- ch – chain
- sl st – slip stitch
- sc – single crochet
- dc – double crochet
- sk – skip
- sp – space
- st(s) – stitch(es)
- rev sc – reverse single crochet (crab stitch): working from left to right (right-handers), insert the hook into the next stitch to the right, yarn over, pull up a loop, yarn over, and draw through both loops on the hook.
- Mesh square – one dc plus one ch-2 space.
Gauge and Checkpoints
Mesh gauge: 5 mesh squares wide (15 sts) = 3 in (7.6 cm), and 5 mesh rows = 3 in (7.6 cm). One mesh square is 0.6 x 0.6 in (1.5 x 1.5 cm).
Border gauge: 5 sc = 1 in (2.5 cm) along the edge.
Test one piece first. Work the first 10 rows of one strip and one snowflake, then measure:
- After Row 1: the strip is 4.4 in (11.2 cm) wide.
- After Row 5: it is 3 in (7.6 cm) tall.
- After Row 10: it is 6 in (15.2 cm) tall.
- The snowflake measures 3.6 in (9.1 cm) from tip to opposite tip.
If your piece is too big, go down a hook size. If it is too small, go up a hook size. A small difference adds up over 120 rows. Being 0.1 in too long per row makes the strip 12 in (30.5 cm) too long, so check row height carefully.
Checkpoints along the strip:
- Row 40: 24 in (61.0 cm)
- Row 80: 48 in (121.9 cm)
- Row 120: 72 in (182.9 cm)
Strip (Make 7)
Make 4 strips in Color B and 3 in Color W.
Foundation: Ch 26.
Row 1: Dc in the 8th ch from hook. The skipped 7 ch count as the first dc, a ch-2 space, and the base. Ch 2, sk 2 ch, dc in next ch; repeat from * 5 more times. Turn.
Count: 8 dc and 7 ch-2 sps (22 sts, 7 mesh squares).*
Check the chain math: 26 ch = 7 used for the first square + 1 for its dc + 6 repeats x 3 ch.
Row 2: Ch 5 (counts as dc and ch 2), sk first ch-2 sp, dc in next dc. Ch 2, dc in next dc; repeat from * across, working the last dc into the 3rd ch of the turning ch. Turn.
Count: 8 dc and 7 ch-2 sps (22 sts).*
Rows 3–120: Repeat Row 2. Every row keeps the same count of 8 dc and 7 ch-2 sps. Do not fasten off after Row 120.
Place a marker every 10 rows (Rows 10, 20, 30, and so on). These mark the 12 snowflake blocks and make placement easy later.
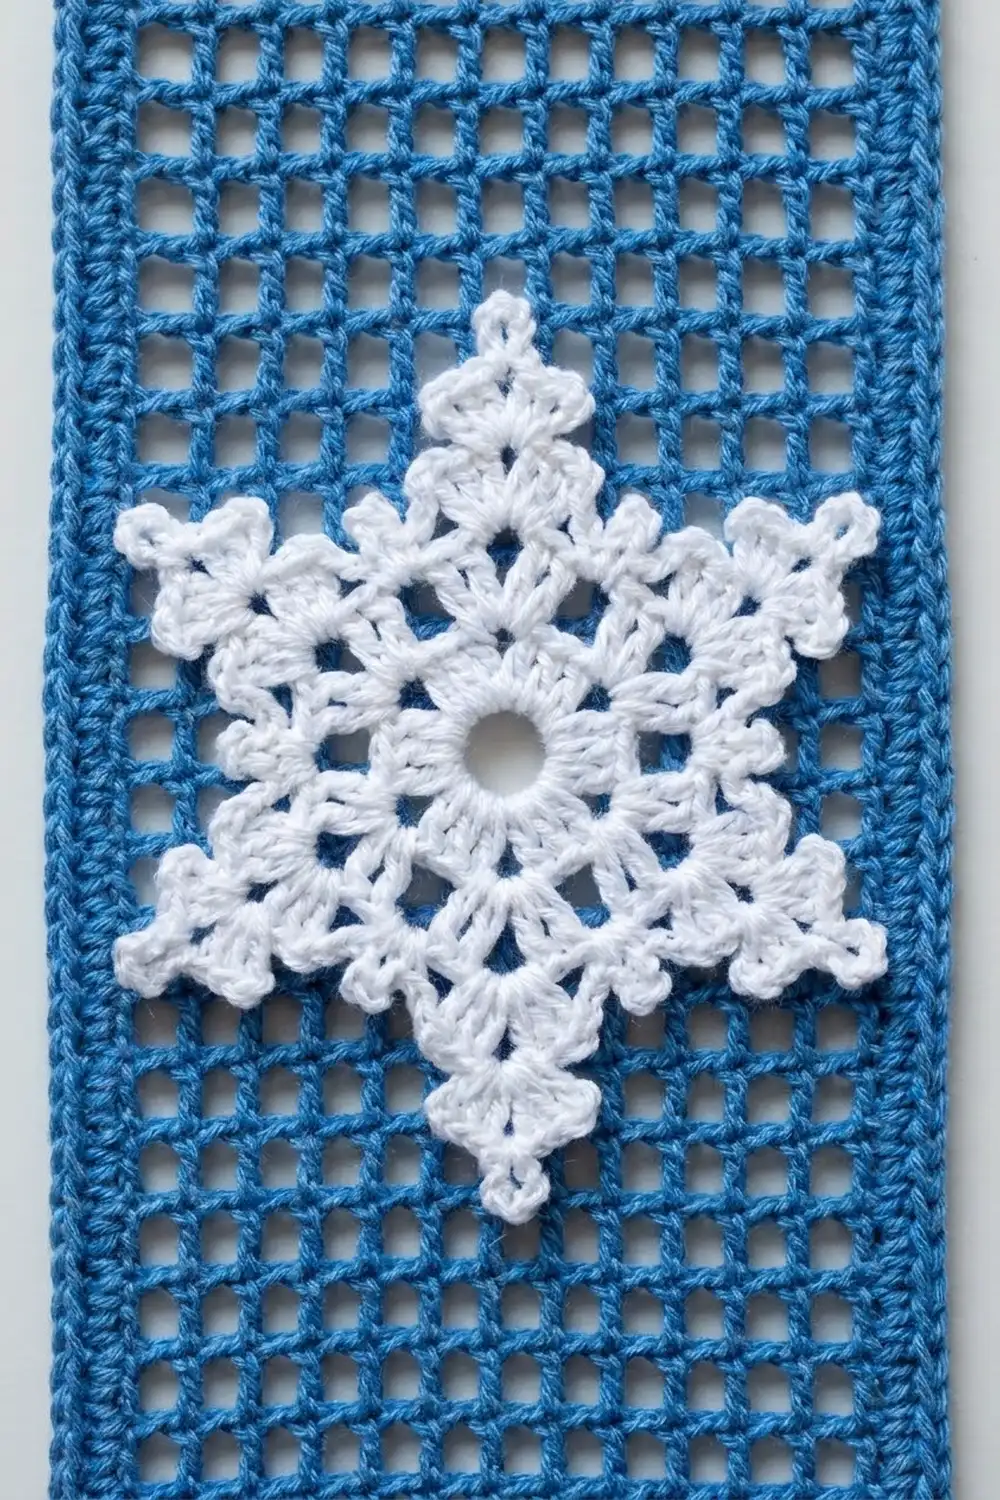
Keep the dc posts stacked straight on top of each other. The grid should look like a true checkerboard of open squares, not a diagonal lattice.
Border
The border is worked separately on each strip and frames all four edges in the same color as the strip. The border math is set by the mesh: the top and bottom edges are 22 sts wide, so they take 22 sc. Each row-end is 0.6 in (1.5 cm) tall, so it takes 3 sc at the border gauge of 5 sc per inch (0.6 x 5 = 3). This keeps the edges flat without stretching or ruffling.
Corner definition: each corner is a separate ch-2 sp. It is not included in the side counts below.
Round 1 (sc): Continuing from the last row, ch 1. Work along the top edge: sc in each dc and 2 sc in each ch-2 sp (22 sc). Ch 2 for the corner. Rotate and work 3 sc in each row-end down the long side (120 row-ends x 3 = 360 sc). Ch 2 for the corner. Along the foundation edge, work sc at the base of each dc and 2 sc in each ch-2 sp (22 sc). Ch 2 for the corner. Work 3 sc in each row-end up the second long side (360 sc). Ch 2, then sl st to the first sc to join.
Count: 22 + 360 + 22 + 360 = 764 sc, plus 4 corner ch-2 sps.
Round 2 (rev sc, corded edge): Ch 1. Work rev sc in each sc around, with 2 rev sc in each corner ch-2 sp. Join and fasten off.
Count: 764 sts worked 1 per existing sc + 8 corner sts = 772 rev sc.
Per side: 22 on each short side and 360 on each long side, with 2 in each corner.
Border checkpoint: the strip should now measure 5.2 x 72.8 in (13.2 x 184.9 cm). That is 4.4 + 0.4 + 0.4 in wide and 72 + 0.4 + 0.4 in long.
Hanging Loops (2 per Strip)
Choose which short edge is the top. Count the 22 rev sc along it from the right corner.
Right loop: Join yarn with a sl st in st 3. Ch 16, then sl st in st 5 to form the loop. Turn and work 24 sc over the ch-16 loop. Sl st in st 3 and fasten off.
Left loop: Repeat the right loop in sts 18 and 20, working 24 sc over the loop and finishing at st 18.
Each loop stands about 1.5 in (3.8 cm) above the edge. It fits a rod or ring up to 1 in (2.5 cm) thick. Weave in the ends firmly, because these loops carry the whole weight of the strip.
Snowflake Appliqué (Make 84)
Make 48 in Color W for the blue strips and 36 in Color B for the white strips.
Round 1: Make a magic ring. Ch 3 (counts as dc), work 11 dc into the ring, and join with a sl st to the top of the ch-3. Pull the ring snug, leaving a small open hole in the center.
Count: 12 dc. Diameter about 0.8 in (2.0 cm).
Round 2: Ch 1. Sc in next dc, ch 3, sk next dc; repeat from * 5 more times. Join with a sl st to the first sc.
Count: 6 sc and 6 ch-3 sps. Diameter about 1.2 in (3.0 cm).*
Round 3 (arms): Sl st into the first ch-3 sp. Work each arm as follows in each ch-3 sp:
- Sc in the sp, then ch 13.
- Sl st in the 4th ch from hook. This makes the tip picot and leaves 9 unworked arm ch.
- Sl st in the next 2 ch.
- Outer branches: [Ch 4, sl st in 2nd ch from hook, sc in next 2 ch] twice.
- Sl st in the next 3 ch.
- Inner branches: [Ch 3, sl st in 2nd ch from hook, sc in next ch] twice.
- Sl st in the next 4 ch, then sc in the same ch-3 sp.
Arm chain check: 13 ch = 3 for the picot + 1 for its sl st + 9 arm ch, and 2 + 3 + 4 = 9, so all 9 arm ch are used.
Each pair of branches is attached at the same arm stitch. Push one branch to each side so it forms a V. Repeat the arm in each remaining ch-3 sp, then join with a sl st to the first sc.
Count: 6 arms, each with a tip picot, 2 long branches, and 2 short branches.
Fasten off, leaving a 12 in (30.5 cm) tail for sewing. Steam or pin the snowflake flat to 3.6 in (9.1 cm), with the arms evenly spaced 60 degrees apart.
Make All Pieces
- Color B: 4 strips and 36 snowflakes
- Color W: 3 strips and 48 snowflakes
Layout from left to right, with the snowflake color in brackets:
Strip:  1    2    3    4    5    6    7
Color:  B    W    B    W    B    W    B
Flakes: [W]  [B]  [W]  [B]  [W]  [B]  [W]
Count:  12   12   12   12   12   12   12
Placement on each strip: each 10-row block of mesh holds one snowflake. Center the snowflake on the boundary between rows 5 and 6 of the block. Center it across the width on the middle (4th) mesh square column. The snowflake centers fall 3 in (7.6 cm) from the bottom of the mesh and then every 6 in (15.2 cm), with the last one at 69 in (175.3 cm).
Each 3.6 in (9.1 cm) snowflake leaves 2.4 in (6.1 cm) of open mesh between neighbors and 0.4 in (1.0 cm) of mesh on each side inside the border.
Sew each snowflake through the mesh with the tail. Use small stitches at the center ring, at all 6 arm tips, and at the 6 points where the arms meet Round 2. Keep the stitches loose enough that the mesh stays flat.
Joining
This curtain has no stitched joins between the strips. They hang independently, so people can walk through. The “join” is the rod. That is also why each strip gets its own border, rather than one shared border around a joined panel. Because the strips are never stitched together, no seam stitches are added to any border count.
- Lay out the strips in the order B, W, B, W, B, W, B, all with the loops at the top.
- Slide the loops onto the rod, or clip a ring through each loop. That makes 14 loops in total.
- The loops of one strip sit 3 in (7.6 cm) apart, center to center. Keep that spacing on the rod so the strip hangs flat.
- Keep the tension even. Every strip should hang at the same height, with its bottom edge level with its neighbors.
Size checkpoint: 7 strips x 5.2 in = 36.4 in (92.5 cm) edge to edge. On a wider rod, for example 42 in (106.7 cm), spread the strips with equal gaps of about 0.9 in (2.3 cm). Those 6 gaps add 5.6 in (14.2 cm).
Final Blocking
- Weave in all ends securely, especially on the loops.
- Wet each strip in cool water and press out the water in a towel. Do not wring.
- Pin the strip flat to 5.2 x 72.8 in (13.2 x 184.9 cm). Place pins at each corner and every 6 in (15.2 cm) along the sides.
- Straighten the grid so the dc posts run in true vertical lines and the ch-2 spaces stay square.
- Open every snowflake arm and branch and pin the tips.
- Let the strip dry completely before you unpin it.
- Hang it for 24 hours to let it settle, then check the length again.
Final Quality-Control Checklist
- Every strip has 120 mesh rows with 7 squares per row.
- Border Round 1 has 764 sc and Round 2 has 772 rev sc.
- Each strip measures 5.2 x 72.8 in (13.2 x 184.9 cm).
- Each strip has 12 snowflakes, centered and evenly spaced 6 in (15.2 cm) apart.
- Snowflakes are in the contrast color on every strip.
- Both loops are in the same positions (sts 3–5 and 18–20) on all 7 strips.
- All strips hang level, in the order B, W, B, W, B, W, B.
Troubleshooting
Mesh slants diagonally: you may be working the dc into the ch-2 space instead of into the dc. Work each dc into the top of the dc below it.
Strip is too long: your row height is too tall. Pull the dc loops snugger or use a smaller hook. Re-check at Row 10.
Long edges ruffle: reduce to 5 sc per 2 row-ends, keeping the side counts equal on both sides.
Long edges pull in: your sc are too tight. Keep 3 sc per row-end and loosen up, or use a larger hook for the border only.
Snowflake arms curl: block them with steam and pins, and make sure the branch chains are not too tight.
Strip stretches when hung: cotton can grow. Block the strip slightly short, to about 72 in (182.9 cm) overall.
Care
Hand wash in cool water with a mild detergent and dry flat. Re-block if needed. Do not tumble dry, because the long strips can twist and stretch.

Final Notes
The measurement chain runs like this:
- One mesh square is 0.6 in (1.5 cm).
- 7 squares make a mesh 4.4 in (11.2 cm) wide.
- 120 rows make it 72 in (182.9 cm) long.
- A 0.4 in (1.0 cm) border brings each strip to 5.2 x 72.8 in (13.2 x 184.9 cm).
- 12 snowflakes of 3.6 in (9.1 cm) sit every 6 in (15.2 cm) down each strip.
- 7 strips span 36.4 in (92.5 cm).
Match your gauge at the start, check at Rows 40, 80, and 120, and the whole curtain will hang straight and even.
Happy crocheting!