

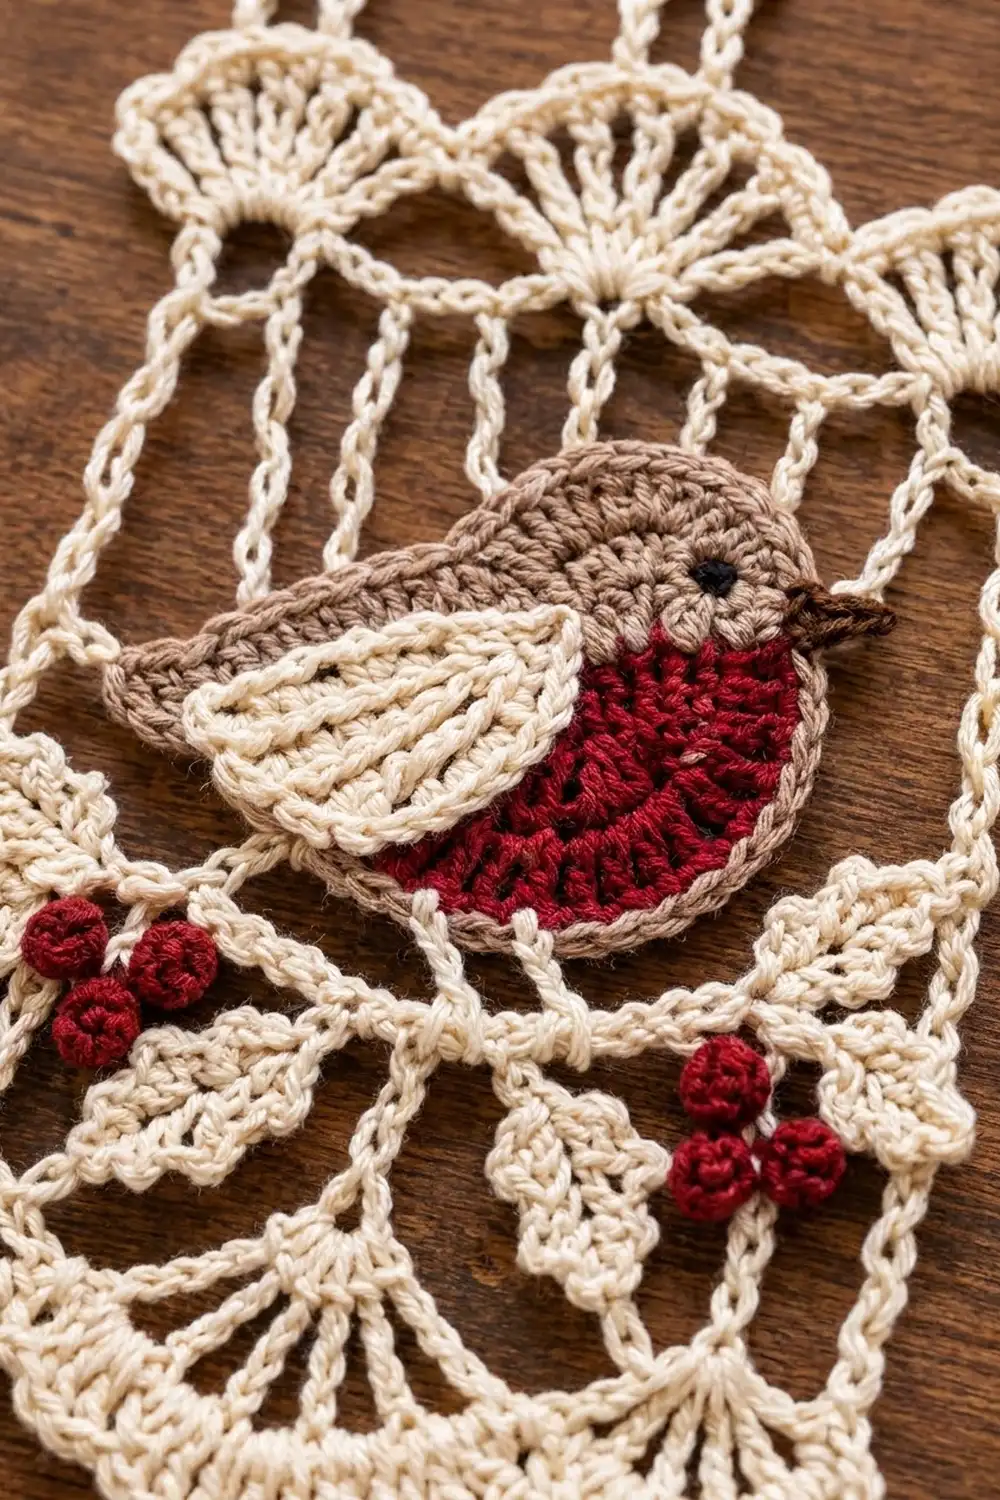
This pattern makes one long lace strip in cream cotton with three red-breasted robins on it. Each robin sits on a dc branch band with cream holly leaves and red berries. Above each robin is a tall open window of vertical chain bars, and fan scallops divide the sections. Four chain loops at the top let you hang the strip from a rod, a hook, or a branch.
The colors are traditional for winter: creamy white lace, taupe robin bodies, deep cranberry breasts and berries, with a little brown for the beaks and black for the eyes. The style is vintage filet-style lace with simple 3D appliqués on top.
The pattern uses US crochet terms. The blocked strip measures 5½ in (14.0 cm) wide and 16¾ in (42.5 cm) long. With the hanging loops it is 18¼ in (46.4 cm) long.
You work the strip from the bottom up, in turned rows. A two-round border adds the side edges, the bottom fan scallops, and the hanging loops. Then you make the robins and berries separately and sew them on.
Finished Size and Construction
- Finished size: 5½ in x 16¾ in (14.0 cm x 42.5 cm), or 18¼ in (46.4 cm) long including loops
- Skill level: Intermediate
- Terminology: US
- Yarn weight: Sport (#2) mercerized cotton
- Hook: 2.75 mm (C-2)
- Number of pieces: 1 lace strip, plus appliqués (3 robins, 18 berries)
- Layout: One vertical strip with 3 robin sections stacked
- Section size: 15 rows = 5 in (12.7 cm) tall
- Size before border: 5 in x 16 in (12.7 cm x 40.6 cm)
- Border depth: ¼ in (0.6 cm) on the sides and top, ½ in (1.3 cm) at the bottom scallops, plus loops 1½ in (3.8 cm) long
Materials
Choose a smooth mercerized cotton in sport weight. It gives crisp stitch definition and holds its shape when blocked. Avoid fuzzy or very soft yarns, because they blur the open windows.
- Cream: 50 g / 170 m (strip, border, leaves, wings)
- Cranberry red: 10 g / 34 m (breasts, berries)
- Taupe: 10 g / 34 m (robin bodies)
- Brown: 2 g / 7 m (beaks)
- Black: 1 m of yarn or embroidery floss (eyes), or three 4 mm black beads
Tools:
– 2.75 mm (C-2) crochet hook
– Tapestry needle
– Sharp sewing needle and cream sewing thread (optional, for neat appliqué)
– Stitch markers
– Blocking mat, rust-proof pins, and spray bottle
– Measuring tape
These quantities include a margin of about 15% for swatching and weaving in ends.
Abbreviations (US Terms)
- ch – chain
- sl st – slip stitch
- sc – single crochet
- hdc – half double crochet
- dc – double crochet
- tr – treble crochet
- sk – skip
- sp – space
- st(s) – stitch(es)
- BLO – back loop only
- RS / WS – right side / wrong side
Special stitch – Holly Leaf (HL): Ch 7, sl st in 2nd ch from hook, then work sc, hdc, dc, hdc, sc in the next 5 ch. Sl st in the top of the dc you just made before the leaf. The leaf does not count as a stitch.
Stitch-count convention: On the strip, a beginning ch-3 counts as 1 dc. Every chain inside a row counts as 1 stitch, so every row of the strip has 31 stitches.
Gauge and Checkpoints
Gauge: 31 sts = 5 in (12.7 cm) and 9 dc rows = 3 in (7.6 cm), measured over solid dc.
Use the first section of the strip as your test piece. Work the foundation row and Rows 2–16, then measure before you continue.
- After Row 1: width 5 in (12.7 cm)
- After Row 16: 5 in x 5⅓ in (12.7 cm x 13.5 cm)
- After Row 31: length 10⅓ in (26.2 cm)
- After Row 46: length 15⅓ in (38.9 cm)
- After Row 48: 5 in x 16 in (12.7 cm x 40.6 cm)
If your strip is too wide or too long, go down 0.25 mm in hook size. If it is too small, go up 0.25 mm. Fix the width first. Row height can relax by about ⅛ in (0.3 cm) per section when blocked, but width changes very little.
The Lace Strip
With cream, ch 33.
Row 1 (foundation): Dc in 4th ch from hook (skipped ch count as 1 dc) and in each ch across. Turn. (31 dc)
Section Repeat (15 rows)
Work the 15-row section 3 times: Rows 2–16, Rows 17–31, and Rows 32–46. The row numbers below are for the first section.
Row 2 (fan row): Ch 1 (does not count), sc in first dc, sk 4, 9 dc in next dc, sk 4, sc in next st; repeat from * 2 more times, working the last sc in the top of the turning ch. Turn. (31 sts: 3 fans of 9 dc + 4 sc)
Row 3 (bar row): Ch 3, ch 4, sc in 5th dc of next fan, ch 4, dc in next sc; repeat from * 2 more times. Turn. (31 sts: 4 dc + 3 sc + 24 ch)
Row 4 (solid row): Ch 3, sk first st, dc in each ch and st across. Turn. (31 dc)
Row 5 (branch row): Ch 3, sk first st, dc in next 3 dc, HL, dc in next 6 dc, HL, dc in next 12 dc, HL, dc in next 6 dc, HL, dc in last 3 sts. Turn. (31 dc + 4 leaves)
Push all four leaves to the same side. That side is the front of the strip. In every following section, push the leaves to this same front side.
Row 6 (window set-up): Ch 3, ch 4, sk 4, dc in next dc; repeat from * 5 more times, working the last dc in the top of the turning ch. Turn. (31 sts: 7 dc + 24 ch, 6 open spaces)
Rows 7–15 (window rows): Ch 3, ch 4, dc in next dc; repeat from * 5 more times. Turn. (31 sts each row)
The 10 window rows (Rows 6–15) stack the dc into 7 vertical bars. Together they form an open window 3⅓ in (8.5 cm) tall.
Row 16 (solid row): Ch 3, dc in each of next 4 ch, dc in next dc; repeat from * 5 more times. Turn. (31 dc)
Repeat Rows 2–16 two more times (Rows 17–31, then Rows 32–46).
Top Rows
Row 47: Work as Row 2. (31 sts)
Row 48: Work as Row 3. (31 sts) Do not fasten off.
The strip now measures 5 in x 16 in (12.7 cm x 40.6 cm).
Border
Border gauge: 2 sc around each row-end = 6 sc per inch (2.5 cm) of side edge. The body gauge is 6.2 sts per inch, so the edge lies flat without pulling or rippling.
Round 1: Continue with the loop on your hook. Ch 1, then work across the top: sc in each of the 31 sts of Row 48 (work 1 sc in each ch). Ch 2 for the corner. Working down the side edge, work 2 sc around each row-end post, 96 sc in total. Ch 2 for the corner. Working into the free loops of the foundation chain, sc in each of 31 sts. Ch 2 for the corner. Work 2 sc around each row-end up the second side (96 sc). Ch 2, then sl st to the first sc.
(Top 31 + side 96 + bottom 31 + side 96 = 254 sc, plus 4 ch-2 corner sps)
The ch-2 corner spaces are not included in the side counts.
Round 2: Ch 1.
– Top edge with loops: [sc, ch 18, sc] in first sc, sc in next 9 sc, [sc, ch 18, sc] in next sc; repeat from * 2 more times. (35 sc + 4 loops)
– Corner: 3 sc in ch-2 sp.
– Side: Sc in each of 96 sc. (96)
– Corner: 3 sc in ch-2 sp.
– Bottom scallops: Sc in first sc, sk 4, 9 dc in next sc, sk 4, sc in next sc; repeat from * 2 more times. (31 sts: 27 dc + 4 sc, 3 scallops)
– Corner: 3 sc in ch-2 sp.
– Side: Sc in each of 96 sc. (96)
– Corner: 3 sc in ch-2 sp. Sl st to first sc and fasten off.
(35 + 96 + 31 + 96 + 12 corner sc = 270 sts, plus 4 loops)
Why the math works:
– The top and bottom have 31 sts = 3 × 10 + 1. That is the exact fan multiple, so the bottom scallops line up under the fans in the body.
– The loops sit at stitches 1, 11, 21, and 31, which are evenly 10 sts apart.
– The sides have 48 rows × 2 sc = 96 sc. Nothing is added on Round 2 except the corner groups, so the counts stay the same from round to round.
Robin Appliqué (make 3)
Body (taupe)
Ch 10.
Rnd 1: Sc in 2nd ch from hook, sc in next 7 ch, 3 sc in last ch (head end). Working along the other side of the chain, sc in next 7 ch, 2 sc in the same ch as the first sc (tail end). Sl st to first sc. (20 sc)
Rnd 2: Ch 1, 2 sc in first st, sc in next 7, 2 sc in each of next 3, sc in next 7, 2 sc in each of last 2. Sl st to first sc. (26 sc)
Rnd 3: Ch 1, sc in next 2, hdc in next 7, 2 dc in each of next 6 (head), hdc in next 7, sc in next 2, then work the tail in the next st: hdc, ch 3, sl st in 3rd ch from hook, hdc. Sc in last st. Sl st to first sc and fasten off. (33 sts + tail picot)
The body is about 3¼ in (8.3 cm) long including the tail and 2 in (5.1 cm) tall.
Breast (red)
Row 1: Make a magic ring, ch 2 (does not count), 7 dc in ring, pull the ring closed. Turn. (7 dc)
Row 2: Ch 2, 2 dc in each dc. Turn. (14 dc)
Row 3: Ch 1, sc in next dc, 2 sc in next dc; repeat from * 6 more times. (21 sc) Fasten off and leave a long tail.
The breast is a semicircle about 1¾ in (4.4 cm) across its straight edge.
Wing (cream)
Ch 10.
Rnd 1: Sc in 2nd ch from hook, then work sc, hdc, hdc, dc, dc, dc, tr in the next 7 ch, and 5 tr in the last ch. Working along the other side of the chain, work tr, dc, dc, dc, hdc, hdc, sc, sc in the next 8 ch. Sl st to first sc. (21 sts)
Rnd 2: Working in BLO, sc in each st around. Sl st to first sc. (21 sc) Fasten off and leave a long tail.
With cream yarn, work 3 lines of surface backstitch from the rounded end toward the point. This gives the raised ridges. The wing is about 1¾ in x 1 in (4.4 cm x 2.5 cm).
Beak and Eye
Beak (brown): Ch 3, sl st in 2nd ch from hook, sc in next ch. Fasten off and leave a tail.
Eye: With black, work a French knot (wrap twice) 3 sts in from the head edge, or sew on a 4 mm bead.
Assembly
- Sew the breast to the lower front of the body. The curved edge follows the chest, and the straight edge faces the tail.
- Sew the wing over the upper back. The point aims toward the tail, and the rounded end slightly overlaps the top of the breast.
- Sew the beak to the tip of the head.
Berries (make 18)
With red, make a magic ring, ch 1, 6 sc in ring, and sl st to the first sc. Pull the ring tight and fasten off. Tuck the tails inside, then run one tail around the edge and pull to form a firm ball about ⅜ in (1.0 cm) wide.
Placing the Appliqués
Lay the strip front side up.
- Robins: Center one robin over each window, facing right. The lower edge of the breast and body should rest on the branch row (Rows 5, 20, and 35).
- Berries: Sew a cluster of 3 berries just below each branch row, between each pair of leaves: under stitches 7 and 25. That makes 2 clusters per section and 6 clusters in all.
Whipstitch the edges of every appliqué through the dc bars and branch stitches. Keep the stitches small and do not pull the lace tight.
Final Blocking
- Weave in all ends along solid rows or inside appliqués.
- Soak the strip in cool water for 10 minutes, then press out the water in a towel. Do not wring it.
- Pin the strip face up to 5½ in x 16¾ in (14.0 cm x 42.5 cm).
- Pin straight down each side every 1 in (2.5 cm).
- Pin the tip of each bottom scallop and open each top fan into an even arc.
- Pull the hanging loops straight and pin them to 1½ in (3.8 cm).
- Pat the robins into shape with your fingers. Do not pin through the appliqués.
- Let the strip dry completely before unpinning.
Final Quality-Control Checklist
- [ ] Every strip row has 31 sts
- [ ] There are 7 straight vertical bars in each window
- [ ] There are 4 leaves per branch row, all on the front
- [ ] Each border side has 96 sc, and the top and bottom each have 31 sts before the scallops and loops
- [ ] The 4 hanging loops are equal in length and evenly spaced
- [ ] All 3 robins face right and sit on their branches
- [ ] There are 6 berry clusters of 3
- [ ] The blocked size is 5½ in x 16¾ in (14.0 cm x 42.5 cm)
Troubleshooting
- Windows lean to one side: Check that each dc goes into a dc and not into a chain.
- Fans cup or ruffle: Your tension is loose on the dc. Go down 0.25 mm in hook size for the fan rows only.
- Side edges ripple: You worked more than 2 sc into some row-ends. The sc-height ends of the fan rows also need only 2 sc.
- Side edges pull in: Make sure you work 2 sc into every row-end and not 1.
- Leaves on the wrong side: Pull the leaf through the gap between the stitches to the front. Then tack it in place with cream yarn.
- Robin looks flat: Stitch the wing only along its outer edge, so the ridged surface stands up a little.
Care
Hand wash in cool water with a mild soap and dry flat, reshaping it while damp. Do not iron directly over the robins. Press lightly from the back through a cloth if needed.

Final Notes
The measurement chain is straightforward:
– 31 sts = 5 in (12.7 cm) of width.
– Each 15-row section = 5 in (12.7 cm).
– Three sections plus the foundation and top rows = 48 rows, or 16 in (40.6 cm).
– The border adds ¼ in (0.6 cm) at the sides and top and ½ in (1.3 cm) at the bottom, giving 5½ in x 16¾ in (14.0 cm x 42.5 cm).
– The loops add 1½ in (3.8 cm), for 18¼ in (46.4 cm) overall.
Check your measurements at each stage and the finished strip will match.
Happy crocheting!