

This little tree is built from soft, corded loops. A braided blue spine runs straight down the middle, and three pairs of teardrop branches droop from it, each pair larger than the one above. The result is airy and graphic, closer to a line drawing than a solid tree.
The palette is calm and wintry. A dusty denim blue makes the spine, branches, and hanging loop. A warm ivory makes the scalloped snow band and the tiny trunk. It looks at home on a real tree, tied to a gift, or hung from a window hook, and a set of them in matching colors makes a quiet, modern theme.
The pattern uses US crochet terms. The finished ornament measures 4.25 in (10.8 cm) wide and 5.5 in (14.0 cm) tall, not counting the hanging loop, which adds about 1.75 in (4.4 cm).
Construction is simple and seamless. You chain the spine from the top down, making and covering each pair of branch loops when you reach it. Then you single crochet back up the spine to thicken it and add the hanging loop. Finally, you work an ivory scalloped band along the bottom tier and a small trunk from its center. There is nothing to sew except the yarn tails.
Finished Size and Construction
- Finished size: 4.25 in (10.8 cm) wide x 5.5 in (14.0 cm) tall, excluding hanging loop
- Hanging loop: about 1.75 in (4.4 cm) tall
- Skill level: Easy / advanced beginner
- Terminology: US crochet terms
- Yarn weight: Worsted (#4)
- Hook: US G-6 (4.0 mm)
- Number of pieces: 1, worked seamlessly
- Layout: central spine, 3 tiers of paired loops, ivory band, trunk
- Piece size before band: 4.25 in (10.8 cm) wide x 4.4 in (11.2 cm) tall
- Band depth: about 0.6 in (1.5 cm) at its deepest point
- Trunk: 0.9 in (2.3 cm) wide x 0.8 in (2.0 cm) tall
Materials
Choose a smooth worsted-weight yarn with good stitch definition. A cotton blend or a firm acrylic shows the corded texture best. Fuzzy or very soft yarn blurs the loops and makes them droop.
- Color A, dusty denim blue: 10 g, about 20 m
- Color B, ivory: 5 g, about 10 m
These amounts include a margin of about 25 percent, so one small ball of each color will make several ornaments.
Tools:
- US G-6 (4.0 mm) crochet hook
- Tapestry needle
- Scissors
- 2 stitch markers
- Ruler or tape measure
- Blocking mat and rust-proof pins
- Spray bottle with water
Abbreviations (US Terms)
- ch – chain
- sl st – slip stitch
- sc – single crochet
- hdc – half double crochet
- dc – double crochet
- st(s) – stitch(es)
- RS – right side
- sk – skip
Special stitch – Covered Loop: Chain the stated number, then sl st into the indicated spine ch to close a ring. Work the stated number of sc into the ring, over the chain rather than into the chain stitches. Push the sc together as you go so the chain is fully hidden. Sl st into the same spine ch to finish. This makes the thick, corded teardrop shape.
Gauge and Checkpoints
Gauge: 18 sc and 20 rows = 4 in (10.2 cm) in sc with a 4.0 mm hook.
That works out to 4.5 sc and 5 rows per inch (2.5 cm). Exact gauge matters less here than for a garment, but it controls the tree’s proportions and how well the band fits the bottom tier.
Make one complete test ornament before starting a batch. Measure at these checkpoints:
- After Tier 1: about 2 in (5.1 cm) across the pair of loops
- After Tier 2: about 3.25 in (8.3 cm) across
- After Tier 3: about 4.25 in (10.8 cm) across
- Spine after Row 2: about 4.4 in (11.2 cm) from tip to bottom
- After the band and trunk: 5.5 in (14.0 cm) tall
If your tree is too big: Go down one hook size, or tighten each Covered Loop by pushing the sc closer together.
If your tree is too small: Go up one hook size. Do not add extra sc to the loops, because that changes the stitch counts for the band.
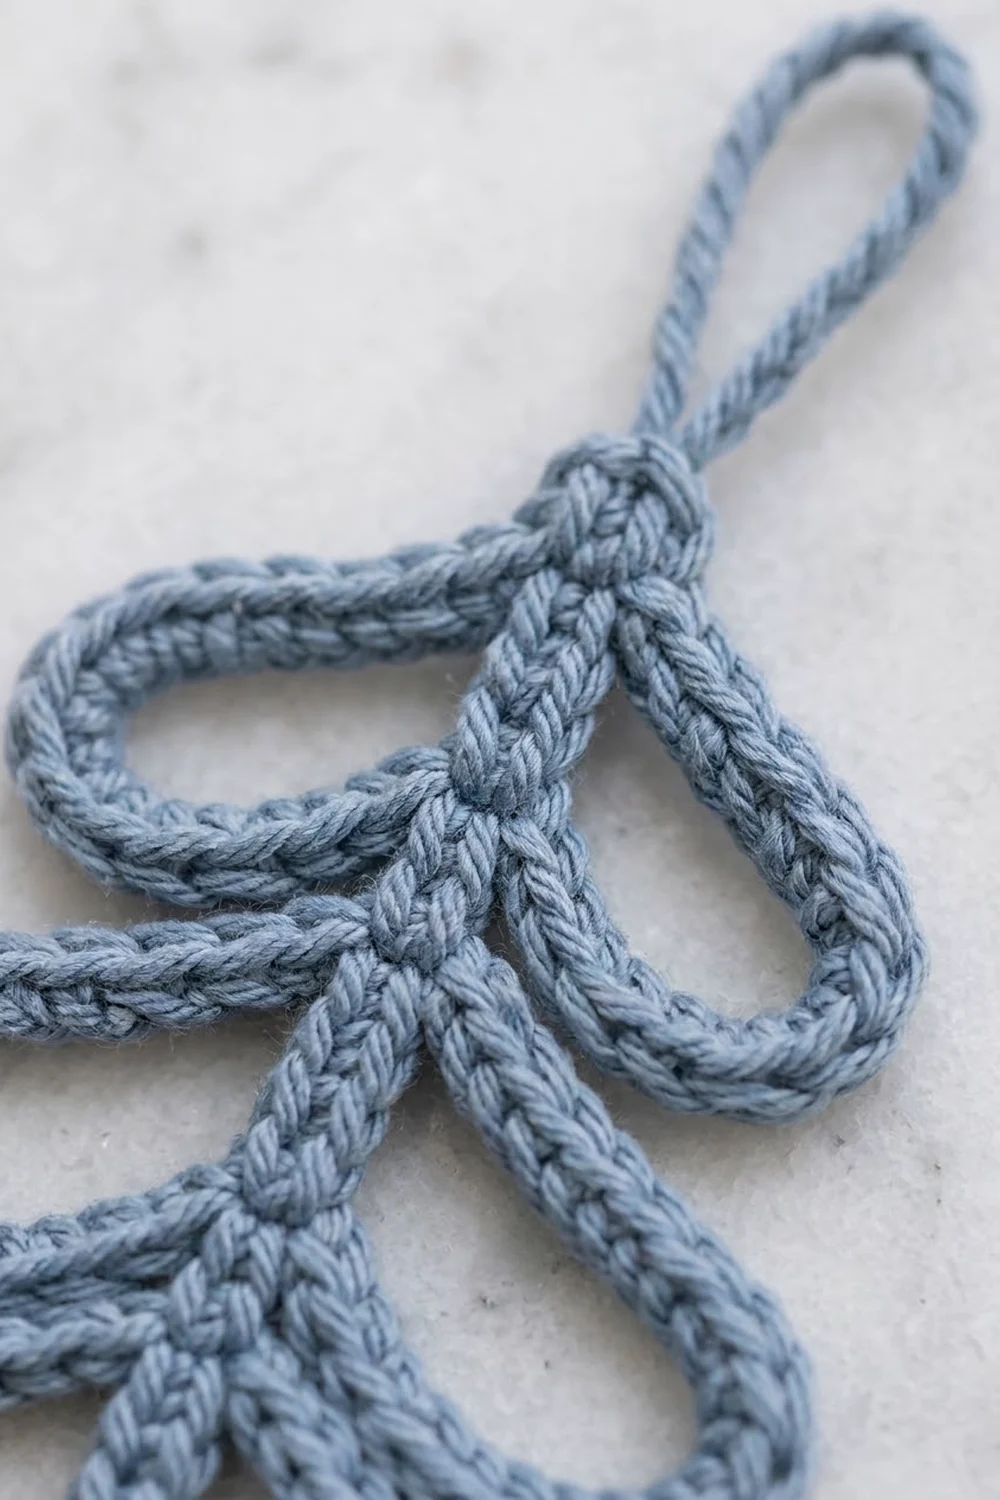
Spine and Branches (Color A)
The spine is chained from the top down. Each tier attaches at a single spine chain, with one loop to the left and one to the right. Keep the RS facing you throughout Row 1.
Row 1 (spine chain with branches):
Ch 3. These are spine chains 1 to 3. Place a marker in the first ch to mark the tip.
Tier 1: Ch 8, sl st in spine ch 3 to close a ring. Work 14 sc into the ring, then sl st in spine ch 3. This is the left loop. Repeat for the right loop: ch 8, sl st in spine ch 3, 14 sc into the ring, sl st in spine ch 3.
Tier 1 total: 2 loops, 14 sc each = 28 sc.
Lay the loops so they droop down and outward. Measure: about 2 in (5.1 cm) across.
Ch 7. These are spine chains 4 to 10.
Tier 2: Work 2 Covered Loops into spine ch 10, each with ch 12 and 20 sc.
Tier 2 total: 2 loops, 20 sc each = 40 sc.
Measure: about 3.25 in (8.3 cm) across.
Ch 7. These are spine chains 11 to 17.
Tier 3: Work 2 Covered Loops into spine ch 17, each with ch 16 and 26 sc.
Tier 3 total: 2 loops, 26 sc each = 52 sc.
Measure: about 4.25 in (10.8 cm) across.
Ch 3. These are spine chains 18 to 20.
Spine count: 3 + 7 + 7 + 3 = 20 spine chains.
Tip: Keep the spine chains slightly looser than your normal chain. They have to carry a full row of sc in Row 2, and tight chains will make the spine curve.
Row 2 (spine return): Ch 1 for turning. Working up the spine into the back bump of each spine ch, sc in spine ch 20 and in each spine ch up to the tip. At each tier, push the loop bases slightly forward and work the sc into the spine ch behind them.
Row 2 count: 20 sc.
The spine is now two strands thick, and the front V’s of the chain show as a braided center line. Measure: about 4.4 in (11.2 cm) from tip to bottom.
Hanging loop: At the tip, ch 14, sl st in the last sc made to close a ring. Work 20 sc into the ring, then sl st in the same sc. Fasten off, leaving a 4 in (10.2 cm) tail.
Hanging loop: 20 sc, about 1.75 in (4.4 cm) tall.
Weave the tails into the spine. Use the starting tail to close any gap at the bottom of the spine.
Border: Ivory Snow Band and Trunk (Color B)
The ivory band follows the lower edges of the Tier 3 loops and crosses the bottom of the spine. It is worked in rows across that curved edge.
Border gauge: Same as the main gauge, 4.5 sc per inch (2.5 cm). Hold the yarn a little more loosely than usual on the curve so the band lies flat.
Setup: Hold the tree upside down with the RS facing you. Each Tier 3 loop has 26 sc. The lower half of each loop, from the outer tip back to the spine, is 13 sc. On each loop, mark the 12 sc that start at the outer tip. Skip the 13th sc, where the loop meets the spine.
Row 1 (RS): Join Color B with sl st in the first marked sc at the outer tip of one Tier 3 loop. Ch 1, then sc in the same st and in the next 11 sc (12 sc). Sc in the bottom of the spine, working into the first sc of Row 2 (1 sc). Sc in the 12 marked sc of the other loop, ending at its outer tip (12 sc).
Row 1 count: 12 + 1 + 12 = 25 sc.
Row 2: Ch 1, turn (the ch 1 does not count as a st). Hdc in each st across.
Row 2 count: 25 hdc.
Row 3 (scallops): Ch 1, turn. Sc in the first st, sk 2 sts, 5 dc in next st, sk 2 sts, sc in next st; repeat from * 3 more times.
Row 3 count: 4 shells of 5 dc (20 dc) + 5 sc = 25 sts. That makes 4 scallops.
Why the math works: The scallop repeat uses 6 stitches (sk 2, shell, sk 2, sc), plus 1 stitch for the first sc. Four repeats need 6 x 4 + 1 = 25 sts, which is exactly the Row 1 count. Taking 12 sc from each loop plus 1 at the spine keeps the center sc of Row 3 (the 3rd sc, at st 13) lined up with the spine, so the scallops are symmetrical.
Fasten off and weave in the ends. Measure: the band adds about 0.6 in (1.5 cm) below the loop edges at its deepest point.
Trunk:
Row 1: With the RS facing and the tree upright, join Color B with sl st in the 5th dc of the 2nd shell. Ch 1, sc in the same st, 2 sc in the center sc (st 13), then sc in the 1st dc of the 3rd shell.
Row 1 count: 1 + 2 + 1 = 4 sc.
Rows 2–4: Ch 1, turn. Sc in each st across.
Each row: 4 sc.
Fasten off and weave in the ends. Trunk: 0.9 in (2.3 cm) wide x 0.8 in (2.0 cm) tall.
Final Blocking
- Lay the ornament RS up on a blocking mat.
- Pin the tip and the bottom of the trunk so the spine is straight and measures 5.5 in (14.0 cm) from tip to trunk bottom.
- Shape each pair of loops into matching teardrops that droop down and outward. Pin each loop at its outer point.
- Check the widths: about 2 in (5.1 cm), 3.25 in (8.3 cm), and 4.25 in (10.8 cm) for Tiers 1, 2, and 3.
- Pin each scallop into a round curve and square up the trunk.
- Mist lightly with water until damp but not soaked.
- Let it dry completely, at least 6 hours, before unpinning.
- For extra firmness, mist with a light fabric stiffener before drying.
Final Quality-Control Checklist
- The spine is straight and 4.4 in (11.2 cm) tall before the band.
- Each tier has 2 loops with matching counts: 14, 20, and 26 sc.
- No chain shows through any Covered Loop.
- Spine Row 2 has 20 sc.
- Band Rows 1 and 2 each have 25 sts.
- Row 3 has 4 even scallops and 25 sts.
- The trunk is centered, 4 sc wide and 4 rows tall.
- The hanging loop is centered at the tip and firmly anchored.
- All ends are woven in securely.
- The finished size is 4.25 in (10.8 cm) x 5.5 in (14.0 cm).
Troubleshooting
Loops look thin or the chain shows: Push the sc closer together. If the chain still shows, try a slightly thicker yarn rather than adding stitches, which would change the band count.
Loops twist: The chain may have twisted before you closed the ring. Rip back that loop and keep the chain flat when you sl st.
Spine curves: Your Row 2 sc are tighter than your chains. Chain the spine more loosely, or go up one hook size for Row 1 only.
Loops on one side are bigger: You likely added or dropped an sc. Count each loop before closing it; both loops in a tier must match.
Band ruffles: You are working too loosely on the curve. Go down one hook size for Rows 1 and 2.
Band cups or pulls the loops inward: Work Row 1 more loosely, or use the next hook size up.
Trunk is off-center: Recount the shells in Row 3. The join must be in shell 2, next to the center sc.
Ornament won’t hang straight: Re-anchor the hanging loop exactly at the tip, then block again.
Care
Hand wash in cool water with mild soap, press out the water in a towel, and dry flat, reshaping the loops while damp. Do not tumble dry.
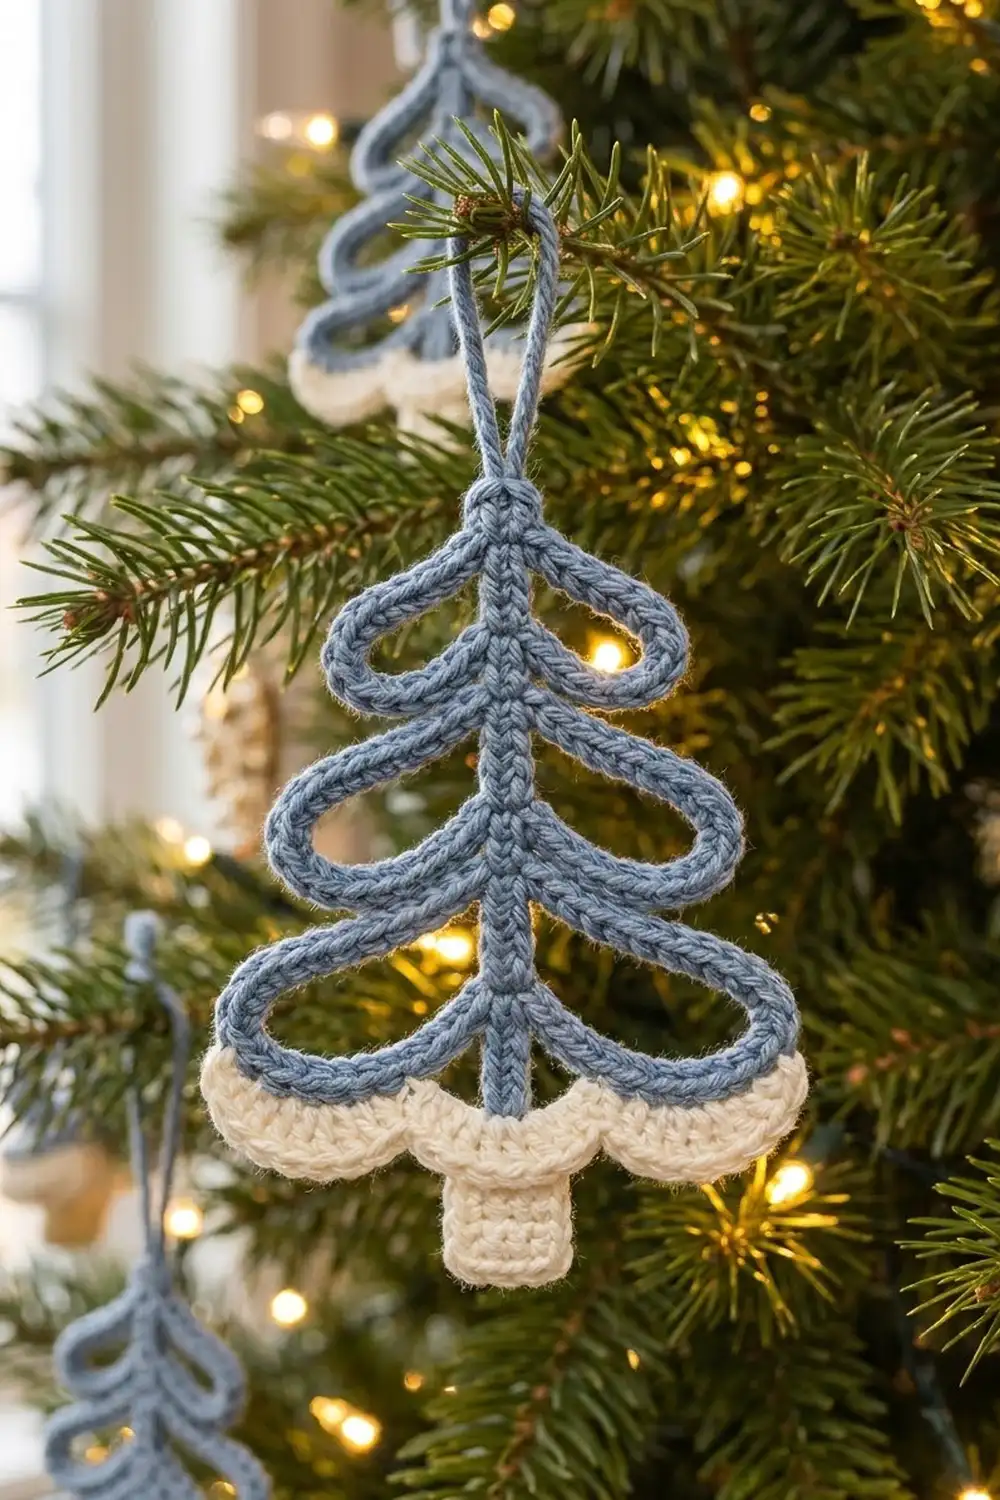
Final Notes
The measurement chain is short and reliable. Gauge sets the size of each Covered Loop: 14, 20, and 26 sc give tiers of 2 in (5.1 cm), 3.25 in (8.3 cm), and 4.25 in (10.8 cm). Twenty spine stitches give a 4.4 in (11.2 cm) spine. The 25-stitch band fits four 6-stitch scallops plus one stitch, and the 4-row trunk brings the tree to 5.5 in (14.0 cm). Check each step as you go, and every tree in your batch will match.
Happy crocheting!