

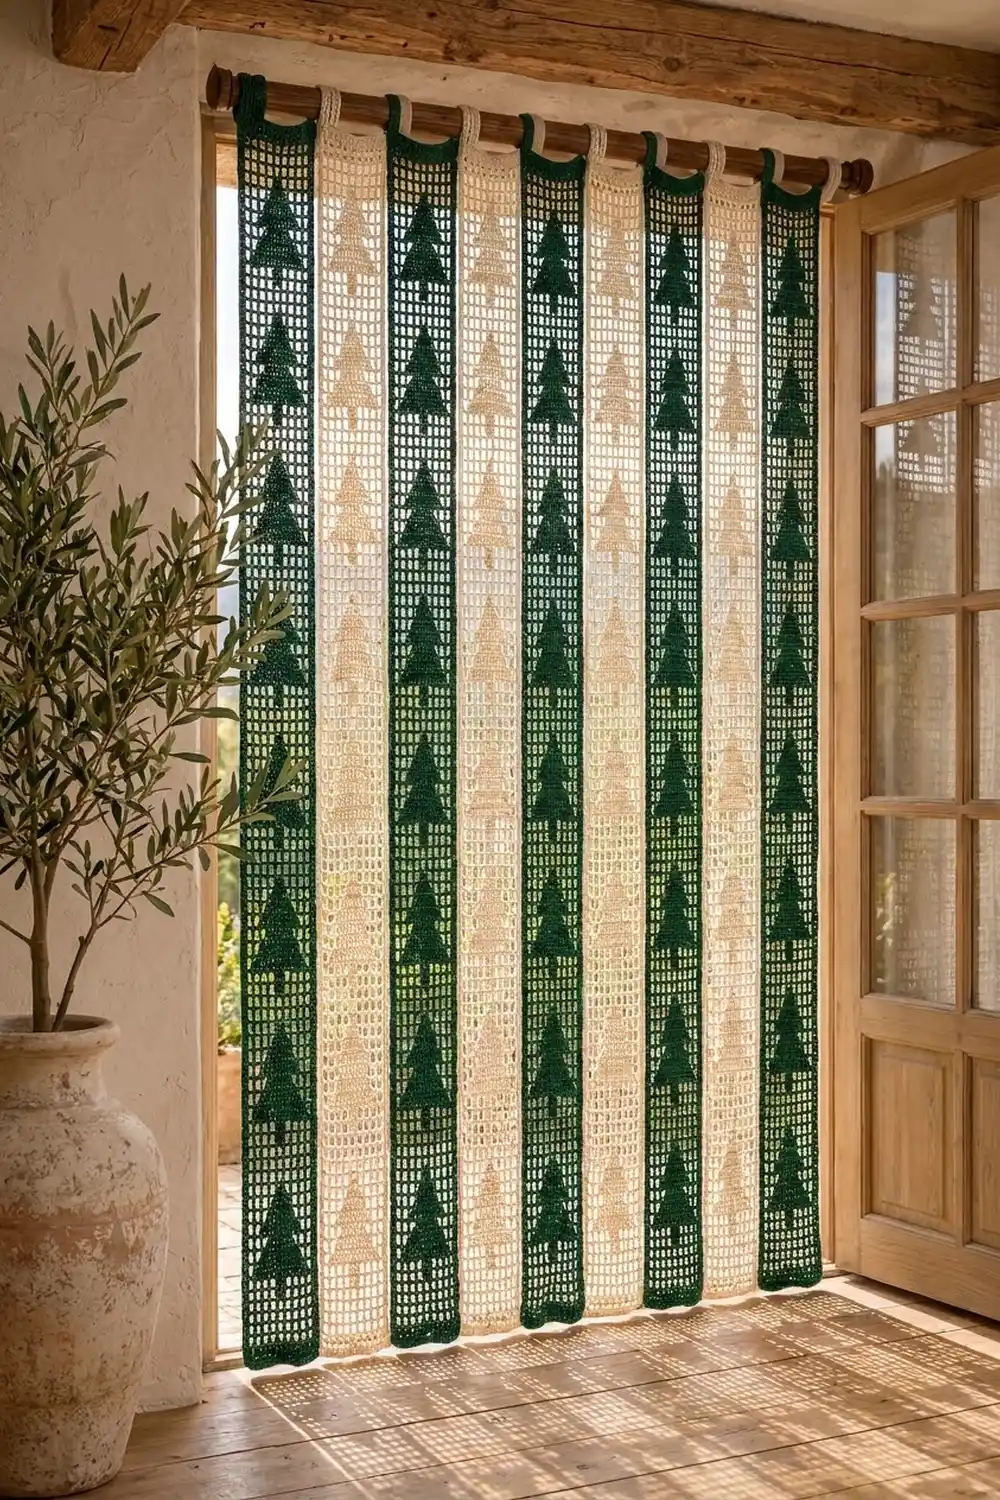
This curtain is made of nine long, narrow filet strips that hang side by side from a rod. Each strip shows a column of simple two-tier pine trees in solid blocks on an open square mesh. Light comes through the mesh, and the trees read clearly from across the room.
The colors alternate forest green and cream: five green strips and four cream ones. Because every strip hangs on its own, the curtain parts easily when you walk through it, and you can rearrange or wash the strips one at a time. The style is rustic and seasonal without being loud, so it works for the winter holidays and stays at home all year.
All instructions use US crochet terms. Each finished strip measures 6.0 in (15.2 cm) wide by 74.25 in (188.6 cm) long, not counting the hanging loop. Hung edge to edge, the nine strips cover about 54 in (137.2 cm) of width.
Each strip is worked flat from the bottom up in filet mesh, beginning and ending with one solid row. A narrow single crochet tab is worked off the top row, folded to the back and sewn down to form a loop. A two-row edging finishes the sides and the bottom.
Finished Size and Construction
- Finished strip size: 6.0 in × 74.25 in (15.2 cm × 188.6 cm)
- Skill level: Intermediate (basic filet)
- Terminology: US
- Yarn weight: Sport-weight (2) cotton
- Hook: 3.5 mm (E-4)
- Number of pieces: 9 strips (5 green, 4 cream)
- Layout: 9 strips in one row, alternating colors, hung separately and not joined to each other
- Strip size before border: 5.5 in × 74.0 in (14.0 cm × 188.0 cm)
- Border depth: 0.25 in (0.6 cm) on the sides and bottom
- Tab: 3.25 in (8.3 cm) wide × 6 in (15.2 cm) long; folds into a loop that fits rods up to 1.5 in (3.8 cm) in diameter
Materials
Use a smooth, mercerized or combed sport-weight cotton. Cotton gives crisp, square meshes and doesn’t stretch much while hanging. Avoid fuzzy or very stretchy yarns, because they blur the tree outlines and the strips will keep growing in length over time.
These amounts assume a yarn of about 50 g / 155 m (170 yd) per ball:
- Forest green: 300 g / 930 m (1017 yd), 6 balls, for 5 strips
- Cream: 250 g / 775 m (848 yd), 5 balls, for 4 strips
One strip, including tab and border, uses about 55 g / 170 m (186 yd).
Tools:
– 3.5 mm (E-4) crochet hook
– Tapestry needle
– Stitch markers
– Measuring tape
– Blocking pins and a long blocking surface (or folded towels on the floor)
– Spray bottle
– Curtain rod up to 1.5 in (3.8 cm) in diameter
The quantities include a margin of about 10% for gauge swatching, sewing the tabs and weaving in ends.
Abbreviations (US Terms)
- ch – chain
- sc – single crochet
- dc – double crochet
- sl st – slip stitch
- sk – skip
- st(s) – stitch(es)
- sp – space
- RS / WS – right side / wrong side
Special stitches
- Open mesh (O): ch 2, sk next 2 sts (or the ch-2 sp), dc in next dc.
- Block (B): dc in each of the next 2 sts (or work 2 dc into the ch-2 sp), then dc in next dc.
- Starting an O row: ch 5. This counts as the first dc plus ch 2.
- Starting a B row: ch 3. This counts as the first dc.
- Ending a row: work the last dc into the 3rd ch of the turning chain from the row below.
Every row has 11 meshes. That makes 34 stitch positions per row: 12 dc posts plus 11 two-stitch gaps (11 × 3 + 1 = 34).
Gauge and Checkpoints
Gauge: 10 meshes × 10 rows = 5 in × 5 in (12.7 cm × 12.7 cm) in filet mesh, so one mesh is 0.5 in (1.3 cm) square.
Tab gauge: 20 sc = 3.25 in (8.3 cm); 5 sc rows = 1 in (2.5 cm).
Test one strip before starting the rest. Work Rows 1–27, then lay the piece flat and measure:
- After Row 1: 5.5 in (14.0 cm) wide.
- After Row 3: 1.5 in (3.8 cm) tall.
- After Row 27: 13.5 in (34.3 cm) tall. The first two trees are each 4.5 in (11.4 cm) wide and 4.5 in (11.4 cm) tall.
- After Row 51: 25.5 in (64.8 cm).
- After Row 99: 49.5 in (125.7 cm).
- After Row 148: 74.0 in (188.0 cm).
If the strip is too wide or too tall, go down 0.25–0.5 mm in hook size. If it’s too small, go up 0.25–0.5 mm. If only the height is off, adjust the height of your dc rather than changing hook. Square meshes keep the trees in proportion.
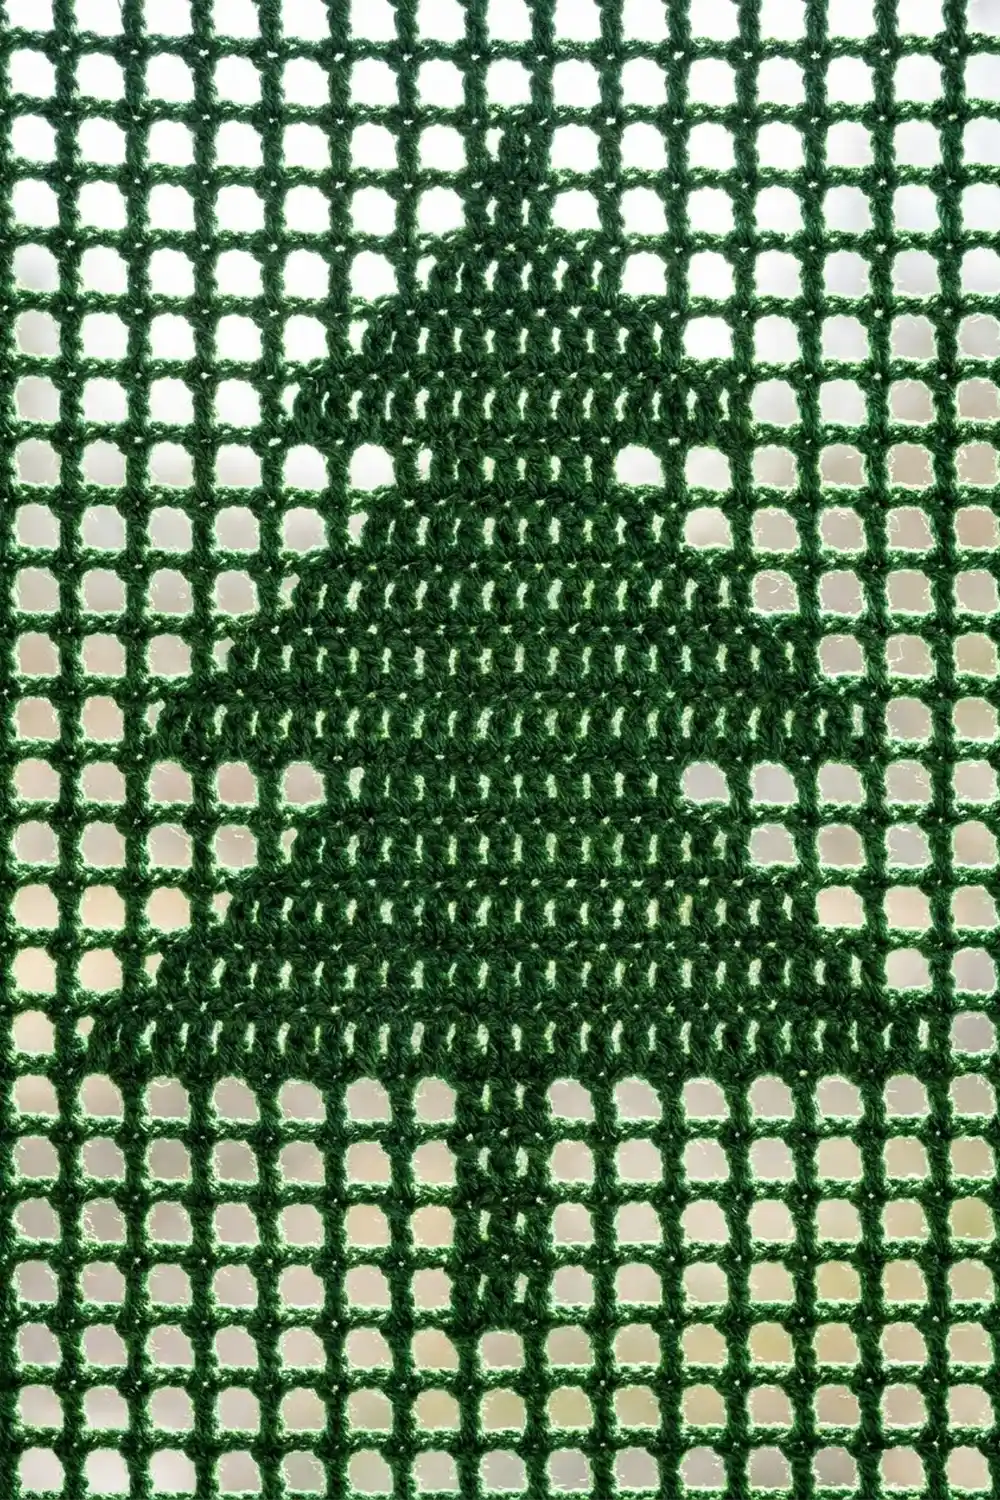
Strip Pattern (Make 9)
Foundation
Row 1 (solid): Ch 36. Dc in 4th ch from hook and in each ch across. Turn. (34 sts: 33 dc + turning ch.)
Rows 2–3 (open): Ch 5, sk 2 sts, dc in next dc; ch 2, sk 2, dc in next dc, repeat from * across. Turn. (12 dc, 11 ch-2 sp = 11 O.)
Tree Repeat (Rows 4–147)
Work the 12-row repeat below 12 times. Repeat 1 is Rows 4–15, Repeat 2 is Rows 16–27, and so on; Repeat 12 is Rows 136–147.
The tree is symmetrical, so each row reads the same from either end. Work every row from right to left as you hold it, then turn.
- Tree Row 1: 5 O, 1 B, 5 O. (14 dc, 10 ch-2 sp) – trunk
- Tree Row 2: 5 O, 1 B, 5 O. (14 dc, 10 ch-2 sp) – trunk
- Tree Row 3: 1 O, 9 B, 1 O. (30 dc, 2 ch-2 sp) – base of lower tier
- Tree Row 4: 2 O, 7 B, 2 O. (26 dc, 4 ch-2 sp)
- Tree Row 5: 3 O, 5 B, 3 O. (22 dc, 6 ch-2 sp)
- Tree Row 6: 2 O, 7 B, 2 O. (26 dc, 4 ch-2 sp) – base of upper tier
- Tree Row 7: 3 O, 5 B, 3 O. (22 dc, 6 ch-2 sp)
- Tree Row 8: 4 O, 3 B, 4 O. (18 dc, 8 ch-2 sp)
- Tree Row 9: 5 O, 1 B, 5 O. (14 dc, 10 ch-2 sp) – treetop
- Tree Rows 10–12: 11 O. (12 dc, 11 ch-2 sp) – spacer
In every row, the dc count plus 2 × (ch-2 sp) equals 34. For example, Tree Row 3: 30 + (2 × 2) = 34. Use this as a quick check at the end of each row.
The step from Tree Row 5 (5 blocks) back out to Tree Row 6 (7 blocks) is what creates the two-tier pine shape. Each tree uses 39 blocks: 1 + 1 + 9 + 7 + 5 + 7 + 5 + 3 + 1 = 39.
Top Row
Row 148 (solid): Ch 3, then work 3 dc per mesh across: dc in each dc, and 2 dc in each ch-2 sp. (34 sts.) Fasten off.
The strip now has 148 rows: 1 solid, 2 open, 144 tree-repeat rows and 1 solid. At 0.5 in (1.3 cm) per row, that measures 74.0 in (188.0 cm).
Hanging Tab
With the same side facing as Row 148, skip the first 7 sts. Join yarn in the 8th st.
Tab Row 1: Ch 1, sc in the same st and in each of the next 19 sts. Turn. (20 sc.) This leaves 7 sts unworked at each side: 7 + 20 + 7 = 34.
Tab Rows 2–30: Ch 1, sc in each st across. Turn. (20 sc.)
Fasten off, leaving a 16 in (40.6 cm) tail for sewing. The tab now measures 3.25 in × 6 in (8.3 cm × 15.2 cm).
Make All Pieces
- Forest green: 5 strips
- Cream: 4 strips
Layout (left to right, as hung):
| G | C | G | C | G | C | G | C | G |
G = green, C = cream. Every strip is 6.0 in (15.2 cm) wide, so the total width is 9 × 6.0 = 54 in (137.2 cm). Green strips sit at both outer edges.
Joining
The strips are not joined to each other. The only joining in this project is closing each tab into a hanging loop.
- Fold the tab toward the WS of the strip.
- Line up the 20 sts of Tab Row 30 with the same 20 sts (sts 8–27) of Row 148 on the WS.
- Whipstitch one tab stitch to one Row 148 stitch, 20 stitches in total, working through the back of Row 148 so the sewing doesn’t show on the RS.
- Keep the tension even. Pull each stitch snug enough to close the gap, but not so tight that Row 148 puckers or narrows.
Checkpoint: The flattened loop should be about 3 in (7.6 cm) tall, with an inner circumference of roughly 6 in (15.2 cm). Slide a 1.5 in (3.8 cm) rod through it; it should pass freely without stretching the tab.
Weave in the tail along the tab seam.
Border
Each strip gets its own border on the two long sides and the bottom edge. The top edge is left as is, because the tab sits there. There are no seams between strips, so no seam stitches are involved.
Border gauge: 2 sc per dc row-end, which works out to 4 sc per inch (2.5 cm) along the sides.
Border Row 1: With the RS facing, join yarn at the top right corner of Row 148. Ch 1, then work:
- Right side: 2 sc in each row-end down to the bottom. (148 rows × 2 = 296 sc.)
- Bottom corner: 3 sc in the first foundation st.
- Bottom edge: sc in each of the next 32 foundation sts.
- Bottom corner: 3 sc in the last foundation st.
- Left side: 2 sc in each row-end up to the top. (296 sc.)
Bottom edge total, including both corner groups: 3 + 32 + 3 = 38 sc.
Row 1 total: 296 + 38 + 296 = 630 sc. Turn.
Border Row 2: Ch 1, sl st loosely in each sc around, including each corner sc. (630 sl st.) Fasten off.
Why the math works:
- Long sides: 74.0 in × 4 sc per inch = 296 sc. That matches 2 sc on each of the 148 row-ends, so the sides lie flat with no ruffling or pulling.
- Bottom edge: each of the 34 foundation sts gets exactly one stitch, so the bottom keeps its 5.5 in (14.0 cm) width. The extra 2 sc at each corner turn the corner without cupping.
- Finished size: the border adds 0.25 in (0.6 cm) on each side, so the width becomes 5.5 + 0.25 + 0.25 = 6.0 in (15.2 cm). It also adds 0.25 in (0.6 cm) at the bottom, so the length becomes 74.0 + 0.25 = 74.25 in (188.6 cm).
Final Blocking
- Weave in all remaining ends along solid blocks or border stitches, not across open meshes.
- Lay one strip flat on a long blocking surface with the RS up.
- Spray it until it is evenly damp, but not dripping.
- Pin the bottom corners 6.0 in (15.2 cm) apart. Then pin the sides straight every 4 in (10.2 cm), keeping the width at 6.0 in (15.2 cm) along the full length.
- Gently ease the meshes square. Each mesh should measure 0.5 in (1.3 cm). Line up the tree trunks along the center column.
- Check the length: 74.25 in (188.6 cm) from the bottom border to the top of Row 148.
- Leave the strip to dry completely, then unpin it. Repeat for all nine strips.
Final Quality-Control Checklist
- Each strip has 148 rows and 12 complete trees.
- Every row has 34 stitch positions.
- Each tree is 9 meshes wide at its base and 9 rows tall, with a single-block trunk and a single-block top.
- The two tiers are clearly defined (Tree Row 5 has 5 B, Tree Row 6 has 7 B).
- The tab is 20 sc wide, centered with 7 sts free on each side, and sewn across all 20 sts.
- Border Row 1 has 296 + 38 + 296 = 630 sc.
- Each strip is 6.0 in × 74.25 in (15.2 cm × 188.6 cm).
- All nine strips match in length to within 0.5 in (1.3 cm).
- There are 5 green and 4 cream strips, hung G-C-G-C-G-C-G-C-G.
Troubleshooting
- Meshes are taller than they are wide: Your dc is loose. Shorten the yarn-over pull-through, or go down a hook size.
- The tree looks lopsided: You probably miscounted the open meshes before the blocks. Recount from the edge so each row is symmetrical, as listed in the repeat.
- The strip narrows or widens: Check that each row ends with a dc in the turning chain and that every row has 34 stitch positions.
- The sides ruffle after the border: You are working more than 2 sc per row-end. Take it out and work exactly 296 sc per side.
- The sides pull in after the border: Your sc are too tight. Loosen up, or use a hook 0.5 mm larger for the border only.
- Strips are different lengths: Re-block the longer or shorter strips to match. If they are off by more than 1 in (2.5 cm), check your row counts.
- The loop is too tight on the rod: Add 5 more tab rows before sewing. Each extra row adds about 0.2 in (0.5 cm) of length.
Care
Hand wash in cool water with mild soap, roll each strip in a towel to remove water, and dry flat. Re-pin to 6.0 in × 74.25 in (15.2 cm × 188.6 cm) if needed.
Final Notes
Here is how the measurements build on each other:
- One mesh is 0.5 in (1.3 cm).
- 11 meshes make the 5.5 in (14.0 cm) width.
- 148 rows make the 74.0 in (188.0 cm) length.
- The border brings each strip to 6.0 in × 74.25 in (15.2 cm × 188.6 cm).
- Nine strips side by side cover 54 in (137.2 cm).
If your first test strip passes each checkpoint, the other eight will match it. Hang the strips in alternating green and cream, step back, and enjoy the row of evergreens in your doorway.
Happy crocheting!