

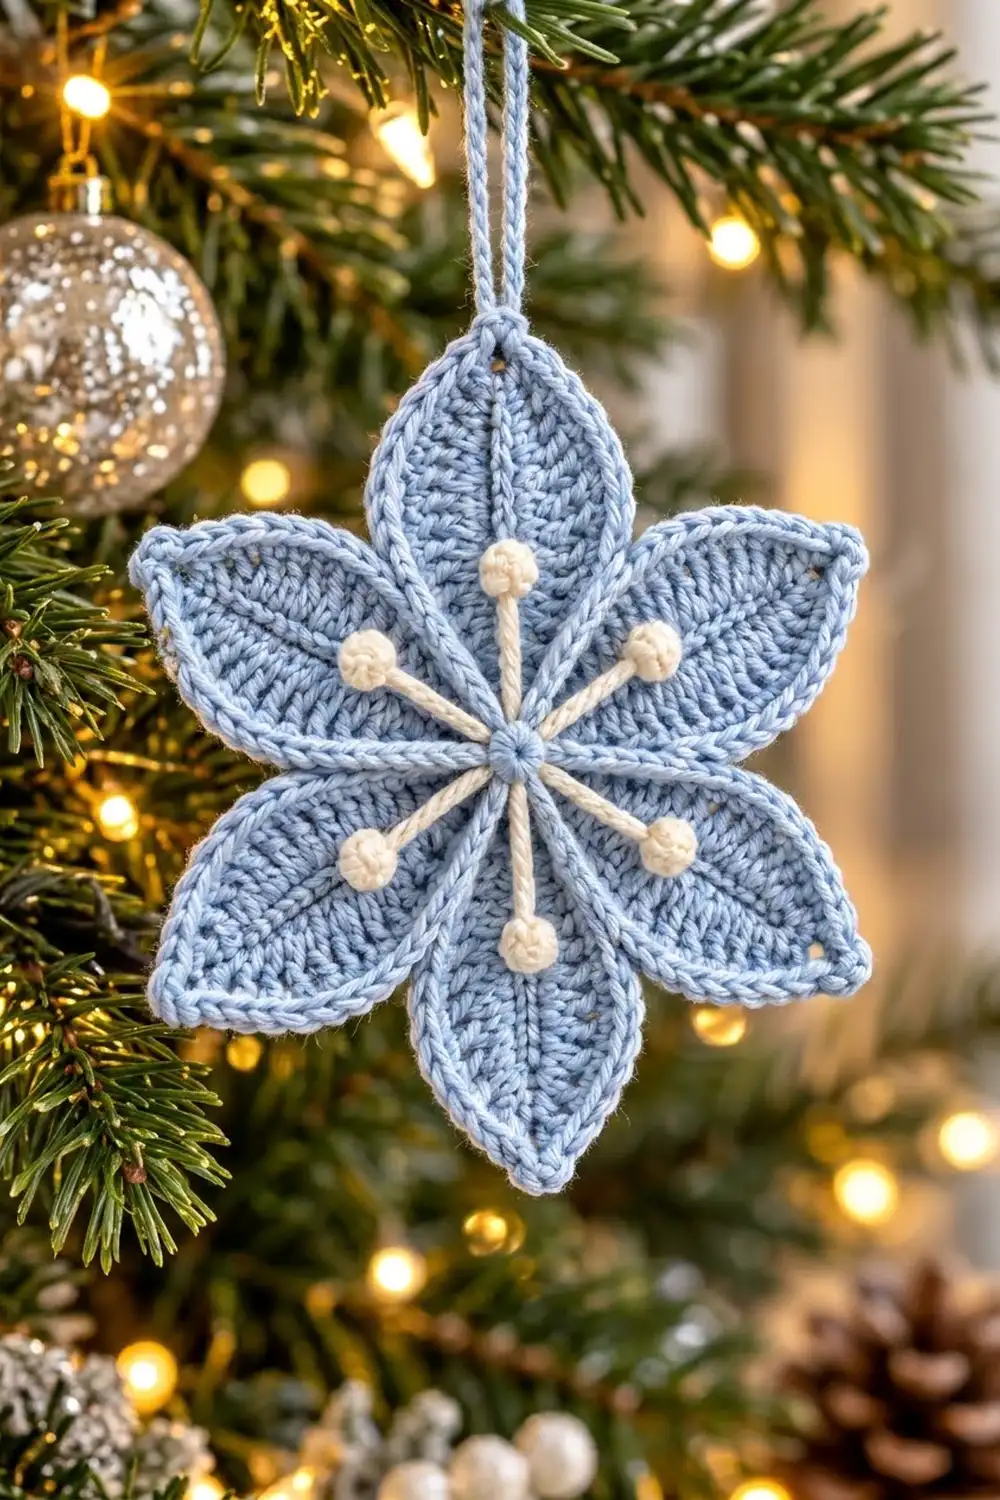
The Frosted Petal Snowflake is a six-pointed ornament built from soft leaf-shaped petals. Each petal has a raised center vein and a rope-like outline, and a cream spoke appliqué with tiny bobbles sits on top.
The main colorway is light powder blue with cream accents, which reads as frosty and calm on a tree full of silver and white. It also works in gray petals with blue spokes, or white with gold.
This pattern uses US crochet terms. The finished ornament measures 5.75 in (14.6 cm) from tip to tip, plus a 2 in (5.1 cm) hanging loop.
You make six identical petals in the round around a foundation chain, sew them together near their bases, and work one slip-stitch border around the whole outline. That border also forms the hanging loop. Last, you make a small cream spoke appliqué and sew it to the center.
Finished Size and Construction
- Finished size: 5.75 in (14.6 cm) tip to tip, plus a 2 in (5.1 cm) hanging loop
- Skill level: Easy-intermediate
- Terminology: US crochet terms
- Yarn weight: DK (#3) cotton or cotton blend
- Hook: 3.5 mm (E-4)
- Number of pieces: 6 petals + 1 spoke appliqué
- Layout: 6 petals in a ring, bases meeting at the center
- Petal size: 3 in (7.6 cm) long x 1.5 in (3.8 cm) wide before the border; 3.25 in (8.3 cm) x 1.75 in (4.4 cm) after
- Size before border: 5.5 in (14.0 cm) tip to tip
- Border depth: about 0.125 in (0.3 cm) on each edge
Materials
Choose a smooth, tightly plied DK cotton. It gives the clear stitch definition and the firm, rope-like edge you see on the finished piece. Fuzzy yarns will blur the vein and outline.
- Light blue (petals, vein, border, loop): 12 g, about 29 m
- Cream (spoke appliqué): 3 g, about 7 m
These amounts are based on DK cotton at 50 g / 120 m. They include a margin for your gauge swatch and sewing tails.
Tools:
- 3.5 mm (E-4) crochet hook
- Tapestry needle
- Stitch markers (2–3)
- Scissors
- Rust-proof pins and a foam blocking mat
- Spray bottle with clean water
Abbreviations (US Terms)
- ch – chain
- sl st – slip stitch
- sc – single crochet
- hdc – half double crochet
- dc – double crochet
- st(s) – stitch(es)
- sp – space
- RS – right side
- WS – wrong side
- rnd – round
Special stitch – Bobble: [yarn over, insert hook in the stated chain, yarn over and pull up a loop, yarn over and draw through 2 loops] 4 times in the same chain, then yarn over and draw through all 5 loops on hook.
Surface slip stitch: Hold the working yarn behind the piece. Insert the hook from front to back between stitches, pull up a loop, and draw it through the loop on your hook.
Gauge and Checkpoints
Gauge: 20 sc and 22 sc rows = 4 in (10.2 cm) with a 3.5 mm hook.
Gauge is what controls the final size, so make and measure one complete petal before you make the rest. Lay it flat with no stretching and measure at each stage:
- After Rnd 1: 2.5 in (6.4 cm) long x 1 in (2.5 cm) wide
- After Rnd 2: 2.75 in (7.0 cm) long x 1.25 in (3.2 cm) wide
- After Rnd 3: 3 in (7.6 cm) long x 1.5 in (3.8 cm) wide
If your petal is too big (over 3.125 in / 7.9 cm long after Rnd 3), go down to a 3.25 mm hook. If it is too small (under 2.875 in / 7.3 cm), go up to a 3.75 mm hook. Remeasure after the change. The six petals need to match each other closely so the star stays symmetrical.

Petal (make 6)
Each petal is worked in joined rounds around both sides of a foundation chain. It has a pointed tip and a pointed base. Do not turn between rounds. The side facing you is the RS.
For these instructions, the tip is the end where you start working (2nd ch from hook). The base is the last chain worked on the first side.
With light blue, ch 12.
Rnd 1: Sc in 2nd ch from hook, hdc in next ch, dc in next 7 ch, hdc in next ch, (sc, ch 2, sc) in last ch for the base point. Rotate and work into the free loops on the other side of the chain: hdc in next ch, dc in next 7 ch, hdc in next ch, sc in the same ch as the first sc, ch 2 for the tip point. Join with sl st to the first sc. (22 sts: 11 per long side + 2 ch-2 sps)
Each long side is sc, hdc, 7 dc, hdc, sc. The tall stitches in the middle and short ones at the ends create the leaf shape.
Rnd 2: Ch 1. Starting in the same st as the join, sc in next 3 sts, hdc in next 5 sts, sc in next 3 sts, (sc, ch 2, sc) in ch-2 sp; repeat from * once more. Join with sl st to the first sc. (26 sts: 13 per long side + 2 ch-2 sps)*
The new count is 22 sts worked 1-per-stitch, plus 4 extra sc added at the two points. The hdc block widens the belly of the leaf.
Rnd 3: Ch 1. Sc in each st around, working (sc, ch 2, sc) in each ch-2 sp. Join with sl st to the first sc. (30 sts: 15 per long side + 2 ch-2 sps)
This is 26 sts worked 1-per-stitch plus 4 extra sc at the points. Each long side count of 15 already includes the sc on each side of both points. Fasten off, leaving a 10 in (25.4 cm) tail on petals 2 through 6 for joining. On petal 1, weave in the tail.
Center vein: With RS facing and light blue, start at the base ch-2 sp. Work 11 surface sl sts straight up the foundation chain line to the tip, one per chain. Fasten off and weave in the ends on the WS. This creates the raised vein running from base to tip.
Checkpoint: Each petal should measure 3 in (7.6 cm) x 1.5 in (3.8 cm), with 15 sts on each long side.
Make All Pieces
- Light blue: 6 petals, each with a center vein
- Cream: 1 spoke appliqué (instructions below)
Layout (RS up, viewed like a clock face):
              P1 (12:00)
     P6 (10:00)        P2 (2:00)
              [center]
     P5 (8:00)         P3 (4:00)
              P4 (6:00)
All bases point to the center and all tips point out. P1 is the top petal and will carry the hanging loop.
Joining
Method: Whipstitch through both loops on the WS, using each petal’s long tail.
Stitch-to-stitch logic: Each petal is joined to its neighbor along the 3 sts closest to the base on each long side. Place two petals side by side with RS together, bases level. Match the last 3 sts of the right-hand side of one petal to the first 3 sts of the left-hand side of the next petal, counting from the base. Each pair of sts gets one whipstitch: 3 stitches per seam.
Join P1 to P2, P2 to P3, and so on around to P6, then join P6 back to P1. That makes 6 seams of 3 sts each. Every petal now has 15 − 3 = 12 free sts on each long side.
Closing the center: Thread the last tail through the 6 base ch-2 sps and pull gently until the bases meet in a neat point. Take a few small stitches through the center to lock it, then weave in.
Tension: Keep your whipstitches snug but not tight. Tight seams pull the center into a cone, while loose seams let the petals drift apart. The star should lie completely flat.
Checkpoint: The joined star measures 5.5 in (14.0 cm) from tip to tip before the border. Opposite tips should match within 0.125 in (0.3 cm).
Border and Hanging Loop
The border is a single round of slip stitches worked into the free sts around the whole outline. Worked loosely, this creates the raised rope edge.
Border gauge: 1 sl st into each free sc; each tip gets 2 extra sl sts. Keep your loops slightly loose so the edge does not cup. If you tend to slip stitch tightly, go up to a 4.0 mm hook for this round only.
Starting count: 6 petals x 2 long sides x 12 free sts = 144 free sts, plus 6 tip ch-2 sps.
Border Rnd: With RS facing and light blue, join with sl st in the first free st on the left side of P1, just above the seam. Sl st in each of the next 11 free sts (12 sts on this side). In the P1 tip ch-2 sp, work (sl st, ch 20, sl st) for the hanging loop. Sl st in each of the 12 free sts down the right side of P1.
At the seam, move straight to the next petal with no added stitches. Sl st in each of the 12 free sts up the left side of the next petal, (sl st, ch 2, sl st) in the tip ch-2 sp, sl st in each of the 12 free sts down the right side. Repeat from * to * for P2 through P6. Join with sl st to the first sl st. Fasten off and weave in.
Count: 144 sl sts worked 1-per-stitch + 12 extra sl sts at the tips (2 per tip) = 156 sl sts. Each petal has 12 + 2 + 12 = 26 sl sts. There are 5 ch-2 tips and 1 ch-20 loop.
Why the math works: Each side count of 12 equals the 15 sts per side from Rnd 3, minus the 3 sts used in the seam. The 2 sl sts at each tip follow the sharp point without squaring it off. Adding no stitches at the seams keeps the valleys crisp and the star flat.
Checkpoint: 5.75 in (14.6 cm) tip to tip. The ch-20 loop forms a 2 in (5.1 cm) hanging loop above P1.
Spoke Appliqué
With cream, make a magic ring.
Spoke (make 6): Ch 9. Bobble in 4th ch from hook; the 3 skipped chains fold behind the bobble. Sl st in each of the next 5 ch back toward the ring, then sl st in the ring. (6 spokes, each 5 sl sts + 1 bobble)
Pull the ring closed and fasten off, leaving a 12 in (30.5 cm) tail. Each spoke measures about 1.25 in (3.2 cm) from the ring to the far edge of the bobble.
Attach: Place the ring over the center of the star, then lay each spoke directly on a petal’s vein. The bobble should sit about halfway up the petal, and the outer half of the blue vein should stay visible. Use the cream tail to tack each spoke down with 3 small stitches, plus 1 stitch behind each bobble so it stands up, round and raised. Weave the tail in on the WS.
Final Blocking
- Lightly spray the ornament with water until it is damp, not soaked.
- Lay it RS up on the blocking mat.
- Pin the center first, then pin each of the 6 tips at an even 2.875 in (7.3 cm) from the center.
- Pin each petal’s widest point so it measures 1.75 in (4.4 cm) across.
- Pin the hanging loop straight up from P1.
- Gently push the bobbles and vein up with a fingertip so they stay raised.
- Let it dry completely, about 6–8 hours, before unpinning.
Final Quality-Control Checklist
- Six petals, each 3.25 in (8.3 cm) x 1.75 in (4.4 cm)
- Each petal has 15 sts per long side after Rnd 3
- Raised blue vein from base to tip on every petal
- Six 3-st seams, all at the base end
- Border: 156 sl sts, 26 per petal, sharp tips
- Star measures 5.75 in (14.6 cm) tip to tip and lies flat
- 2 in (5.1 cm) hanging loop centered above P1
- Six cream spokes on the veins, bobbles about halfway up the petals
- All ends woven in on the WS
Troubleshooting
Petals are round, not pointed: Make sure you work (sc, ch 2, sc) at both points every round, not 3 sc.
Petal is lopsided: Check that each long side has exactly 11, 13, and 15 sts after Rnds 1, 2, and 3.
Center bulges up: The seams or the center gathering are too tight. Undo and resew with looser stitches, or block the center flat with a pin.
Border ruffles: Your slip stitches are too loose. Go down a hook size for the border.
Border cups or puckers: Your slip stitches are too tight. Go up to a 4.0 mm hook for the border.
Bobbles look flat: Push them through to the RS with your fingertip, and anchor each one with a stitch behind it.
Star is too large or small: Recheck gauge on one petal and change the hook size. A 0.125 in (0.3 cm) difference per petal shows up as 0.25 in (0.6 cm) across the star.
Care
Spot clean with cool water and mild soap, then reshape and dry flat. Store flat or hanging, away from heavy ornaments that could crush the bobbles.
Final Notes
The measurement chain is simple. Gauge sets the petal: Rnd 1 at 2.5 in (6.4 cm), Rnd 2 at 2.75 in (7.0 cm), and Rnd 3 at 3 in (7.6 cm). Each petal has 15 sts per long side.
Six petals joined with 3-st seams give a 5.5 in (14.0 cm) star. Each side leaves 12 free sts, for 144 border sts plus 12 at the tips, or 156 total. The border brings the ornament to 5.75 in (14.6 cm) tip to tip, and the spokes and bobbles finish the snowflake look.
Make one, then make a set in different colorways for your tree or for gift toppers.
Happy crocheting!