

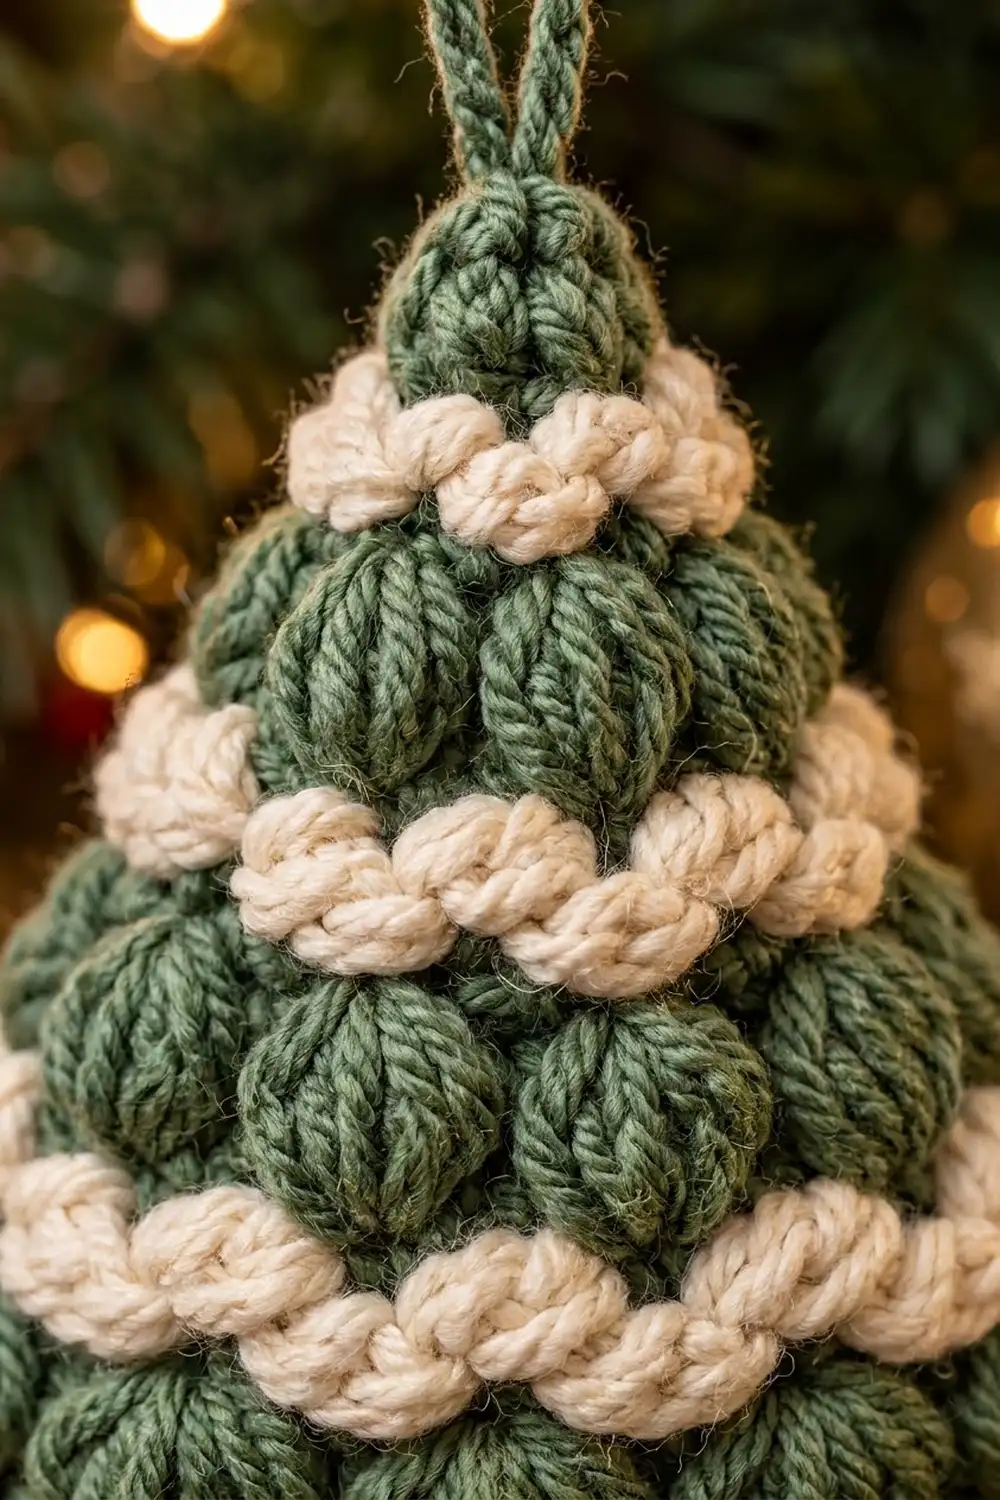
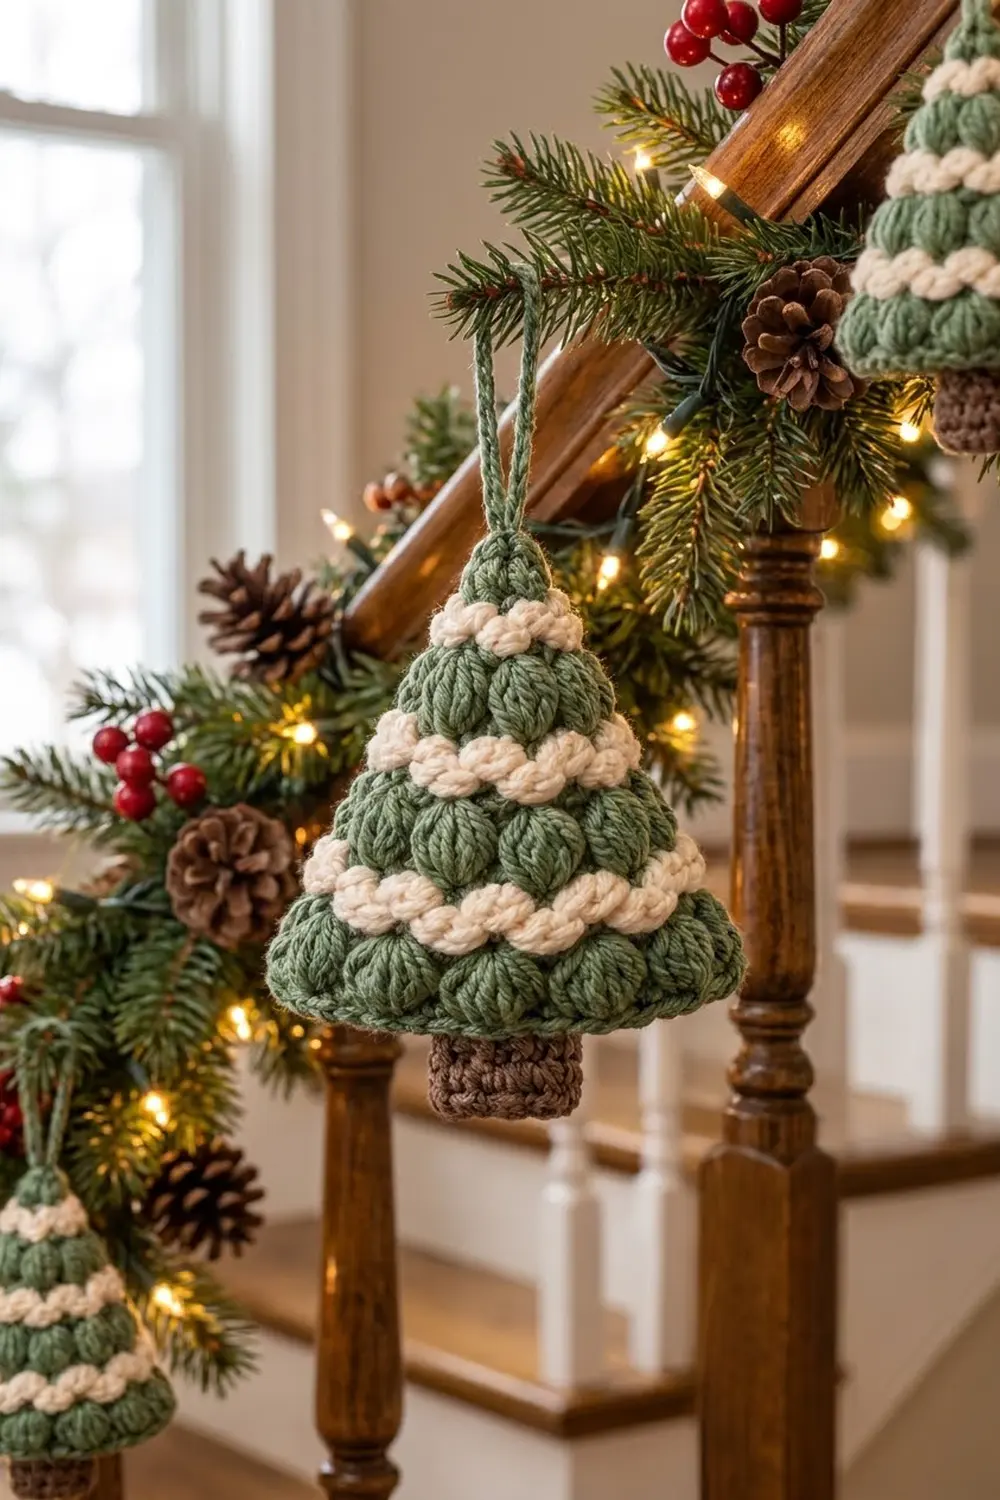
This little tree ornament is chunky and soft, with rows of rounded sage-green puffs. Three plump cream bands look like strands of garland or fresh snow. A short brown trunk sits at the bottom, and a slim chain loop at the tip lets you hang it on a tree branch, a stair garland or a gift package.
The colors are sage green for the branches, cream for the snowy garland bands and chocolate brown for the trunk. The style is cozy and rustic, which suits natural wood, pinecones and warm string lights.
This pattern uses US crochet terms. The finished tree measures 4.2 in (10.7 cm) wide and 4.2 in (10.7 cm) tall. With the trunk, it’s 5.0 in (12.7 cm) tall. The hanging loop adds about 2 in (5.1 cm) more.
The ornament is made as one flat piece. You start at the tip and work down in rows, alternating a puff stitch row with a single crochet row that increases at both edges. When the triangle is finished, one green border round tidies the edges. The trunk is worked straight down from the bottom border, and the hanging loop is added at the tip.
Finished Size and Construction
- Finished size: 4.2 in × 4.2 in (10.7 cm × 10.7 cm) for the tree; 5.0 in (12.7 cm) tall with trunk
- Skill level: Easy to intermediate
- Terminology: US crochet terms
- Yarn weight: DK (light worsted, weight 3)
- Hook: 3.5 mm (E-4)
- Number of pieces: 1
- Layout: One flat triangle, worked top-down in rows
- Piece size before border: 3.8 in × 3.8 in (9.7 cm × 9.7 cm)
- Border depth: 0.2 in (0.5 cm), one round of single crochet
- Trunk: 1.4 in wide × 0.8 in tall (3.6 cm × 2.0 cm)
Materials
Yarn: Use a smooth DK cotton, cotton blend or acrylic. Smooth yarn shows the puff shapes clearly. Very fuzzy yarn hides the cream bands’ twisted look, and splitty yarn makes puff stitches hard to pull through.
- Color A, Sage Green: 12 g / about 30 m (33 yd)
- Color B, Cream: 5 g / about 12 m (13 yd)
- Color C, Chocolate Brown: 3 g / about 7 m (8 yd)
All quantities include a margin of about 20% for gauge differences and weaving in ends.
Tools:
- 3.5 mm (E-4) crochet hook
- Tapestry needle
- Scissors
- 2 stitch markers
- Ruler or measuring tape
- Blocking mat and pins
- Spray bottle or steam iron (optional)
Abbreviations (US Terms)
- ch – chain
- sc – single crochet
- sl st – slip stitch
- sk – skip
- st(s) – stitch(es)
- sp – space
- RS / WS – right side / wrong side
- rep – repeat
- puff – puff stitch (see below)
- tpuff – twisted puff (see below)
Puff stitch (puff), Color A: (Yarn over, insert hook in the stitch, pull up a loop to about 0.3 in / 0.8 cm) 4 times. You now have 9 loops on the hook. Yarn over and draw through all 9 loops.
Twisted puff (tpuff), Color B: (Yarn over, insert hook in the stitch, pull up a loop) 3 times. You now have 7 loops on the hook. Yarn over and draw through 6 loops, then yarn over and draw through the last 2 loops. This two-step finish tilts the puff slightly, which gives the cream bands their cord-like, twisted look.
A puff or tpuff counts as 1 stitch. The ch-1 between puffs counts as a space, not a stitch.
Gauge and Checkpoints
Gauge: 20 sc and 20 sc rows = 4 in (10.2 cm). That works out to 5 sc per 1 in (2.5 cm).
Row pair gauge: 1 puff row plus 1 sc row = 0.4 in (1.0 cm) tall.
Test the piece first: Instead of a separate swatch, crochet the tree through Row 9 and measure it.
- After Row 9: Width across Row 9 = 11 sc = 2.2 in (5.6 cm). Height from tip = 1.8 in (4.6 cm).
- After Row 19: 3.8 in (9.7 cm) wide × 3.8 in (9.7 cm) tall.
- After the border: 4.2 in (10.7 cm) wide × 4.2 in (10.7 cm) tall.
- After the trunk: 5.0 in (12.7 cm) total height.
Too big? Go down to a 3.25 mm hook, or pull up shorter loops in your puffs.
Too small? Go up to a 3.75 mm hook.
Puff loop height changes how tall each row is. If the width is right but the height is off, pull up longer or shorter loops and keep the same hook.
Tree Pattern
The tree is worked top-down in rows. Even-numbered rows are RS puff rows. Odd-numbered rows from Row 3 onward are WS sc rows that add 1 stitch at each edge.
Color plan:
- Color A: Rows 1–3, 6–9, 12–15 and 18–19
- Color B: Rows 4–5, 10–11 and 16–17
Each cream band is 2 rows, so both colors always finish at the same edge. That’s the RS-row starting edge. Carry the unused color loosely up that edge instead of cutting it. The border will cover the carried strands.
To change color, work the last stitch of the row until 2 loops remain. Yarn over with the new color and draw it through.
Row 1 (WS): With Color A, ch 2. Work 3 sc in the 2nd ch from hook. Turn. (3 sc)
Place a marker in the free loop of the ch at the base of these stitches. This is the tip of the tree.
Row 2 (RS): Ch 2 (does not count as a st). Puff in first sc, ch 1, sk next sc, puff in last sc. Turn. (2 puffs, 1 ch-1 sp)
Row 3 (WS): Ch 1. Work 2 sc in first puff, sc in ch-1 sp, 2 sc in last puff. Change to Color B on the last st. Turn. (5 sc)
Row 4 (RS), Color B: Ch 2. Tpuff in first sc, ch 1, sk next sc, tpuff in next sc; rep from * across. Turn. (3 tpuffs, 2 ch-1 sps)*
Row 5 (WS), Color B: Ch 1. Work 2 sc in first tpuff, sc in each ch-1 sp and each tpuff across to the last tpuff, 2 sc in last tpuff. Change to Color A on the last st. Turn. (7 sc)
From here, every row repeats one of two patterns:
Puff Row (RS): Ch 2. Puff (or tpuff in Color B) in first sc, *ch 1, sk next sc, puff in next sc; rep from * across. You end up with (sc count + 1) ÷ 2 puffs.
Increase Row (WS): Ch 1. Work 2 sc in first puff, sc in each ch-1 sp and each puff across to the last puff, 2 sc in last puff. You end up with (2 × puffs) + 1 sc.
Row 6 (RS), A: Puff Row. (4 puffs, 3 ch-1 sps)
Row 7 (WS), A: Increase Row. (9 sc)
Row 8 (RS), A: Puff Row. (5 puffs, 4 ch-1 sps)
Row 9 (WS), A: Increase Row. Change to Color B on the last st. (11 sc)
Stop here and check the measurements: 2.2 in (5.6 cm) wide, 1.8 in (4.6 cm) tall.
Row 10 (RS), B: Puff Row, using tpuffs. (6 tpuffs, 5 ch-1 sps)
Row 11 (WS), B: Increase Row. Change to Color A on the last st. (13 sc)
Row 12 (RS), A: Puff Row. (7 puffs, 6 ch-1 sps)
Row 13 (WS), A: Increase Row. (15 sc)
Row 14 (RS), A: Puff Row. (8 puffs, 7 ch-1 sps)
Row 15 (WS), A: Increase Row. Change to Color B on the last st. (17 sc)
Row 16 (RS), B: Puff Row, using tpuffs. (9 tpuffs, 8 ch-1 sps)
Row 17 (WS), B: Increase Row. Change to Color A on the last st. Cut Color B and leave a 4 in (10.2 cm) tail. (19 sc)
Row 18 (RS), A: Puff Row. (10 puffs, 9 ch-1 sps)
Row 19 (WS), A: Ch 1. Sc in each puff and each ch-1 sp across, with no increases. Turn. Don’t fasten off. (19 sc)
This row is worked straight, so the bottom edge comes out level. Its 19 sc measure 3.8 in (9.7 cm) wide. The triangle should now be 3.8 in × 3.8 in (9.7 cm × 9.7 cm).
Border
Border gauge: 5 sc = 1 in (2.5 cm), the same as the body.
The border is one round worked in Color A, continuing from Row 19 with the RS facing. Each corner gets a 3-sc group, and the middle sc of that group is the corner stitch. Each side count below includes its 2 corner stitches.
Border Round (RS):
- Bottom edge: Ch 1. Work 3 sc in the first st of Row 19 (corner). Sc in each of the next 17 sts. Work 3 sc in the last st (corner).
- First slanted side: Rotate the piece. Work 1 sc in the end of each row from Row 18 up to Row 2. (17 sc) Skip the ends of Rows 19 and 1, because the corner groups cover them.
- Tip: Work 3 sc in the marked free loop at the tip (corner).
- Second slanted side: Work 1 sc in the end of each row from Row 2 down to Row 18. (17 sc)
- Sl st to the first sc to join. Fasten off and leave a 4 in (10.2 cm) tail.
Round total: 17 + 17 + 17 sc along the sides, plus 3 corner groups × 3 sc = 60 sc.
Count per side, including corners: Each side has 1 corner st + 1 sc + 17 sc + 1 sc + 1 corner st = 21 sts.
Why the math works: At 5 sc per inch, 21 sts = 4.2 in (10.7 cm). The bottom edge was 3.8 in (9.7 cm), and adding one sc at each end brings it to 4.2 in (10.7 cm).
Each slanted side of the unbordered triangle is about 4.25 in (10.8 cm) long. That’s the diagonal of a 1.9 in × 3.8 in (4.8 cm × 9.7 cm) right triangle. 21 sts lands within 0.05 in (0.1 cm) of that length. So the edge lies flat: it won’t ruffle from too many stitches, and it won’t cup from too few.
The border also hides the yarn carried up the color-change edge.
Trunk
The trunk is worked straight down from the bottom border.
Hold the tree with the RS facing and the bottom edge on top. The bottom side has 21 sts from corner to corner. Count the corner st on your right as st 1. Leave 7 sts unworked on each side so the trunk is centered.
Trunk Row 1 (RS): Join Color C with a sl st in st 8. Ch 1, then sc in the same st and in each of the next 6 sts (sts 8–14). Turn. (7 sc)
Trunk Rows 2–4: Ch 1, sc in each st across. Turn. (7 sc)
Fasten off. The trunk measures 1.4 in (3.6 cm) wide and 0.8 in (2.0 cm) tall.
Hanging Loop
With the RS facing, join Color A with a sl st in the center sc of the tip corner group. Ch 20, then sl st in the same st.
Fasten off, and weave the tail back down the chain to stiffen the base of the loop. The loop stands about 2 in (5.1 cm) tall.
Final Blocking
- Weave in all ends along the WS edges and inside the sc rows. Keep cream tails behind cream stitches so they don’t show through the green.
- Mist the ornament lightly with water until it’s damp but not wet.
- Pin it to a blocking mat at 4.2 in (10.7 cm) wide at the base and 4.2 in (10.7 cm) from the tip to the bottom border.
- Pin the trunk straight, at 1.4 in (3.6 cm) wide.
- Don’t press the puffs. If you’re using steam on acrylic, hover the iron above the piece and never touch it.
- Gently nudge each puff upward with your fingertip so it looks rounded.
- Let it dry completely, then unpin.
Final Quality-Control Checklist
- The tree is 4.2 in × 4.2 in (10.7 cm × 10.7 cm).
- The total height with the trunk is 5.0 in (12.7 cm).
- There are 9 puff rows, counting 2, 3, 4, 5, 6, 7, 8, 9 and 10 puffs from the tip down.
- There are 3 cream bands, at Rows 4–5, 10–11 and 16–17.
- The bottom row of puffs is green.
- The border has 60 sc, with 21 sts per side including corners.
- The trunk is centered, with 7 border sts free on each side.
- No carried yarn shows along the slanted edges.
- The hanging loop is secure and sits at the exact tip.
Troubleshooting
The puffs look flat or uneven. Pull every loop up to the same height before you yarn over to close.
The tree curls or cups. Check that the Increase Rows have exactly 2 sc in the first and last puffs. Missing an increase narrows the triangle.
The slanted edges ruffle. You’ve probably worked 2 sc into some row ends. Work only 1 sc per row end.
The cream bands don’t look twisted. Make sure you’re using tpuff for Color B, with its two-step finish.
The trunk sits off-center. Count again from the corner st. The trunk goes in sts 8–14 of the 21.
There are gaps at the color changes. Snug the carried strand before you start the next row, but leave enough slack that the edge still lies flat.
Care
Hand wash in cool water and lay flat to dry, shaping the puffs while the ornament is damp. Store it flat or hanging, away from heavy items that could crush the puffs.
Final Notes
Every measurement comes from the gauge of 5 sc per 1 in (2.5 cm), with 0.4 in (1.0 cm) per row pair.
- Row 19 is 19 sc, which makes the triangle 3.8 in × 3.8 in (9.7 cm × 9.7 cm).
- The border adds 1 sc at each end, so each side becomes 21 sts and the tree measures 4.2 in × 4.2 in (10.7 cm × 10.7 cm).
- The trunk adds 0.8 in (2.0 cm), for a total height of 5.0 in (12.7 cm).
If your Row 9 checkpoint matches, everything after it will fall into place.
Happy crocheting!