

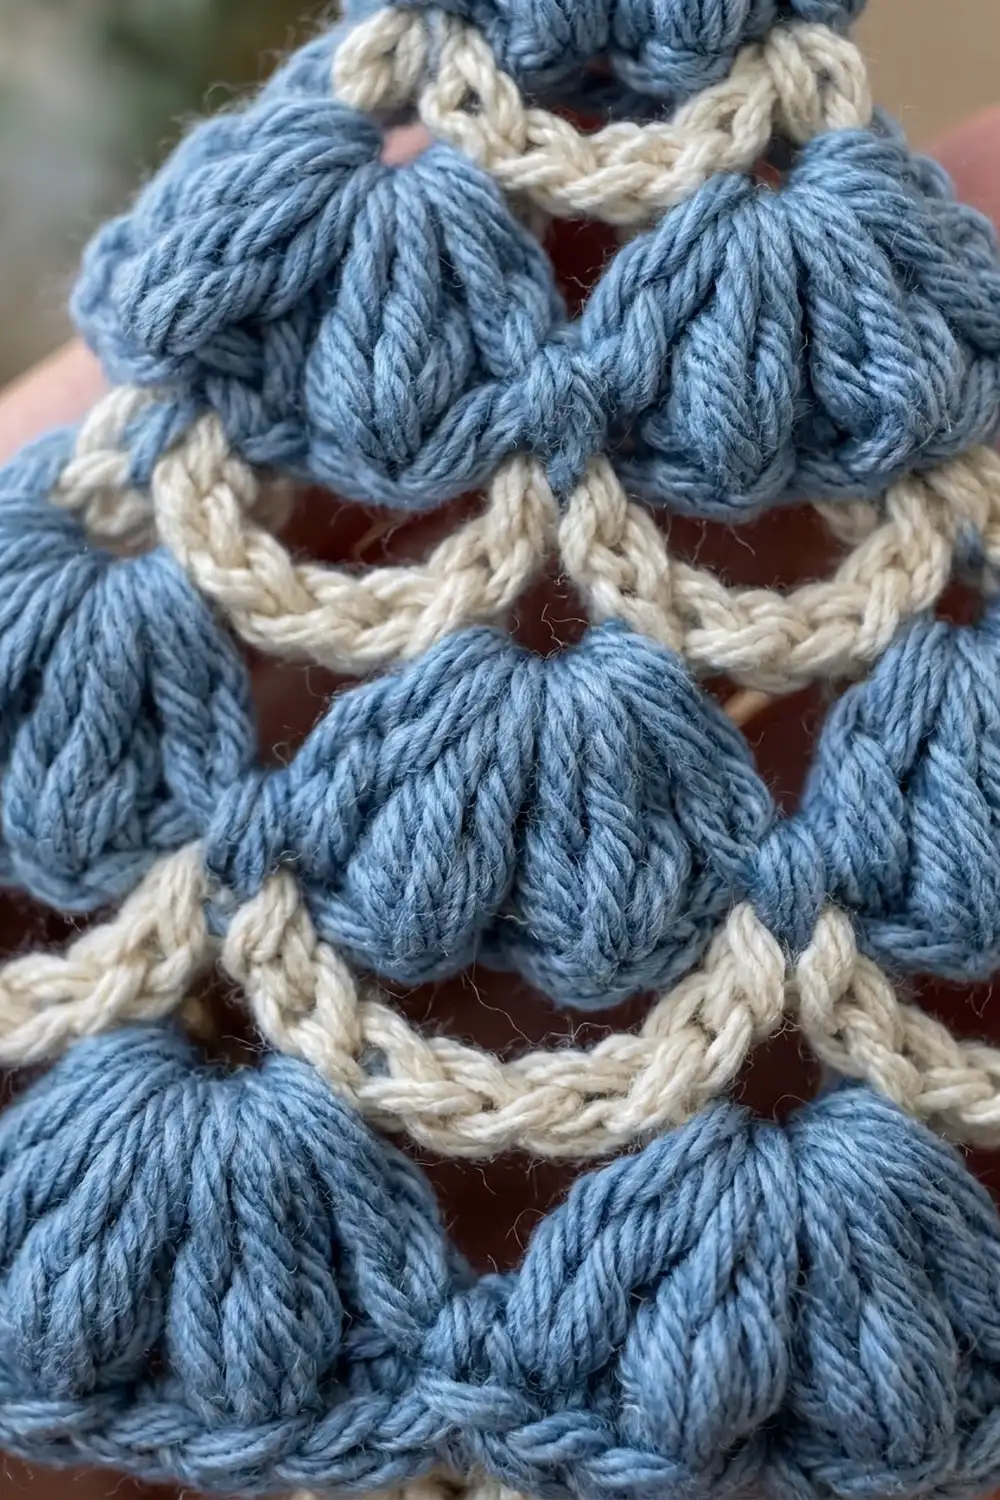
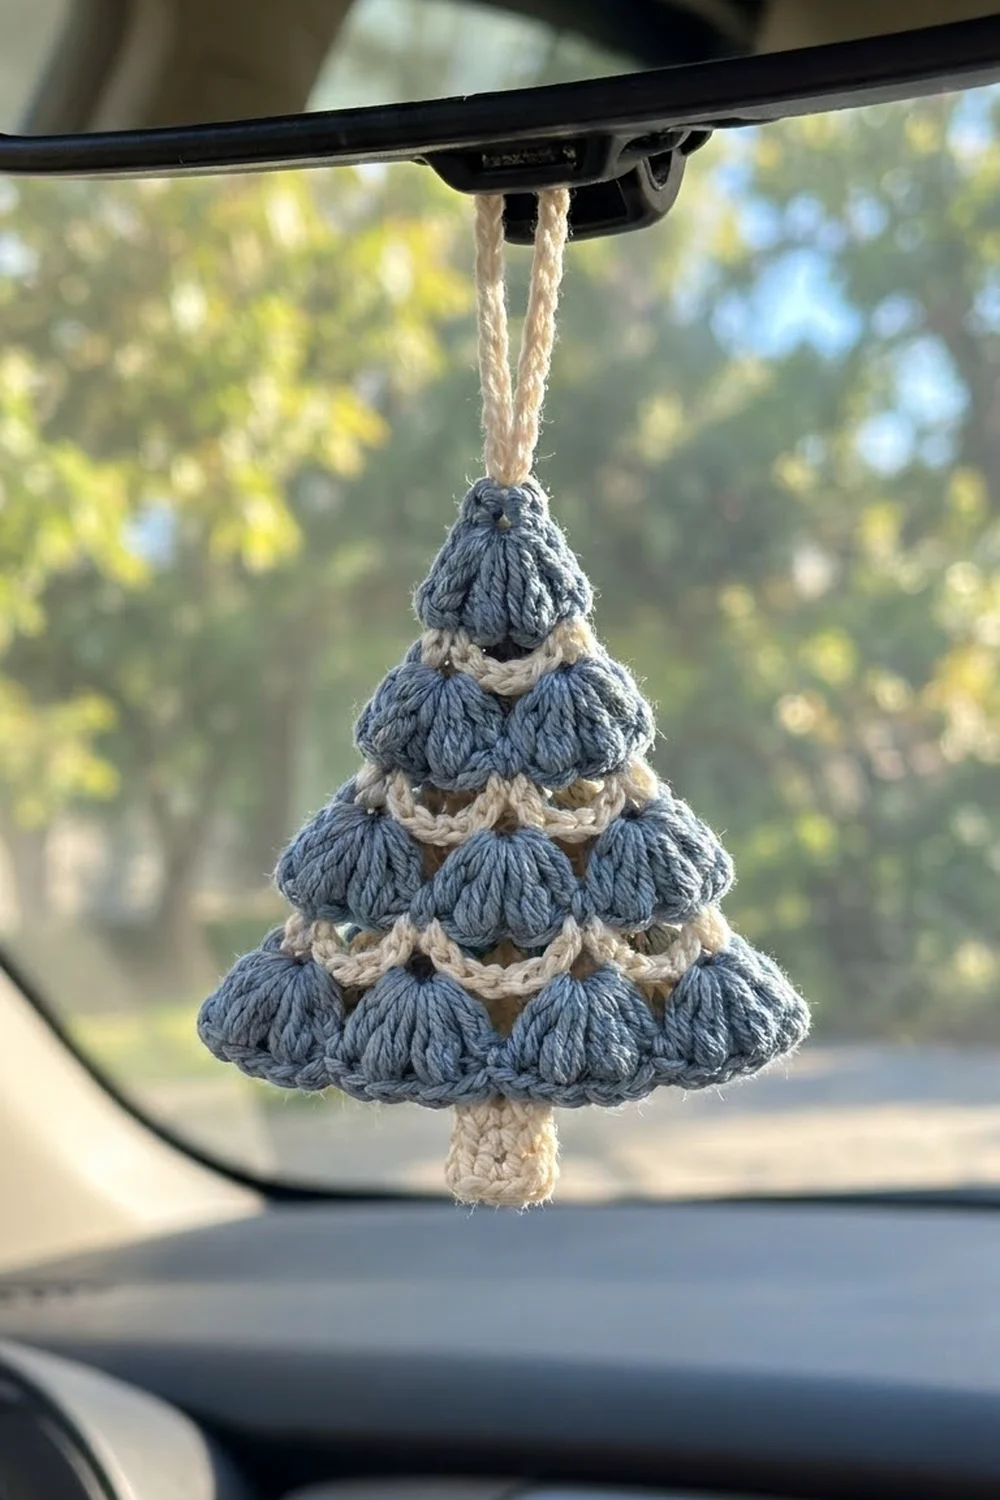
The Frosted Pine is a small, flat Christmas tree ornament. Plump puff-stitch fans in soft denim blue stack into a neat triangle, and thin cream chain swags run between the tiers like garland. A cream trunk sits at the base and a cream chain loop is at the top, so you can hang it on a tree, a gift, or your car mirror.
The style is cozy and slightly vintage. Matte cotton shows off the puffs well and keeps the shape crisp. Only two colors are used, and there is no stuffing and no sewing of separate parts.
This pattern uses US crochet terms. The finished ornament measures 3.5 in (8.9 cm) wide and about 4 in (10.2 cm) tall from treetop to the bottom of the trunk. With the loop, it is about 5.25 in (13.3 cm) tall.
You work the tree from the top down in rows, always with the right side facing. Blue fan rows alternate with cream chain-arc rows. Two blue single crochet rows close the bottom edge, then you add the trunk and the loop.
Finished Size and Construction
- Finished size: 3.5 in (8.9 cm) wide × 3.2 in (8.1 cm) tall for the tree body; about 4 in (10.2 cm) including the trunk
- Skill level: Easy–Intermediate (confident puff stitches)
- Terminology: US
- Yarn weight: DK (#3), cotton or cotton blend
- Hook: 3.5 mm (E-4)
- Number of pieces: 1
- Layout: one triangular tree with 4 tiers (1, 2, 3, 4 fans)
- Piece size: 3.5 in (8.9 cm) wide at the base
- Size before border: 3.5 in (8.9 cm) wide × 3 in (7.6 cm) tall
- Border depth: 2 rows of sc, about 0.2 in (0.5 cm)
- Trunk: 0.6 in (1.5 cm) wide × 0.75 in (1.9 cm) tall
- Hanging loop: about 1.25 in (3.2 cm) tall when folded
Materials
Yarn: Use a smooth DK cotton or cotton blend at about 115 m per 50 g. Cotton gives the puffs clean definition and stops the ornament from stretching when it hangs. Avoid fuzzy yarns, because they hide the cream swags.
- Color A – Denim Blue: 10 g (about 23 m)
- Color B – Cream: 4 g (about 9 m)
Tools:
– 3.5 mm (E-4) crochet hook
– Tapestry needle
– Scissors
– 2 stitch markers
– Blocking mat and pins
– Spray bottle with water
All yarn quantities include a small margin for your gauge swatch and for weaving in ends.
Abbreviations (US Terms)
- ch – chain
- sl st – slip stitch
- sc – single crochet
- hdc – half double crochet
- sp – space
- RS – right side
- MR – magic ring
- st(s) – stitch(es)
Special stitch – Puff: (Yarn over, insert hook into the stitch or space, yarn over and pull up a loop to about 0.5 in / 1.3 cm) 3 times. You now have 7 loops on the hook. Yarn over and pull through all 7 loops, then ch 1 to lock. The locking ch is part of the puff and does not count as a separate stitch.
Fan: 5 puffs worked into the same ring or space.
Standing sc: With a slip knot on the hook, insert the hook into the stitch, yarn over, pull up a loop, yarn over and pull through both loops.
Gauge and Checkpoints
Exact gauge isn’t critical for an ornament, but it does control the final size. Work Row 1 first and measure it before you continue.
Gauge: One fan (Row 1) = 0.9 in (2.3 cm) wide × 0.6 in (1.5 cm) tall. In the border rows, 23 sc = 3.5 in (8.9 cm), which is about 6.5 sc per inch (2.6 sc per cm).
Checkpoints (width × height):
– After Row 1: 0.9 in (2.3 cm) × 0.6 in (1.5 cm)
– After Row 3: 1.75 in (4.4 cm) × 1.4 in (3.6 cm)
– After Row 5: 2.6 in (6.6 cm) × 2.2 in (5.6 cm)
– After Row 7: 3.5 in (8.9 cm) × 3 in (7.6 cm)
– After Row 9 (border): 3.5 in (8.9 cm) × 3.2 in (8.1 cm)
If your piece is too big: go down to a 3.25 mm (D-3) hook, or pull up your puff loops a little shorter.
If your piece is too small: go up to a 3.75 mm (F-5) hook, or pull your puff loops a little taller.
Change only one thing at a time, then check Row 1 again.
Pattern
Construction note: Do not turn between Rows 1 and 7. Fasten off at the end of every row, then join the next color at the right-hand end with the RS facing you. This keeps every puff facing the front and puts all the color changes on the side edges, where the ends are easy to hide.
Row 1 – Treetop Fan (Color A)
With Color A, make a MR. Ch 2 (does not count as a stitch). Work 5 puffs into the ring. Pull the ring tight so the puffs spread into a fan that opens downward. Fasten off and leave a 4 in (10.2 cm) tail.
Count: 5 puffs (1 fan).
Row 2 – First Garland (Color B)
With the RS facing, join Color B with a standing sc in the 1st puff. Ch 3, skip the 2nd puff, sc in the 3rd puff (center). Ch 3, skip the 4th puff, sc in the 5th puff. Fasten off.
Count: 3 sc and 2 ch-3 arcs.
Both arcs are edge arcs, so they are short (ch 3) and keep the treetop narrow.
Row 3 – Tier 2 (Color A)
With the RS facing, join Color A with a sl st in the first ch-3 arc. Ch 2 (does not count). Work 5 puffs in the same arc, then 5 puffs in the next ch-3 arc. Fasten off.
Count: 10 puffs (2 fans).
Row 4 – Second Garland (Color B)
Join Color B with a standing sc in the 1st puff of Fan 1. Ch 3, sc in the 3rd puff (center) of Fan 1. Ch 5, sc in the 3rd puff (center) of Fan 2. Ch 3, sc in the 5th puff of Fan 2. Fasten off.
Count: 4 sc and 3 arcs (ch-3, ch-5, ch-3).
The center-to-center arc skips 4 puffs, so it needs the longer ch 5. That longer arc forms the deep swag you can see between the tiers.
Row 5 – Tier 3 (Color A)
Join Color A with a sl st in the first arc. Ch 2 (does not count). Work 5 puffs in each of the 3 arcs. Fasten off.
Count: 15 puffs (3 fans).
Row 6 – Third Garland (Color B)
Join Color B with a standing sc in the 1st puff of Fan 1. Ch 3, sc in the center puff of Fan 1. Ch 5, sc in the center puff of the next fan, repeat from * to * once more. Ch 3, sc in the 5th puff of Fan 3. Fasten off.
Count: 5 sc and 4 arcs (ch-3, ch-5, ch-5, ch-3).
Row 7 – Tier 4 (Color A)
Join Color A with a sl st in the first arc. Ch 2 (does not count). Work 5 puffs in each of the 4 arcs. Do not fasten off.
Count: 20 puffs (4 fans).
Checkpoint: The piece should measure 3.5 in (8.9 cm) wide × 3 in (7.6 cm) tall. Each tier should have one more fan than the tier above it, which gives the straight triangle sides.
Tier logic: Each garland row anchors at the first puff, at every fan center and at the last puff. A tier with n fans therefore makes n + 2 anchor points and n + 1 arcs, and the next tier gets exactly one extra fan.
Border
The border is the straight blue band along the bottom of the tree. The two slanted sides keep their natural scalloped puff edge on purpose, so they get no border stitches.
Border gauge: 23 sc = 3.5 in (8.9 cm).
Row 8 – Conversion Row (Color A)
Continue with Color A. Ch 1 and turn so the WS is facing. Sc in the top of each puff across Fan 4. Sc in the gap between fans, then sc in each of the 5 puffs of the next fan, repeat from * to * 2 more times.
Count: 20 sc (1 per existing puff) + 3 sc (1 in each gap between fans) = 23 sc.
Row 9 (Color A)
Ch 1 and turn. Sc in each sc across. Fasten off.
Count: 23 sc.
Counts per side after the border:
– Bottom edge: 23 sc
– Left and right slanted sides: 0 border stitches; the fan edges show
Why the math works: 4 fans × 5 puffs = 20 stitches, and the 3 gaps between fans add 3 more, for 23. Because 23 is odd, there is a single center stitch (the 12th), with exactly 11 stitches on each side. That lets you center the 3-stitch trunk on stitches 11, 12 and 13, leaving 10 sc free on each side.
Trunk (Color B)
With the RS facing and working along the bottom edge (the tops of Row 9), place markers in the 11th and 13th sc.
Trunk Row 1: Join Color B with a sl st in the 11th sc. Ch 2 (does not count). Hdc in the 11th, 12th and 13th sc. Count: 3 hdc.
Trunk Rows 2–4: Ch 2 (does not count) and turn. Hdc in each hdc across. Count: 3 hdc per row.
Fasten off. The trunk should measure 0.6 in (1.5 cm) wide × 0.75 in (1.9 cm) tall.
Hanging Loop (Color B)
Join Color B with a sl st in the center top of Row 1, where the magic ring closed. Ch 20, then sl st in the same spot. Fasten off.
The folded loop should stand about 1.25 in (3.2 cm) above the treetop.
Final Blocking
- Weave in all the ends along the side edges, hiding them inside the puffs of the matching color.
- Lay the tree face up on a blocking mat.
- Pin the two bottom corners 3.5 in (8.9 cm) apart.
- Pin the treetop 3.2 in (8.1 cm) above the center of the bottom edge.
- Gently straighten both slanted sides so the fan tips line up along a straight diagonal.
- Ease each cream swag into an even, shallow curve.
- Pin the trunk straight down, 0.75 in (1.9 cm) long.
- Mist the piece lightly with water. Do not soak it, or the puffs will flatten.
- Let it dry completely before you unpin.
Final Quality-Control Checklist
- [ ] The tiers have 1, 2, 3 and 4 fans, with 5 puffs in each fan
- [ ] There are 50 puffs in total
- [ ] All 3 cream garland rows show clearly between the tiers
- [ ] The bottom edge has 23 sc and measures 3.5 in (8.9 cm)
- [ ] The trunk is exactly centered, with 10 sc free on each side
- [ ] The tree body is 3.2 in (8.1 cm) tall
- [ ] The hanging loop is secure and about 1.25 in (3.2 cm) tall
- [ ] No ends are visible from the front
Troubleshooting
The puffs look flat or thin. Pull every loop up to the same height, and lock each puff with its ch 1.
The tree leans to one side. Check that every garland row has ch-3 arcs at both edges. A ch-5 arc at one edge will make that side flare.
The swags pull tight and pucker. Your chains are too snug. Loosen your chain tension, or go up a hook size for the cream rows only.
The bottom edge is wavy. You probably skipped a gap sc or added an extra stitch. Recount Row 8 to make sure it has 23 sc.
The trunk is off-center. Recount from both ends: the trunk sits on sc 11–13.
The ornament curls. Block it again with light mist, and pin it firmly at the corners.
Care
Hand wash in cool water with mild soap. Press out the water gently and lay the ornament flat to dry, reshaping it as described under blocking.
Final Notes
The measurement chain is simple. One fan is 0.9 in (2.3 cm) wide, four tiers bring the tree to 3.5 in × 3 in (8.9 cm × 7.6 cm), and the 23-stitch border adds 0.2 in (0.5 cm) for a 3.2 in (8.1 cm) tree body. The 0.75 in (1.9 cm) trunk brings the ornament to about 4 in (10.2 cm), and the loop adds 1.25 in (3.2 cm).
If Row 1 matches the gauge, the rest of the tree will follow. Make one in blue, then try other color pairs for a whole set of gift toppers.
Happy crocheting!