

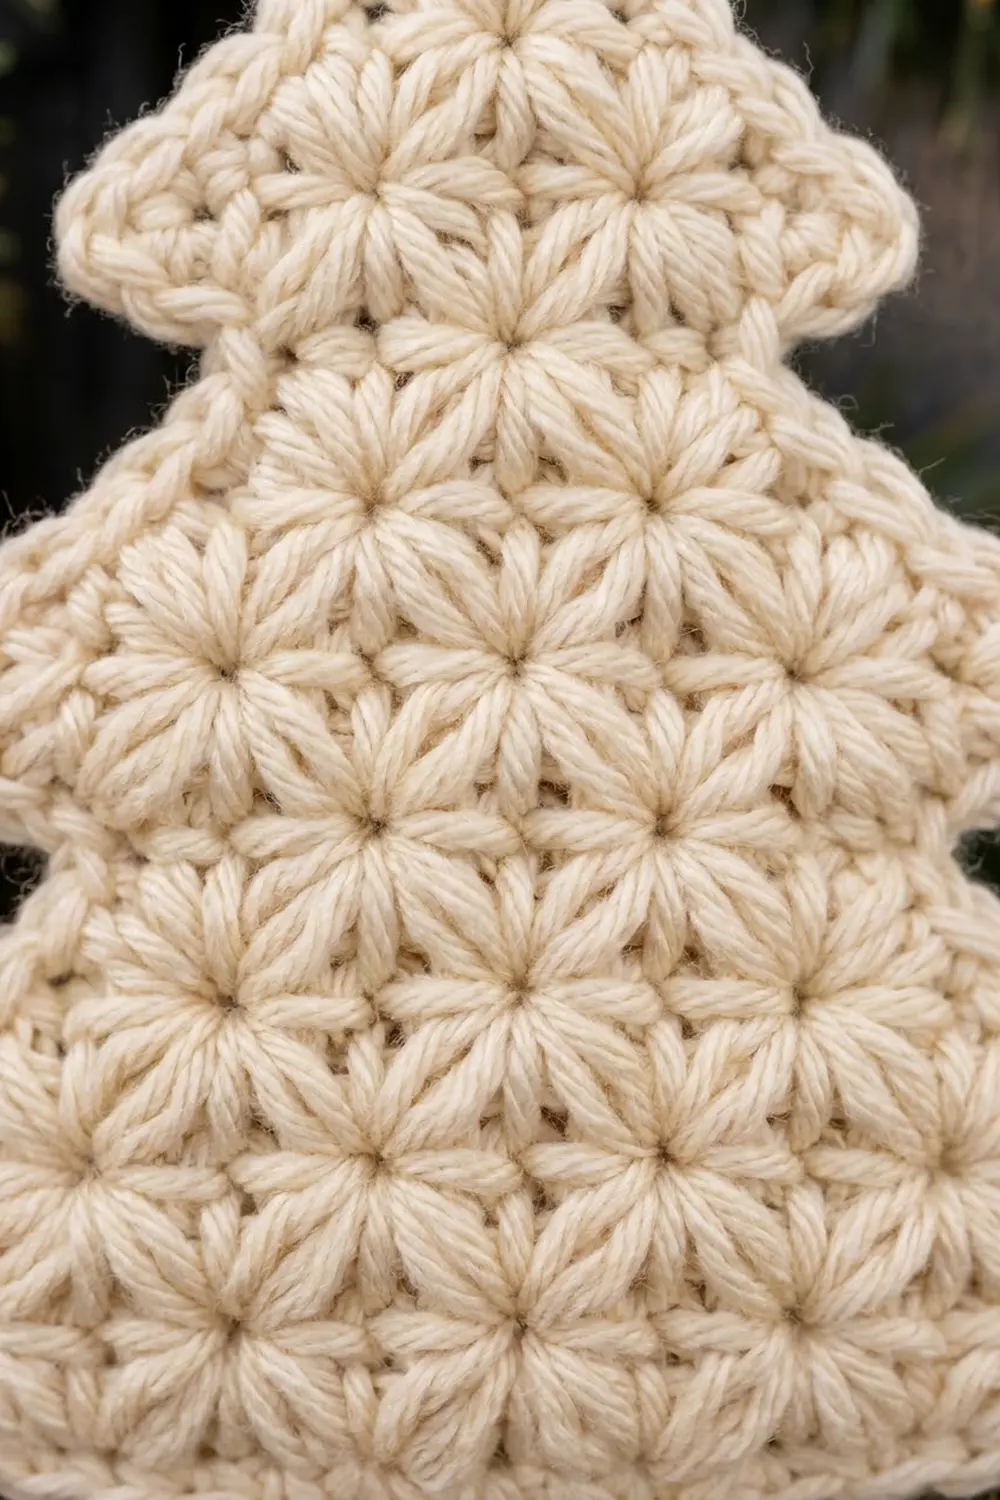
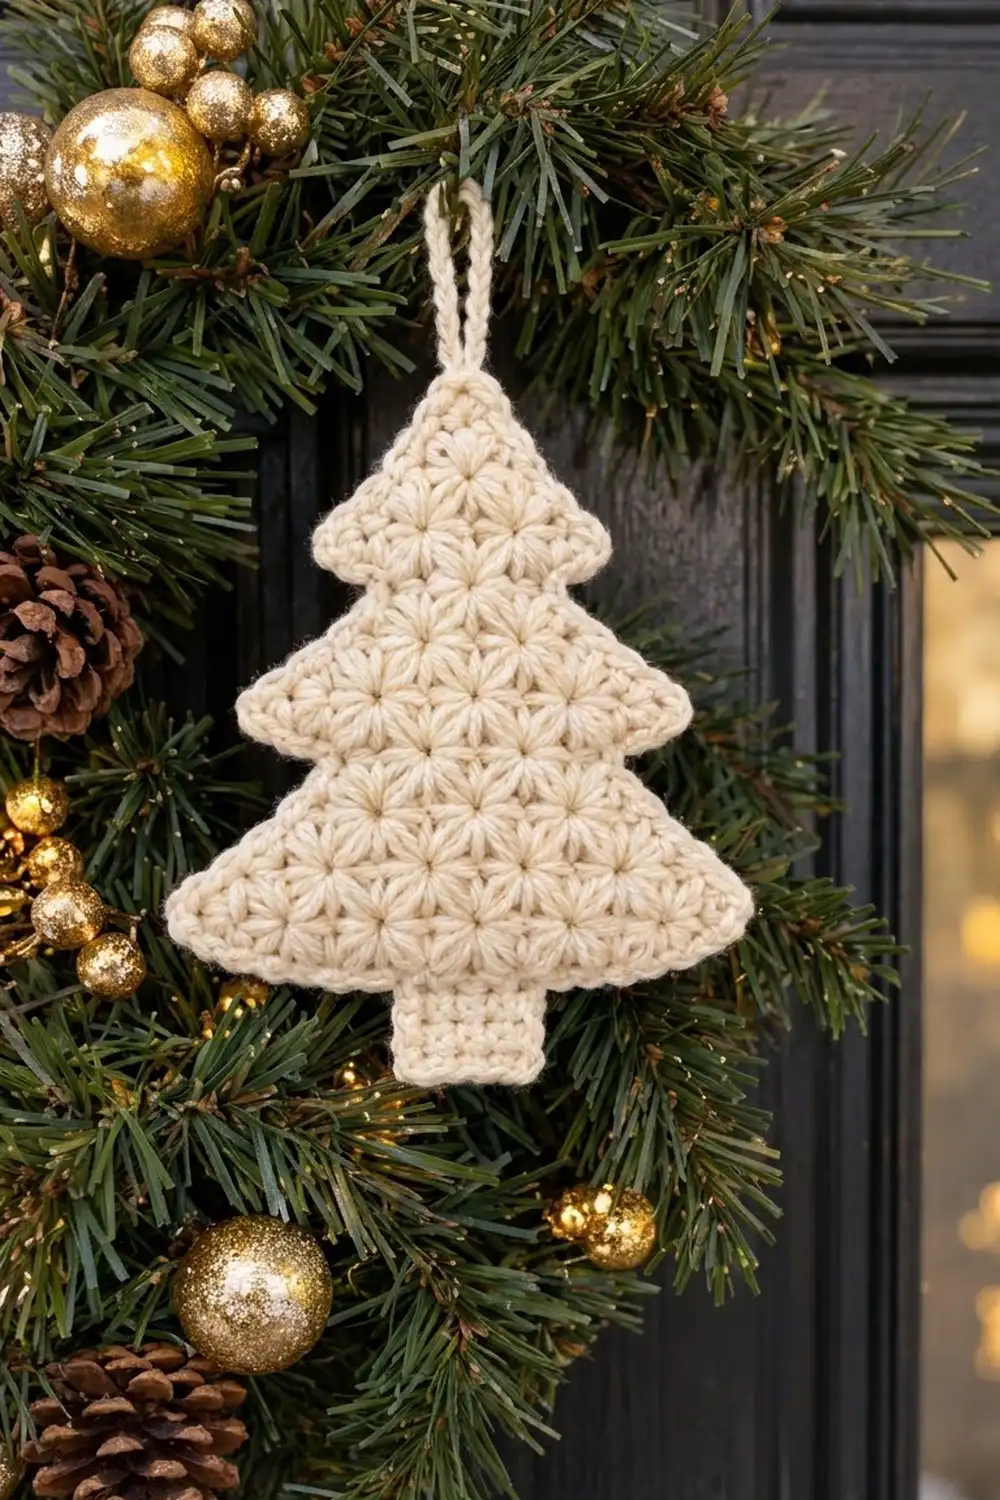
The Frosted Pine ornament is a flat Christmas tree covered in tiny raised stars. Rows of star stitch give it a soft, quilted look, almost like snow sitting on the branches. Three tiers step outward toward the base, and a short single crochet trunk and a sturdy hanging loop finish the shape.
It is worked in a single creamy ivory, so the texture does the work. It looks calm and Scandinavian on a green wreath, a tree branch, or a gift package. If you like, the same pattern also works in sage, red, or soft gold.
This pattern uses US crochet terms. The finished ornament measures about 5.25 in (13.3 cm) wide by 6 in (15.2 cm) tall, not counting the loop.
You crochet the tree in one piece from the top point down, alternating star rows with half double crochet return rows. Increase return rows widen each tier, and a decrease return row steps the edge in to start the next tier. After that, you work the trunk straight down from the bottom center, add one round of single crochet border, and make the hanging loop.
Finished Size and Construction
- Finished size: 5.25 in (13.3 cm) wide × 6 in (15.2 cm) tall, plus a 1.75 in (4.4 cm) loop
- Skill level: Intermediate (star stitch plus simple shaping)
- Terminology: US
- Yarn weight: DK (#3)
- Hook: 4.0 mm (G-6)
- Number of pieces: 1
- Layout: Single flat tree shape with 3 tiers and a trunk
- Body size (before trunk and border): 4.75 in (12.1 cm) wide × 4.75 in (12.1 cm) tall
- Size before border (body + trunk): 4.75 in (12.1 cm) wide × 5.5 in (14.0 cm) tall
- Border depth: 1 round of sc, about 0.25 in (0.6 cm) on every edge
Materials
Choose a smooth DK yarn so the stars stay crisp. Mercerized cotton or a cotton blend shows the texture best and holds its shape on a wreath. Soft acrylic also works but will look a little fuzzier.
- Cream / ivory DK yarn: 15 g, about 36 m (39 yd)
Star stitch uses more yarn than plain stitches. The amount above includes a margin for your gauge swatch, the border, and the loop.
Tools:
– 4.0 mm (G-6) crochet hook
– Tapestry needle
– Scissors
– Stitch markers (2)
– Pins and a blocking mat or folded towel
– Spray bottle with water
Abbreviations (US Terms)
- ch – chain
- sl st – slip stitch
- sc – single crochet
- hdc – half double crochet
- st(s) – stitch(es)
- RS / WS – right side / wrong side
Star (special stitch):
- First star of a row: Ch 3. Pull up a loop in the 2nd ch from hook and in the 3rd ch from hook. Then pull up a loop in each of the first 3 sts of the row. You now have 6 loops on the hook. Yo and draw through all 6 loops, then ch 1 to close. That ch-1 is the star’s eye.
- Every following star: Pull up a loop in the eye of the last star. Pull up a loop in the back of the last loop of that star, then in the same st that last loop went into. Pull up a loop in each of the next 2 sts. You now have 6 loops. Yo and draw through all 6, then ch 1 to close.
The first star uses 3 sts, and each star after it uses 2 new sts. So a row of n stars sits on (2n + 1) sts.
Return rows (worked after each star row):
- Plain return: Ch 2 (does not count as a st). Work 2 hdc in each eye across, then 1 hdc in the 3rd ch of the beginning ch-3. That gives 2n + 1 hdc.
- Increase return: Ch 2 (does not count). Work 4 hdc in the first eye, 2 hdc in each remaining eye, then 3 hdc in the 3rd ch of the beginning ch-3. That gives 2n + 5 hdc, which is enough for 2 more stars.
- Decrease return: Ch 1, then sl st into the first eye (the sl st does not count). Ch 2, work 2 hdc in each of the next (n − 2) eyes, then 1 hdc in the last eye. Leave the beginning ch-3 unworked. That gives 2n − 3 hdc, which is 2 fewer stars.
Gauge and Checkpoints
Gauge: 8 sts × 4 rows (2 star rows + 2 hdc rows) = 2 in (5.1 cm) wide × 1 in (2.5 cm) tall. In other words, 4 sts and 4 rows per inch.
Treat Tier 1 (Rows 1–6) as your gauge test. It is small, uses only a few grams, and checks width and height at the same time.
Checkpoints:
- After Row 6 (Tier 1): 2.75 in (7.0 cm) wide × 1.5 in (3.8 cm) tall
- After Row 12 (Tier 2): the widest row measures 3.75 in (9.5 cm), and the body is 3 in (7.6 cm) tall
- After Row 19 (Tier 3): 4.75 in (12.1 cm) wide × 4.75 in (12.1 cm) tall
- After the trunk: 5.5 in (14.0 cm) tall in total
- After the border: 5.25 in (13.3 cm) × 6 in (15.2 cm)
If Tier 1 is too big: go down to a 3.75 mm hook, or pull up the star loops shorter and more evenly.
If Tier 1 is too small: go up to a 4.5 mm hook. Star stitch shrinks quickly if the loops are tight.
Measure lightly, without stretching. Star stitch relaxes a little when blocked.
Tree Body (Worked Top Down)
The star rows are RS rows (even numbers). The hdc return rows are WS rows (odd numbers). Turn at the end of every row.
Tier 1 (Top Tier)
Ch 5.
Row 1 (WS): Hdc in the 3rd ch from hook and in the next 2 ch. Turn. (3 hdc) The ch-2 does not count.
Row 2 (RS): Make 1 first star across all 3 sts. Turn. (1 star, on 3 sts)
Row 3 (WS, increase return): Ch 2, 4 hdc in the eye, 3 hdc in the 3rd ch of the beginning ch-3. Turn. (7 hdc)
Row 4: First star, then 2 more stars. Turn. (3 stars, on 7 sts)
Row 5 (increase return): Ch 2, 4 hdc in the first eye, 2 hdc in each of the next 2 eyes, 3 hdc in the 3rd ch of ch-3. Turn. (11 hdc)
Row 6: 5 stars across. Turn. (5 stars, on 11 sts)
Checkpoint: 2.75 in (7.0 cm) wide × 1.5 in (3.8 cm) tall.
Tier 2 (Middle Tier)
Row 7 (decrease return): Ch 1, sl st into the first eye. Ch 2, 2 hdc in each of the next 3 eyes, 1 hdc in the last eye. Leave the ch-3 unworked. Turn. (7 hdc)
This row is 2 sts narrower than Row 6 on each side. Those 2 uncovered sts on each side form the ledge, about 0.5 in (1.3 cm), and that ledge is what makes Tier 1 stand out as its own point.
Row 8: 3 stars across. Turn. (3 stars, on 7 sts)
Row 9 (increase return): Ch 2, 4 hdc in the first eye, 2 hdc in the next eye, 3 hdc in the 3rd ch of ch-3. Turn. (11 hdc)
Row 10: 5 stars across. Turn. (5 stars, on 11 sts)
Row 11 (increase return): Ch 2, 4 hdc in the first eye, 2 hdc in each of the next 4 eyes, 3 hdc in the 3rd ch of ch-3. Turn. (15 hdc)
Row 12: 7 stars across. Turn. (7 stars, on 15 sts)
Checkpoint: Row 12 measures 3.75 in (9.5 cm) wide, and the body is 3 in (7.6 cm) tall.
Tier 3 (Bottom Tier)
Row 13 (decrease return): Ch 1, sl st into the first eye. Ch 2, 2 hdc in each of the next 5 eyes, 1 hdc in the last eye. Leave the ch-3 unworked. Turn. (11 hdc)
Row 14: 5 stars across. Turn. (5 stars, on 11 sts)
Row 15 (increase return): Ch 2, 4 hdc in the first eye, 2 hdc in each of the next 4 eyes, 3 hdc in the 3rd ch of ch-3. Turn. (15 hdc)
Row 16: 7 stars across. Turn. (7 stars, on 15 sts)
Row 17 (increase return): Ch 2, 4 hdc in the first eye, 2 hdc in each of the next 6 eyes, 3 hdc in the 3rd ch of ch-3. Turn. (19 hdc)
Row 18: 9 stars across. Turn. (9 stars, on 19 sts)
Row 19 (plain return): Ch 2, 2 hdc in each of the 9 eyes, 1 hdc in the 3rd ch of ch-3. (19 hdc) Fasten off.
Checkpoint: 4.75 in (12.1 cm) wide × 4.75 in (12.1 cm) tall.
Body row summary: 3, 1★, 7, 3★, 11, 5★ | 7, 3★, 11, 5★, 15, 7★ | 11, 5★, 15, 7★, 19, 9★, 19.
Trunk
With the body upside down (Row 19 at the top), count 19 sts across. Place markers in st 8 and st 12. That leaves 7 sts outside the markers on each side.
Row 1: Join yarn with a standing sc in st 8, then sc in sts 9–12. Turn. (5 sc)
Rows 2–4: Ch 1, sc in each st across. Turn. (5 sc)
Fasten off after Row 4.
The trunk is 1.25 in (3.2 cm) wide × 0.75 in (1.9 cm) tall. Checkpoint: the piece is now 4.75 in (12.1 cm) wide × 5.5 in (14.0 cm) tall.
Border
Border gauge: 4 sc = 1 in (2.5 cm) along the edges. The body rows also run 4 per inch, so the base rule is 1 sc per row end. That keeps the edges flat.
Round 1 (RS): Join yarn in the first foundation ch at the top point.
- Top point: Sc in the first ch, 3 sc in the center ch, sc in the last ch. (5 sc)
- Tier 1, first side: Sc in the ends of Rows 1–5 (5 sc). Work 3 sc in the end of Row 6 for the tier point. Then sc in each of the 2 ledge sts on the underside of Row 6. (10 sc)
- Tier 2, first side: Sc in the ends of Rows 7–11 (5 sc). Work 3 sc in the end of Row 12, then sc in its 2 ledge sts. (10 sc)
- Tier 3, first side: Sc in the ends of Rows 13–18 (6 sc), then 3 sc in the end of Row 19 for the bottom corner. (9 sc)
- Bottom edge, first side: Sc in each of the 7 sts of Row 19 up to the trunk. (7 sc)
- Trunk, first side: Sc in the ends of trunk Rows 1–3. (3 sc)
- Trunk base: 3 sc in the first st of Row 4, sc in the next 3 sts, 3 sc in the last st. (9 sc)
- Trunk, second side: Sc in the ends of trunk Rows 3–1. (3 sc)
- Bottom edge, second side: Sc in each of the 7 sts of Row 19. (7 sc)
- Tier 3, second side: 3 sc in the end of Row 19, then sc in the ends of Rows 18–13. (9 sc)
- Tier 2, second side: Sc in the 2 ledge sts under Row 12, 3 sc in the end of Row 12, then sc in the ends of Rows 11–7. (10 sc)
- Tier 1, second side: Sc in the 2 ledge sts under Row 6, 3 sc in the end of Row 6, then sc in the ends of Rows 5–1. (10 sc)
Sl st to the first sc. Total: 5 + (10 + 10 + 9 + 7 + 3) × 2 + 9 = 5 + 78 + 9 = 92 sc.
Why the math works: Each tier side has exactly one sc per row, so the slope lies flat. The 3 sc at each tier point turn the sharp outward corner without cupping. Each ledge is exactly 2 sts wide because every decrease return row drops 2 sts per side, so it gets 2 sc. The bottom edge gets 7 sc because 19 − 5 trunk sts = 14, which is 7 per side. The border adds 0.25 in (0.6 cm) all around, giving 4.75 + 0.5 = 5.25 in (13.3 cm) wide and 5.5 + 0.5 = 6 in (15.2 cm) tall.
Hanging Loop
Do not fasten off. Sl st along the border to the center sc of the top point. Ch 18, then sl st into the same center sc to make a ring. Work 24 sc around the ch-18 ring, then sl st into the top point.
Fasten off. The loop stands about 1.75 in (4.4 cm) tall. Weave in all ends on the WS, running them through the hdc rows so they don’t show between the stars.
Final Blocking
- Lightly mist the ornament with water until it is damp, not soaked.
- Lay it RS up on a blocking mat or folded towel.
- Pin the top point and the bottom trunk corners first, setting the height to 6 in (15.2 cm).
- Pin the two bottom tier points so they sit 5.25 in (13.3 cm) apart.
- Pin the Tier 1 and Tier 2 points so they stick out evenly on both sides.
- Gently press the star rows flat with your palm, but don’t stretch them.
- Pin the loop straight up.
- Let it dry completely, about 6–12 hours, before unpinning.
Final Quality-Control Checklist
- Body rows match the counts: 3, 7, 11 | 7, 11, 15 | 11, 15, 19 hdc.
- Star rows have 1, 3, 5 | 3, 5, 7 | 5, 7, 9 stars.
- Both sides of each tier step in by the same 2-st ledge.
- The trunk is centered, with 7 sts free on each side.
- The border has exactly 92 sc, with 3 sc at each of the 6 tier points and the top point.
- The finished size is 5.25 in (13.3 cm) × 6 in (15.2 cm).
- The loop is centered and firmly anchored.
- All ends are hidden on the WS.
Troubleshooting
Stars look squashed or slanted: Pull every loop up to the same height before you close the star. Uneven loops tilt the star.
Stitch count is off after a return row: Check that you worked into the 3rd ch of the beginning ch-3 at the end of the row. It is easy to miss.
Tiers look lopsided: In a decrease return row, the sl st and the unworked ch-3 should each sit over 2 sts. Count before you move on.
Edges ruffle after the border: Your sc is looser than your rows. Use a 3.75 mm hook for the border only.
Edges pull in or cup: Check the 3 sc at each tier point and don’t skip any row ends.
Trunk is off-center: Remove it and recount Row 19 from both ends. The trunk starts in st 8.
Care
Hand wash in cool water with mild soap, press out the water in a towel, and dry flat. Re-block if the points soften after storage.
Final Notes
Each stage builds on the one before. Gauge of 4 sts and 4 rows per inch gives a 2.75 in (7.0 cm) Tier 1. Tier 2 then grows to 3.75 in (9.5 cm), and Tier 3 reaches 4.75 in (12.1 cm). The trunk brings the height to 5.5 in (14.0 cm), and the 92-sc border finishes at 5.25 in (13.3 cm) × 6 in (15.2 cm). If you check each stage, the finished tree will come out symmetrical and crisp, ready for a wreath or the tree.
Happy crocheting!