

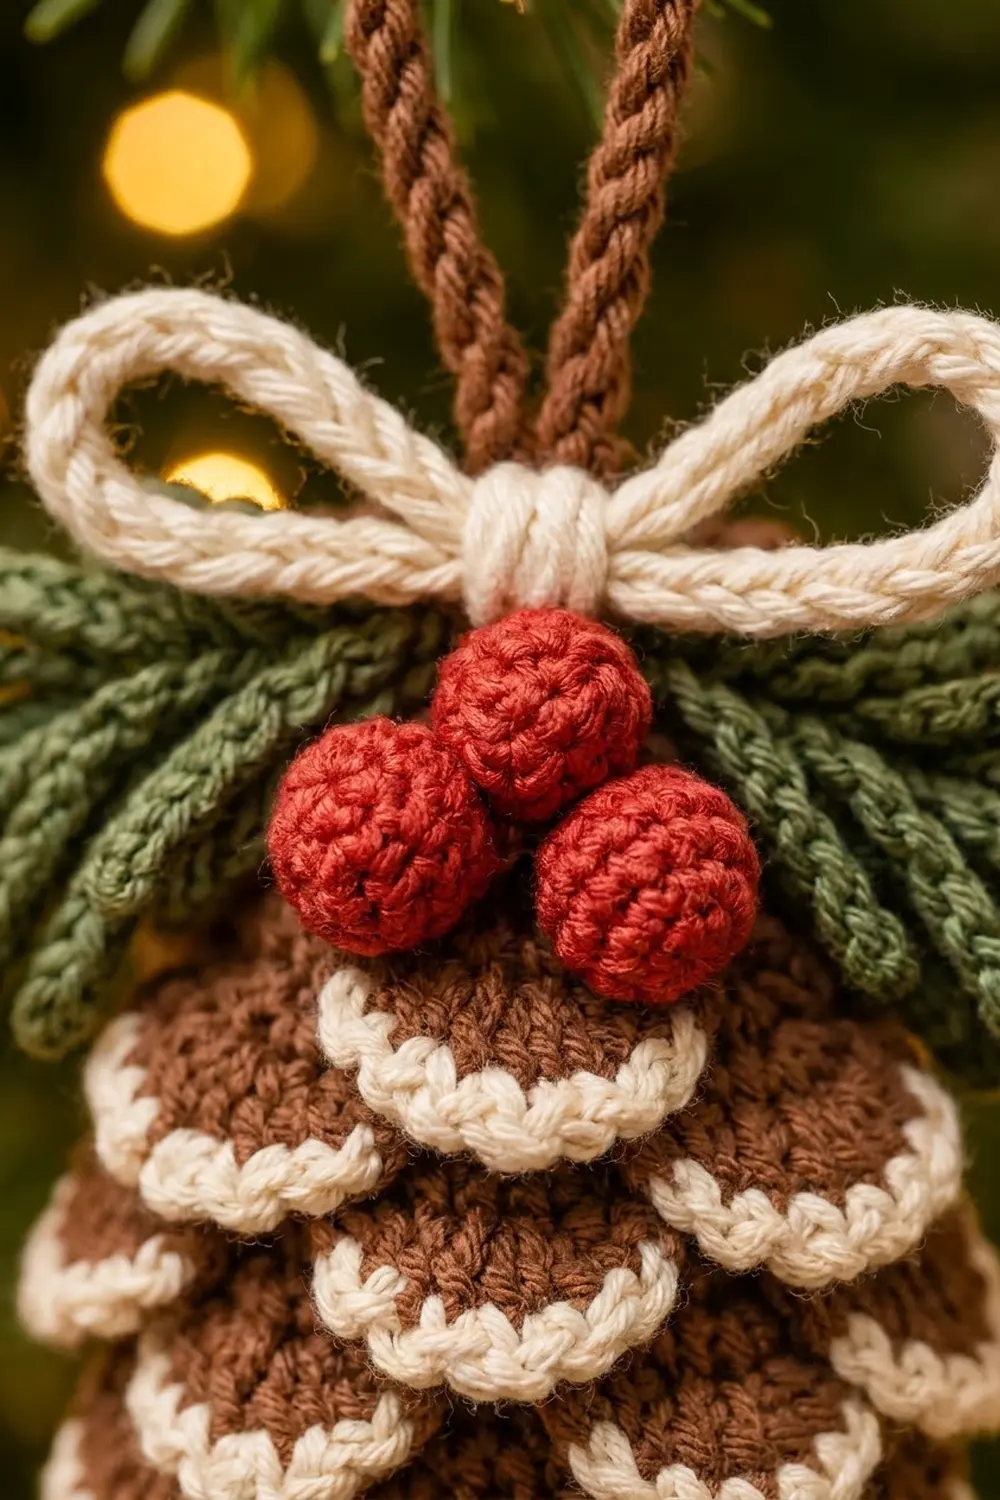
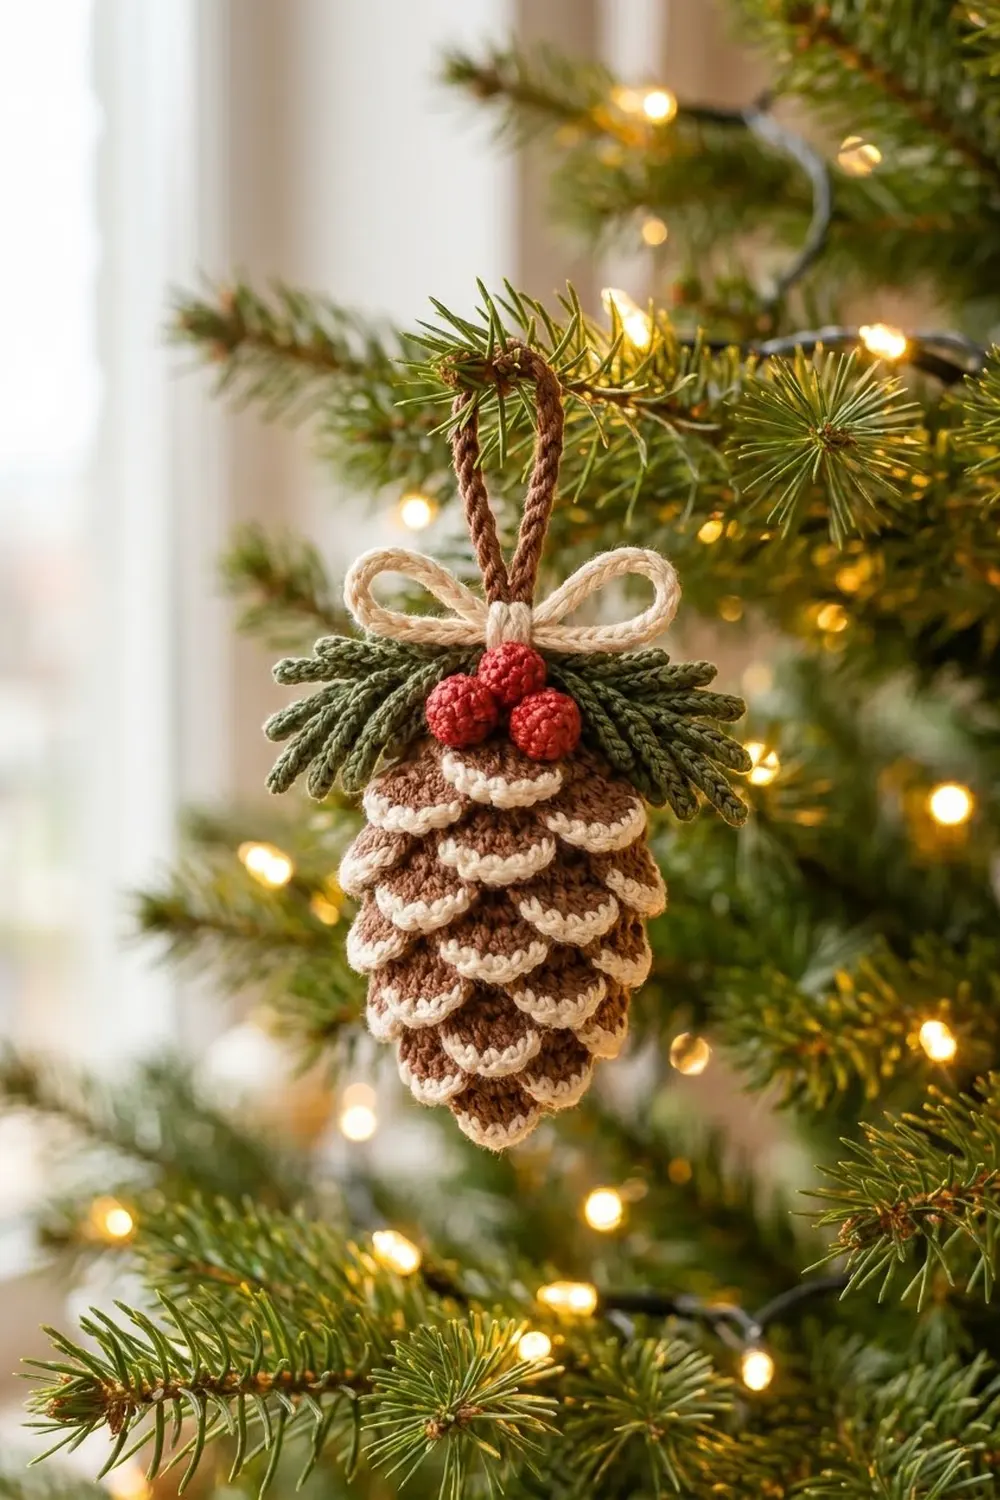
This pinecone ornament is built the way a real cone grows: a firm stuffed core covered in tier after tier of small, overlapping scales. Each scale is cocoa brown with a crisp cream edge, so the finished cone looks lightly dusted with frost.
The top has two fans of green pine sprigs, a cluster of three round red berries, a cream bow and a brown hanging loop. The colors are classic and cozy: brown, cream, forest green and berry red. It looks good on a tree, tied to a gift or hung in a window.
The pattern uses US crochet terms. The finished cone is about 3.5 in (8.9 cm) tall and 2.25 in (5.7 cm) wide. It measures about 4.5 in (11.4 cm) across the pine sprigs and about 5.5 in (14.0 cm) tall including the loop.
You’ll crochet a small amigurumi body in continuous rounds and make 36 half-circle scales. Then you’ll sew the scales on in eight offset tiers, working from the bottom up. The sprigs, berries, bow and loop go on last.
Finished Size and Construction
- Finished size: cone 3.5 in (8.9 cm) tall x 2.25 in (5.7 cm) wide; 4.5 in (11.4 cm) wide across the sprigs; 5.5 in (14.0 cm) tall with the loop
- Skill level: Intermediate
- Terminology: US crochet terms
- Yarn weight: Sport (#2), cotton or cotton blend
- Hook: 2.5 mm (US B/1 or C/2)
- Number of pieces: one ornament, assembled from 49 small parts (1 body, 36 scales, 6 sprigs, 3 berries, 1 bow cord, 1 bow band, 1 loop)
- Layout: scales sewn in 8 tiers of 3, 4, 5, 5, 5, 5, 5 and 4, with each tier offset by half a scale
- Body size: 3.1 in (7.9 cm) tall x 1.5 in (3.8 cm) across
- Scale size before the cream edge: about 0.75 in (1.9 cm) wide
- Cream edge depth: about 0.15 in (0.4 cm), which brings each scale to about 1 in (2.5 cm) wide x 0.6 in (1.5 cm) deep
Materials
Choose a smooth, mercerized sport-weight cotton. It shows stitch definition clearly and holds the curve of the scales without going floppy. It also resists fuzzing, which matters on an ornament that gets handled every year. Use the same yarn for all four colors so the tension stays consistent.
- Brown (body and scales): 12 g / 36 m
- Cream (scale edges and bow): 6 g / 18 m
- Forest green (pine sprigs): 5 g / 15 m
- Red (berries): 2 g / 6 m
These amounts include a margin of about 20 percent for swatching and sewing tails.
Tools:
- 2.5 mm crochet hook
- Polyester fiberfill, about 5 g
- Tapestry needle
- Stitch marker
- Straight pins or clips
- Scissors
Abbreviations (US Terms)
- ch – chain
- sl st – slip stitch
- sc – single crochet
- hdc – half double crochet
- inc – 2 sc in the same stitch
- dec – single crochet decrease (the invisible decrease is recommended: insert hook in the front loops only of the next 2 sts, yarn over and pull through both, yarn over and pull through 2)
- MR – magic ring
- st(s) – stitch(es)
Special stitch – Needle: ch 4, sl st in 2nd ch from hook and in next 2 ch. This makes one short pine needle.
Gauge and Checkpoints
Gauge: 13 sc and 14 rounds = 2 in (5.1 cm) in continuous sc rounds. That works out to 6.5 sc and 7 rounds per inch (2.5 cm).
Make the body first and use it as your swatch. Check these points as you go:
- After Round 5: the flat base is about 1.5 in (3.8 cm) across.
- After Round 15: the tube is about 4.6 in (11.7 cm) around and about 2.1 in (5.3 cm) tall.
- Finished body: 3.1 in (7.9 cm) tall.
- First scale: about 1 in (2.5 cm) wide after the cream edge.
If your body comes out bigger, switch to a 2.25 mm hook. If it’s smaller, or the fabric feels stiff, switch to 2.75 mm. Amigurumi fabric should be tight enough that the fiberfill doesn’t show between stitches, so err on the firm side.
Make one complete scale before you make the other 35. Scale size controls how many scales fit around each tier, so it’s worth checking early.
Body
With brown, work in continuous rounds without joining. Place a marker in the first stitch of each round.
- Round 1: 6 sc in MR. (6)
- Round 2: inc in each st around. (12)
- Round 3: (sc in next st, inc) 6 times. (18)
- Round 4: (sc in next 2 sts, inc) 6 times. (24)
- Round 5: (sc in next 3 sts, inc) 6 times. (30)
- Rounds 6–15: sc in each st around. (30) — 10 rounds
- Round 16: (sc in next 3 sts, dec) 6 times. (24)
- Rounds 17–18: sc in each st around. (24)
- Round 19: (sc in next 2 sts, dec) 6 times. (18)
- Round 20: sc in each st around. (18)
Stuff firmly into a slightly tapered oval, rounder at the bottom and narrower at the top.
- Round 21: (sc in next st, dec) 6 times. (12)
- Round 22: dec 6 times. (6)
Add a little more stuffing. Fasten off and leave a 6 in (15.2 cm) tail. Weave the tail through the front loops of the last 6 sts and pull the opening closed. Leave the tail hanging, because you’ll use it to secure the hanging loop.
Check: 22 rounds at 7 rounds per inch gives a body 3.1 in (7.9 cm) tall.
Scales (Make 36)
Each scale is a flat half circle. You’ll sew the straight edge to the body, and the curved edge will hang downward.
With brown:
- Row 1: MR, ch 2 (doesn’t count as a st), 6 hdc in ring. Pull the ring closed until the hdc form a half circle with a straight lower edge. (6)
- Row 2: ch 1, turn, 2 sc in each st across. (12)
Fasten off the brown. Weave the magic-ring tail back through the base of the hdc before you trim it, so the ring can’t loosen. Leave the other brown tail about 6 in (15.2 cm) long for sewing. Then add the cream edge (see “Border: Cream Scale Edging” below).
Tip: work the scales in batches of six, and count and block each batch before you start the next. This keeps tension steady across all 36.
Pine Sprigs (Make 6)
With green:
- Ch 15.
- Sl st in 2nd ch from hook. This is the tip.
- First side: (Needle, sl st in next 2 foundation ch) 6 times, then sl st in the last foundation ch. You’ve now worked 1 + 12 + 1 = 14 foundation ch and made 6 needles.
- Second side: turn the work so you’re working into the free loops on the other side of the foundation chain. (Needle, sl st in next 2 free loops) 6 times, then sl st in the last 2 free loops to reach the tip. That uses 12 + 2 = 14 free loops and makes 6 more needles.
Fasten off, leaving a 6 in (15.2 cm) tail at the base. Each sprig has 12 needles, 6 on each side, and is about 2 in (5.1 cm) long.
Berries (Make 3)
With red:
- Round 1: 6 sc in MR. (6)
- Round 2: inc in each st around. (12)
- Round 3: sc in each st around. (12)
- Round 4: dec 6 times. (6)
Stuff with a small pinch of fiberfill. Fasten off, close the hole and leave a 6 in (15.2 cm) tail. Each berry is about 0.5 in (1.3 cm) across.
Bow and Hanging Loop
Bow cord (cream): Ch 45. Sl st in the back bump of the 2nd ch from hook and in each ch across. (44 sl st) The cord is about 5.5 in (14.0 cm) long.
Fold it into a figure eight with two loops of about 1.25 in (3.2 cm) each. The ends should meet at the center and show as two short tails underneath. Pin it in place.
Bow band (cream): Ch 7. Sl st in the back bump of the 2nd ch from hook and in each ch across. (6 sl st) Wrap the band around the center of the bow and sew its ends together at the back. The finished bow is about 2.75 in (7.0 cm) wide.
Hanging loop (brown): Ch 36. Sl st in the back bump of the 2nd ch from hook and in each ch across. (35 sl st) The cord is about 4.25 in (10.8 cm) long. Give it a few twists so it looks like rope, then fold it in half. Once attached, the loop stands about 2 in (5.1 cm) tall.
Assembly
Scale tiers: Sew each scale on by its straight edge with its brown tail. Use small whipstitches through the base of the Row 1 and Row 2 stitches. Work from the bottom up so each new tier covers the sewn edges of the tier below.
| Tier | Body round | Scales |
|---|---|---|
| 1 | Round 3 | 3 |
| 2 | Round 5 | 4 |
| 3 | Round 7 | 5 |
| 4 | Round 9 | 5 |
| 5 | Round 11 | 5 |
| 6 | Round 13 | 5 |
| 7 | Round 15 | 5 |
| 8 | Round 17 | 4 |
| Total | 36 |
Space the scales evenly around each round. Center each scale over the gap between two scales in the tier below, like bricks in a wall. In Tiers 3–7, the 30-st (or 24-st) round is about 4.6 in (11.7 cm) or less around, so five 1 in (2.5 cm) scales overlap slightly at their sides. The curved edges of Tier 1 hang about 0.4 in (1.0 cm) below the tip of the body, which brings the cone to 3.5 in (8.9 cm) tall. Rounds 18–22 stay bare, because the sprigs and berries cover them.
Sprigs: Sew 3 sprigs to each side of the body at Rounds 19–20, fanning them outward and slightly down. They extend about 1.1 in (2.8 cm) past each side of the cone, for a total width of about 4.5 in (11.4 cm).
Berries: Sew the 3 berries in a tight triangle at the front center of Rounds 19–21, two below and one above.
Bow and loop: Push the folded ends of the loop into the closed top of Round 22. Sew them in firmly with the body tail, passing through them several times. Sew the bow just above the berries, at the base of the loop.
Border: Cream Scale Edging
Work this border on every scale before assembly, along the curved edge only. The straight edge stays brown, and it’s hidden under the next tier.
Border gauge: one row of sc adds about 0.15 in (0.4 cm) of depth.
- Row 3: Join cream in the first st of Row 2. Ch 1, (sc in next 3 sts, inc) 3 times. That’s 12 sts worked 1 per existing stitch + 3 extra = 15 sc.
Fasten off and weave the tails in on the back.
Why the math works: a flat half circle usually needs about 6 extra stitches per row of standard height. This trim is only one sc row on a curve that’s already wide, so 3 evenly spaced increases are enough for it to lie flat with a soft flare. More increases make it ruffle, and none at all makes it cup inward.
Final Blocking
- Before assembly, lay all 36 scales right side up on a towel or foam board.
- Pin each scale into a smooth half circle with a straight top edge.
- Mist lightly with water and let them dry completely, about 1 hour.
- Block the 6 sprigs flat with the needles spread evenly, and let them dry.
- After assembly, steam the sprigs and bow from about 1 in (2.5 cm) away without pressing. Shape them with your fingers while they’re warm.
- Gently roll the finished cone between your palms to even out its shape.
Final Quality-Control Checklist
- The body is 3.1 in (7.9 cm) tall and firm, with no stuffing showing through.
- All 36 scales have 15 cream sc along the curve and lie flat.
- Each tier is offset by half a scale from the tier below.
- No bare brown body shows between the scales from Round 3 to Round 17.
- The cone is 3.5 in (8.9 cm) tall and 2.25 in (5.7 cm) wide.
- There are 3 sprigs on each side, and they’re balanced.
- The berries sit tight and centered.
- Both bow loops are the same size.
- The loop is firmly anchored and holds the ornament’s weight without pulling the top open.
- All ends are woven in and hidden.
Troubleshooting
Scales cup or curl: Your cream tension is tighter than your brown. Loosen up, or use a hook 0.25 mm larger for the cream row.
Scales ruffle: They’re too loose, or extra increases slipped in. Count to make sure there are 15 sc.
Body shows between scales: Add one scale to that tier, or sew the tiers one round apart instead of two.
Magic ring loosens: Weave the starting tail back through the base of the stitches before you trim it.
Sprigs twist: Pin them flat and mist them lightly.
Ornament tilts on the tree: Re-center the loop over Round 22, and make sure each side has the same sprig weight.
Care
Spot clean with mild soap and cool water, then reshape and dry flat. Store wrapped in tissue so the sprigs and bow keep their shape.
Final Notes
The measurements build on each other in a short chain. If you match the gauge of 13 sc x 14 rounds = 2 in (5.1 cm), you’ll get a 3.1 in (7.9 cm) body. Thirty-six 1 in (2.5 cm) scales in eight offset tiers cover the body and extend the cone to 3.5 in (8.9 cm). The sprigs widen it to 4.5 in (11.4 cm), and the loop brings the whole ornament to 5.5 in (14.0 cm). Check the body and your first scale, and the rest will follow.
Happy crocheting!