

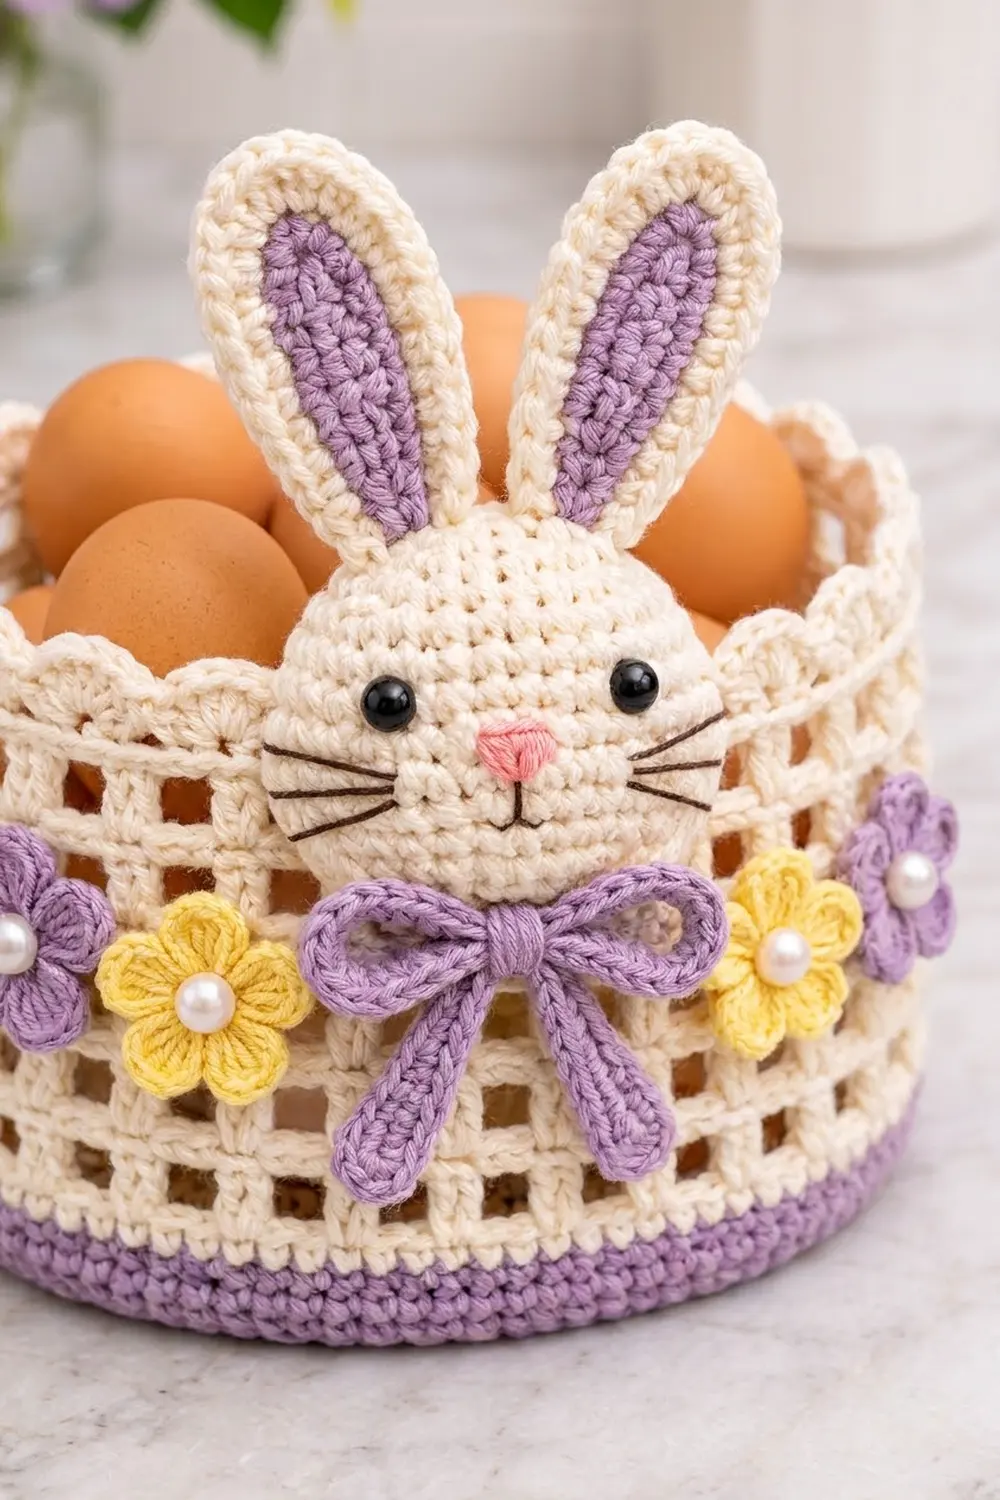
This oval Easter basket has a solid lavender base, a cream filet-mesh wall with square windows and a soft scalloped rim. A small bunny face with tall lavender-lined ears peeks over the front edge. A lavender bow sits under the chin, with two pearl-centered flowers on each side.
The colors are lavender, cream and butter yellow, with a pink nose, black bead eyes and dark embroidered whiskers. The basket looks sweet but is simple to make, and it holds a dozen small eggs, treats or a gift card.
The pattern uses US crochet terms. The finished basket measures about 7.75 in (19.7 cm) long, 4.25 in (10.8 cm) wide and 5 in (12.7 cm) tall, not counting the ears.
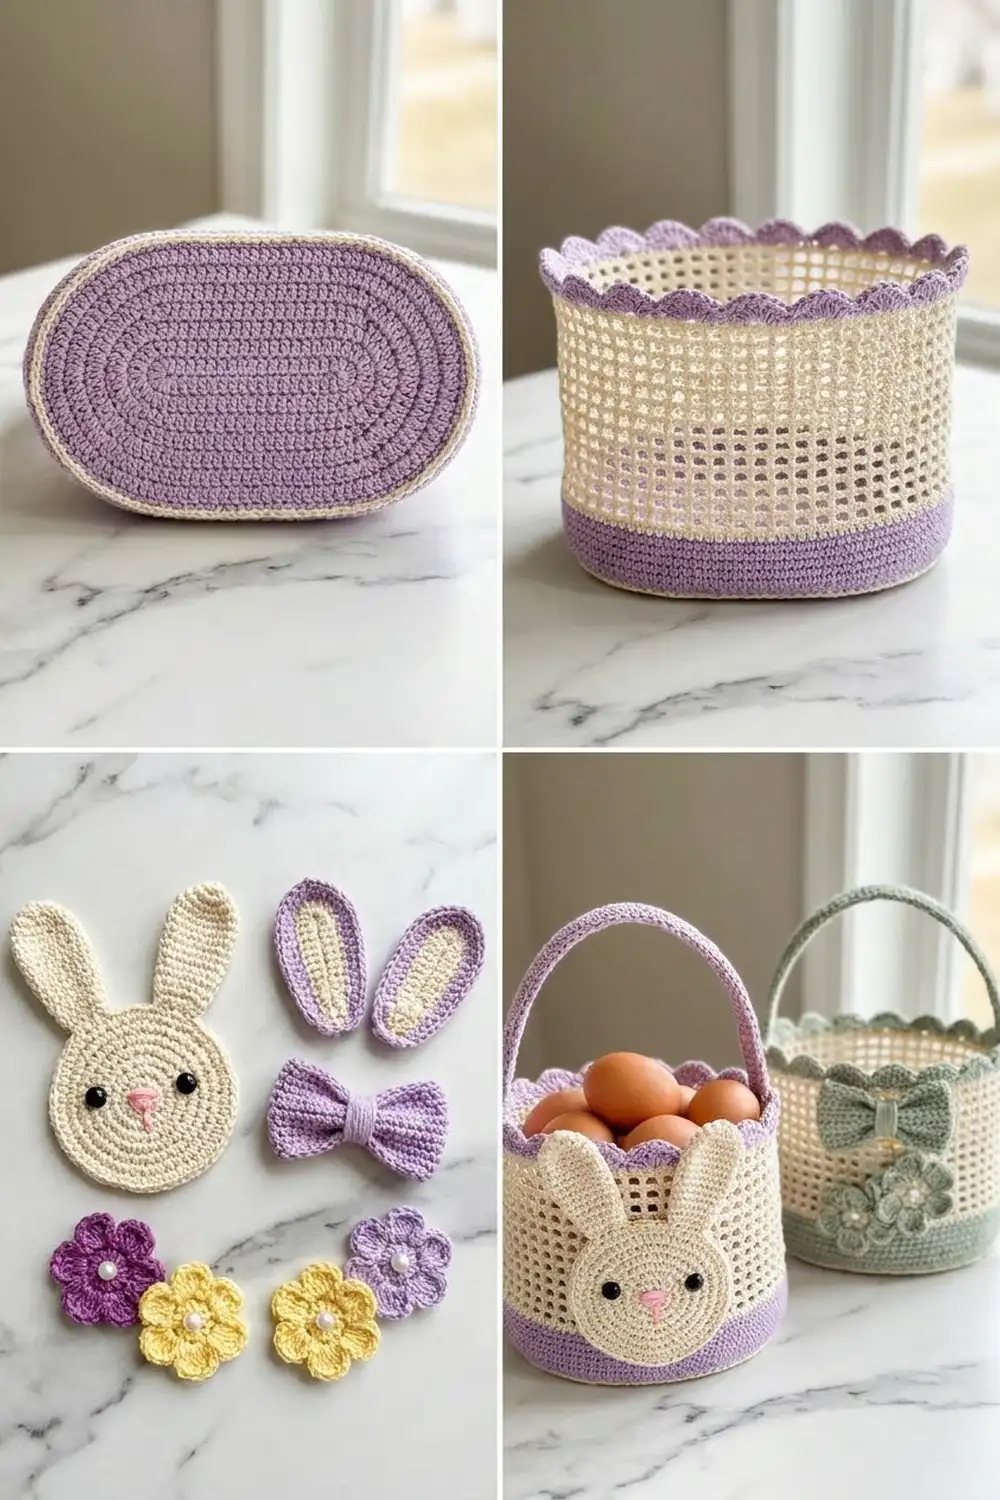
The basket body is one piece worked in joined rounds: an oval single-crochet base, a lavender band, a cream mesh wall and a scalloped rim. You make the bunny head, ears, bow and flowers separately and sew them to the front.
Finished Size and Construction
- Finished size: 7.75 x 4.25 in (19.7 x 10.8 cm) base, 5 in (12.7 cm) tall
- Skill level: Easy-intermediate
- Terminology: US terms
- Yarn weight: Worsted (#4) cotton
- Hook: 4.0 mm (G-6)
- Number of pieces: 1 basket body plus 10 small appliqué pieces (head front, head back, 2 ears, 2 bow strips, 4 flowers)
- Layout: A single oval basket, with all appliqués grouped on one long side
- Piece size: 20 in (50.8 cm) around the wall
- Size before border: 4.5 in (11.4 cm) tall after the last wall round
- Border depth: 0.5 in (1.3 cm) scalloped rim
Materials
Use a smooth worsted-weight cotton, about 85 m (93 yd) per 50 g. Cotton keeps the mesh crisp and lets the basket stand without stiffener. Acrylic also works, but the walls will be softer.
- Lavender: 50 g, 85 m (93 yd), for the base, bottom band, ear linings, bow and 2 flowers
- Cream: 60 g, 102 m (112 yd), for the base edge, mesh wall, rim, head and ear edges
- Butter yellow: 5 g, 9 m (10 yd), for 2 flowers
- Pink: 1 g, 2 m (2 yd), for the nose
Tools:
- 4.0 mm (G-6) crochet hook
- Two 6 mm black beads or safety eyes
- Four 6 mm pearl beads
- Black or dark brown embroidery floss
- Small amount of fiberfill
- Tapestry needle, sewing needle and cream thread
- Stitch markers, scissors and a measuring tape
All quantities include a margin of about 15–20%.
Abbreviations (US Terms)
- ch: chain
- sl st: slip stitch
- sc: single crochet
- hdc: half double crochet
- dc: double crochet
- inc: 2 sc in the same stitch
- BLO: back loop only
- MR: magic ring
- st(s): stitch(es)
- sp: space
Special stitch, scallop: 5 dc worked into the same stitch.
Gauge and Checkpoints
Gauge: 18 sc and 20 rows = 4 in (10.2 cm) with a 4.0 mm hook, which is 4.5 sc per inch.
Before you make the whole basket, crochet the base through Round 5 as your test piece and measure it.
- After Round 5: about 5.75 x 2.25 in (14.6 x 5.7 cm)
- After Round 10: 7.75 x 4.25 in (19.7 x 10.8 cm), 90 sts
- After Round 15: lavender band is 1 in (2.5 cm) tall
- After Round 22: wall is about 3.25 in (8.3 cm) tall
- After Round 26: wall is 4.5 in (11.4 cm) tall
If your base is too large, go down 0.5 mm in hook size. If it’s too small, go up 0.5 mm.
If the size is right but the base ruffles, your tension is loose. If it cups, your tension is tight.
Fix the gauge before you start the wall, because the wall copies the base’s 90-stitch circumference.
Basket Body
Join every round with a sl st to the first st. Start each round with ch 1, which does not count as a stitch, unless the round says otherwise.
Oval Base
With lavender, ch 18.
Round 1: 3 sc in the 2nd ch from the hook (end A), sc in the next 15 ch, 3 sc in the last ch (end B). Turn the piece and work along the other side of the chain: sc in the next 15 ch. Join. (36 sts: 3 per end, 15 per side)
From Round 2 on, each end grows by 3 sts per round and each side stays at 15 sts.
Rounds 2–10: For round number k:
- End A: [sc in the next (k − 2) sts, inc] 3 times.
- Side: sc in the next 15 sts.
- End B: [sc in the next (k − 2) sts, inc] 3 times.
- Side: sc in the next 15 sts.
- Join.
Round by round, that gives:
- Round 2: [inc] 3 times at each end. (42 sts)
- Round 3: [sc 1, inc] at each end. (48 sts)
- Round 4: [sc 2, inc] at each end. (54 sts)
- Round 5: [sc 3, inc] at each end. (60 sts)
- Round 6: [sc 4, inc] at each end. (66 sts)
- Round 7: [sc 5, inc] at each end. (72 sts)
- Round 8: [sc 6, inc] at each end. (78 sts)
- Round 9: [sc 7, inc] at each end. Fasten off lavender. (84 sts)
- Round 10: Join cream and work [sc 8, inc] at each end. (90 sts: 30 per end, 15 per side)
Check: 6 × 10 + 30 = 90. The cream round makes the thin pale edge around the base.
Lavender Band
Round 11: Join lavender. Sc in the BLO of each st. (90 sts) The unused front loops form a ridge that turns the wall upward.
Rounds 12–15: Sc in each st. Fasten off at the end of Round 15. (90 sts)
Cream Mesh Wall
Round 16: Join cream. Sc in each st. (90 sts)
Round 17 (mesh): Ch 5 (counts as dc + ch 2). Skip 2 sts. Dc in the next st, ch 2, skip 2 sts. Repeat from * 29 times. Join to the 3rd ch of the beginning ch-5. (30 dc + 30 ch-2 sps = 90 sts)
Round 18 (bar): Ch 1, sc in the same st, 2 sc in the next ch-2 sp. Sc in the next dc, 2 sc in the next ch-2 sp. Repeat from * around. Join. (30 + 60 = 90 sts)
Round 19 (mesh): Ch 5. Skip 2 sts. Dc in the next sc (the one above a dc), ch 2, skip 2 sts. Repeat from * 29 times. Join to the 3rd ch. (90 sts)
Rounds 20–26: Repeat Rounds 18 and 19 three more times, then work Round 18 once more. That gives 5 mesh rounds (17, 19, 21, 23, 25) and 5 bar rounds (18, 20, 22, 24, 26). (90 sts per round)
Each window is 2 sts wide and one dc tall, about 0.4 in (1.0 cm) square. The sc bars make the thick horizontal grid lines.
Border: Scalloped Rim
Border gauge: Each scallop uses 6 sts, about 1.33 in. Because the basket is oval, there are no corners, so counts are given for the whole round.
Round 27: Ch 1. Sc in the next st, skip 2 sts, 5 dc in the next st, skip 2 sts. Repeat from * 15 times. Join to the first sc and fasten off. (15 scallops: 15 sc + 75 dc)
Why the math works:
- 90 sts ÷ 6 = 15 repeats, with nothing left over.
- The 90 comes from the base: 36 sts plus 6 increases in each of 9 rounds. The wall never changes that count.
- The mesh uses the same 90 as 30 three-stitch blocks (dc + ch 2), and each bar round restores the full 90 sts.
- The rim adds 0.5 in (1.3 cm), so the total height is 5 in (12.7 cm).
Bunny Appliqués
Head Front (cream)
- Round 1: 6 sc in MR. (6)
- Round 2: Inc in each st. (12)
- Round 3: [Sc 1, inc] 6 times. (18)
- Round 4: [Sc 2, inc] 6 times. (24)
- Round 5: [Sc 3, inc] 6 times. (30)
- Round 6: [Sc 4, inc] 6 times. (36)
- Rounds 7–8: Sc in each st. (36) These even rounds give the face a gentle dome.
Fasten off.
Head Back (cream)
Work Rounds 1–6 of the head front (36 sts). Don’t fasten off.
Joining round: Hold the back against the domed front, wrong sides together. Sc through both layers in each st, stuffing lightly before you close the round. (36 sts) The head is about 2.75 in (7.0 cm) across.
Ears (make 2)
Row 1 (lavender): Ch 11.
- Sc in the 2nd ch from the hook, hdc in the next 2 ch, dc in the next 5 ch, hdc in the next ch.
- 5 hdc in the last ch for the tip.
- Working along the other side of the chain: hdc in the next ch, dc in the next 5 ch, hdc in the next 2 ch, sc in the last ch.
Fasten off. (23 sts)
Row 2 (cream): Join cream in the first st. Sc in the next 9 sts, 2 sc in each of the next 5 tip sts, sc in the next 9 sts. Fasten off, leaving a long tail. (9 + 10 + 9 = 28 sts)
This gives a lavender lining framed by a cream edge. The base of the ear stays open and flat. Each ear is about 2.75 in (7.0 cm) tall.
Bow (lavender)
Loop strip: Ch 27. Sc in the 2nd ch from the hook and in each ch across. (26 sc)
Tail strip: Ch 15. Sc in the 2nd ch from the hook and in each ch across. (14 sc)
To make the bow:
- Fold both ends of the loop strip to the center, overlapping them, to make two loops.
- Fold the tail strip into a V and place it behind the loops.
- Wrap lavender yarn tightly around the center 6–8 times.
The bow is about 3 in (7.6 cm) wide, with tails hanging about 1.5 in (3.8 cm).
Flowers (make 2 lavender, 2 yellow)
Round 1: 10 sc in MR. Join. (10)
Round 2: (Hdc, 2 dc, hdc) in the next st, sl st in the next st. Repeat from * 5 times. (5 petals)
Fasten off and sew a pearl to the center. Each flower is about 1.25 in (3.2 cm) across.
Face Details
- Attach the eyes on Round 5 of the head front, 7 sts apart.
- Embroider a small pink triangle nose between Rounds 3 and 4, centered under the eyes.
- With floss, stitch a short mouth below the nose and 3 whiskers on each side, each about 1 in (2.5 cm) long.
Assembly
- Head: Center it on one long side, with its top edge just below the bottom of the scallops. Whipstitch the edge of the back to the mesh bars.
- Ears: Sew them to the back of the head, upright, so they rise about 2 in (5.1 cm) above the rim.
- Bow: Sew it directly under the chin.
- Flowers: Working from left to right, sew lavender, yellow, then the bow, then yellow, lavender. Place each flower on a bar round, level with the bow.
Final Blocking
- Lightly mist the whole basket with water.
- Stuff it firmly with a towel, or slide it over an oval container about 7.75 x 4.25 in (19.7 x 10.8 cm).
- Straighten the mesh columns so each dc stands upright.
- Pin each scallop so it lies flat and even.
- Shape the ears upright, curving them slightly forward.
- Let it dry completely, about 24 hours.
For a stiffer basket, brush diluted fabric stiffener on the base and band, or add a plastic canvas oval inside the base.
Final Quality-Control Checklist
- The base lies flat and measures 7.75 x 4.25 in (19.7 x 10.8 cm).
- Every wall round has 90 sts.
- There are 5 rows of 30 square windows, with the columns standing upright.
- There are 15 even scallops, with no gap at the join.
- The total height is 5 in (12.7 cm).
- The head, ears, bow and flowers are firmly attached and centered.
- All ends are woven into solid stitches, not mesh chains.
Troubleshooting
- Base ruffles: Go down a hook size, or check that you’re making exactly 6 increases per round.
- Base cups: An increase is missing. After Round k, each end should have 3k sts.
- Pointed oval ends: Shift the increase positions by 1 st on every other round.
- Mesh columns lean: Make sure each dc goes into the sc directly above the previous dc.
- Windows are too tall: Work the dc a little shorter, or use hdc in the mesh rounds.
- Rim flares: Use 4 dc per scallop instead of 5.
- Head looks flat: Add 1 more even round to the head front.
Care
Hand wash in cool water and gently press out the excess. Reshape the basket over its container and let it dry flat, away from heat.
Final Notes
Every measurement in this basket follows from the gauge:
- A gauge of 4.5 sc per inch gives a 90-stitch base measuring 7.75 x 4.25 in (19.7 x 10.8 cm).
- That count carries straight up through a 1 in (2.5 cm) lavender band and a 3.5 in (8.9 cm) mesh wall.
- A 0.5 in (1.3 cm) rim brings the total height to 5 in (12.7 cm).
Because 90 divides evenly by 3 for the mesh and by 6 for the scallops, every repeat closes cleanly. Get the base right and the rest will fit.
Happy crocheting!