

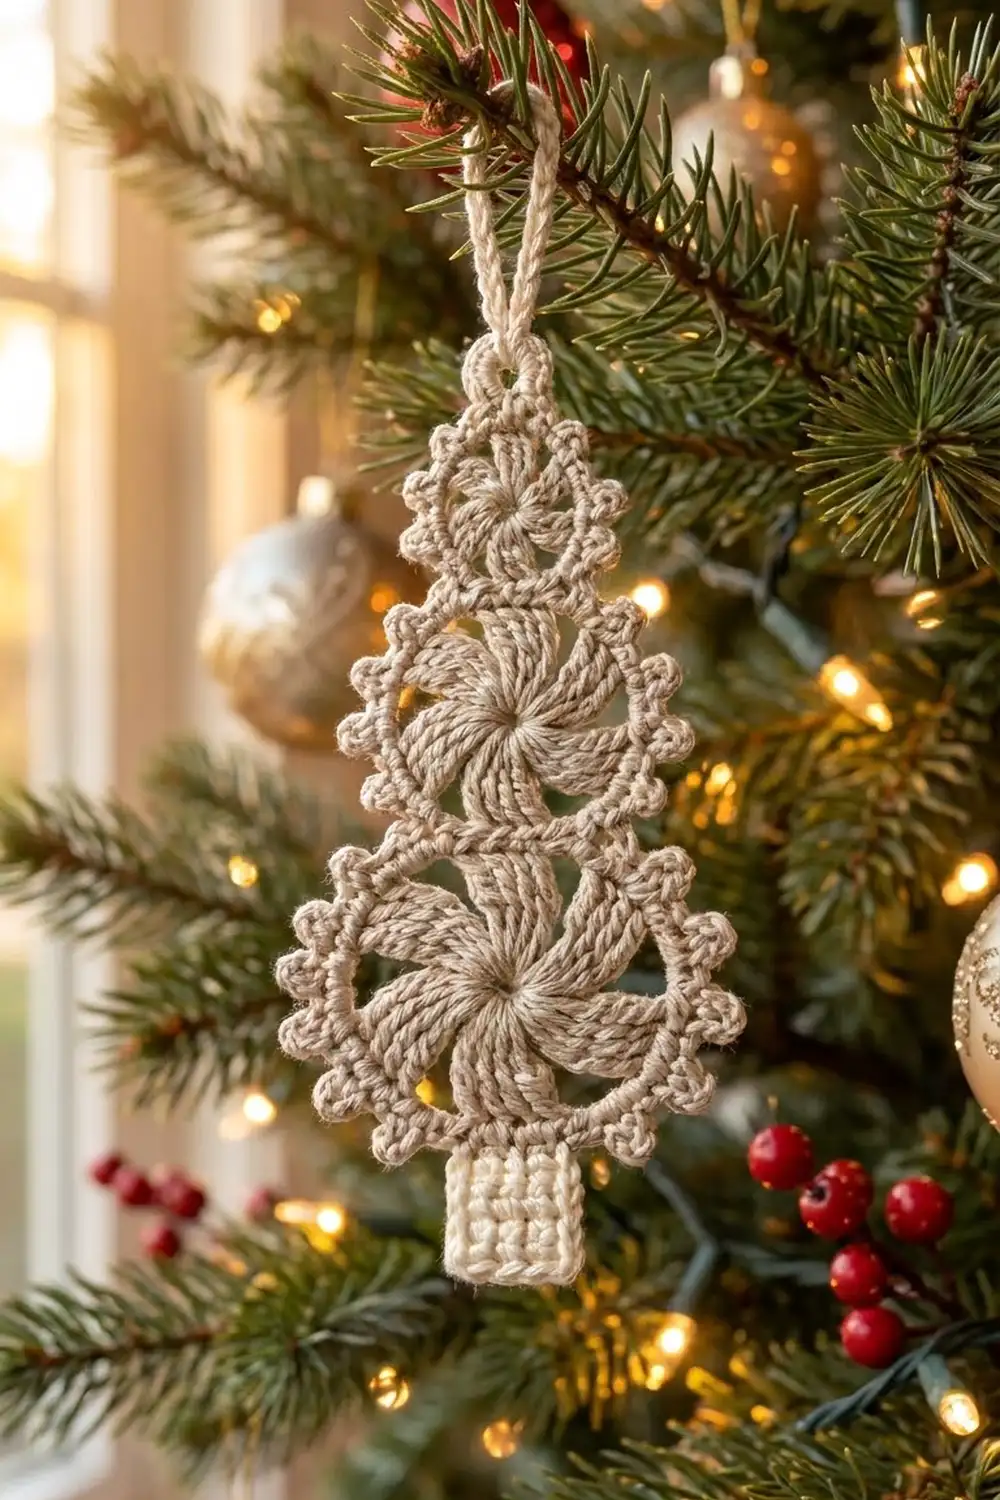
This little tree is made from three swirling pinwheel circles stacked from small to large. A lacy picot border wraps the whole stack and turns the round motifs into a stepped, tapering tree. A neat cream trunk finishes the bottom, and a firm loop at the tip lets you hang it from a branch, a gift tag, or a car mirror.
The sample uses two quiet neutrals: oatmeal beige for the tree and cream for the trunk. The result has a soft, Scandinavian look that suits rustic and modern holiday decor. It also works well in white and gold, sage green, or classic red.
The pattern uses US crochet terms. The finished ornament measures 5.5 in (14.0 cm) tall without the hanging loop and 2.5 in (6.4 cm) wide at the widest point.
Here is the construction in short: make three swirl motifs in three sizes, whipstitch them together top to bottom, work a two-round border around the whole outline, then add the hanging loop and sew on the trunk.
Finished Size and Construction
- Finished size: 5.5 in (14.0 cm) tall × 2.5 in (6.4 cm) wide, without the loop
- Hanging loop: about 2.25 in (5.7 cm) long
- Skill level: Intermediate (working in rounds, small pieces, picots)
- Terminology: US
- Yarn weight: Super fine (#1) cotton, fingering weight
- Hook: 2.25 mm (B-1)
- Number of pieces: 4 (3 swirl motifs + 1 trunk)
- Layout: 3 motifs in one vertical column, smallest at the top
- Piece sizes: small 1 in (2.5 cm), medium 1.5 in (3.8 cm), large 2 in (5.1 cm) across; trunk 0.75 × 0.75 in (1.9 × 1.9 cm)
- Size before border: 4.5 in (11.4 cm) tall × 2 in (5.1 cm) wide
- Border depth: 0.25 in (0.6 cm)
Materials
Choose a smooth mercerized cotton or cotton blend in fingering weight. Crisp cotton shows the swirl arms clearly and holds the picots after blocking. Fuzzy yarns hide the spiral, so avoid them.
- Color A, oatmeal beige: about 8 g / 27 m (motifs, border, hanging loop)
- Color B, cream: about 2 g / 7 m (trunk)
Tools:
- 2.25 mm (B-1) crochet hook
- Tapestry needle
- 2 locking stitch markers
- Scissors
- Blocking mat, rustproof pins, and a spray bottle
- Optional: fabric stiffener
These quantities include a margin of about 25% for swatching and weaving in ends.
Abbreviations (US Terms)
- ch – chain
- sl st – slip stitch
- sc – single crochet
- hdc – half double crochet
- dc – double crochet
- MR – magic ring
- sk – skip
- sp – space
- st(s) – stitch(es)
- PM – place marker
- rep – repeat
Special stitches
- Picot: ch 3, sl st in the 3rd ch from the hook.
- Swirl arm: an arm is a group of dc followed by ch 1. On each new round, sk the first dc of the old arm, dc in each remaining dc of that arm, work 2 dc in the ch-1 sp after it, then ch 1. Each arm grows by 1 dc and moves one stitch forward, which makes the pinwheel spiral.
Gauge and Checkpoints
Gauge in sc rows is 8 sc and 9 rows = 1 in (2.5 cm). Exact gauge matters less than the motif sizes, because each motif has its own checkpoint.
Make the large motif first and treat it as your test piece. It uses the most rounds, so any gauge problem shows up there first.
Checkpoints, measured flat before blocking:
- Large motif: 1 in (2.5 cm) after Round 2, 1.75 in (4.4 cm) after Round 4, 2 in (5.1 cm) after Round 5
- Medium motif: 1.3 in (3.3 cm) after Round 3, 1.5 in (3.8 cm) after Round 4
- Small motif: 0.8 in (2.0 cm) after Round 2, 1 in (2.5 cm) after Round 3
- Joined stack: 4.5 in (11.4 cm) tall
- After the border: 5 in (12.7 cm) tall × 2.5 in (6.4 cm) wide
If the large motif is bigger than 2.125 in (5.4 cm), switch to a 2.0 mm hook. If it is smaller than 1.875 in (4.8 cm), switch to a 2.5 mm hook. If it cups, the dc are too tight, so relax your yarn hand or go up a hook size. If it ruffles, go down a size.
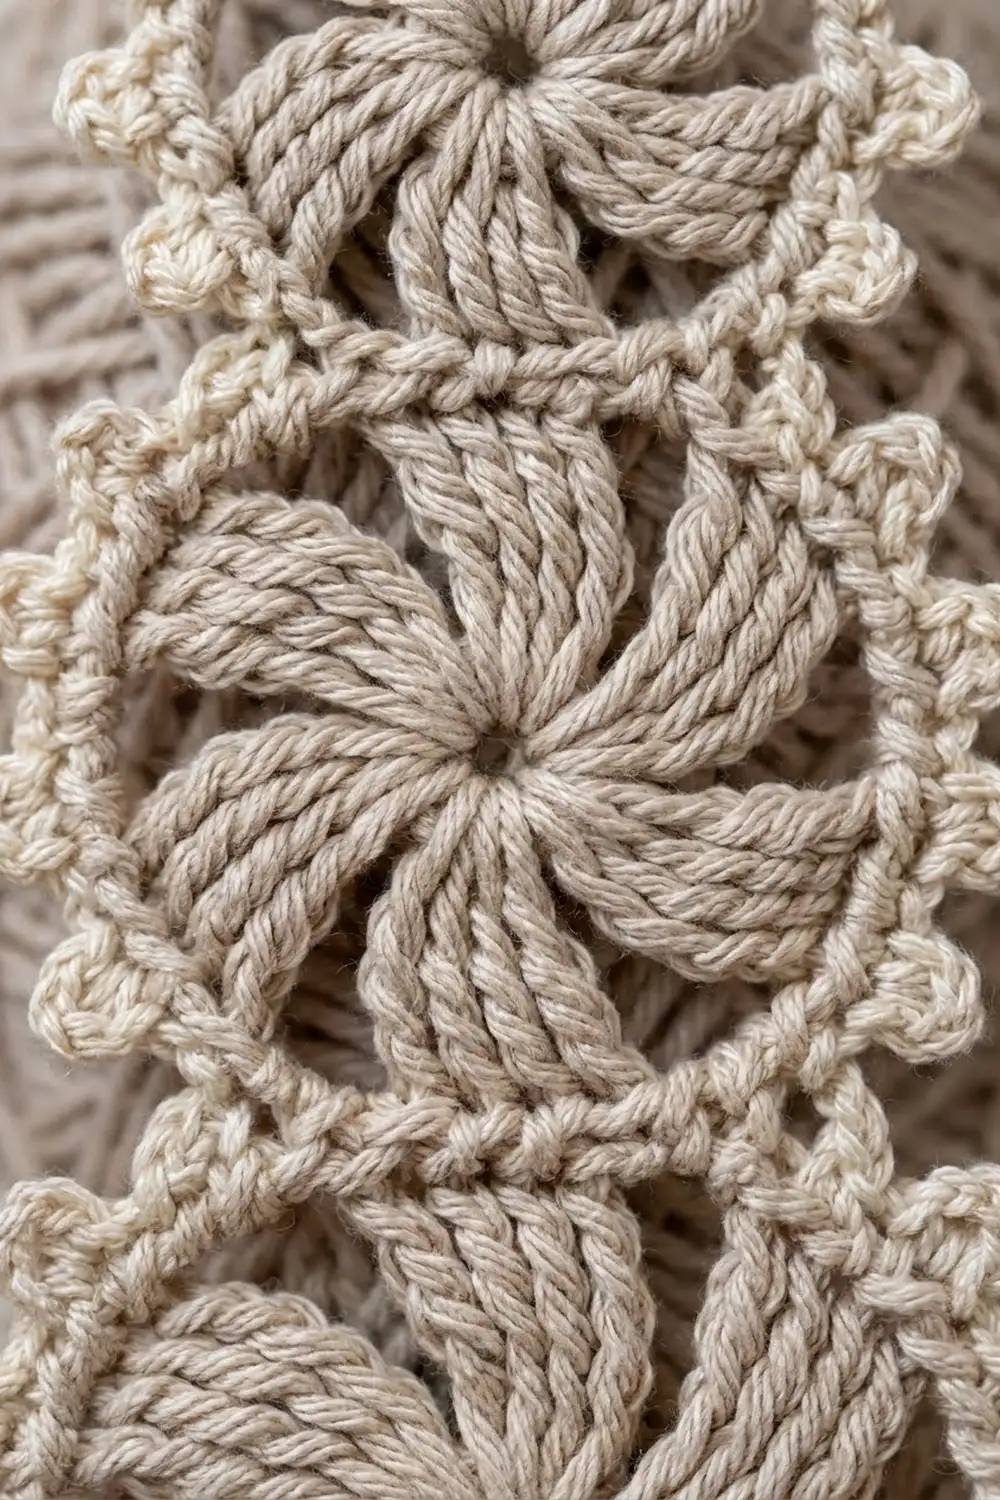
Large Swirl Motif (make 1, Color A)
Round 1: MR, ch 3 (counts as dc here and throughout), 15 dc in ring, sl st to the top of the beginning ch-3. Pull the ring closed. (16 dc)
Round 2: Ch 3, dc in same st, dc in next st, ch 1. 2 dc in next st, dc in next st, ch 1; rep from * 6 more times. Sl st to the top of the beginning ch-3. (8 arms of 3 dc = 24 dc + 8 ch-1 sps)*
Round 3: Sl st in next dc (the 2nd st of the first arm). Ch 3, dc in next dc, 2 dc in ch-1 sp, ch 1. Sk first dc of next arm, dc in next 2 dc, 2 dc in ch-1 sp, ch 1; rep from * 6 more times. Sl st to the top of the beginning ch-3. (8 arms of 4 dc = 32 dc + 8 ch-1 sps)*
Round 4: Sl st in next dc. Ch 3, dc in next 2 dc, 2 dc in ch-1 sp, ch 1. Sk first dc of next arm, dc in next 3 dc, 2 dc in ch-1 sp, ch 1; rep from * 6 more times. Sl st to the top of the beginning ch-3. (8 arms of 5 dc = 40 dc + 8 ch-1 sps)*
Round 5 (edge, a trim round): Ch 1, sc in same st. Sc in each dc around and 1 sc in each ch-1 sp. Sl st to the first sc. (40 sc worked 1 per dc + 8 sc added in sps = 48 sc)
Fasten off and leave a 6 in (15.2 cm) tail.
Numbering: Hold the motif right side up. Call the stitch at the top center st 1 and PM there. Count counterclockwise, so the stitch numbers go down the left side. St 25 is the bottom center.
Medium Swirl Motif (make 1, Color A)
Round 1: MR, ch 3, 11 dc in ring, sl st to the top of ch-3. (12 dc)
Round 2: Ch 3, dc in same st, dc in next st, ch 1. 2 dc in next st, dc in next st, ch 1; rep from * 4 more times. Sl st to join. (6 arms of 3 dc = 18 dc + 6 ch-1 sps)*
Round 3: Sl st in next dc. Ch 3, dc in next dc, 2 dc in ch-1 sp, ch 1. Sk first dc of next arm, dc in next 2 dc, 2 dc in ch-1 sp, ch 1; rep from * 4 more times. Sl st to join. (6 arms of 4 dc = 24 dc + 6 ch-1 sps)*
Round 4 (edge): Ch 1, sc in each dc and 1 sc in each ch-1 sp. Sl st to the first sc. (24 sc worked 1 per dc + 6 sc added = 30 sc)
Fasten off and leave a 12 in (30.5 cm) tail for sewing. Number the stitches the same way: st 1 at the top center, st 16 at the bottom center.
Small Swirl Motif (make 1, Color A)
Round 1: MR, ch 3, 11 dc in ring, sl st to join. (12 dc)
Round 2: Work as Round 2 of the medium motif. (6 arms of 3 dc = 18 dc + 6 ch-1 sps)
Round 3 (edge): Ch 1, sc in each dc and 1 sc in each ch-1 sp. Sl st to the first sc. (18 sc + 6 sc added = 24 sc)
Fasten off and leave a 12 in (30.5 cm) tail. Number the stitches: st 1 at the top center, st 13 at the bottom center.
Trunk (make 1, Color B)
Foundation: Ch 7.
Row 1: Sc in the 2nd ch from the hook and in each ch across. (6 sc)
Rows 2–7: Ch 1, turn, sc in each st across. (6 sc)
Fasten off and leave a 10 in (25.4 cm) tail. The trunk measures 0.75 × 0.75 in (1.9 × 1.9 cm).
Make All Pieces
- Color A: 1 large, 1 medium, and 1 small swirl motif
- Color B: 1 trunk
Layout, a single column:
   [ small  ]
  [ medium  ]
 [  large   ]
    [trunk]
Joining
Joining the circles is a whipstitch between the edge sc of two motifs, worked through the back loops so the seam lies flat.
Small to medium: Place the two motifs side by side, right sides up. Line up small sts 12, 13, and 14 with medium sts 2, 1, and 30, so the bottom center of the small motif meets the top center of the medium. Use the small motif’s tail to whipstitch these 3 pairs of stitches together.
Medium to large: In the same way, line up medium sts 15, 16, and 17 with large sts 2, 1, and 48. Whipstitch with the medium motif’s tail.
Keep the tension snug but not tight. The motifs should touch at the seam without buckling. Lay the stack flat. It should measure 4.5 in (11.4 cm) tall and 2 in (5.1 cm) wide.
The seam stitches are not used in the border. The free edge stitches on each motif are:
- Small: st 1 and sts 2–11 and 15–24 (21 sts)
- Medium: sts 3–14 and 18–29 (24 sts)
- Large: sts 3–47 (45 sts)
Border
Border gauge: each ch-3 loop spans 2 edge sts, about 0.25 in (0.6 cm) of edge. Hold the piece right side up and work counterclockwise.
Border Round 1 (Color A):
Join with a sc in small st 1, the top tip.
- Small, left side: (ch 3, sk 1 st, sc in next st) 5 times. You will sc in sts 3, 5, 7, 9, and 11. (5 loops)
- Bridge: Ch 5, sk the seam, sc in medium st 3.
- Medium, left side: (ch 3, sk 1 st, sc in next st) 5 times, ending in st 13. Leave st 14 unworked. (5 loops)
- Bridge: Ch 5, sc in large st 3.
- Large, all around: (ch 3, sk 1 st, sc in next st) 22 times, ending in st 47. (22 loops) Your sc in st 25 is the bottom center.
- Bridge: Ch 5, sk medium st 18, sc in medium st 19.
- Medium, right side: (ch 3, sk 1 st, sc in next st) 5 times, ending in st 29. (5 loops)
- Bridge: Ch 5, sc in small st 15.
- Small, right side: (ch 3, sk 1 st, sc in next st) 4 times, ending in st 23. Then ch 3, sk st 24, and sl st to the first sc. (5 loops)
Round 1 total: 46 sc, 42 ch-3 loops, and 4 ch-5 bridges (46 spaces).
Why the math works: Each motif side has an even number of steps between its first and last sc. On the small left side, 1 to 11 is 10 sts, or 5 loops. On the medium, 3 to 13 and 19 to 29 are 10 sts each, or 5 loops. On the large, 3 to 47 is 44 sts, or 22 loops. Both sides of each motif mirror each other, so the tree stays symmetrical. The bridges run straight across the waists between circles, which creates the stepped tree outline.
Border Round 2 (Color A): Sl st into the first ch-3 loop.
- In each ch-3 loop: (sc, hdc, picot, hdc, sc).
- In each ch-5 bridge: (3 sc, picot, 3 sc).
Work into the spaces only and skip every sc from Round 1. Sl st to the first sc.
Counts by section:
| Section | Stitches | Picots |
|---|---|---|
| Small, left | 20 | 5 |
| Bridge | 6 | 1 |
| Medium, left | 20 | 5 |
| Bridge | 6 | 1 |
| Large | 88 | 22 |
| Bridge | 6 | 1 |
| Medium, right | 20 | 5 |
| Bridge | 6 | 1 |
| Small, right | 20 | 5 |
| Total | 192 | 46 |
Hanging loop: Do not fasten off. Ch 40, then sl st into the same st at the top tip. Work 1 sc in each ch around the loop (40 sc) and sl st at the base. Fasten off. The loop is about 2.25 in (5.7 cm) long. For a shorter tree-branch loop, use ch 20 and 20 sc.
Attach the trunk: Center the trunk’s last row behind the bottom of the large motif, under large st 25. It should overlap the motif by 0.25 in (0.6 cm), so that 0.5 in (1.3 cm) of trunk shows below the border. Whipstitch the top edge and the overlapped sides to the edge sc from the back.
The ornament now measures 5.5 in (14.0 cm) tall × 2.5 in (6.4 cm) wide.
Final Blocking
- Weave in all ends along the backs of the swirl arms.
- Mist the ornament until it is damp but not soaked.
- Pin it flat with the right side up. Line up the motif centers in a straight vertical line.
- Pin the bottom of the large motif out to 2.5 in (6.4 cm) wide, including the border.
- Pin each ch-5 bridge so it runs straight out. The bridges make the tier “shoulders.”
- Pin out each picot.
- Check the height: 5.5 in (14.0 cm) from the tip to the bottom of the trunk.
- Optional: brush on diluted fabric stiffener for a firm car or window hanger.
- Let it dry completely before you unpin it.
Final Quality-Control Checklist
- Small, medium, and large motifs measure 1 in, 1.5 in, and 2 in (2.5 cm, 3.8 cm, and 5.1 cm).
- All the swirl arms spiral in the same direction.
- Each seam covers exactly 3 stitch pairs and lies flat.
- Border Round 1 has 42 ch-3 loops and 4 ch-5 bridges.
- Border Round 2 has 192 stitches and 46 picots.
- The left and right sides mirror each other.
- The trunk is centered and shows 0.5 in (1.3 cm) below the border.
- The hanging loop sits at the exact top center.
- The ends are hidden and secure.
Troubleshooting
- The swirl doesn’t spiral: You probably forgot to skip the first dc of each arm. Check that each round has the right number of dc per arm.
- Arm count is off: Recount the stitches in Round 1. The large motif needs 16 dc; the other two need 12 dc.
- Motif cups: Your dc are too tight. Relax your tension or go up a hook size.
- Border ruffles: Use ch 2 loops on the large motif, or go down a hook size for the border only.
- Border pulls the edges in: Make your chains looser. Do not shorten the bridges.
- Tree leans: Re-block with the centers pinned along a ruler.
- Trunk flips forward: Sew the trunk’s side edges as well as the top.
Care
Hand wash in cool water with mild soap, press out the water in a towel, and reshape the ornament flat to dry. Stiffened ornaments should only be spot-cleaned.
Final Notes
Here is the measurement chain, from start to finish:
- Motifs at 1 in, 1.5 in, and 2 in (2.5 cm, 3.8 cm, and 5.1 cm)
- Stack of 4.5 in (11.4 cm)
- Border of 0.25 in (0.6 cm) on every edge, bringing it to 5 × 2.5 in (12.7 × 6.4 cm)
- Trunk adds 0.5 in (1.3 cm), for 5.5 in (14.0 cm) in total
If each checkpoint matches, the border counts will work out without adjustment.
Happy crocheting!